Setting Up for Development & Building Extensions
This document covers details on how to set up the developer machine and develop extensions for the Infosys Equinox Commerce microservices.
Introduction
If you are a Java Developer, you can quickly develop extensions on the Infosys Equinox Commerce platform since all the microservices are implemented as a Java Spring Boot application. You need to write extension code in Java. You have other types of extensions as well.
Before starting the development, you need to
- understand the Software Architecture of the Infosys Equinox Commerce platform. This gives you the components of the Infosys Equinox Commerce platform and how they interact with each other.
- adhere to the Infosys Equinox coding standards and guidelines
- learn the APIs of the microservices, the extension points, and how extensions are developed and deployed.
- set up your machine with the required components and tools and set up the database
- set up the development environment using STS
- know the Infosys Equinox Commerce artifacts and URLs
Prerequisites for Developing Infosys Equinox Commerce
For developing the extensions for Infosys Equinox Commerce, you need to set up your machine with the required components and tools.
Required Components for Development
The following components are required to run as a standalone application in the local or stage environment for the development of Infosys Equinox Commerce:
|
Component |
Version |
Comments |
|
Zulu JDK |
1.8.x (Latest patch) |
Can be Hotspot (if permitted) or Zulu JDK |
|
Apache Maven |
3.6.x (Latest patch) |
|
|
MySQL |
5.7.x (Latest patch) |
RDBMS DB is used by a few Infosys Equinox Microservices |
|
Mongo |
4.2.x (Latest patch) |
NoSQL DB used by a few Infosys Equinox Microservices |
|
Apache ZooKeeper |
3.6.1 or above |
Configuration Management |
|
Pentaho |
8.2.0.0-342 |
ETL tool |
|
Redis |
6.2.6 or above |
In-memory cache server |
|
RabbitMQ |
3.7.7 or above |
Messaging Subsystem |
|
Apache SOLR |
7.7.3 |
Contextual text Search Engine |
|
Node JS |
Latest stable version |
React development |
| Project Lombok |
1.16.2 |
Tested and built on 1.16.2 (Candid Duck). |
Required Tools for Development
Infosys Equinox’s Commerce 8 platform is built primarily using Java, Spring Boot, and Camel. The platform exposes its API through a series of REST-based endpoints. This section describes the tools used to invoke the platform, build Java-based programs on top of the platform SDK, and extend the platform’s microservices and orchestration. This is one of the ways to develop solutions on the Infosys Equinox Commerce platform, but there could be other ways as well.
These notes are written for both MacOS and Windows environments. The installation instructions follow a logical progression, starting with Postman and Java, then the SDK, and finally the tools necessary to build platform extensions.
The following table lists software required to develop and test in the local environment for the development of Infosys Equinox Commerce:
|
Tool |
Version |
Comments |
|
Spring Tool Suite (STS) |
Latest stable version |
|
|
Java |
1.8.181 or higher |
Requires Version 1.8.181 or higher. Must have full JDK installed, JRE is NOT sufficient. |
|
Camunda Modeler |
3.7.3 or higher |
Camunda BPM workflow Modelling and editor |
|
MySQL Workbench |
5.7.x or 8.0.x |
MySQL client and workspace. |
|
Robo Mongo |
Latest stable version |
Mongo client. |
|
Postman |
Latest Stable version |
|
Tools for Calling Services and for Running the Microservices and Orchestration Locally
This section explains Postman and GraphQL tools:
Postman
We use Postman to exercise both the Microservice and Orchestrated endpoints as a quick way to get familiar with Infosys Equinox platform APIs. Postman permits the posting of requests to REST endpoints, the parsing of those responses, and light scripting to chain a series of requests into a coherent workflow.
Download the Postman from https://www.getpostman.com/downloads/ and follow the installation instructions.

GraphQL
Overview
GraphQL is an open-source query language for APIs. It provides a more efficient, powerful and flexible alternative to RESTful APIs for querying and manipulating data.
Here, at Infosys Equinox, GraphQL Mesh tool is being used which simplifies the process of fetching data from multiple sources using GraphQL. With GraphQL Mesh, GraphQL gateways are being built on top of the Storefront Orchestration REST API services. As a result, SFO Rest API endpoints are fetched as GraphQL endpoints for querying the result/response. Thus, it offers a flexible and efficient way to manage complex data architectures and build modern solutions.
Features
- It introduces GraphQL-based API for Storefront operations for catalog APIs such as Categories, Product, and Search.
- It internally calls the StoreFront Orchestration API and fetches the result from those APIs.
- It uses GraphQL Mesh Library which is an Open-Source Project that converts the REST APIs into GraphQL APIs by providing the swagger definition file.
- The dynamic swagger file could be passed during the build step, and it generates the Graphql APIs for them.
- Resolvers and GraphQL-type definitions are autogenerated using the mesh library.
Prerequisite
You must install the following before deploying the Graph QL application:
- Install Nodejs 18.X version.
- Install yarn 1.X version.
- Install the packages mentioned in the package.json using the “npm install” command.
Configurations
At the time of deployment of GraphQL, you should configure these settings during the build time:
- Set ‘apiDomainName’ as environment variables required by the application for Dynamic swagger file mapping. The value that you need to provide in the required environment should be apiDomainName=’uat.skavacommerce.com’.
- Set the port to 5001 in the index.ts file as the application is running at 5001 port and keep it as a static port. This file will be present in the base directory of the source code.
Deployment
Follow these steps to deploy GraphQL on the required environment(s):
- Prepare the application for deployment:
- GraphQL Mesh is deployed as the NodeJS project, which uses the Express JS server framework in order to expose GraphQL APIs.
- Ensure that all dependencies are listed in the ‘package.json’ file. This file will be present in the base directory of the source code.
- Remove unnecessary files, such as development-specific files and ‘.env’ files by adding them to .gitignore.
- Configure environment variables:
- Set ‘apiDomainName’ as environment variables as mentioned in the Configurations section.
- Build the application:
- Run ‘yarn build’ command to build the application.
- The dist folder is created when you build the project, and this folder is served using Node during runtime.
- The dist. folder contains the JavaScript code which is transpiled from the TypeScript code. This folder will be auto-generated in the base directory of the source code.
- Once the deployment is completed, you can run the GraphQL playground in the domain like {domain_name}/graphqlmesh/api. For example, https://cloudapi.equinox.shop/graphqlmesh/api
You can consume the GraphQL API endpoints via Postman as well.
<image>
Components Used Per Service
The following table lists the components used in the microservices of Infosys Equinox Commerce:
|
Service |
Mongo |
MySQL |
RabbitMQ |
Redis |
ZooKeeper |
SOLR |
Pentaho |
|
Accounts Admin |
|
|
|
|
|
|
|
|
Authorization Admin |
|
|
|
|
 |
|
|
|
Catalog Admin |
|
|
|
|
|
|
|
|
Common/Foundation Admin |
|
|
|
|
|
|
|
|
Customer Admin |
|
|
|
|
|
|
|
|
Loyalty Admin |
|
|
|
|
|
|
|
|
Merchandising Admin |
|
|
|
|
|
|
|
|
Notification Admin |
|
|
|
|
|
|
|
|
Order Admin |
|
|
|
|
|
|
|
|
Pricing Admin |
|
|
|
|
|
|
|
|
Promotions Admin |
|
|
|
|
|
|
|
|
Ratings and Reviews Admin |
|
|
|
|
|
|
|
|
Subscription Admin |
|
|
|
|
|
|
|
|
Accounts Services |
|
accountsdb |
|
|
|
|
|
|
Catalog Services |
catalogdb |
|
|
|
|
|
|
|
Address Services |
|
addressdb |
|
|
|
|
|
|
Authorization Services |
|
authdb |
|
|
|
|
|
|
Cart Services |
|
cartdb |
|
|
|
|
|
|
Inventory Services |
|
inventorydb |
|
|
|
|
|
|
List Services |
listdb |
|
|
|
|
|
|
|
Notification Services |
|
|
|
|
|
|
|
|
Order Management Services (OMS) |
omsdb |
omsdb |
|
|
|
|
|
|
Payment Services |
|
paymentdb |
|
|
|
|
|
|
Ratings and Reviews Services |
|
ratingsand |
|
|
|
|
|
|
Reporting Services |
|
reportdb |
|
|
|
|
|
|
Shipping Services |
|
shipping |
|
|
|
|
|
|
Subscription Services |
|
subscription |
|
|
|
|
|
|
Tax Services |
|
tax |
|
|
|
|
|
|
User Services |
|
user |
|
|
|
|
|
|
Feed Services |
feed |
|
|
|
|
|
|
|
Feed Job Services |
|
|
|
|
|
|
 |
|
Foundation Services |
|
foundation |
|
|
|
|
|
|
Loyalty Services |
loyalty |
|
|
|
|
|
|
|
Merchandising Services |
merchandise |
|
|
|
|
|
|
|
Pricing Services |
|
price |
|
|
|
|
|
|
Promotions Services |
promotion |
|
|
|
|
|
|
|
Search Services |
|
search |
|
|
|
|
|
|
Studio Admin |
|
|
|
|
|
|
|
|
Studio Services |
|
mc |
|
|
|
|
|
|
Admin Orchestration |
|
|
|
|
|
|
|
|
Storefront Orchestration |
|
|
|
|
|
|
|
Setting Up a Development Environment
Local Environment Set Up
This section describes how to set up the developer’s local environment to develop extensions for the Infosys Equinox Commerce.
Java and the Java JDK
Java
Complex applications can be built in Java using Infosys Equinox’s Java SDKs. To test whether your Java installation is current, issue the command java -version at a Windows Command prompt or in a Mac Terminal session. Your result should be similar to the following:

If your results are not similar, follow the instructions at https://java.com/en/download/help/download_options.xml.
Java Development Kit
Note: If you wish to modify or extend services or use the SDK, you need to install a full Java Development Kit (JDK), not merely a Java runtime (JRE).
To test whether the Java JDK is installed, issue the command javac -version at a Windows Command prompt or in a Mac Terminal session. Your result should be similar to the following:

For detailed JDK installation instructions for your specific operating system, see the links below.
- JDK Install on Windows at https://docs.oracle.com/javase/8/docs/technotes/guides/install/windows_jdk_install.html
- JDK Install on MacOS at https://docs.oracle.com/javase/8/docs/technotes/guides/install/mac_jdk.html#CHDBADCG
Maven
Maven is used to manage dependencies and perform automated builds of software projects. We use a standalone Maven, even when building projects in Eclipse or Spring Tool Suite.
Installation
Download Maven for your operating system from https://maven.apache.org/download.cgi?Preferred=ftp://mirror.reverse.net/pub/apache/. Follow the installation instructions at https://maven.apache.org/install.html to complete the installation and setup.
Configure Your Environment Variables
Configure the Environment variables in the bash_profile file after installation.
- Open your Bash Profile
- In your MacOS terminal run:
touch ~/.bash_profile
open ~/.bash_profile

-
- Make your edits and save. This is generic so make sure your path is correct in the above example.
export JAVA_HOME=$(/usr/libexec/java_home)
export PATH=/Users/pamkelly/downloads/apache-maven-3.6.1/bin:$PATH
- Make your edits and save. This is generic so make sure your path is correct in the above example.
-
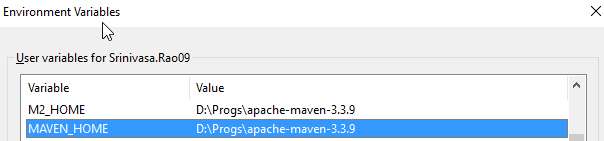
- In windows you will need to open your system settings and edit your environment variables, setting them to match your paths:
- Verify Maven version after updating the bash_profile file
- In a MacOS terminal session, run mvn -v
- At a Windows command prompt, run mvn -v

Configuring Maven
To configure Maven in your machine,
- Install the Maven version as mentioned in the Required Components section.
- Back up the existing settings.xml file found under <MAVEN_HOME>/conf directory.
- Update the settings.xml with the configurations given below to enable your machine to connect with Infosys Equinox’s Maven Artifactory.
- Configure Maven and download Infosys Equinox dependency JARs from JFrog artifactory (remote location).
- In the Apache maven installation directory configuration file (settings.xml), you need to include the profile settings (refer to the next step) with the respective repository ID and URL of the repository server from where the artifacts/jars have to be downloaded.
- Paste the following profile tag content under the <profiles> tag in the settings.xml of your Maven folder:
<profile> <id>artifactory</id> <activation> <activeByDefault>true</activeByDefault> </activation> <repositories> <repository> <id>artifactory-prod</id> <url><a href="https://enablement.skavacommerce.com/artifactory/libs-release-local">https://</a><a tabindex="-1" title="https://artifactory.skavaone.com/artifactory/libs-release-local" href="https://artifactory.skavaone.com/artifactory/libs-release-local" target="_blank" rel="noopener noreferrer" aria-label="Link https://artifactory.skavaone.com/artifactory/libs-release-local">artifactory.skavaone.com</a><a href="https://enablement.skavacommerce.com/artifactory/libs-release-local">/artifactory/libs-release-local</a></url> <snapshots> <enabled>false</enabled> </snapshots> <releases> <enabled>true</enabled> </releases> </repository> <repository> <id>artifactory-dev</id> <url><a href="https://enablement.skavacommerce.com/artifactory/libs-snapshot-local">https://</a><a tabindex="-1" title="https://artifactory.skavaone.com/artifactory/libs-release-local" href="https://artifactory.skavaone.com/artifactory/libs-release-local" target="_blank" rel="noopener noreferrer" aria-label="Link https://artifactory.skavaone.com/artifactory/libs-release-local">artifactory.skavaone.com</a><a href="https://enablement.skavacommerce.com/artifactory/libs-snapshot-local">/artifactory/libs-snapshot-local</a></url> <snapshots> <enabled>true</enabled> </snapshots> <releases> <enabled>false</enabled> </releases> </repository> </repositories> <pluginRepositories> <pluginRepository> <id>artifactory-prod</id> <url><a href="https://enablement.skavacommerce.com/artifactory/libs-release-local">https://</a><a tabindex="-1" title="https://artifactory.skavaone.com/artifactory/libs-release-local" href="https://artifactory.skavaone.com/artifactory/libs-release-local" target="_blank" rel="noopener noreferrer" aria-label="Link https://artifactory.skavaone.com/artifactory/libs-release-local">artifactory.skavaone.com</a><a href="https://enablement.skavacommerce.com/artifactory/libs-release-local">/artifactory/libs-release-local</a></url> <snapshots> <enabled>false</enabled> </snapshots> <releases> <enabled>true</enabled> </releases> </pluginRepository> <pluginRepository> <id>artifactory-dev</id> <url><a href="https://enablement.skavacommerce.com/artifactory/libs-snapshot-local">https://</a><a tabindex="-1" title="https://artifactory.skavaone.com/artifactory/libs-release-local" href="https://artifactory.skavaone.com/artifactory/libs-release-local" target="_blank" rel="noopener noreferrer" aria-label="Link https://artifactory.skavaone.com/artifactory/libs-release-local">artifactory.skavaone.com</a><a href="https://enablement.skavacommerce.com/artifactory/libs-snapshot-local">/artifactory/libs-snapshot-local</a></url> <snapshots> <enabled>true</enabled> </snapshots> <releases> <enabled>false</enabled> </releases> </pluginRepository> </pluginRepositories> </profile> - Paste the following content server tag under <servers> tag:
Note: Replace the <userNameShared> and <PasswpordShared> with the user name and password shared with your team respectively.<server> <username><userNameShared></username> <password><PasswpordShared></password> <id>artifactory-dev</id> </server> <server> <username><userNameShared></username> <password><PasswpordShared></password> <id>artifactory-prod</id> </server>
- Replace the variables ##userName## and ##password## with the received Infosys Equinox repository’s username and password respectively in the file.
Note: Check the reference settings.xml file present in the location. It is an updated settings.xml for easy reference with macros for username and password.
Configuring Apache ZooKeeper
Apache ZooKeeper Server
To configure the ZooKeeper server in your machine,
- Install the Apache ZooKeeper version as mentioned in the Required Components section into your machine.
Note: No additional configurations are required. - Navigate to <Zookeeper_Install_dir>/bin folder in the command prompt.
- Run the zkServer.cmd file.
Note: By default, the ZooKeeper server should start running in port 2181.
Apache ZooKeeper UI
To configure ZooKeeper UI in your machine,
- Copy the ZooKeeper UI from the link if you are within the Infosys network. Be advised that the tool you are seeing after clicking the link is an Infosys Equinox developed tool.
- Open the config.cfg file.
- Validate and update the values as per your need.
Note: DO NOT edit values that are mentioned as not to be modified. - Run the ZK UI using the following command: java -jar zkui.jar
- Access the ZK UI using the link: https://localhost:9090/home
Note: If you have updated the configuration file, replace the port accordingly.
Configuring RabbitMQ
To configure the RabbitMQ server in your machine,
- Install the RabbitMQ version as mentioned in the Required Components section into your machine.
Note: You need to install Erlang also based on the RabbitMQ version. You need to check the link for the Erlang version compatible with the RabbitMQ version. - If the host is a Windows machine, update the following lines in the rabbitmq-env.bat file under the <RabbitMQ_Installed_Directory>/sbin folder:
Available Original Lines
Reconfigure
set RABBITMQ_NODENAME=rabbit@!HOSTNAME!
set HOSTNAME=set HOSTNAME=localhost
set RABBITMQ_NODENAME=rabbit@!HOSTNAME!IMPORTANT: You need to reconfigure in the same way as mentioned above instead of the original lines.
- Navigate to the <RabbitMQ_Installed_Directory>/sbin folder in the command prompt.
- Run the rabbitmq-server.bat file.
Note: By default, the RabbitMQ server should start running in port 5672. Post enabling the management plugin, the console should be accessible in port 15672. - Download the delayed message plugin from this link.
- Copy the plugin into the <RabbitMQ_Installed_Directory>/plugins folder.
Note: Download the plugin version matching/compatible with the RabbitMQ version. - Run the following commands in the same order to enable miscellaneous plugins for RabbitMQ.
Ignore the ones that are already enabled:rabbitmq-plugins list
rabbitmq-plugins enable rabbitmq_management
rabbitmq-plugins enable rabbitmq_delayed_message_exchange
rabbitmq-plugins enable rabbitmq_shovel
rabbitmq-plugins enable rabbitmq_shovel_management
rabbitmq-plugins list
MySQL Setup
Setting Up MySQL Server
To set up a MySQL server in your machine:
- Install the MySQL version as mentioned in the Required Components section to the desired location.
- Create data and log directories at the desired location.
- Create the config file mysql-db-local.cfg with the below configurations and values:
[mysqld]
datadir=D:/Applns/DB/MySQL/MySQL-5.7.31-data-conf/data
general_log=1
general_log_file=D:/Applns/DB/MySQL/MySQL-5.7.31-data-conf/logs/general.log
slow_query_log=1
slow_query_log_file=D:/Applns/DB/MySQL/MySQL-5.7.31-data-conf/logs/slow_query.log
# Charset configuration
init-connect=’SET NAMES utf8mb4′
collation-server=utf8mb4_unicode_ci
character-set-server=utf8mb4Note:
- Specify the directory path as per your local setup.
- You need to set the charset as utf8mb4 to get full support of Mandarin/Chinese characters.
- Run the MySQL server using the following command with the full location of the config file:
mysqld –defaults-file=D:\Applns\DB\MySQL\MySQL-5.7.31-data-conf\conf\mysql-db-local.cfg
MySQL Queries
The following are the queries for the MySQL server in your machine:
|
Query |
Purpose |
|
SET global sql_mode = ‘STRICT_TRANS_TABLES, |
SQL mode global updates for MySQL server |
|
SET session sql_mode = ‘STRICT_TRANS_TABLES, |
SQL mode session updates for MySQL server |
|
CREATE USER ‘campaign’@’localhost’ IDENTIFIED BY ‘##password##‘; |
DB user creation |
Enabling SSL for MySQL Server
To enable SSL for the MySQL server in your machine:
- Generate SSL self-signed certificates using the utility provided by MySQL.
- Update the datadir value as below:
mysql_ssl_rsa_setup –datadir=D:\CertGenerated\MySQL –verbose
Note: Specify the directory path as per your local setup.
- Append the config file mysql-db-local.cfg with SSL settings as below:
# SSL configurations
ssl_ca=D:/CertGenerated/MySQL/ca.pem
ssl_cert=D:/CertGenerated/MySQL/server-cert.pem
ssl_key=D:/CertGenerated/MySQL/server-key.pemNote: Specify the directory path as per your local setup.
- Restart the MySQL server using the mysql-db-local.cfg config file.
- Import the self-signed certificate to the Java trust store so that the application will not fail due to its identity. Update the values as per your configurations:
keytool -import -trustcacerts -keystore D:\Applns\Languages\Java\zulu8.48.0.53-ca-jdk8.0.265-win_x64\jre\lib\security\cacerts -storepass changeit -noprompt -alias localmysql -file D:\CertGenerated\MySQL\ca.pem
Note:
- Specify the directory path as per your local setup.
- For more information on enabling SSL for a MySQL server, refer to https://dev.mysql.com/doc/refman/5.7/en/using-encrypted-connections.html
MongoDB Setup
Setting Up MongoDB Server
To set up MongoDB server on your machine:
- Install Mongo version as mentioned in the Required Components to the desired location.
- Create data and log directories at the desired location.
- Create a config file mongod-db-local.cfg with the below configurations and values:
systemLog:
destination: file
path: “D:/Applns/DB/MongoDB/4.4.0/logs/mongod.log”
logAppend: true
storage:
dbPath: D:/Applns/DB/MongoDB/4.4.0/dataNote:
- Specify the directory path as per your local setup.
- Provide the above indentation (ensure tabs are provided within the set).
- Run the MongoDB server using the following command with the full location of the config file:
mongod –config D:\Applns\DB\MongoDB\4.4.0\conf\mongod-db-local.cfg
Note: Specify the directory path as per your local setup.
- After successfully running the above mongod command, create a user with your password. For example, the username can be campaign.
- If the user is successfully created, run the mongod command with auth enabled.
Note: By adding the –auth parameter, the MongoDB server can be connected only using credentials and not as an anonymous user:mongod –auth –config D:\Applns\DB\MongoDB\4.4.0\conf\mongod-db-local.cfg
Note: Specify the directory path as per your local setup.
MongoDB Queries
The following are queries for the MongoDB server in your machine:
|
Query |
Purpose |
|
use admin; |
Create a user named campaign with password of your choice.
Note: Replace the macro ##password## with your password which should be used by the application for connection. |
|
use omsdb; |
Create a database with a dummy collection before running the DB load utility. |
Note:
- Replace ##password## text with the password of your choice.
- The same password must be used during the DB load and application connection.
Enabling SSL for MongoDB Server
To enable SSL for the MongoDB server in your machine,
- Generate SSL self-signed certificates using the OpenSSL utility, install the utility if it is not unavailable:
openssl genrsa -des3 -out server.key 2048
openssl rsa -in server.key -out server.key
openssl req -sha256 -new -key server.key -out local-mongo.csr -subj “/C=US/ST=Georgia/L=Atlanta/O=Infosys LLC/OU=Org/E=##YourEmailId##/CN=mongo.skavacommerce.com”
type server.crt server.key > cert.pem - Append the config file mongo-db-local.cfg with SSL settings as below:
ssl:
mode: requireSSL
PEMKeyFile: D:/CertGenerated/Mongo/cert.pem
PEMKeyPassword: changeit
allowConnectionsWithoutCertificates: true
allowInvalidCertificates: true
allowInvalidHostnames: trueNote:
- Specify the directory path as per your local setup.
- The above configuration is applicable for Mongo Version 4.0.X
- Restart the MongoDB server using the above config file which has been updated with SSL configurations.
- Import the self-signed certificate to the Java trust store so that the application will not fail due to its identity. Update the values as per your configurations:
keytool -import -trustcacerts -keystore D:\Applns\Languages\Java\zulu8.48.0.53-ca-jdk8.0.265-win_x64\jre\lib\security\cacerts -storepass changeit -noprompt -alias localmongo -file D:\CertGenerated\Mongo\cert.pem
Note:
- Specify the directory path as per your local setup.
- For more information on enabling SSL for MongoDB server, refer to https://zappysys.com/blog/configure-mongodb-ssl-connection-certificate/ and https://docs.mongodb.com/manual/tutorial/configure-ssl/#configure-ssl.
Apache SOLR Configurations
To configure the Apache SOLR server on your machine,
Note: SOLR 7.7.2 can be found in the link and any other version in the link.
- Download the version as mentioned in the Required Components section.
- Extract the SOLR binaries as per your OS distro into a working folder.
- Using Apache ZooKeeper UI, create a node solr in the base node of the ZooKeeper.
- Navigate to <SOLR_HOME>/bin folder.
- Run the following command:
Starting Release 8.11.0, these configuration files will be available as part of the searchservices-8.x.y.RELEASE-config.jar file.solr start -e cloud –noprompt -z localhost:2181/solr
- Extract the JAR and navigate to <SOLR_HOME>/server/scripts/cloud-scripts in the command prompt.
src\main\resources\config\solr\product\conf\ folder in the command prompt.
- Run the following command to perform upconfig for creation of Infosys Equinox’s SOLR definitions to be used for all collections:
zkcli.bat -cmd upconfig -zkhost zookeeper:2181/solr –confdir <CONFIG_EXTRACTED_LOCATION>\src\main\resources\config\solr\product\conf -confname conf_product
zkcli.bat -cmd upconfig -zkhost zookeeper:2181/solr -confdir <CONFIG_EXTRACTED_LOCATION>\src\main\resources\config\solr\product\conf -confname conf_category
- Create SOLR collections as per your need using the configurations created.
Project Structure Reference
Below is a typical project structure:
|
a. Equinox-project |
Database Setup
As mentioned in the Infosys Equinox Commerce Artifacts section, <serviceName>-8.X.Y.RELEASE-config.jar consists of all configurations including the database scripts.
To set up a database,
- Download the configuration JAR from the respective repositories.
- Extract the Java archive.
- Download the DB load utility JAR and the POM file from Infosys Equinox Artifactory, consider the latest released version.
- Rename the dbconfig-8.x.x.RELEASE.pom to pom.xml.
- Copy the downloaded JAR file and renamed pom.xml into the webbox folder of the extracted archive (see Step 2 above).
- Run the following commands based on the Liquibase DB type and replace the correct values:
DB type
Command
MySQL (Liquibase)
mvn liquibase:updateTestingRollback -DdbName=<dbName> -DdbFolderName=<folderName> -Dhost=%host% -Duname=%mysqlUserName% -Dpwd=%mysqlPassword%
MongoDB (Custom developed logic)
java -jar dbconfig-8.x.y.RELEASE.jar migration=upgrade host=%mongoHost% db=<dbName> version=%versionNo% userName=%mongoUser% password=%mongoPassword% sslEnabled=%mongoSSLEnabled% authSource=%mongoAuthSource% dbFolderName=<folderName>
Note: Before running the above commands, ensure that MySQL and MongoDB have been configured as per the instructions.
The following table shows the various parameters of the commands given above:Parameter
Possible Values
Description
dbName
Any valid database name
Name of the database schema in which the load should be performed.
folderName
Name of the folder containing the DB scripts. The location is inside webbox/databases/mongo/<folderName> or webbox/databases/mysql/<folderName>. The folder is obtained after extracting the <serviceName>-8.X.Y.RELEASE-config.jar file.
host
mongoHost
localhost/valid IP/Valid DNS
Host where the MySQL or MongoDB server is hosted. The value can be localhost or a remote IP/DNS.
mysqlUserName
String
Username of the MySQL database.
mysqlPassword
String
A password for the MySQL database.
versionNo
8.X.Y
The version of the artifact you are deploying. Extract it from the <serviceName>-8.X.Y.RELEASE-config.jar file.
mongoUser
String
Username of MongoDB database.
mongoPassword
String
A password for the MongoDB database.
mongoSSLEnabled
true/false
Flag to indicate whether the MongoDB is enabled to communicate over SSL or not.
mongoAuthSource
admin/<Database_Name>
If specified, an attempt will be made to authenticate the user with the AuthSource.
MySQL Filename Structure in Liquibase
The following table shows the MySQL files in Liquibase:
|
MySQL File |
Responsibility |
|
<serviceName>-8.x.y-DDL.sql |
Schema changes (Create/Alter/Drop TABLE, Create/DROP INDEX etc) |
|
<serviceName>-8.x.y-DML.sql |
Master Data Management (MDM) (Data required from an application perspective in all environments.) |
|
<serviceName>-8.x.y-SEED.sql |
Test data required for SFO or the ReadyAPI tool to work. This normally includes your collections, collections properties, and sample data set in your entities. |
MongoDB Filename Structure in Liquibase
The following table shows the MongoDB files in Liquibase:
|
MongoDB File |
Responsibility |
|
<serviceName>-8.x.y.xml* |
XML file containing the indices to be created per collection. |
|
<serviceName>-8.x.y-DML.json* |
Master Data Management (MDM) (Data required from an application perspective in all environments.) |
|
<serviceName>-8.x.y-SEED.json* |
Test data required for SFO or the ReadyAPI tool to work. This normally includes your collections, collections properties, and sample data set in your entities. |
Data Stored by Service
Each Service has its own database schema. User, Order, and Subscription service stores PII (Personally Identifiable Information). Payment service does not store any card information typically. But it will also depend on the Payment Provider and their capability to provide tokenization so that Infosys Equinox Commerce does not store card information. User Identifier is referred to in all services that are unique user identifiers are used in all services. Redis is used for caching objects, and Infosys Equinox Commerce is not using it as persistent storage that is expiries are attached to all such objects. SOLR powers the product search and navigation functionalities within the platform. No PII or PCI data is stored in SOLR.
|
Service |
MongoDB |
MySQL |
Redis (Cached for a period) |
SOLR |
|
Account Services |
Not Used |
|
|
Not Used |
|
Catalog Services |
|
Not Used |
|
Not Used |
|
Address Services |
Not Used |
|
|
Not Used |
|
Authorization Services |
Not Used |
|
|
Not Used |
|
Cart Services |
Not Used |
|
|
Not Used |
|
Foundation Services |
Not Used |
Stores the business, stores, and configurations for the business and store | Business and store Objects |
Not Used |
|
Feed Services |
Stores the on-demand and scheduled feed details |
Not Used | Stores all the feed details |
Not Used |
|
Feed Job Services |
Not Used |
Stores the inbuilt job details supported by SpringBatch | Stores all the job details and runtime data |
Contains the product details |
|
Inventory Services |
Not Used |
|
|
Not Used |
|
List Services |
|
Not Used |
List objects |
Not Used |
|
Loyalty Services |
Loyalty points, rewards, store credit |
Not Used |
Events and reward details |
Not Used |
|
Merchandising Services |
Stores category details, site milestones, site navigation |
Not Used |
Stores category details, site milestones, site navigation |
Not Used |
|
Notification Services |
Not Used |
Notification Connector Configurations |
Notification Connector Configurations |
Not Used |
|
Order Management Services (OMS) |
|
Camunda workflow data |
Order objects |
Not Used |
|
Payment Services |
Not Used |
|
Payment Objects |
Not Used |
|
Pricing Services |
Not Used |
Storing the price details of the product |
Storing the price details of the product |
Not Used |
|
Promotions Services |
Storing the promotion discount details |
Not Used |
Promotion Objects |
Not Used |
|
Ratings and Reviews Services |
Not Used |
|
Ratings and Reviews Configurations |
Not Used |
|
Reporting Services |
Not Used |
Report Configurations |
Reporting Configurations |
Not Used |
|
Search Services |
Not Used |
Product and price details |
Product and price details |
Indexing data and retrieves indexed data |
|
Shipping Services |
Not Used |
Shipping Connector Configurations |
Shipping Connector Configurations |
Not Used |
|
Subscription Services |
Not Used |
|
Subscription Objects |
Not Used |
|
Storefront Orchestration Services |
Not Used |
Not Used |
Cart detail |
Used via a plugin |
|
Tax Services |
Not Used |
Tax Connector Configuration |
Tax Connector Configurations |
Not Used |
|
User Services |
Not Used |
|
User Objects |
Not Used |
Development Environment Set Up Using STS
The development team can use any Integrated Development Environment (IDE) of choice. However, setting up the development environment using STS.
Before configuring STS, you need to install it as mentioned in the Required Tools for Development section to the desired location.
Spring Tools Suite
Installation
We use Spring Tools Suite (STS) in all of our examples and testing, but any current Eclipse with GIT and Maven support should work well. Download STS for your operating system from https://spring.io/tools. Once you’ve installed STS or Eclipse, you will need to set up the external Maven as follows:
Configuring JDK in STS
- Launch the Spring Tool Suite.
- Select Preferences… under the Spring Tool Suite in the header.
- Drill down to Java-> Installed JREs.
- Click the Add… button.
- Select Standard VM.
- Click the Next button.
- Click the Directory button.
- Browse to your JDK path.
- Click the Open button.
- Click the Finish button.
- Click the Apply and Close button.

Configuring Maven in STS
To configure the Maven installation directory in STS,
- Navigate to Window > Preferences > Maven > Installations.

- Click the Add button.
- Browse and select the Maven home directory on your local machine.

- Click the Finish button.
- In the Installations window, select the newly added Maven installation and click the Apply and Close button:

- Navigate to Window > Preferences > Maven > User Settings to select the settings.xml location.

- Click the Browse button available next to Global Settings.
- Select the settings.xml as the Global Settings configurations.
Note: The settings.xml file is updated while Configuring Maven for your machine. - Click the Apply and Close button.

Now, you need to configure the source code formatter in STS.
Configuring Source Code Formatter in STS
To configure source code formatter,
- Navigate to Window > Preferences > Java > Code Style > Formatter.

- Click the Import button.
Note:
-
- Use the file in the link for importing the formatter settings. This file is in line with Sonar configurations, so it is necessary for development.
- Once the file is imported successfully, the Active Profile will be updated as SonarQube.
-

- Click the Apply and Close button.
Now, you need to configure the SonarLint formatter in STS.
Executing Extension using STS
You can execute the Infosys Equinox extensions using STS. For any extension development, Infosys Equinox follows the Remote Java Application Debugging concept in Eclipse Based IDEs.
Note: For any microservice development, follow the traditional STS debugging process.
To execute an extension in STS,
- Add the extension/plugin maven project to any Eclipse Based IDE (in this case STS).
- Build the project.
- Download the executable JAR you want to execute.
The JAR file format is <serviceName>-<versionNo>.RELEASE-<exec|embedded>.jar - Run the spring boot as a java process as mentioned below from the appropriate folder:
java -cp <serviceName>–<versionNo>.RELEASE-<exec|embedded>.jar -Xdebug -agentlib:jdwp=transport=dt_socket,server=y,suspend=n,address=<anUnusedPort> -Dloader.path=<pathOfPluginsDeployed> org.springframework.boot.loader.PropertiesLauncher <anyOtherParametersToBeOverridden>
Note: Run the above command outside of IDE or using terminal options within the IDE.
Now, you need to set up debugging in STS.
Setting Up Debugging in STS
The agent settings are important and do not forget to use different ports for different applications. Appropriate ports must be mentioned during the debugger setup.
To set up the debugging in STS,
- Create a new Remote Java Application debug configuration.
- Enter the same port provided during the application startup as mentioned in the previous section Executing Extension using STS.

Debug the application once it has successfully started and the debugger will attach itself to the application. If prompted for a source code attachment, add the project.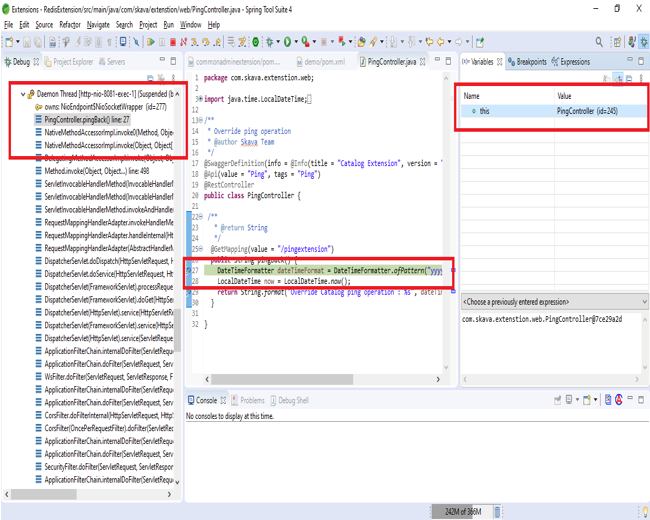
Now, you need to configure the debugging external code in STS.
Debugging External Code
To debug external code using STS,
- Navigate to Help -> Eclipse Marketplace and enter jad.

- Click the Install button against the search result.
- Complete the installation, based on the options provided. You need to select all components to be installed and accept all license agreements.

Note: Select Install Anyway if any Security Warning appears. - Restart STS when prompted.
- Once the installation of Decompiler is successful and STS has been restarted, navigate to Window > Preferences > General > Editors > File Associations.

- Select the newly installed plugin as the default editor for file types such as *.class and *.class without source.
- Select the Class Decompiler Viewer as the default editor for the mentioned file types.
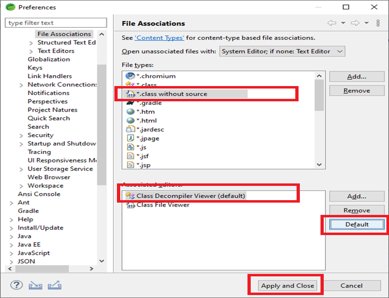
- Click the Apply and Close button.
Once the settings are done, you can open a class file and should be able to see the code view. Now, you can place a debug point in this class and debug as usual.
Now, you need to set up SonarQube server in STS.
Setting Up and Configuring Pentaho
What is Pentaho?
To know more, see Introduction to ETL Framework.
Pre-Request and Installation Guide
For the detailed steps, refer to the https://d3gqeq5wcctqxw.cloudfront.net/catalogadmin/263dba67-46ec-4506-bfa3-2910b621b912/feed-service-setups.txt file.
Spoon and MySQL Connection
To connect spoon and MySQL,
- Launch the spoon by running the spoon.bat file.
- Click the Connect button on the right top of the dashboard to initialize the MySQL connection.

- In the New Repository Connection dialog box, click the Other Repositories link.

- In the Other Repositories dialog, select Database Repository.

- Click the Get Started button.
- In the Connection Details dialog box, provide Display Name and select Database Connection.

- Navigate to the Connection manage page.
- In the Select a database connection page, click the Create New Connection button.

- In the Database Connection dialog box, provide the required details as mentioned below,
- General is active by default.
- Enter a Connection name.
- Select MySQL for Connection type.
- Select Native (JDBC) for Access type.

- Provide the required details in the Settings section.
- Click the Test button.
The Connection status popup will be displayed.
Note: If you get the Connection Tested Successfully popup, you are on the right track. - Click OK and proceed to the next step.

The created connection will be listed in the New Repository Connection dialog.
- Click the Back button.
Now, the Database Connection is selected. - Select the Launch connection on startup option.

- Click the Finish button to proceed to the next step.
Now, if you got the below dialog, a connection is successfully established:
- Click the Connect Now button.
Now, you are ready to establish the Repository Connection. - Provide the required username and password.
- Click the Connect button.

Note: The user must be an admin. - To ensure the connection state, check the right top of the Spoon workspace. In that place connect link was replaced with Username | Connection Name.
For example, admin | localDB.
The setup is complete. Now, you need to initiate the ETL process.
Getting Started with Kettle
The following is a sample Hello World ETL for getting started with Extract data from *.csv file, Transform, and Load to MongoDB:
To import and run the helloworld repository,
- Extract the above helloworld.zip into your desktop.
- Import into Spoon as shown in the screen given below:

Note: Ensure to start the MongoDB server in the default port 27017. - Click the Run Icon (highlighted in yellow color) or F9.
The Run Options dialog box displays. - Click the Run button.

Refer to the below logger screen for successfully processing the CSV file and loading it into MongoDB. - Check the MongoDB. The database name is kettlelocaldb and the collection name is helloworld.
The list of products in sample sheets was loaded into MongoDB as shown below:
Developer Guide Options in Spoon
- There is a list of designs under the Design tab to utilize by dragging into the work area.

- Double click on the process icon to provide options. Each process has its own options.
- Click the Help button on the bottom left of the dialog to get the detailed documentation of each field specific to the process.

How to Customize Pentaho Feed Job
Introduction
Overview
This document describes how to:
- customize an existing Pentaho feed job by adding a custom Java code snippet with it
- develop the Java code snippet
Intended Audience
This document is intended for a developer who wants to customize the Pentaho feed job.
Prerequisite
Before customizing the Pentaho feed job, the developer must have:
- development environment to develop Maven projects
- installed the Spoon tool
- access to the feedservices repository
Note: To get access to the above repository, contact the Infosys Equinox team.
Customizing the Pentaho Feed Job
To customize the Pentaho feed job, you need to:
- Add a custom Java code snippet using the Spoon tool
- Develop the custom Java code using a preferred IDE
Adding a Custom Java Code Snippet
You can use the User Defined Java Class component of the Spoon tool for this customization.
To add a custom Java code snippet with any transformation in the Spoon tool:
- In the Spoon tool, go to the tab Design:

- In the Search bar, enter java in the left panel to search the Java class component.
The User Defined Java Class component appears. - Drag and drop the User Defined Java Class component from the left panel to the Transformation design area:

- Double click on the newly created User Defined Java Class component to start editing the Java code:

Note: Pentaho uses a Janino compiler to compile and execute the Java code snippets.
Developing the Custom Java Code
You can create a Maven project with Pentaho dependencies for the easy development of the Java code snippet. You can import the project to your preferred IDE and start writing classes. When you copy the code from Java project in IDE to the component in the Spoon tool, you should comment out the package declarations and class declarations. By default the Java classes are extended the class TransformClassBase, which overrides the following set of methods:
| init(StepMetaInterface, StepDataInterface) processRows(StepMetaInterface, StepDataInterface) dispose(StepMetaInterface, StepDataInterface) |
Here, you should only have import statements, data members, and methods.
Note:
- You can only write code and check compilation issues using the Pentaho project. You can debug the issues only in the Spoon tool.
- For the sample files, contact the Infosys Equinox team.
Installing and Configuring Project Lombok
Infosys Equinox uses Project Lombok to manage getters and setters.
You need to download lombok-1.16.2.jar from https://projectlombok.org/all-versions. See below or Lombok in Eclipse at https://www.baeldung.com/lombok-ide#eclipse for installation details.
Note: More recent Spring Tool installations have issues with the Lombok’s installer. See below for the work around mentioned at https://stackoverflow.com/questions/52780535/lombok-with-spring-tool-suite-4 (see post regarding renaming files).
- Rename the SpringToolSuite4.ini file (on MacOS under Show Package Content > Content > Eclipse) to sts.ini:

- Launch the lombok-1.16.2.jar file.
- Click the OK button on the warning screen:

- Click the Specify location button:

- Select the sts.ini file and click the Open button:

- Click the Install / Update button:

- Click the OK button:

- Rename the sts.ini file back to SpringToolSuite4.ini:

- Edit the SpringToolSuite4.ini file and change the last line the file from -javaagent:lombok.jar to -javaagent:/Applications/SpringToolSuite4.app/Contents/Eclipse/lombok.jar:

- Save and close the file.
- Launch Spring Tool Suite to ensure it runs properly. The About Spring Tool Suite screen should show that Lombok is installed:

Code Sources
The Infosys Equinox SDK is stored in the Infosys Equinox Enablement Artifactory (“Artifactory”) and can be included as dependencies. The samples for the Infosys Equinox SDK are stored as projects in the BitBucket repository URL: https://bitbucket.org/skava-admin/firstapi/src/master/. For access to the repository, please send an email, including your name, company, and email address to devportal@infosysequinox.com.
Pulling Sources from the Artifactory
To pull the sources from the Artificatory, modify the settings.xml in your mvn home (usersyourid.m2 on Windows and ~/.m2 on MacOS) to include the following:
| <repository> <snapshots> <enabled>false</enabled> </snapshots> <id>central</id> <name>libs-release-local</name> <url>https://artifactory.skavaone.com/artifactory/libs-release-local/</url> </repository> <repository> <snapshots/> <id>snapshots</id> <name>libs-snapshot-local</name> <url>https://artifactory.skavaone.com/artifactory/libs-snapshot-local/</url> </repository> |
This will enable resolving the SDK Jars from the Artifactory. For further details on configuring the Maven settings.xml file at https://maven.apache.org/guides/mini/guide-configuring-maven.html.
Dependencies
The dependencies for the Infosys Equinox SDK in a Maven POM file take the following form:
Syntax
| <dependency> <groupId>com.skava.sdk</groupId> <artifactId><microservice name></artifactId> <version><version number></version> </dependency> |
For the list of microservices and the latest available version, see Exposed SDK Artifacts.
Example
| <dependency> <groupId>com.skava.sdk</groupId> <artifactId>account-services</artifactId> <version>8.14.5.RELEASE</version> </dependency> |
Gradle
To reference the SDK in Gradle, use the following standard form:
Syntax
| compile(group: ‘com.skava.sdk’, name: ‘<microservice name>‘, version: ‘<version number>‘) |
For the list of microservices and the latest available version, see Exposed SDK Artifacts.
Example
| compile(group: ‘com.skava.sdk’, name: ‘account-services’, version: ‘8.14.5.RELEASE’) |
Exposed SDK Artifacts
The following table lists the microservices and the latest available version of the SDK artifacts:
| Sl. # | Microservice/SDK Name | Available Version Number |
|---|---|---|
| 1. | account-services | 8.14.5.RELEASE |
| 2. | address-services | 8.14.5.RELEASE |
| 3. | authorization-services | 8.14.5.RELEASE |
| 4. | cart-services | 8.14.5.RELEASE |
| 5. | catalog-services | 8.14.5.RELEASE |
| 6. | feed-services | 8.14.5.RELEASE |
| 7. | foundation-services | 8.14.5.RELEASE |
| 8. | inventory-services | 8.14.5.RELEASE |
| 9. | list-services | 8.14.5.RELEASE |
| 10. | loyalty-services | 8.14.5.RELEASE |
| 11. | merchandising-services | 8.14.5.RELEASE |
| 12. | notification-services | 8.14.5.RELEASE |
| 13. | orchestration-services | 8.14.5.RELEASE |
| 14. | order-services | 8.14.5.RELEASE |
| 15. | payment-services | 8.14.5.RELEASE |
| 16. | pricing-services | 8.14.5.RELEASE |
| 17. | promotion-services | 8.14.5.RELEASE |
| 18. | ratingsreviews-services | 8.14.5.RELEASE |
| 19. | reporting-services | 8.14.5.RELEASE |
| 20. | search-services | 8.14.5.RELEASE |
| 21. | shipping-services | 8.14.5.RELEASE |
| 22. | subscription-services | 8.14.5.RELEASE |
| 23. | tax-services | 8.14.5.RELEASE |
| 24. | user-services | 8.14.5.RELEASE |
Running Microservices Locally
After setting up a development environment locally and completing the code development, you need to validate the added functionalities to see if it meets the business requirements for the specific microservice(s).
To run the Infosys Equinox Microservices locally,
- Download the required microservice’s executable from the locations mentioned in the Appendix section to a working directory.
- Refer to the various artifact’s purposes and download the appropriate artifacts.
You need to run Infosys Equinox Microservices in two modes:- Production mode – Executable will be <serviceName>-8.X.Y.RELEASE-exec.jar and backend services/tools must be set up as per the microservice you are trying to run locally.
- Embedded mode – Executable will be <serviceName>-8.X.Y.RELEASE-embedded.jar and no other backend services/tools are required. This indicates you DO NOT need Mongo, MySQL, Redis, SOLR, etc. to be set up in your machine, all you need is Java to run the embedded JAR.
- Launch a command prompt.
- Run the appropriate commands as mentioned in the sections Running Microservices Locally – Production mode and Running Microservices Locally – Embedded mode.
Running Microservices Locally – Production Mode
To run the Infosys Equinox Microservices locally for the production mode,
- Launch a command prompt from the working directory where the production-ready executable is placed.
- Set up all required backend services/tools as per these details. Refer to Local Development Environment Setup for details pertaining to the setup of various tools.
- For generating ZooKeeper properties, refer to the utility and use Zookeeper UI to load the properties into ZooKeeper. Input file zookeeper-template.yml for the utility is present in the <serviceName>-8.X.Y.RELEASE-config.jar available in the artifactory.
- Applicable Spring Boot properties can be applied during the application start up.
Mode
Command
Production
java -cp <serviceName>-8.X.Y.RELEASE-exec.jar -Dspring.cloud.zookeeper.enabled=true -Dspring.cloud.zookeeper.config.watcher.enabled=true -DenvironmentName=local -Dspring.cloud.zookeeper.connect-string=localhost:2181 -Dspring.cloud.zookeeper.config.root=<Zookeeper_Basepath> –Dloader.path=<Extension/Plugin_Location> -Dserver.port=<NonConflictingPortNumber> org.springframework.boot.loader.PropertiesLauncher
Running Microservices Locally – Embedded Mode
To run the microservices locally for the embedded mode,
- Launch a command prompt from the working directory where the embedded executable is placed.
- You do not require any other backend services/tools in this mode. This is not built for production but more as a development/consumer enabler.
- Applicable Spring Boot properties can be applied during application start up.
Mode
Command
Embedded
java -cp <serviceName>-8.X.Y.RELEASE-embedded.jar -Dskava.redis.maxHeap=512M -Dspring.profiles.active=dev -DenvironmentName=local -Dspring.cloud.zookeeper.enabled=false -Dspring.cloud.zookeeper.config.watcher.enabled=false –Dloader.path=<Extension/Plugin_Location> -Dserver.port=<NonConflictingPortNumber> org.springframework.boot.loader.PropertiesLauncher
Working With Extensions
About Extending Infosys Equinox
This article discusses extensions in Infosys Equinox.
Overview
This document provides an introduction to customizing and extending Infosys Equinox’s platform release 8.0 (“Infosys Equinox” or “platform”). It includes details on how the platform is organized and key extension and customization features. We describe:
- The major building blocks of the platform from front-end to backend
- They key places where customization and extension are designed into the platform
- Compile, Deployment, and Runtime customization options
- Authorization and authentication patterns
- How to call the platform
- How the platform is deploying using Docker and Kubernetes
- How the admin components of the platform are built and extended
- How the UI/UX elements of the platform are built and extended
Expectations
The reader of this document is expected to have a basic understanding of:
- Java Spring Boot architecture (https://spring.io/projects/spring-boot)
- Building and deploying Java artifacts using Kubernetes (https://kubernetes.io/) and Docker (https://docs.docker.com/)
- JavaScript (https://www.javascript.com/) and React (https://reactjs.org/) front-ends
- Modern SQL (https://modern-sql.com/) and NoSQL (https://nosql-database.org/) databases
This document is not intended to be a comprehensive guide for updating specific microservices or components in Infosys Equinox, rather it is intended to give the reader a high-level understanding of how they may be modified and to direct the reader to the specific components they may wish to modify.
Platform Components and Concepts
Infosys Equinox Commerce consists of five (5) primary blocks:
- The underlying distributed computing components used to deliver the platform
- The backend microservices which hold a persistent state
- The orchestrations which link microservices together and support operational and admin functions
- The frontend presentation services support consumers (buyers)
- The admin presentation services which support administrative and business users
Users and Roles
Infosys Equinox includes three (3) types of users: end-users, business users, and site administrators.
- Site or End-Users (Consumers)
- These users are the customers of our clients who actually use the site to engage in commerce. They search for products, place them in carts, make payments, and receive the items being purchased — either electronically or via physical shipment.
- Business Users
- Business users manipulate the content of the site. They manage the products for sale, place them in categories, and manage promotions and merchandise. Business users are managed via roles.
- Site Administrators (Business Admins)
- Site Administrators manage the platform itself. They manage the roles that control what Business Users are authorized to do, control access to security keys, and can update key configuration information that controls the platform.
Note: Each action performed by a user role can be performed through the platform’s application programming interfaces (APIs).
Basic Structure
Infosys Equinox can be thought of as having three (3) broad capabilities, delivered by a collection of coordinated microservices.
- An e-commerce website
- Business User and Admin control of the website
- Backend that supports the other two (2) capabilities
Figure 1: Platform Capabilities

The Platform delivers these functions through a collection of microservices that manage low-level data, orchestration that stitches these low-level functions into useful capabilities, and then a set of presentation services that present the data to both end-users and administrative users.
Consumer sites are presented via React, GraphQL, and orchestration specific to supporting end-user capabilities. Business user and platform administrative capabilities are provided through templated ThymeLeaf pages, and all of the low-level functions are provided by a set of microservices. (See Figure 2: Major Platform Components)
Figure 2: Major Platform Components
Points of Customization
The following points in the platform can be customized or used to modify the behavior of the platform.
- Camel Orchestration Layer
- For individual microservices
- For composite REST microservices
- Microservices
- Each has validation extension points that allow custom code (currently Java) to be invoked to validate inputs
- Each has processor extension points that allow custom code to be invoked, which performs specific well-understood operations, including:
- Sending emails, texts (SMS), and other forms of notifications
- Processing payments
- Each has a pre-process extension point that may be used prior to routine processing
- Each has a post-process extension point that may be called after routine processing
- Order Management
- Microservice has Camunda BPM workflows that can be modified to handle custom behaviors
- Has the ability to install Work Items to process nodes in the BPM workflows
- Notification Events
- Each microservice creates notification events on major activities. These events, delivered via RabbitMQ topics, allow customizations and extensions to asynchronously respond to these activities.
- React
- Specific React components can be created that call the out-of-the-box services or any extensions in the solution.
- ThymeLeaf
- ThymeLeaf admin screens can call additional plug-ins that invoke each of the extension/customization points has different properties and capabilities.
Camel Orchestration
Camel Orchestration acts as the primary way of coordinating the behavior of the microservices. There are several forms of orchestration, each of which can be modified.
Microservice Routes
Each microservice has a Camel route. These routes permit both simple tweaks to the behavior of the existing microservice, and wholesale substitution via wrapping external services.
Composite Routes
A number of core services are implemented through the action of multiple microservices. These form composite services, built as Camel orchestrations. The behavior of the high-level composite services can be modified by changing the composite orchestrations, adding or removing steps, or invoking additional internal or external services.
Wrapped Services
As every low-level microservice is exposed via a Camel route, we can replace a low-level service with a wrapped external service by creating a new Camel route. The Camel route needs to externalize the same interface as the microservice. The Camel route can modify inputs and outputs to/from the external service and can call Java utility functions to augment inputs and outputs.
As an example, an external enterprise resource planning (ERP) system could be wrapped to provide the inventory status for some or all products in a solution. All of the existing functions of Infosys Equinox would invoke the new route, which would direct queries and post changes to the ERP system. Thus, existing product detail pages (PDPs) could check for inventory, and the cart management and checkout service would reserve and expend the items without change.
Microservice Code Extension Points
The microservices define a series of extension points where a plug-in jar can extend or override the behavior of the microservice. These extension points are designed as Java interfaces which can be extended. This permits the core service to invoke the interface and call to either the default or the extension behavior. Which class is invoked is determined at runtime via the extension classes having hooked the factory used to instantiation actual runtime objects.
Specific extension points for each microservice are described in the detailed documents for the microservices. See the Microservices section of the portal.
Order BPM and Work Items
The Order microservice, unlike the other services, is built around the Camunda BPM engine. The structure of the microservice consists of a spring-boot controller which processes requests and then calls the associated Camunda BPM to handle the workflow. The workflows consist of XML-encoded BPM which invokes low-level work Items to perform the work. The service may be customized by:
- Modifying or extending the BPM
- Modifying work items
- Providing both new BPM and new or extended work items
- Adding new endpoints which invoke new BPM which may invoke new or extended work items.
For additional details about Camunda in general, see https://camunda.com/products/bpmn-engine/.
Event-Driven Extension
Each Microservice can be configured to deliver RabbitMQ Advanced Message Queuing Protocol (AMQP) events when major operations occur. These events are published on service-specific topics. By receiving the events and responding to the events, the platform can be extended and modified. These events are purely asynchronous and non-blocking; accordingly, it is not possible to alter the primary flow of a microservice. When, for example, an order is created, the order will exist before the event is created. Thus, we can only modify the order after its creation. We cannot block its creation or change its properties prior to its creation.
The normal flow of an event-driven extension is that the event is received and the extension calls the REST APIs to perform processing. The event does not contain the full details of the system but rather is used to trigger additional processing, as any state included in the event is ephemeral, and may be superseded by processing that occurs after the event was generated.
React Frontend Component Extensions
The React frontend in the out-of-the-box platform is built to provide an easily themed frontend experience that follows a white-label approach. The frontend is also built to permit both detailed creation of new components, and the use of the existing components to build a specialized frontend experience. These components may also include calling extended functions from the base platform.
Added function to be used by the front end should ideally be exposed through GraphQL, in the same fashion as the base function is exposed, but it is also possible to call directly to the orchestration layers or the underlying microservices.
Admin Extensions
All of the Infosys Equinox 8.0 Admin interfaces are built on top of the ThymeLeaf templating framework. We can add admin functionality at multiple levels in the system.
Adding Microservice Functionality
Admin functions can be added directly to the microservices. Strictly speaking, these features are added to the microservice and can be used for any purpose, including administration. In practice, administrative features will require administrative rights in their JWTS token and, thus, be limited to use by administrative functions.
Adding / Changing Admin Orchestration
Parallel to the storefront orchestration, there are Camel orchestration services which support admin features. These orchestrations can be extended and modified in a parallel fashion to the storefront orchestration, allowing additional or changed functionality for administrative features.
How to Manage Extensions in Infosys Equinox
This section describes how to manage extensions in Infosys Equinox.
How to Customize Existing Functionality of Microservices
Infosys Equinox platform microservices have predefined customization points. With the help of that, you can customize the existing functionality of the existing microservice APIs. A list of customization points available in each microservice is as follows:
- Catalog
- Search
- Pricing
- Merchandising
- Inventory
- Customers (Users)
- Accounts
- Authorization
- Cart
- Address
- Order
- Shipping
- Tax
- Payment
- Subscription
- Foundation
- Feeds
- Notification
- Promotions
- Loyalty
- Lists
- Reporting
By default, the extension point UpsellProductIdsValidator of Catalog microservice validates the following:
- The number of product IDs should not be more than 25.
- The same product cannot be an upsell product on its own.
- If a product ID is not available in the catalog.
Note: If the above conditions are not met, then an error message will be displayed. You can customize the above validation as per the business requirement. In the sample implementation, you can change the validation as follows:
- Given upsell products should have SKUs associated with it.
- An upsell product ID should prefix with ‘upsell-‘.
Command to Run in Developer Mode with Plugin
| java -cp <LOCATION_OF_CATALOG_MICROSERVICE_JAR> -Dloader.path=<LOCATION_OF_CATALOG_PLUGIN_JAR> org.springframework.boot.loader.PropertiesLauncher –spring.profiles.active=dev –spring.cloud.zookeeper.enabled=false |
where,
| Parameter | Description |
| LOCATION_OF_CATALOG_MICROSERVICE_JAR | Indicates the Catalog microservice’s JAR file location. |
| LOCATION_OF_CATALOG_PLUGIN_JAR | Indicates the Catalog plugin JAR file location. For the Catalog extension plugin JAR, contact the Sales team. |
| –spring.profiles.active=dev | Specifies the application properties’ values, which can be updated by providing the property name. |
| –spring.cloud.zookeeper.enabled=false | Indicates the external ZooKeeper server is not used to specify configurations. Mentions that the dev profile is used to specify configurations. |
The solution needs the Java Maven project. To build and get the Catalog microservice’s JAR from the project, the compiled JAR file needs to be mentioned in the classpath while running the Catalog microservice Spring Boot application. Note: To get the Java Maven project, contact the Infosys Equinox Sales Team.
How to Implement an Extension for a Microservice
Infosys Equinox Commerce platform microservices can be extended to incorporate additional APIs and customize the existing APIs. To provide a sample implementation, consider the following two scenarios:
- Introduce an API that will provide a summary of the number of Catalogs, Attributes, Products, and SKUs in a Catalog microservice collection.
- Customize the existing SKU: Create an API to accept the expired SKU and make it as an inactive SKU.
Command to Run in Developer Mode with Plugin
| java -cp <LOCATION_OF_CATALOG_MICROSERVICE_JAR> -Dloader.path=<LOCATION_OF_CATALOG_PLUGIN_JAR> org.springframework.boot.loader.PropertiesLauncher –spring.profiles.active=dev –spring.cloud.zookeeper.enabled=false |
where,
| Parameter | Description |
| LOCATION_OF_CATALOG_MICROSERVICE_JAR | Indicates the Catalog microservice’s JAR file location. |
| LOCATION_OF_CATALOG_PLUGIN_JAR | Indicates the Catalog plugin JAR file location. For the Catalog extension plugin JAR, contact the Sales team. |
| –spring.profiles.active=dev | Specifies the application properties’ values, which can be updated by providing the property name. |
| –spring.cloud.zookeeper.enabled=false | Indicates the external ZooKeeper server is not used to specify configurations. Mentions that the dev profile is used to specify configurations. |
The solution needs the Java Maven project. To build and get the Catalog microservice’s JAR from the project, the compiled JAR file needs to be mentioned in the classpath while running the Catalog microservice Spring Boot application. Note: To get the Java Maven project, contact the Infosys Equinox Sales Team.
How to Get X-Auth-Token
In the Infosys Equinox platform, all the microservices’ APIs require an authentication token. This token is provided by the Authorization microservice. It is a JWT token, which consists of the roles and privileges available for the provided credential.
User Authentication Token
You can use the API POST/user/auth of the Customers(Users) microservice. You need to provide valid user credentials like email and password in the request. In response, you can get the userId and bearerToken. This userId and bearerToken can be used in the Authorization microservice’s API POST/session call to get the X-Auth-Token of the user. This authorization token has the session validity for a specific time and also contains the roles and privileges of the particular user who has logged in.
Test Authentication Token
You can get the test authentication token from all the microservices. Each microservice exposes an API to get the test token. For example,
| https://<domain>/catalogservices/getTestTokens |
The above API provides a set of test tokens of various roles. The tokens can be used to access the APIs. This API is not available in production environments.
How to Validate an X-Auth-Token
You can validate the authorization token by using the customized methods available in the Authorization component of Infosys Equinox Framework. When the request reaches the API, an interceptor that parses the JWT token, which is sent in the request and sets a security context for the current request. You can validate the authorization token using code by the following ways:
- Method-level security check: Add Spring Security Annotation @PreAuthorize along with custom Spring Expressions Language (SpEL). For example, @PreAuthorize(“hasRoleForBusinessByCollectionId(‘ROLE_CATALOG_ADMIN’, #collectionId)”) This method of check is used in all the microservices to restrict access to the controller API endpoints by roles and privileges.
- Statement-level security check: Access the methods provided in the bean AuthTokenHandler of the Authorization component. For example, authTokenHandler.hasRoleForBusinessByCollectionId(‘ROLE_CATALOG_ADMIN’, collectionId)
The authorization token can also be validated manually by parsing it through https://jwt.io/.
How to Get the Roles and Privileges from X-Auth-Token
The following are the methods available in the bean AuthTokenHandler to validate the roles and privileges:
| Methods | Purpose |
| hasValidSessionForeUsrId(Long userId)hasValidSession() | Validates the token. |
| getAccessibleBusiness() | Gets a list of accessible businesses. |
| hasRoleByName(String role)hasAnyRoles(String… roles)hasAnyRole()hasRoleForBusinessById(String role, Long businessId)hasRoleForBusinessByCollectionId(String role, Long collectionId)hasRoleForServiceAndCollection(String roleName, String service, Long serviceCollectionId)isSuperAdmin()isBusinessAdmin(Long businessId) | Validates the role. |
| getRoleAttributes(String roleName, Long businessId, String service, Long serviceCollectionId) | Gets the custom role attribute. |
| hasPrivilegeForServiceAndCollection(String privilegeName, String service, Long serviceCollectionId) hasPrivilegeForBusinessById(String privilege, Long businessId) hasPrivilegeForBusinessByCollectionId(String privilege, Long collectionId) hasPrivilege(String privilege) | Validates the privilege. |
Using PreAuthorize or PostAuthorize
For example,
| @PreAuthorize(“hasRoleForBusinessByCollectionId(‘ROLE_CATALOG_ADMIN’, #collectionId) or hasPrivilegeForBusinessByCollectionId(‘catalog/create/catalog’, #collectionId)”) public ResponseEntity<Object> createCatalog() { return new ResponseEntity<>(HttpStatus.OK) } |
Using AuthTokenHandler
For example,
| @Autowired private AuthTokenHandler authTokenHandler; boolean hasRole = authTokenHandler.hasRoleForBusinessByCollectionId(‘ROLE_CATALOG_ADMIN’, collectionId); |
How to Trigger Microservice Endpoints via Publishing Events
In the Infosys Equinox platform, few API endpoints of the microservices such as Catalog, Merchandising, Pricing, etc can be triggered via publishing an event. These microservices listen to an queue. If any message is published in the queue, it is processed by the microservice. The Project entity of these microservices is used to maintain the changes performed by the user. Once the user completed the changes, then the project can be submitted for approval. The Project entity’s endpoint can be triggered by publishing an event to the corresponding queue. Note: To get the file publisheventextension.zip for the message format and sample implementation of message publishing, contact the Infosys Equinox Sales team.
How to Subscribe to the Events that are Published from Microservice
In the Infosys Equinox platform, the microservices such as Catalog, Merchandising, Pricing, etc. publish events to a topic. These microservices publish an event when a particular action is performed by APIs. Consider the use case:
- When an editor (a business user) submits the authored catalog data (as a project) to the approver (a business user with Approver role), an email should be triggered to the approver notifying that the editor has submitted the data for approval.
- When the status of the project changes from OPEN to SUBMITTED, an event is triggered (for example, catalogProjectSubmittedForApproval) and the listener listens for this event.
Note: To get the file subscribeeventextention.zip, contact the Infosys Equinox Sales team.
How to Use the Framework Components in the Extensions
Infosys Equinox platform provides a set of predefined reusable components that are maintained in the Infosys Equinox Framework for the microservices. These reusable components can also be used in extensions. Note: To know about how a framework component can be used in the extensions, contact the Infosys Equinox Sales team.
Command to Run in Developer Mode with Plugin
| java -cp <LOCATION_OF_CATALOG_MICROSERVICE_JAR> -Dloader.path=<LOCATION_OF_CATALOG_PLUGIN_JAR> org.springframework.boot.loader.PropertiesLauncher –spring.profiles.active=dev –spring.cloud.zookeeper.enabled=false |
where,
| Parameter | Description |
| LOCATION_OF_CATALOG_MICROSERVICE_JAR | Indicates the Catalog microservice’s JAR file location. |
| LOCATION_OF_CATALOG_PLUGIN_JAR | Indicates the Catalog plugin JAR file location. For the Catalog extension plugin JAR, contact the Sales team. |
| –spring.profiles.active=dev | Specifies the application properties’ values, which can be updated by providing the property name. |
| –spring.cloud.zookeeper.enabled=false | Indicates the external ZooKeeper server is not used to specify configurations. Mentions that the dev profile is used to specify configurations. |
How to Implement an Extension for a Storefront Orchestration
Infosys Equinox platform offers Storefront Orchestration (SFO) as a separate microservice. Based on the business requirement, the functionality of the existing storefront APIs can be customized. The SFO microservice has implemented using the Apache Camel framework. Consider the below business use: Product details page API of SFO service uses the Infosys Equinox platform’s Inventory microservice. If a third party inventory microservice is to be used in the SFO, customize the extension. To customize the extension, see the section Extension for Storefront Orchestration.
Extension for Storefront Orchestration
Overview
Before customizing storefront orchestration (SFO), you need to know the Routes, RESTs, and Endpoints available in the SFO application. This document provides the following sections:
- Starting the SFO Application
- Customizing the SFO Extension
- Sample Code Snippet
- Preprocessors
- Project Source File
- Building Your Project
Starting the SFO Application
Start the SFO application with plugin JAR by using the following command:
| java -cp targetorchestration-8.1.0-SNAPSHOT-exec.jar -Dspring.profiles.active=dev -Dspring.cloud.zookeeper.enabled=false -Dloader.path=extensions org.springframework.boot.loader.PropertiesLauncher |
Customizing the SFO Extension
Apache Camel provides an interface called CamelContextConfiguration to customize the camel context before and after the application startup. The sample code snippet is given below to change the current Inventory API to third party inventory API. Infosys Equinox Commerce uses inventory APIs in two services Cart and Catalog.
Cart Service
The file to be updated for the third party inventory API is as follows: src/main/resources/camel/cart/cart-custom-routes.xml Highlighted inventory routes will be replaced in the plugin JAR:
| <route id=”constructSFItem”> <from uri=”direct:constructSFItem” /> <log message=”constructSFItem start” loggingLevel=”DEBUG” /> <to uri=”direct:getMultipleStore” /> <multicast parallelProcessing=”true” strategyRef=”cartGetItemsAggregationStrategy” stopOnException=”true”> <to uri=”direct:getUser” /> <to uri=”direct:getMultipleCatalogs” /> <to uri=”direct:getMultiplePriceList” /> <to uri=”direct:checkMultipleInventory” /> <to uri=”direct:calculateMultipleShipping” /> <to uri=”direct:getCartPayment” /> </multicast> <log message=”constructSFItem end” loggingLevel=”DEBUG” /> </route> |
Catalog Service
The file to be updated for the third party inventory API is as follows: src/main/resources/camel/catalog/catalog-custom-routes.xml Highlighted inventory routes will be replaced in the plugin JAR:
| <route id=”getProductResponseFromSearch“> <from uri=”direct:getProductResponseFromSearch” /> <process ref=”queryGeneratorProcessor” /> <log message=”Search Service API Entered” loggingLevel=”DEBUG” logName=”searchServiceAPIEntered” /> <to uri=”direct:searchGetIndexes” /> <log message=”Search Service API Exit” loggingLevel=”DEBUG” logName=”searchServiceAPIExit” /> <choice> <when> <simple>${in.headers.CamelHttpResponseCode} == 200</simple> <setProperty propertyName=”searchResponse”> <simple>${body}</simple> </setProperty> <when> <simple>${exchangeProperty.preventPromotion} != true</simple> <process ref=”setPromotionOfferRequestProcessor” /> <log message=”Search Promotion API Entered” loggingLevel=”DEBUG” logName=”searchPromotionAPIEntered” /> <to uri=”direct:applyOfferUsingPOST”/> <log message=”Search Promotion API Exit” loggingLevel=”DEBUG” logName=”searchPromotionAPIExit” /> <setProperty propertyName=”promotionOffers”> <simple>${body}</simple> </setProperty> <setBody><simple/></setBody> <when> <simple>${exchangeProperty.enableInventorycheck} and ${exchangeProperty.enableInventorycheck} != null and ${exchangeProperty.enableInventorycheck} == true</simple> <process ref=”catalogInventoryPreProcessor” /> <to uri=”direct:checkInventory” /> </when> </when> <process ref=”searchResponseProcessor” /> </when> <otherwise> <process ref=”commonErrorHandler” /> <stop /> </otherwise> </choice> </route> |
Sample Code Snippet
Perform the following steps:
- Create a maven project using the pom.xml; for example,
<project xmlns=”https://maven.apache.org/POM/4.0.0″ xmlns:xsi=”https://www.w3.org/2001/XMLSchema-instance” xsi:schemaLocation=”https://maven.apache.org/POM/4.0.0 https://maven.apache.org/xsd/maven-4.0.0.xsd”> <modelVersion>4.0.0</modelVersion> <parent> <groupId>org.springframework.boot</groupId> <artifactId>spring-boot-starter-parent</artifactId> <version>2.0.3.RELEASE</version> </parent> <groupId>com.skava.partner</groupId> <artifactId>orchestration-extension</artifactId> <version>0.0.1-SNAPSHOT</version> <name>orchestration-extension</name> <description>orchestration-extension</description> <packaging>jar</packaging> <properties> <camel.version>2.22.0</camel.version> <maven.compiler.source>1.8</maven.compiler.source> <maven.compiler.target>1.8</maven.compiler.target> <maven.compiler.version>3.5.1</maven.compiler.version> </properties> <dependencyManagement> <dependencies> <dependency> <groupId>org.apache.camel</groupId> <artifactId>camel-spring-boot-dependencies</artifactId> <version>${camel.version}</version> <type>pom</type> <scope>import</scope> </dependency> </dependencies> </dependencyManagement> <dependencies> <dependency> <groupId>org.springframework.boot</groupId> <artifactId>spring-boot-starter-web</artifactId> <exclusions> <exclusion> <groupId>org.springframework.boot</groupId> <artifactId>spring-boot-starter-logging</artifactId> </exclusion> <exclusion> <groupId>ch.qos.logback</groupId> <artifactId>logback-classic</artifactId> </exclusion> <exclusion> <groupId>org.slf4j</groupId> <artifactId>log4j-over-slf4j</artifactId> </exclusion> </exclusions> </dependency> <dependency> <groupId>org.apache.camel</groupId> <artifactId>camel-core</artifactId> </dependency> <dependency> <groupId>org.apache.camel</groupId> <artifactId>camel-spring-boot-starter</artifactId> </dependency> <dependency> <groupId>org.projectlombok</groupId> <artifactId>lombok</artifactId> <optional>true</optional> </dependency> <!– Orchestration libs –> <dependency> <groupId>com.skava.orchestration</groupId> <artifactId>orchestration</artifactId> <version>8.0.0.RELEASE</version> </dependency> </dependencies> </project> - Obtain the latest release version of SFO and add it to the external dependency for accessing the classes within it.
- Create CustomCamelConfiguration.java; for example,
import org.apache.camel.CamelContext; import org.apache.camel.builder.AdviceWithRouteBuilder; import org.apache.camel.spring.boot.CamelContextConfiguration; import org.slf4j.Logger; import org.slf4j.LoggerFactory; import org.springframework.beans.factory.annotation.Autowired; import org.springframework.context.annotation.Configuration; import com.skava.orchestration.CamelContextUtilityBean; @Configuration public class CustomCamelConfiguration implements CamelContextConfiguration { private static final Logger LOGGER = LoggerFactory.getLogger(CustomCamelConfiguration.class); static { LOGGER.info(“###### Custom camel configuration found ######”); } @Autowired private CamelContextUtilityBean camelContextUtilityBean;public void beforeApplicationStart(CamelContext camelContext) { LOGGER.info(“##### Custom camel configuration started #####”); try { // Load external routes and rests camelContextUtilityBean.loadXmlRoutes(camelContext, “classpath:routes/**/*.xml”); camelContextUtilityBean.loadXmlRests(camelContext, “classpath:rests/*.xml”);camelContext.getRouteDefinition(“constructSFItem”) .adviceWith(camelContext, new AdviceWithRouteBuilder() { @Override public void configure() { interceptSendToEndpoint(“direct:checkMultipleInventory”) .skipSendToOriginalEndpoint() .log(“Redirect to ulta inventory”) .to(“direct:checkCartUltaInventory”); } });camelContext.getRouteDefinition(“getProductResponseFromSearch”) .adviceWith(camelContext, new AdviceWithRouteBuilder() { @Override public void configure() { interceptSendToEndpoint(“direct:checkInventory”) .skipSendToOriginalEndpoint() .log(“Redirect to ulta inventory”) .to(“direct:checkCatalogUltaInventory”); } }); } catch (Exception e) { LOGGER.error(“Exception occured while loading custom routes”); throw new RuntimeException(“Exception occured while loading custom routes”, e); } } public void afterApplicationStart(CamelContext camelContext) { LOGGER.info(“##### Custom camel configuration done #####”); } - Create src/main/resources/routes/inventory/<ClientName>-inventory-routes.xml; for example,
<routes xmlns=”https://camel.apache.org/schema/spring”> <route id=”checkCartUltaInventoryRoute”> <from uri=”direct:checkCartUltaInventory” /> <log message=”ultaCartInventoryCheck start”/> <process ref=”ultaCartInventoryPreProcessor” /> <to uri=”direct:ultaInventoryCheckInventory” /> <process ref=”ultaCartInventoryPostProcessor” /> <log message=”ultaCartInventoryCheck end”/> </route><route id=”checkCatalogUltaInventoryRoute”> <from uri=”direct:checkCatalogUltaInventory” /> <log message=”ultaCatalogInventoryCheck start”/> <process ref=”ultaCatalogInventoryPreProcessor” /> <to uri=”direct:ultaInventoryCheckInventory” /> <process ref=”ultaCatalogInventoryPostProcessor” /> <log message=”ultaCatalogInventoryCheck end”/> </route><!– Inventory endpoint request configuration–> <route id=”ultaInventoryCheckInventoryRoute”> <from uri=”direct:ultaInventoryCheckInventory”/> <log message=”Route Started – $simple{routeId} – $simple{threadName}” loggingLevel=”DEBUG”/> <setHeader headerName=”Exchange.HTTP_PATH”> <simple/> </setHeader> <setBody><simple/></setBody> <setHeader headerName=”Exchange.HTTP_METHOD”> <constant>GET</constant> </setHeader> <setHeader headerName=”Exchange.HTTP_QUERY”> <simple>id=${in.headers.skuIds}&bin=${in.headers.binName}</simple> </setHeader> <setHeader headerName=”Exchange.HTTP_URI”> <simple>https://www.counteractive.org/inventory/check.php</simple> </setHeader> <to uri=”{{skava.component.http}}”/> <choice> <when> <simple>${in.headers.CamelHttpResponseCode} == 200 or ${in.headers.CamelHttpResponseCode} == 206</simple> <log message=”Success – $simple{routeId} – $simple{threadName}” loggingLevel=”DEBUG”/> <unmarshal> <json library=”Jackson” unmarshalTypeName=”com.skava.partner.inventory.model.UltaCheckInventory” useList=”true”/> </unmarshal> </when> <otherwise> <choice> <when> <simple>${exchangeProperty.addressOverrideErrorResponse} != true</simple> <log message=”Failure – $simple{routeId} – $simple{threadName}” loggingLevel=”DEBUG”/> <process ref=”commonErrorHandler” /> <stop/> </when> <otherwise> <log message=”Failure – $simple{routeId} – $simple{threadName}” loggingLevel=”DEBUG”/> <setProperty propertyName=”addressOverrideErrorResponse”> <simple>false</simple> </setProperty> </otherwise> </choice> </otherwise> </choice> </route> </routes> - Create src/main/resources/rests/<ClientNmae>-rests.xml; for example,
<?xml version=”1.0″ encoding=”UTF-8″?> <rest path=”/extension” xmlns=”https://camel.apache.org/schema/spring”> <description>Ulta extension ping</description> <get uri=”/ping” produces=”application/json” outType=”java.lang.String”> <description>Ulta Rest ping</description> <responseMessage message=”Ok” code=”200″ responseModel=”java.lang.String” /> <route id=”extensionRestPingRoute”> <log message=”Extension rest ping call triggered” loggingLevel=”INFO” /> <transform> <simple>Ulta extension rest ping ${bean:java.lang.System?method=currentTimeMillis} </simple> </transform> </route> </get> </rest>
Processors
Preprocessors are used to construct the request from Cart and Catalog service models. For example, skuIds and binname are constructed in the preprocessor class <ClientName>CartInventoryPreProcessor and <ClientName>CatalogInventoryPreProcessor. Postprocessors are used to convert the responses to the Storefront Orchestration inventory.
Project Source File
The project source file is available in the orchestration-extension-src.zip file. Note: To get the orchestration-extension-src.zip file, contact the Infosys Equinox team.
Building Your Project
To build your project, perform the following steps:
- Run the maven command mvn clean install. The extension JAR will be available in the target directory.
- Move the extension JAR from the target directory to the extensions directory.
- Start the SFO JAR with available extension JAR using the following command:
where,java -cp targetorchestration-8.1.0-SNAPSHOT-exec.jar -Dspring.profiles.active=dev -Dspring.cloud.zookeeper.enabled=false -Dloader.path=extensions org.springframework.boot.loader.PropertiesLauncher Parameter Description orchestration-8.1.0.SNAPSHOT-EXEC.jar Represents the application JAR of a particular release. -Dloader.path Contains the path of the generated JAR within the extensions directory. - Verify whether the customization has been applied or not.
How to Customize Pages in Admin Console
You can customize a Infosys Equinox Admin console by creating new pages or modifying existing pages via an extension. This section explains how to add Plugin menu in the left navigation menu of the Customer Admin by using the extension. Before this customization, the Customer Admin page is as follows:  The customization of Customer Admin includes the following steps:
Note: You can also download the sample extension’s source for reference.
Creating a New Page
You can create a new page view by extending the AdminView class. AdminView is an abstract class available in the Infosys Equinox Admin Framework. This class provides the following abstract methods, which can be implemented to build a page:
| Method | Description |
| getBreadCrumbs | Builds the required breadcrumbs for the page. Returns an empty list, if there are no breadcrumbs on the page. |
| getPageData | Returns model data for the page. It contains all the required data to show in the bodyContent of a page. |
| getPageSideNavigation | Defines the page’s side navigation menus if required. Returns an empty list, if there are no side navigation menus on the page. |
| getServiceType | Returns a valid service type. For example, Customer. |
| getViewName | Returns a valid Thymeleaf template file path under the resources/templates folder. |
Perform the following steps to create a simple page PluginPageView:
- Create the page PluginPageView and render the title and page summary. For example, create a Java file PluginPageView.java with the following contents:
@Service @NoArgsConstructor @Qualifier(“PluginPageView”) public class PluginPageView extends AdminView { /** * View name of the layout. It should return the valid thymeleaf template file path under resources/templates folder * * @return {@link String} */ public String getViewName() { return “v2/pages/plugins”; }/** * service type used to get the general layout info * * @return {@link String} */ public String getServiceType() { return Constants.SERVICE_TYPE_CUSTOMER; }/** * getPageData – this can be used to build the page specific data for the layout. * * @param request * @param response * @param requestParams * @return ${@link PageData} */ public PageData getPageData(HttpServletRequest request, HttpServletResponse response, AdminRequestParams requestParams) { PageData pageData = new PageData(); pageData.addObject(“title”, “Plugins Page”); pageData.addObject(“summary”, “Plugins Page – You can add your content here…”); return pageData; }/** * get the breadcrumb for the page. We can build the required breadcrumbs for this page. If breadcrumbs not needed then should pass the emptylist. * * @param requestParams * @param mLayoutData * @return {@link List} */ public List<BreadCrumb> getBreadCrumbs(AdminRequestParams requestParams, MicroserviceLayout mLayoutData) { return new BreadcrumbBuilder() .addBreadCrumb(new BreadCrumb(“Plugin”, “Plugin”, “#”, null)) .build(requestParams); }/** * get the sidenav data for the page. Here we can build the page side navigation menus if required otherwise it should returns emptylist * * @param requestParams * @param mLayoutData * @return ${@link List} */ public List<MenuItem> getPageSideNavigation(AdminRequestParams requestParams, MicroserviceLayout mLayoutData) { return Collections.emptyList(); } } - Create an HTML page by using the Thymeleaf template. For example, create the following file plugins.html, in which every page extend the microservice-layout by the Thymeleaf attribute layout:decorate to get the standard page template:
<!DOCTYPE html> <html xmlns:th=”https://www.thymeleaf.org” xmlns:layout=”https://www.ultraq.net.nz/thymeleaf/layout” layout:decorate=”~{v2/layouts/microservice-layout}“> <head> <title th:text=”#{PLUGIN.PAGE.TITLE}“>Plugins Page</title> </head> <body> <div layout:fragment=”bodyContent”> <h1 th:text=”${title}“>Plugins Page</h1> <p> <span th:text=”${summary}“>Summary</span> </p> </div> </body> </html> - Create a controller to serve the new page. For example, the following file PluginsPageController.java autowires the adminView with the qualifier name and calls the getPage with the request params:
Note: The qualifier name should be same as the plugin page name PluginPageView.@Controller @NoArgsConstructor public class PluginsPageController { @Autowired @Qualifier(“PluginPageView”) private AdminView adminView;@GetMapping(“/plugins”) public ModelAndView catalogPluginPage( HttpServletRequest request, HttpServletResponse response, @ModelAttribute CustomerRequestParams requestParams) { return adminView.getPage(request, response, requestParams); } }
Modifying an Existing Page
Create a new page by extending the existing page and annotate it as @primary to give higher preference to the newly created page. After that customize the page based on the requirements. For example, in the Customer Admin profile page, add a new side navigation menu Plugins and link it to a new page as follows:
- Create a new class ProfilePageViewExtended that should extend the existing class ProfilePageView.
- Annotate it @primary to give higher preference.
- Override getPageSideNavigation method and get the existing menu list by calling super method. After getting the list, you can add a new menu.
The Java file ProfilePageViewExtended.java is as follows:
| @Service @Qualifier(“ProfilePageView”) @NoArgsConstructor @RequestScope @Primary /* to give higher preference to this bean ProfilePageViewExtended instead of ProfilePageView */ public class ProfilePageViewExtended extends ProfilePageView { @Override public List<BreadCrumb> getBreadCrumbs(AdminRequestParams requestParams, MicroserviceLayout mLayoutData) { List<BreadCrumb> existingBreadCrumbs = super.getBreadCrumbs(requestParams, mLayoutData); // Here we can customize existingBreadCrumbs and add new if needed return new BreadcrumbBuilder().addAllBreadCrumbs(existingBreadCrumbs) .build(requestParams); }/** * get the sidenav data for the page * * @param requestParams * @param mLayoutData * @return ${@link List} */ @Override public List<MenuItem> getPageSideNavigation(AdminRequestParams requestParams, MicroserviceLayout mLayoutData) { // Get existing side navs List<MenuItem> existingMenuItems = super.getPageSideNavigation(requestParams, mLayoutData);// add plugins page side nav existingMenuItems.add(new MenuItem(“CUSTOMER_PROFILE.SIDENAV_PLUGINS”, “/plugins” + QUERY_MACRO_MICROSERVICE_WITH_STORE, “false”, “extension”));return new NavigationBuilder() .addAllMenuItems(existingMenuItems) .build(requestParams); }/** * getPageData – this can be used build the page specific data for the layout. * * @param request * @param response * @param requestParams * @return ${@link PageData} */ @Override public PageData getPageData(HttpServletRequest request, HttpServletResponse response, AdminRequestParams requestParams) { // Get existing page data PageData existingPageData = super.getPageData(request, response, requestParams);// here we can add any new page data required. return existingPageData; } } |
Building and Running Extensions
To build and run the extensions, perform the following steps:
- Package the extension JAR by using the mvn clean package command. This command generates the extension JAR under the target directory.
- Move the extension JAR to the desired extensions directory which is specified in loader.path.
- Run the corresponding admin JAR with the extension by Spring Boot’s PropertiesLauncher and with the file loader.path using the below command: java -cp <admin-exec.jar> -Dloader.path=<plugins.path> org.springframework.boot.loader.PropertiesLauncher where,
Macro Description admin-exec.jar Replace this macro with the corresponding admin executable JAR. plugins.path Replace this macro with plugin directory . For example, \skava\usr\local\skava\plugins - Validate the plugin. The Plugin has been added to the left navigation menu of the Customer Admin page:
 Click the Plugin tab in the left navigation menu to view the newly created Plugins page:

How to Implement an Extension for Admin Orchestration
Admin Orchestration can be customized via extension by using Apache Camel’s intercept feature. The intercept feature supports intercepting Exchanges while they are on route. Admin Orchestration supports the following interceptors:
- intercept – Intercepts each and every processing step while routing an Exchange in the route.
- interceptFrom – Intercepts incoming Exchange in the route.
- interceptSendToEndpoint – Intercepts when an Exchange is about to be sent to the given endpoint.
Apache Camel provides an interface called CamelContextConfiguration to customize the Camel context before and after the application startup. By implementing this interface, you can customize endpoints by adding, removing, and re-routing the routes. For example, consider the Customer Admin Orchestration’s Create Address API. It does not have address validation. If you want to validate the address before creating it, you need to re-route the existing route to the custom route. The custom route performs the validation by invoking the Address service and creates the address if it is valid.
Existing Route
The existing route direct:customerCreateUserAddressPreProcess creates address directly by invoking direct:createUserAddress route:
<span style="font-family: 'courier new', courier, monospace;"><</span>route id="direct:customerCreateUserAddressPreProcess">
  <from uri="direct:customerCreateUserAddressPreProcess" />
  <to uri="direct:responseSetOrinalBody" />
  <marshal ref="serializer" />
  <process ref="customerAddressRequestProcessor" />
  <to uri="direct:commonSetCollectionIdHeader" />
  <to uri="direct:customerGetUserStatusValidation" />
  <setBody>
    <simple>${exchangeProperty.addressRequest}</simple>
  </setBody>
  <marshal ref="serializer" />
  <to uri="direct:createUserAddress" />
  <to uri="direct:responseCodeCheck" />
  <process ref="addressResponseProcessor" />
</route>
Create Address API
The following table shows the details of Create Address API:
| API Endpoint | admin/services/customers/{userId}/address |
| Payload |
|
This API accepts the above invalid address payload and creates the address. This invalid address is added as a customer’s address. The following extension once implemented validates the address before it is created.
Using Extension
You need to re-route the route direct:createUserAddress to the custom route direct:extensionCreateUserAddressPreValidation by implementing the CamelContextConfiguration‘s beforeApplicationStart method. The file CustomCamelConfiguration.java has the following code snippet:
<span style="font-family: 'courier new', courier, monospace;">camelContext.getRouteDefinition(</span>"direct:customerCreateUserAddressPreProcess")
.adviceWith(camelContext, new AdviceWithRouteBuilder() {
  @Override
  public void configure() {
    interceptSendToEndpoint("direct:createUserAddress")
      .skipSendToOriginalEndpoint()
      .log("Redirecting direct:createUserAddress to direct:extensionCreateUserAddressPreValidation")
      .to("direct:extensionCreateUserAddressPreValidation");
  }
});
Using Custom Route
The following custom route has the address validation process direct:customAddressValidation before creating the user address by invoking direct:customCreateUserAddress:
<route id="direct:extensionCreateUserAddressPreValidation">
    <from uri="direct:extensionCreateUserAddressPreValidation" />
    <setProperty propertyName="requiredServices"><simple>customer,address</simple></setProperty>
    <to uri="direct:commonStoreValidation" />
    <setBody>
        <simple>${exchangeProperty.addressRequest}</simple>
    </setBody>
    <marshal ref="serializer" />
    <process ref="extensionAddressValidationRequestProcessor" />
    <marshal ref="serializer" />
    <to uri="direct:customAddressValidation" />
        <!-- Validation goes here -->
    <to uri="direct:responseCodeCheck" />
    <setBody>
        <simple>${exchangeProperty.addressRequest}</simple>
    </setBody>
    <marshal ref="serializer" />
    <log message="${exchangeProperty.customerCollectionId}" loggingLevel="INFO" />
    <log message="${body}" loggingLevel="INFO" />
    <setHeader headerName="x-collection-id">
        <simple>${exchangeProperty.customerCollectionId}</simple>
    </setHeader>
    <to uri="direct:customCreateUserAddress" />
    <to uri="direct:responseCodeCheck" />
</route>
Loading Extension’s Rest and Routes
Using the following camelContextUtilityBean, you can add additional rest and routes via classpath (classpath:) or file (file:):
| camelContextUtilityBean.loadXmlRoutes(camelContext, “classpath:extension/transform/*.xml”); camelContextUtilityBean.loadXmlRests(camelContext, “classpath:extension/aggregate/*.xml”); |
Note: The extension should have the above implementation.
Building and Running Extensions
To build and run the extension JAR, refer to the section Building and Running Extensions. After running the extension, you can validate the Create Address API of the Admin Orchestration. If you enter an invalid address, the following error will be shown:
{
    "responseCode": "ADCOVAL0003",
    "responseMessage": "Address provided is invalid",
    "validationErrors": {
        "globalErrors": [
            {
                "code": "ADCOVAL0003",
                "message": "Address provided is invalid"
            }
        ],
        "fieldErrors": []
    }
}
Note: To download the extension implementation source, click here.
How to Trigger a Feed
Feed
The feed is an entity, which holds the information about the Pentaho ETL jobs, such as ETL job ID, job path, and parameters that are required during triggering the job. This information is used when triggering or scheduling the feed.
Feed Job
Feed job entity stores the common parameters or the configuration of the ETL jobs. To trigger a feed, you should create a feed job for a collection with common parameters (if any). The following API is used to create a new feed job:
| API | Body |
| https://DOMAIN/feedservices//feeds/{feedId}/jobs?businessId={businessId} | { “description”: “string”, “jobId”: “string”, “jobParams”: [ { “name”: “string”, “stringValue”: “string” } ], “name”: “string”, “serviceType”: “string”, “status”: “INACTIVE” } |
Schedule
Schedule entity stores the given schedule information while triggering or scheduling each feed. The schedule statuses are as follows:
- ONDEMAND – Indicates the ETL job is triggered immediately if it is scheduled to run the feed.
- SCHEDULED – Indicates the ETL job is triggered at a specified interval of time. The time interval is specified in the field repeatInterval.
- INACTIVE – Indicates that the feed will be disabled.
The following API is used to trigger the feed on-demand and schedule for triggering:
| API | Body |
| https://DOMAIN/feedservices/feeds/{feedId}/jobs/{jobId}/schedules?businessId={businessId} | { “description”: “string”, “endTime”: “string”, “maxRunTime”: 0, “name”: “string”, “params”: [ { “name”: “string”, “stringValue”: “string” } ], “repeatInterval”: 0, “scheduleId”: “string”, “startTime”: “string”, “status”: “INACTIVE” } |
How to Get the Progress of Feed
This FeedRunHistory entity stores the history of the ETL jobs, which have run in the past. The following API retrieves all feed run history of the given feed ID and feed job ID. This API returns the details, such as the number of times a particular feed ran, start time and end time of the feed, status of the feed, and summary of the feed.
| https://DOMAIN/feedservices/feeds/{feedId}/jobs/{jobId}/history?businessId={businessId} |
This API returns the history for the given feedId and feedJobId.
Building Extensions
Infosys Equinox Commerce Platform provides the capability to extend/customize any Microservice and its features. Using the extensions/plugins, you can add new features to the platform. You can also modify the existing features.
There are various points provided as part of the solution, through which the platform can be customized. This capability also enables us to integrate with any 3rd party systems seamlessly. There are a few default plugins which are offered as part of the platform. There will be full control over the extensions and their deployments. Any upgrade to the platform will not have any impact on the extensions.
Following are the broad categories of extensions/customizations use cases:
- Existing functionality updates
- Modify an existing behavior
- Update existing entities and APIs for new fields
- Introduce new functionalities
- Add new APIs – behavioral
- Add new entities
- New Connector plugin(s)
- Payment provider plugin
- Tax provider plugin
- New Microservice(s)
- Build a new microservice altogether
- Accelerate the development by using Infosys Equinox Commerce Framework
Extension Samples
|
Extension |
Extensions Type |
Extension Use Case |
|
Microservice Existing APIs |
Extends the Cart microservice to include a new sum property on the Cart Object based on the properties added during the Add to Cart API. |
|
|
Microservice New APIs |
Extends the Catalog Microservice to add new cache-related APIs. |
|
|
Orchestration Existing APIs |
Extends the Storefront Orchestration to include a new sum property on the Cart Object based on the properties added during the Add to Cart API. |
|
|
Orchestration Existing APIs |
Extends the Storefront Orchestration to invoke an additional API for getting the price updated by an x% in the PDP call. Application mimicking the external API is also present in the location. |
Orchestration Extensions
Orchestration extensions are JAR-based extensions. It includes XML-based Rest and Route configurations. Custom Routes and Rest can be added through extensions.
Microservice Extensions
Microservice extensions are JAR-based extensions and have access to framework and core service components. You can add new features and modify existing behaviors easily. Multiple extensions are supported per deployment.
Admin Tooling Extensions
Admin extensions are JAR-based extensions. It includes layout-based – components, fragments, and inheritance. Layouts, components, and pages can be overridden.
The following images show the admin tool layout:


The following table lists the admin tooling extensions in detail:
|
Grouping |
Purpose |
|
Component |
Reusable Thymeleaf UI components are used on one or more pages to provide a certain experience. For example, header and footer. |
|
Layouts |
Highest level Thymeleaf template which is the layout used by all or set of pages within the admin tooling. |
|
Page |
Navigable Thymeleaf-based pages of the application. It uses components and snippets. |
|
Snippet |
Reusable Thymeleaf Functional components. For example, Address add form |
|
Controller |
Provides the HTTP endpoints for a page or an action within a page. |
|
Model |
Data Objects are required by the Page to display information. |
|
View |
Responsible for binding the data provided with the page view. |
In the Infosys Equinox Admin tools, the Internationalization supported properties file can be created per locale, with no code changes required.
Steps for Creating an Extension
Extensions can be created for Infosys Equinox microservices by following the steps given below:

- Create Maven Project
- Define Microservice Dependency
- Extend or Customize
- Compile and Package
- Deploy Extension
Creating a Maven Project for an Extension
Generate plain vanilla Maven Java project using the command given below:
|
mvn archetype:generate -DgroupId=<Your_Group_Id> -DartifactId=<Your_Extension_Name> -DarchetypeArtifactId=maven-archetype-quickstart -DinteractiveMode=false |
Note:
- It should not be a Spring Boot project but rather a plain Java artifact (exclude the Spring Boot classes and YMLs).
- Update the groupId value as needed.
- Update the artifactId value with the extension name.
Defining Microservice Dependency of an Extension
To define the microservice dependency of an extension,
- Ensure the maven compiler source and target are set for Java 1.8
- Create a maven dependency for the service you would like to extend.
- Set the below scope to avoid packaging of the service you are trying to extend:
<properties>
……..
<maven.compiler.source>1.8</maven.compiler.source>
<maven.compiler.target>1.8</maven.compiler.target>
……..
</properties>
……..
<dependencies>
<dependency>
<groupId>com.skava.xxxxxx</groupId>
<artifactId>yyyyyyyy</artifactId>
<version>8.x.x.RELEASE</version>
<scope>provided</scope>
</dependency>
……..
Extending or Customizing an Extension
- Implement or customize the required classes.
- All classes and appropriate functions of the microservice are available to use in this project.
- The following are the available packages or classes:
- Controllers – API endpoints
- Models – Request and Response Objects
- Rest or Route – updates or creation
- Service – Flow provider
- Domain Objects – Business logic
- Entities – Data layer
Compiling and Packaging an Extension
To compile the extension without the dependencies, use the command given below:
|
mvn clean install |
Note: It produces a JAR package (extension).
Deploying an Extension
The same command and argument are used to include the extension locally or in the docker image.
The Docker image is updated to place the Extension JAR in the corresponding folder.
Thus, the created folder is passed as a JVM argument using the loader.path variable.
Unit Testing of Extensions
The Steps for Creating an Extension are good from a plugin setup perspective. But as part of development, you need to ensure that all changes are quickly tested, and it is part of the build process. Hence automated Junit testing is a must for all plugin projects to ensure there are no regressions due to any fixes or updates. Infosys Equinox Commerce recommends the use of Spring Mock MVC for the automated unit testing of plugins. The plugin is a plain Vanilla Maven plugin that does not have any Spring Boot dependencies.
- Ensure that you can start the parent microservice as a Spring Boot application and use Mock MVC to test the APIs. This way you are testing the entire flow of the application from the starting point of the application (Rest Controller).
- During the test phase in the Maven build of a Spring Boot application, the application is started as a normal Spring Boot application.
The following steps must be followed to enable unit testing with the dependent microservice, which runs as a Spring Boot App during the compilation of the plugin:
|
Step # |
Junit using Spring Mock MVC |
|
1. |
Add skava-framework-bom as a parent to the plugin, it should be the same version as the parent microservice: <parent> |
|
2. |
Add the embedded version of the parent microservice (the version same as step 2 in previous section but with embedded as classifier and scope as test): <dependency> |
|
3. |
Configure your main test class to include the Main application of the parent microservice. You can refer to this section for the main classes of various microservices: @RunWith(SpringRunner.class) “spring.additionalPackages.scan='<AdditionalPackagesToScan>'”}) |
Binary View of Extension Process
Below is the binary view of the process of the extension:

Infosys Equinox Commerce Extension Points
The platform provides various endpoints through which it can be extended/customized, the endpoints are explained in detail below:

API Gateway
The following are the extension points with API gateway:
- Use any gateway to accomplish
- Caching
- Basic Security and Whitelisting
- Basic transformations and version management.
- AWS API Gateway, Azure API Management, Apigee, 3Scale
Events/Actions
The following are extension points with events:
- Infosys Equinox micro services drop Events into RabbitMQ queues.
- External applications can listen to these events.
- Routes can be configured at the Camel Orchestration layer to respond to these events.
The following table contains the event details link of the microservices:
|
Microservice |
Event Details Link |
|
Accounts Service |
|
|
Address Service |
|
|
Catalog Service |
|
|
Authorization Service |
|
|
Cart Service |
|
|
User Service |
|
|
Foundation Service |
|
|
Pricing Service |
|
|
Promotions Service |
|
|
Inventory Service |
|
|
Order Service |
|
|
Payment Service |
|
|
Lists Service |
|
|
Storefront Orchestration |
|
|
Subscription Service |
|
|
Notification Service |
|
|
Feeds Service |
|
|
Merchandising Service |
|
|
Reporting Service |
|
|
Ratings and Reviews Service |
Microservices Extension
The following are extension points in microservices:
- Plugins can be written for predefined extension points.
- Infosys Equinox endpoints can be overwritten with custom code.
- New endpoints can be added to the existing domains
The following table contains the extension details link of the microservices:
|
Microservice |
Extension Details Link |
|
Accounts Service |
|
|
Address Service |
|
|
Catalog Service |
|
|
Authorization Service |
|
|
Cart Service |
|
|
Shipping Service |
|
|
Tax Service |
|
|
User Service |
|
|
Pricing Service |
|
|
Promotions Service |
|
|
Order Service |
|
|
Payment Service |
|
|
Lists Service |
|
|
Subscription Service |
|
|
Notification Service |
|
|
Reporting Service |
Orchestration Extension
The following are extension points with Orchestration:
- Create routes in Orchestration to integrate various services together.
- Use various Enterprise Integration Patterns to combine client services with Infosys Equinox and other third-party services.
- XML-based route creation via Visualization Tools.
The following table contains the extension details link of the storefront orchestration service:
|
Service |
Extension Details Link |
|
Storefront Orchestration |
Admin UI Extension – Sample
To find the extension details of the Catalog Admin service, see Catalog Admin Extensions/
Appendix
Infosys Equinox Commerce Artifacts and URLs
For accessing Infosys Equinox Commerce artifacts, send out an email, including your name, company, and email address to devportal@infosysequinox.com.
Infosys Equinox Commerce Artifacts
The following table lists the Artifacts of Infosys Equinox Commerce:
|
Artifact |
Purpose |
|
<serviceName>-8.X.Y.RELEASE-config.jar |
Java archive containing all configuration files including ETL files, DB scripts, ZooKeeper template, and deployment descriptors. |
|
<serviceName>-8.X.Y.RELEASE-embedded.jar |
Ready to run Java archive with all required components as embedded flavour. Not recommended for higher environments. |
|
<serviceName>-8.X.Y.RELEASE-exec.jar |
Production grade Spring boot executable Java archive. |
|
<serviceName>-8.X.Y.RELEASE-javadoc.jar |
Java archive containing all the Java documentation. |
|
<serviceName>-8.X.Y.RELEASE.jar |
Java archive for enabling extensions/plugin development. This is to be added as a dependency on the extension project. |
Note: To run the JAR in embedded mode and to populate the embedded DB, refer to these sections:
The following sample image shows the artifacts of the Catalog service:

Infosys Equinox Commerce Artifacts – CONFIG Archive
You need to extract the <serviceName>-8.X.Y.RELEASE-config.jar archive into a folder.
The following artifacts will be available and the purpose of each one of them are listed below:
|
Artifacts |
Purpose |
|
etl |
Folder comprising of ETL files of the service including etl.yml representing the actively used feed filenames. |
|
webbox |
Folder comprising all configurations related to running an application. |
|
webbox\databases |
Contains the Liquibase/MongoDB scripts for creating the required DB and schema for the microservice. Note: For more details, refer to the Database Setup section. |
|
webbox\zookeeper-template.yml |
ZooKeeper template YML has the configurations required for an application to run. Use the utility to generate the ZooKeeper property for local execution. |
|
webbox\deployment-descriptor.yml |
The file contains the hardened deployment configurations including Java heap values. This may not be required for local setup. |
Microservices – Artifactory Location
The following table lists the Artifactory location of the Infosys Equinox Microservices:
Swagger and JWT Token URLs
The following table lists the Swagger and JWT token URLS of the Infosys Equinox Microservices:
|
Service |
Swagger URL |
Token URL |
|
Accounts Services |
https://<hostName>:<portNumber> |
https://<hostName>:<portNumber> |
|
Address Services |
https://<hostName>:<portNumber> |
https://<hostName>:<portNumber> |
|
Admin Orchestration |
https://<hostName>:<portNumber> |
NA |
|
Catalog Services |
https://<hostName>:<portNumber> |
https://<hostName>:<portNumber> |
|
Authorization Services |
https://<hostName>:<portNumber> |
https://<hostName>:<portNumber> |
|
Cart Services |
https://<hostName>:<portNumber> |
https://<hostName>:<portNumber> |
|
Shipping Services |
https://<hostName>:<portNumber> |
https://<hostName>:<portNumber> |
|
Tax Services |
https://<hostName>:<portNumber> |
https://<hostName>:<portNumber> |
|
User Services |
https://<hostName>:<portNumber> |
https://<hostName>:<portNumber> |
|
Foundation Services |
https://<hostName>:<portNumber> |
https://<hostName>:<portNumber> |
|
Price Services |
https://<hostName>:<portNumber> |
https://<hostName>:<portNumber> |
|
Promotion Services |
https://<hostName>:<portNumber> |
https://<hostName>:<portNumber> |
|
Inventory Services |
https://<hostName>:<portNumber> |
https://<hostName>:<portNumber> |
|
OMS Services |
https://<hostName>:<portNumber> |
https://<hostName>:<portNumber> |
|
Payment Services |
https://<hostName>:<portNumber> |
https://<hostName>:<portNumber> |
|
List Services |
https://<hostName>:<portNumber> |
https://<hostName>:<portNumber> |
|
Storefront Orchestration |
https://<hostName>:<portNumber> |
NA |
|
Subscription Services |
https://<hostName>:<portNumber> |
https://<hostName>:<portNumber> |
|
Search Services |
https://<hostName>:<portNumber> |
https://<hostName>:<portNumber> |
|
Notification Services |
https://<hostName>:<portNumber> |
https://<hostName>:<portNumber> |
|
Feed Services |
https://<hostName>:<portNumber> |
https://<hostName>:<portNumber> |
|
Merchandise Services |
https://<hostName>:<portNumber> |
https://<hostName>:<portNumber> |
|
Reporting Services |
https://<hostName>:<portNumber> |
https://<hostName>:<portNumber> |
|
Loyalty Services |
https://<hostName>:<portNumber> |
https://<hostName>:<portNumber> |
|
Ratings and Reviews Services |
https://<hostName>:<portNumber> |
https://<hostName>:<portNumber> |
Admin URLs
The following table lists the admin URLs of the Infosys Equinox Microservices:
|
Service |
Swagger URL |
|
Account Admin |
https://<hostName>:<portNumber> |
|
Authorization Admin |
https://<hostName>:<portNumber> |
|
Catalog Admin |
https://<hostName>:<portNumber> |
|
Foundation Admin |
https://<hostName>:<portNumber> |
|
Customer Admin |
https://<hostName>:<portNumber> |
|
Price Admin |
https://<hostName>:<portNumber>/admin/pricing/login |
|
Order admin |
https://<hostName>:<portNumber>/admin/orders/login |
|
Promotion Admin |
https://<hostName>:<portNumber>/admin/promotions/login |
|
Merchandising Admin |
https://<hostName>:<portNumber>/admin/merchandising/login |
|
Notification Admin |
https://<hostName>:<portNumber>/admin/notifications/login |
|
Loyalty Admin |
https://<hostName>:<portNumber>/admin/loyalty/login |
|
Subscription Admin |
https://<hostName>:<portNumber>/admin/subscriptions/login |
|
Ratings and Reviews Admin |
https://<hostName>:<portNumber>/admin/ratingsreviews/login |
Revision History
2023-07-10 | JP – Added component and new service details for 8.14.0
2023-06-13 | JP – Added GraphQL details for Release 8.14.0
2022-11-01 | JP – Updated Swagger URL for Release 8.12.0
2022-06-17 | JP – Added Project Lombok details.
2022-04-29 | JP – Added the page and the content.