Implementation Guides
Tenant Setup & Onboarding
This section walks through the complete process of configuring a new ACI tenant — from creating the tenant record to testing the live chat experience. All setup is done through the ACI Admin Console. No code changes or infrastructure work are required.
Step 1 — Create the Tenant
To create a tenant:
- Log in to the ACI Admin Console using your credentials.
- Go to Tenant Management → Tenant List and click New Tenant.
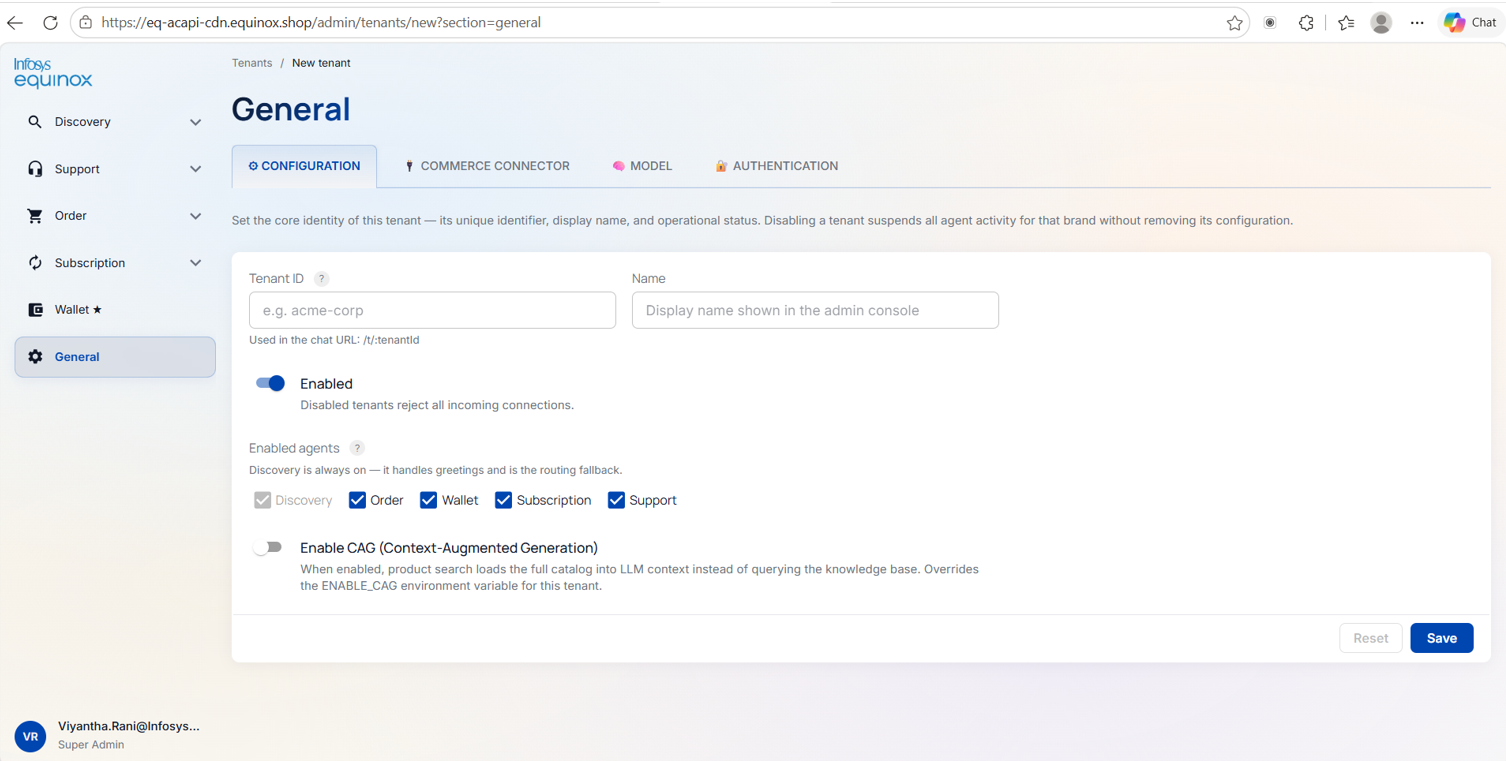
- Complete the following fields:
| Field | Description |
|---|---|
| Tenant name | The brand or store name used throughout the console |
| Commerce platform | Select Equinox, Shopify, or Salesforce |
- Click Save. The tenant record is created and you are taken to the Tenant Edit page.
Step 2 — Connect Your Commerce Store
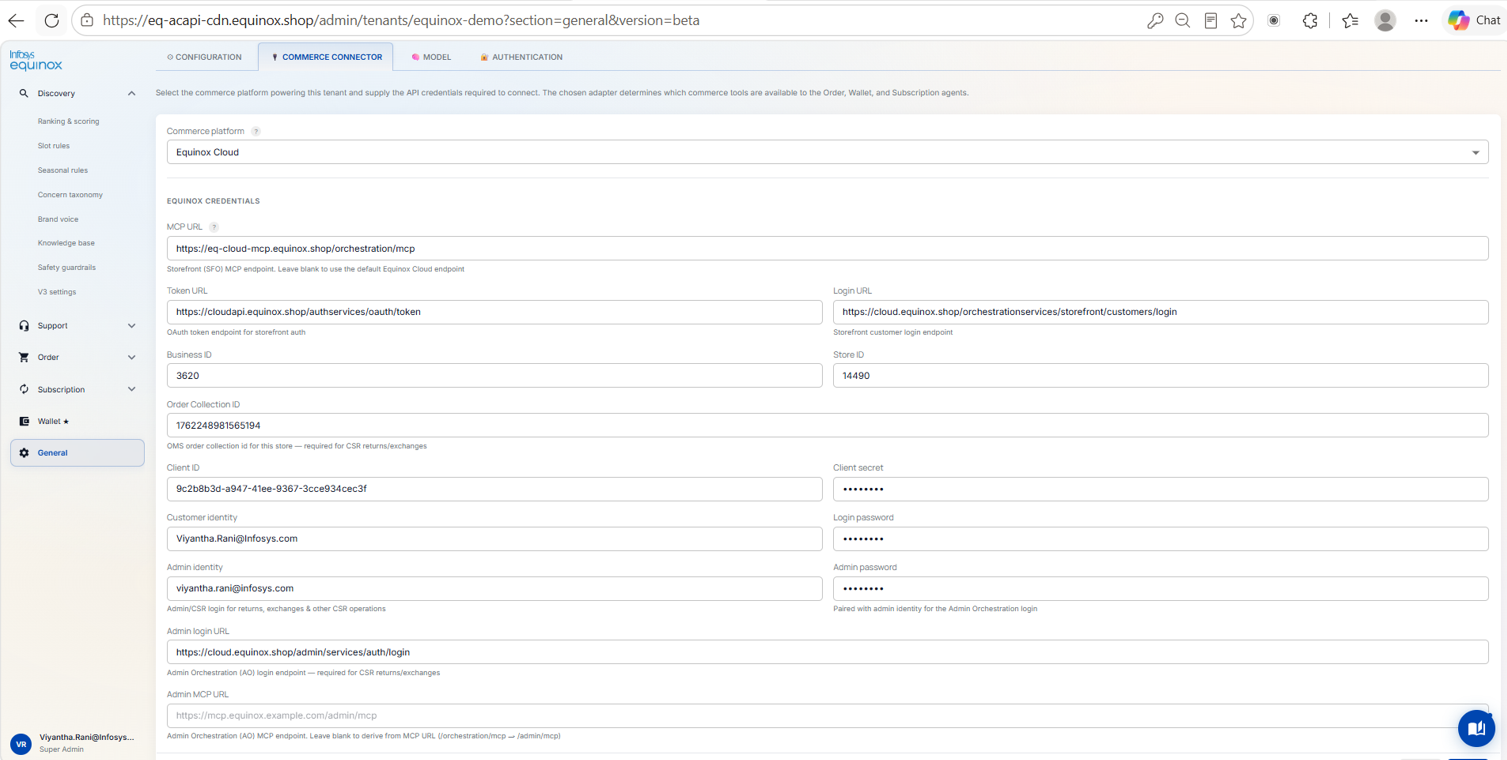
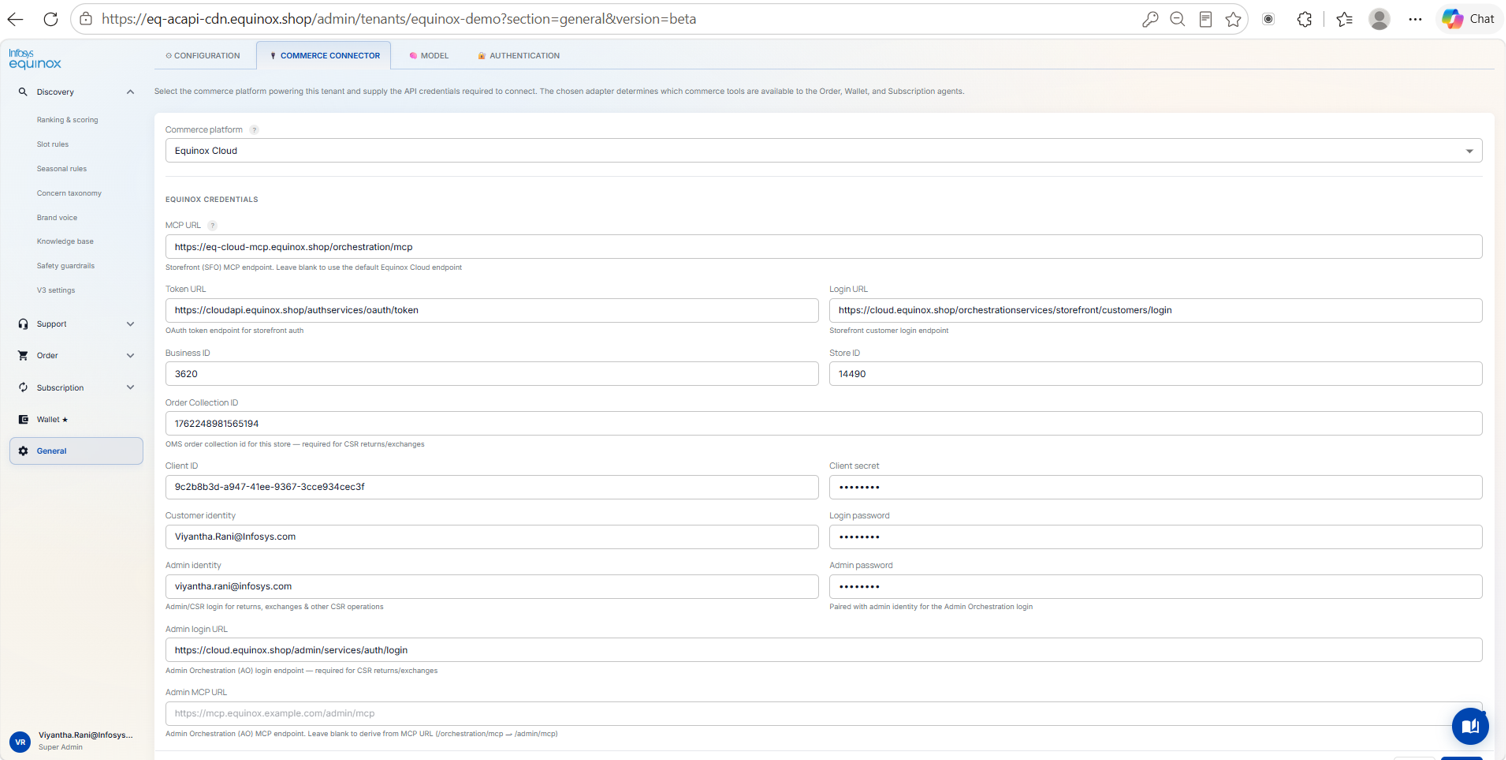
On the Tenant Edit page, connect the commerce platform. Credentials required differ by platform:
| Platform | Credentials required |
|---|---|
| Equinox Cloud | Instance URL, client ID, client secret |
| Shopify | No manual entry — install the ACI app from the Shopify Partner Dashboard; it handles authentication and registers the tenant automatically |
| Salesforce Commerce Cloud | Instance URL, Connected App client ID, client secret, organisation ID |
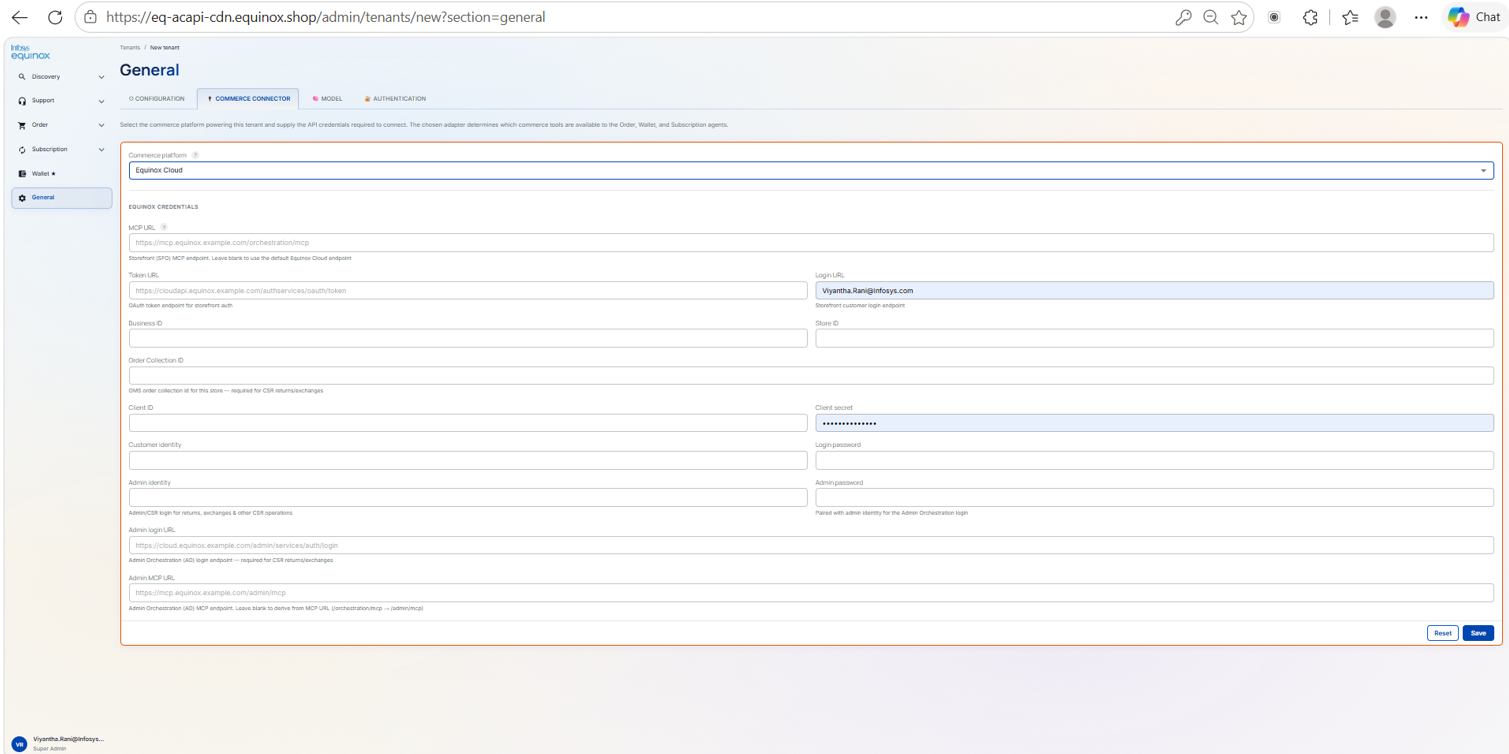
Once credentials are saved, the platform connection is active. Verify connectivity from the Live Playground (Step 8).
Note (Shopify): After app installation, activate the ACI Chat App Embed Block in the Shopify Theme Editor. The app writes the tenant ID and gateway URL to the shop as metafields automatically.
Step 3 — Load Your Product Catalog
The product catalog powers AI search and recommendations.
- Go to Discovery Studio → Data Ingestion → Catalog Import.
- Click Upload Catalog.
- Select the product file.
- Click Import.
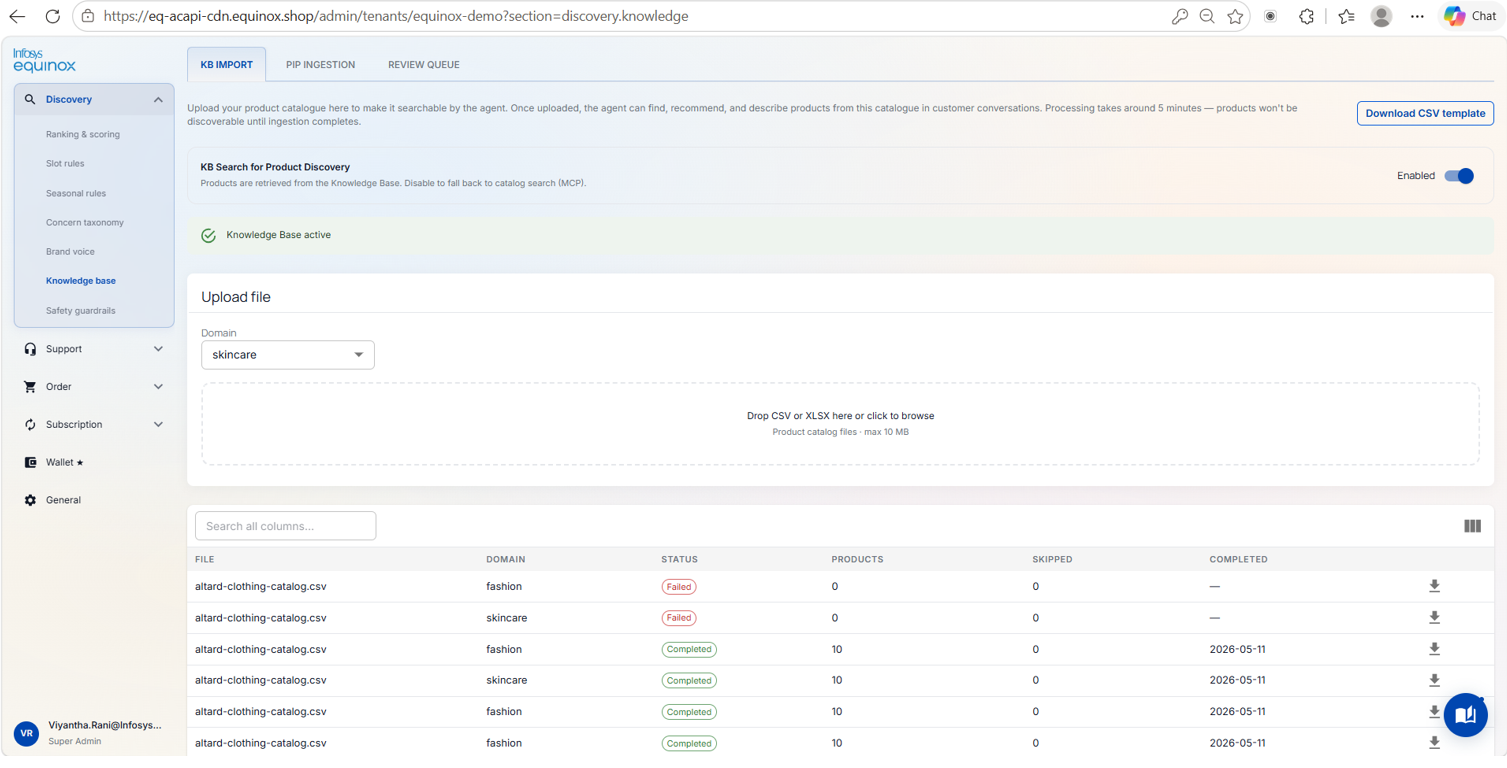
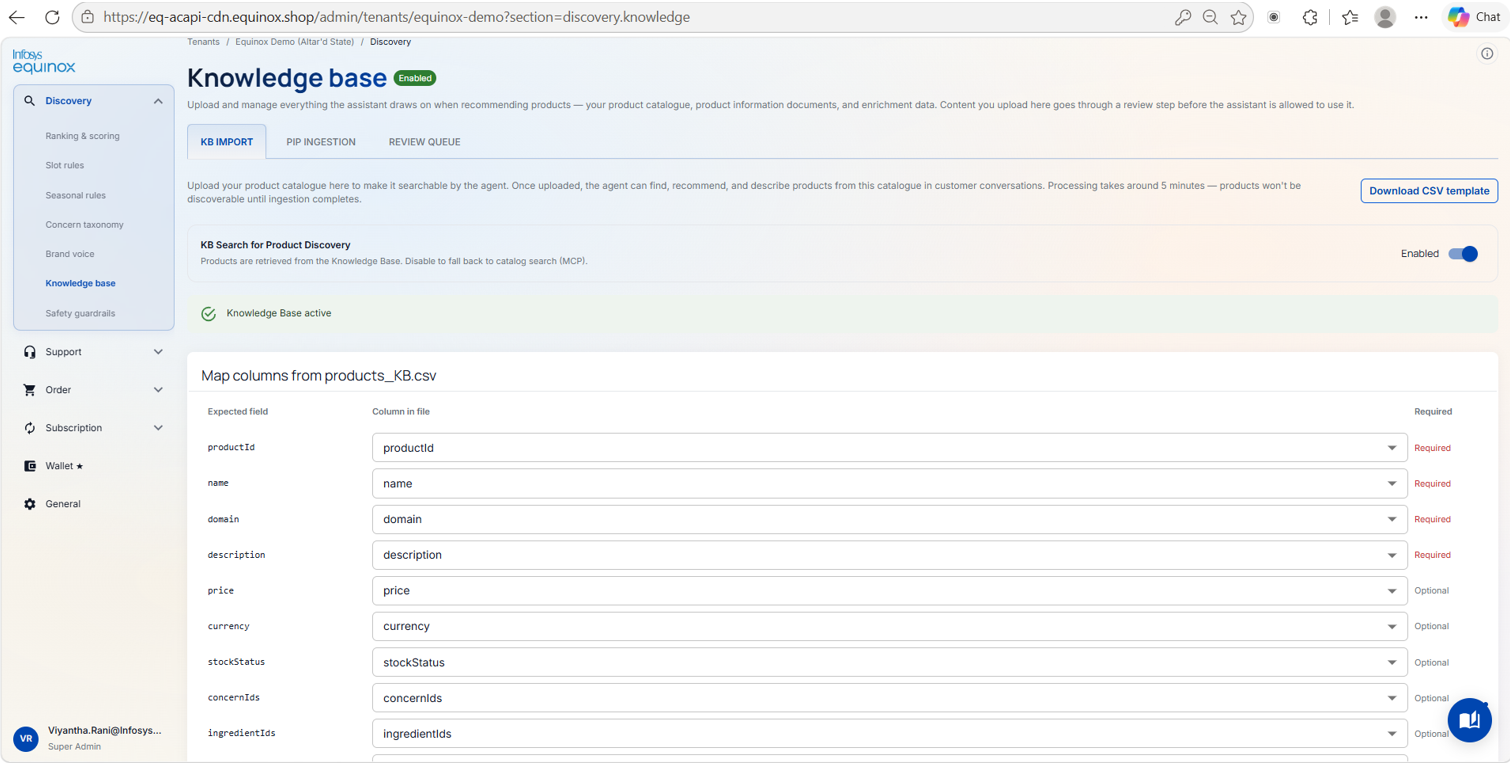
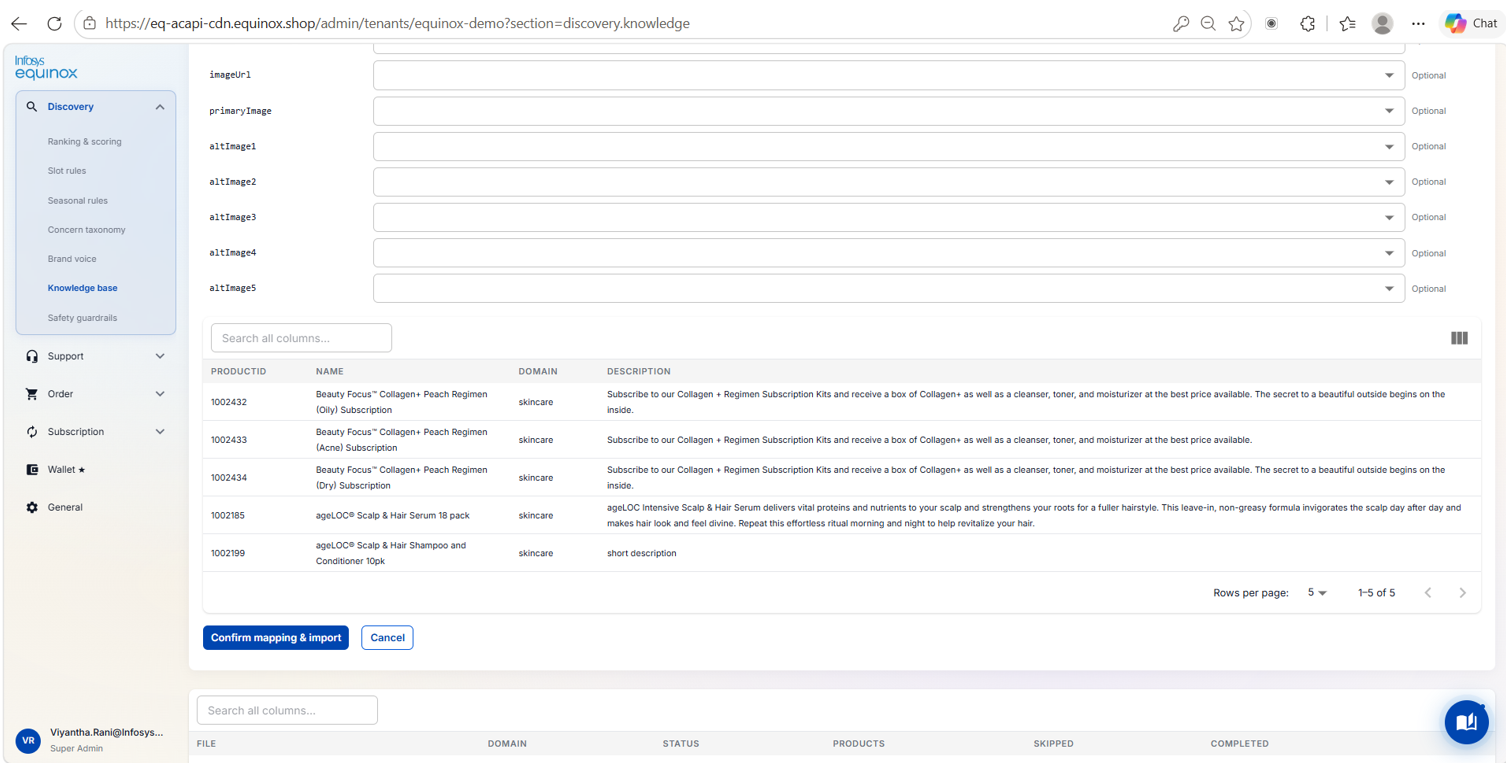
Minimum required fields per product
| Field | Notes |
|---|---|
| Product ID | Unique identifier |
| Name | Display name |
| Description | The richer the description, the more accurately the AI can match shopper queries |
| Category | Used for browse and filtering |
| Price | Used in recommendations and cart |
| Image URL | Displayed in the widget product cards |
Recommended additional fields: skin type suitability, key ingredients, size, occasion use.
Note: Day-to-day price and stock changes sync automatically from the commerce platform via events — re-upload is only needed for new products, discontinued products, or significant description changes.
Step 4 — Add Product Intelligence (PIPs)
Product Intelligence Packs (PIPs) are the ingredient and formulation knowledge behind products, enabling the AI to recommend by skin concern rather than keyword match alone.
What qualifies as a PIP
| Document type | Examples |
|---|---|
| Product data sheets | Individual product specification documents |
| Ingredient lists | Full INCI lists or simplified ingredient summaries |
| Brand formulation guides | Internal guides describing key actives and skin benefits |
| Clinical study summaries | Evidence documents supporting efficacy claims |
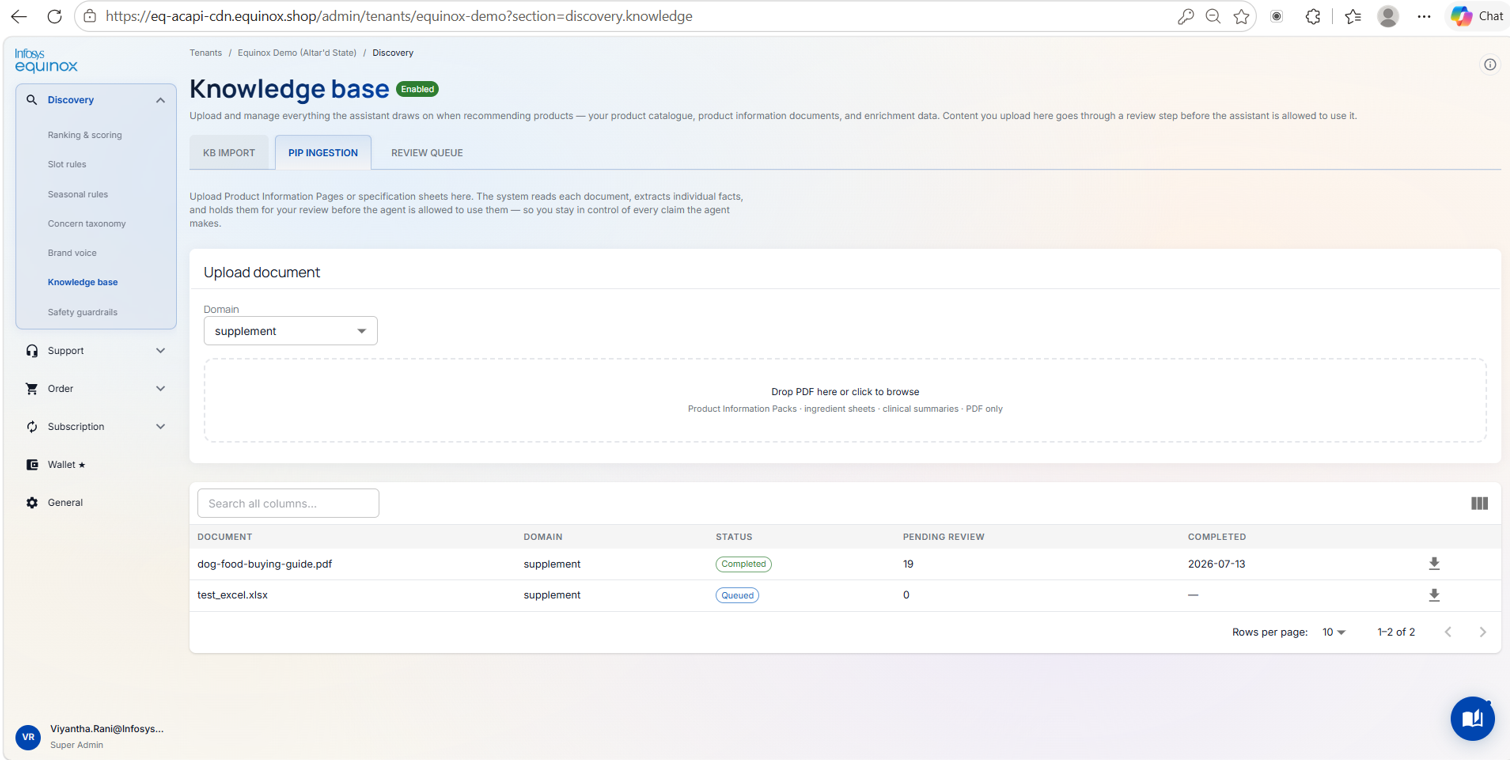
To upload a PIP
- Go to Discovery Studio → Data Ingestion → PIPs.
- Click Upload Document.
- Select the file.
- Click Upload.
To review extracted data
- Go to Discovery Studio → Concerns & Ingredients.
- Review the extracted entries.
- Click Approve for entries you’re confident in, or Reject for inaccurate ones.
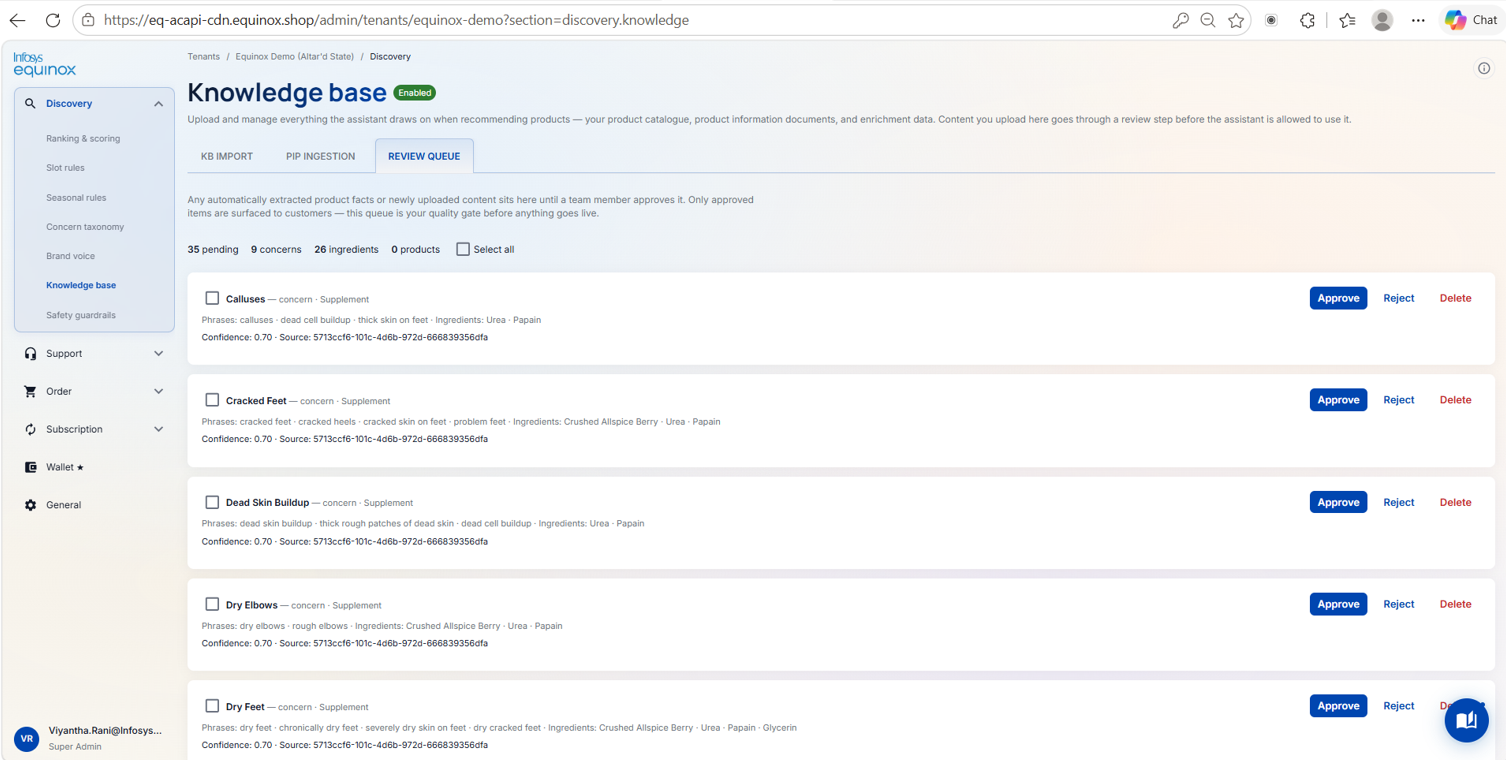
Important: Only approved entries influence recommendations. Rejected entries are excluded from the AI’s knowledge.
Step 5 — Set Up Support Content
Support content gives the AI the knowledge to handle post-purchase questions — return policies, warranty terms, order processes, and FAQs.
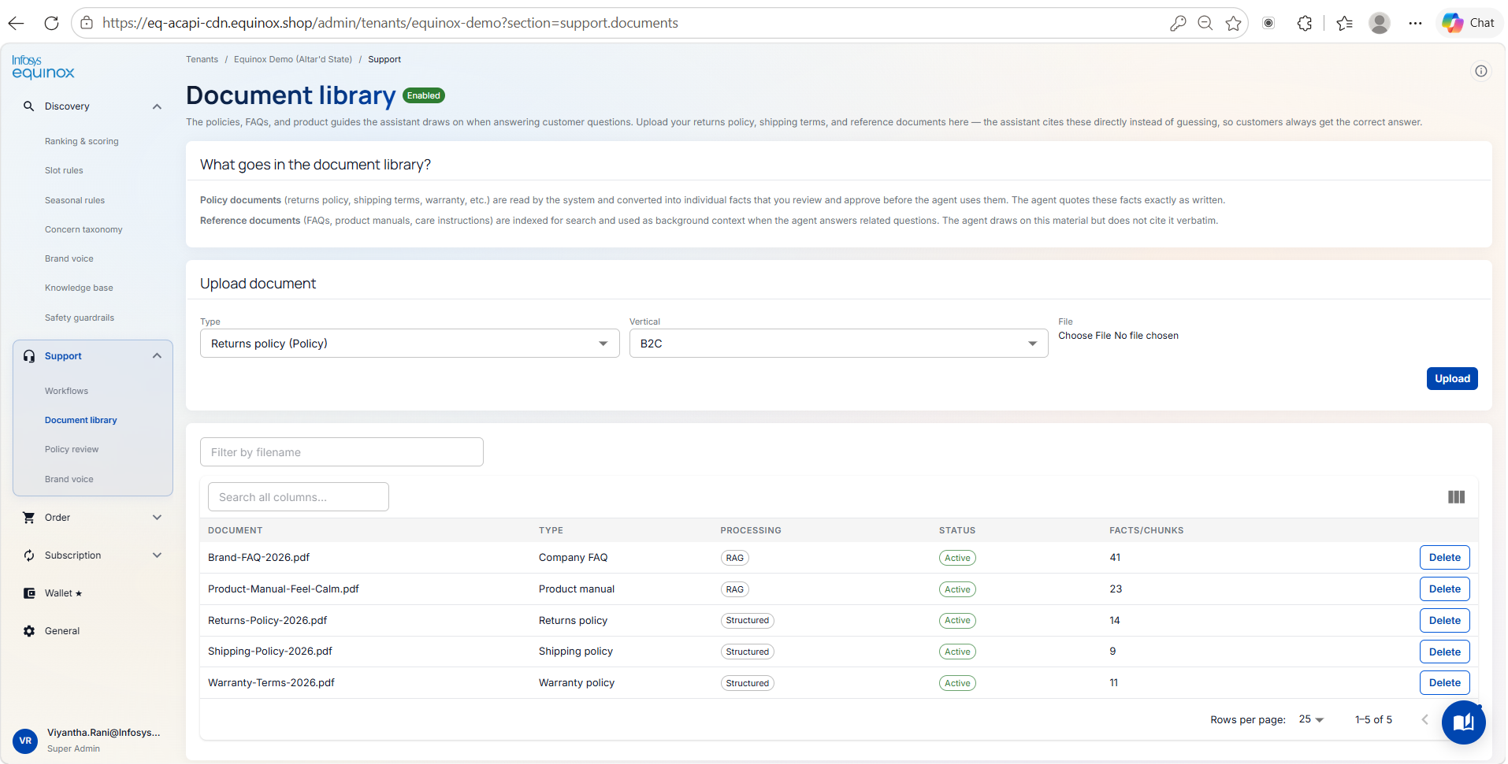
To upload a support document
- Go to Support Studio → Documents.
- Click Upload Document.
- Select the file.
- Choose the relevant customer audience.
- Click Upload.
| Audience option | Use for |
|---|---|
| B2C | Direct-to-consumer content |
| B2B | Business buyer / trade content |
| CPG | Consumer packaged goods–specific content |
| All | Content applicable to all audiences |
How ACI processes support documents
| Document type | How ACI handles it |
|---|---|
| Policy & FAQ documents | Extracts specific facts (e.g. “Returns accepted within 30 days”). Review in Support Studio → Policy Review before they go live. |
| Long reference documents | Stored as searchable content, retrieved at query time |
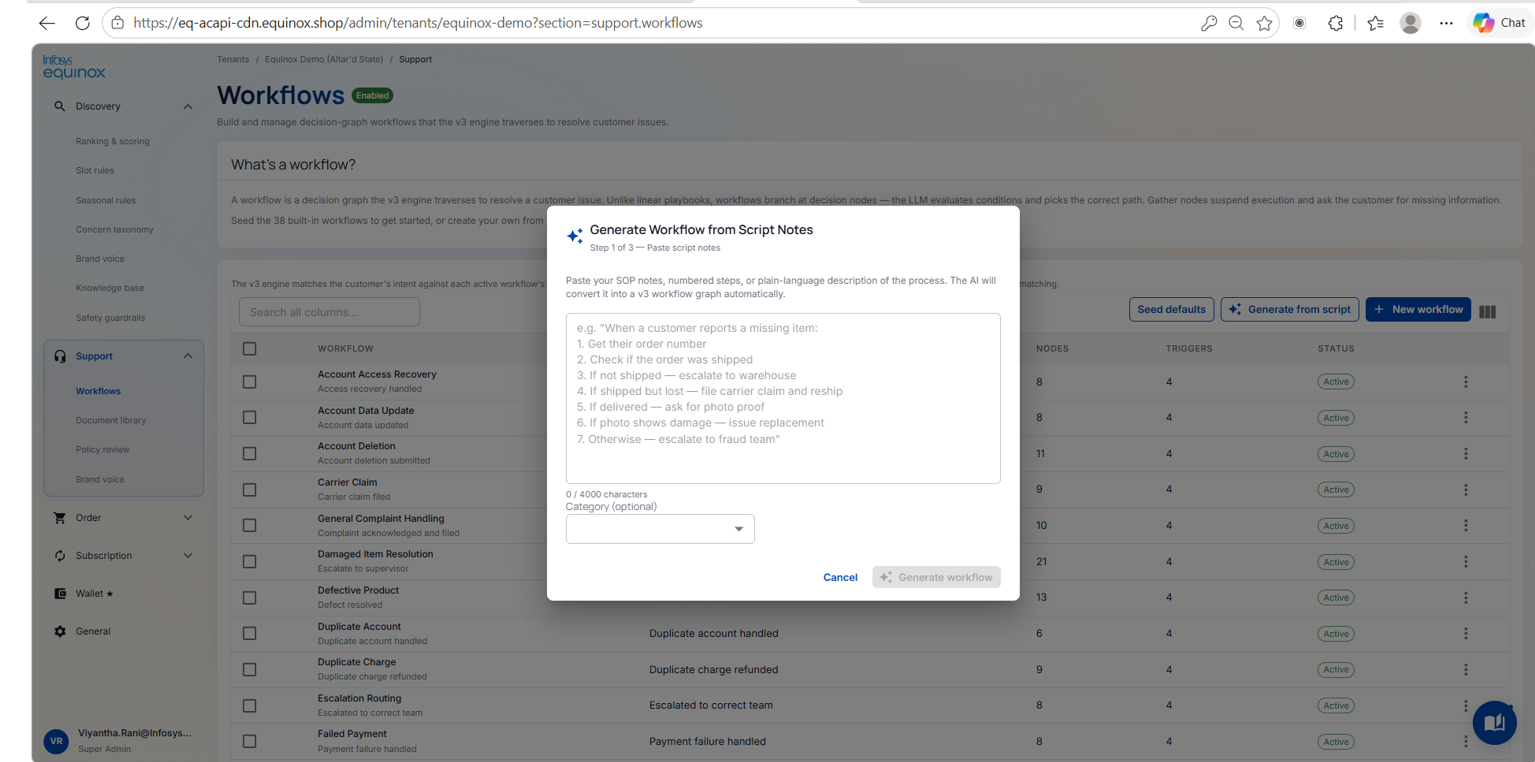
To generate a support workflow
- Go to Support Studio → Support Workflows.
- Click Generate Workflow.
- Describe the scenario in plain language (e.g. “damaged item received”).
- Review and activate the AI-drafted workflow.
Step 6 — Configure Agent Behaviour
Configure agent-specific settings in the Agent Studios section of the Admin Console.
Discovery — Ranking Strategy
Go to Discovery Studio → Strategy to set the weight of each ranking signal.
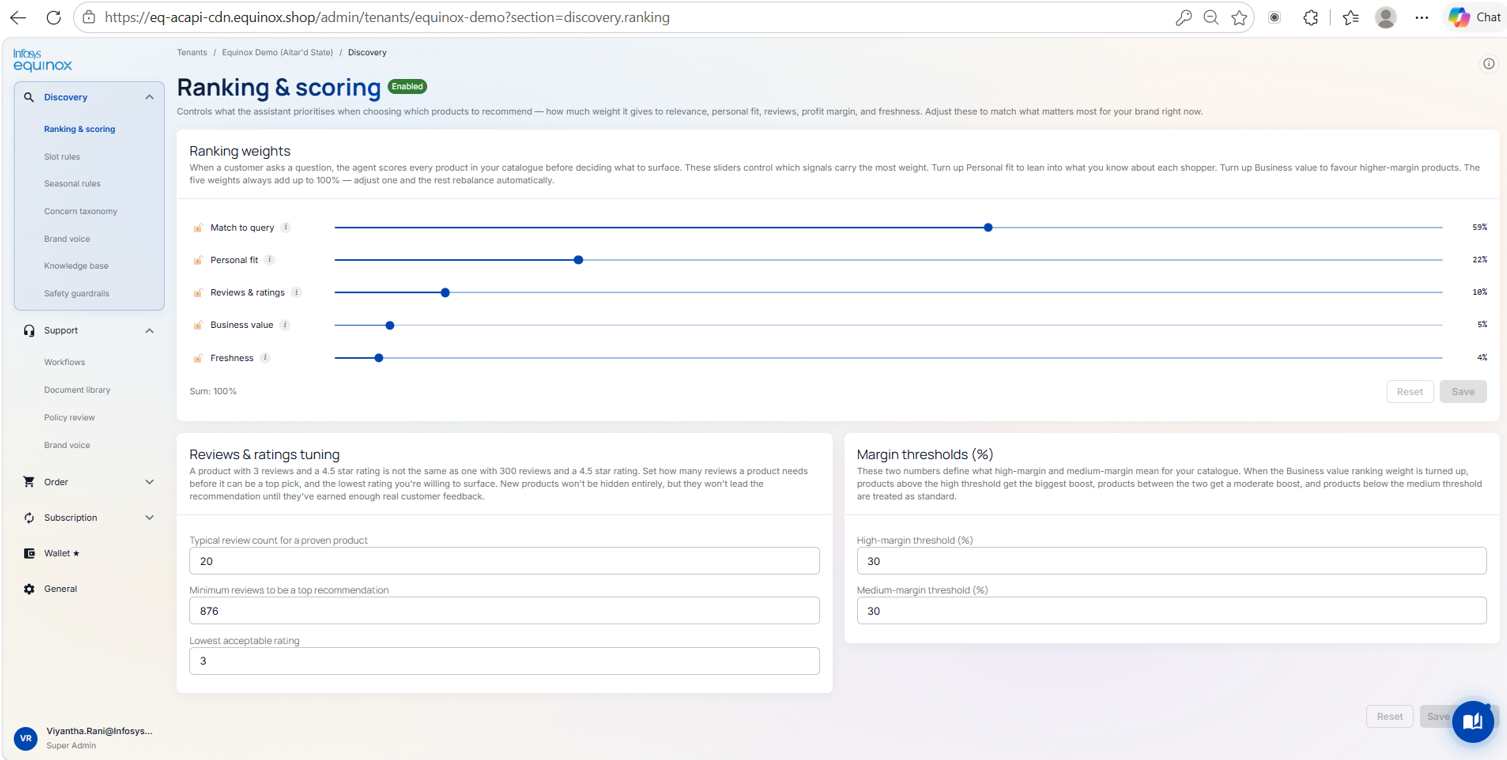
| Ranking signal | What it controls |
|---|---|
| Relevance | How closely a product matches the shopper’s query |
| Margin | Weighting toward higher-margin products |
| Social proof | Weighting toward products with strong reviews or popularity |
| Newness | Preference for recently added or relaunched products |
| Consumer affinity | Match to the shopper’s known preferences and purchase history |
Changes take effect immediately — test in the Live Playground (Step 8) after adjusting.
Discovery — Store Context (Brand Voice)
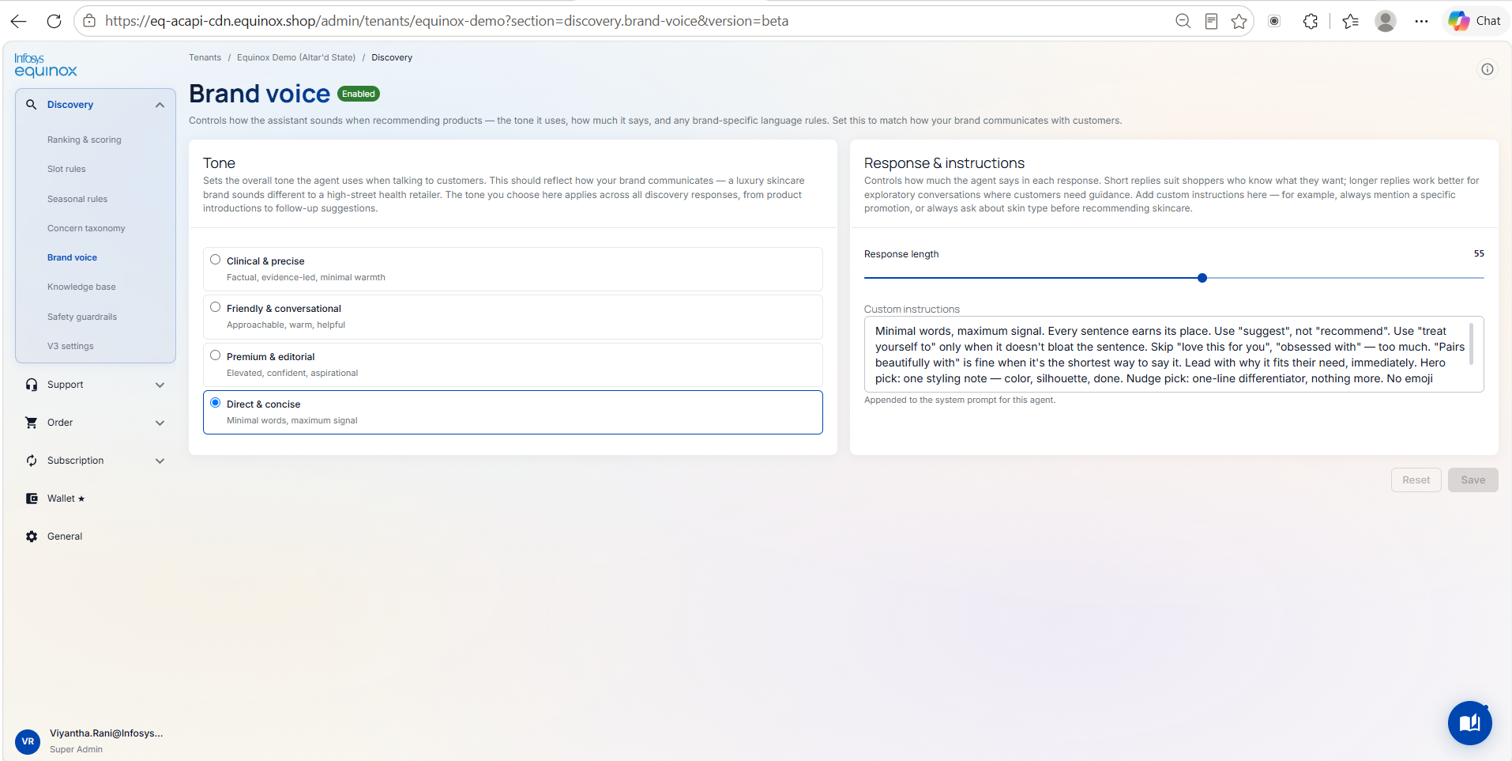
Go to Discovery Studio → V3 Settings to write the Store Context — a short description of the store, its values, and its tone, injected into every product search response.
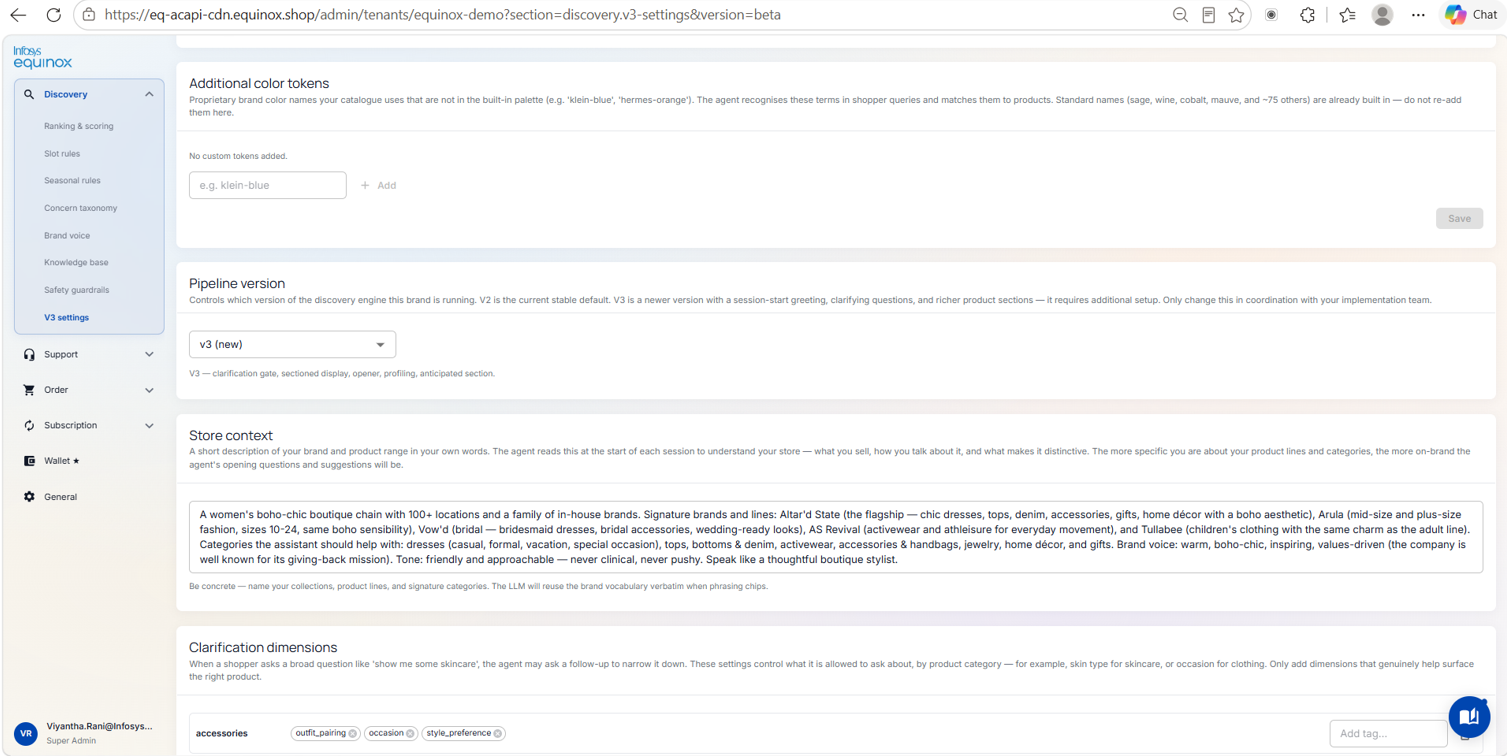
Example: “We are a premium British skincare brand focused on clean, clinically-proven formulations. Our tone is warm, expert, and reassuring. We never use aggressive sales language.”
Subscriptions — Cancellation Retention Flow
Go to Subscription Studio to configure the cancellation flow.
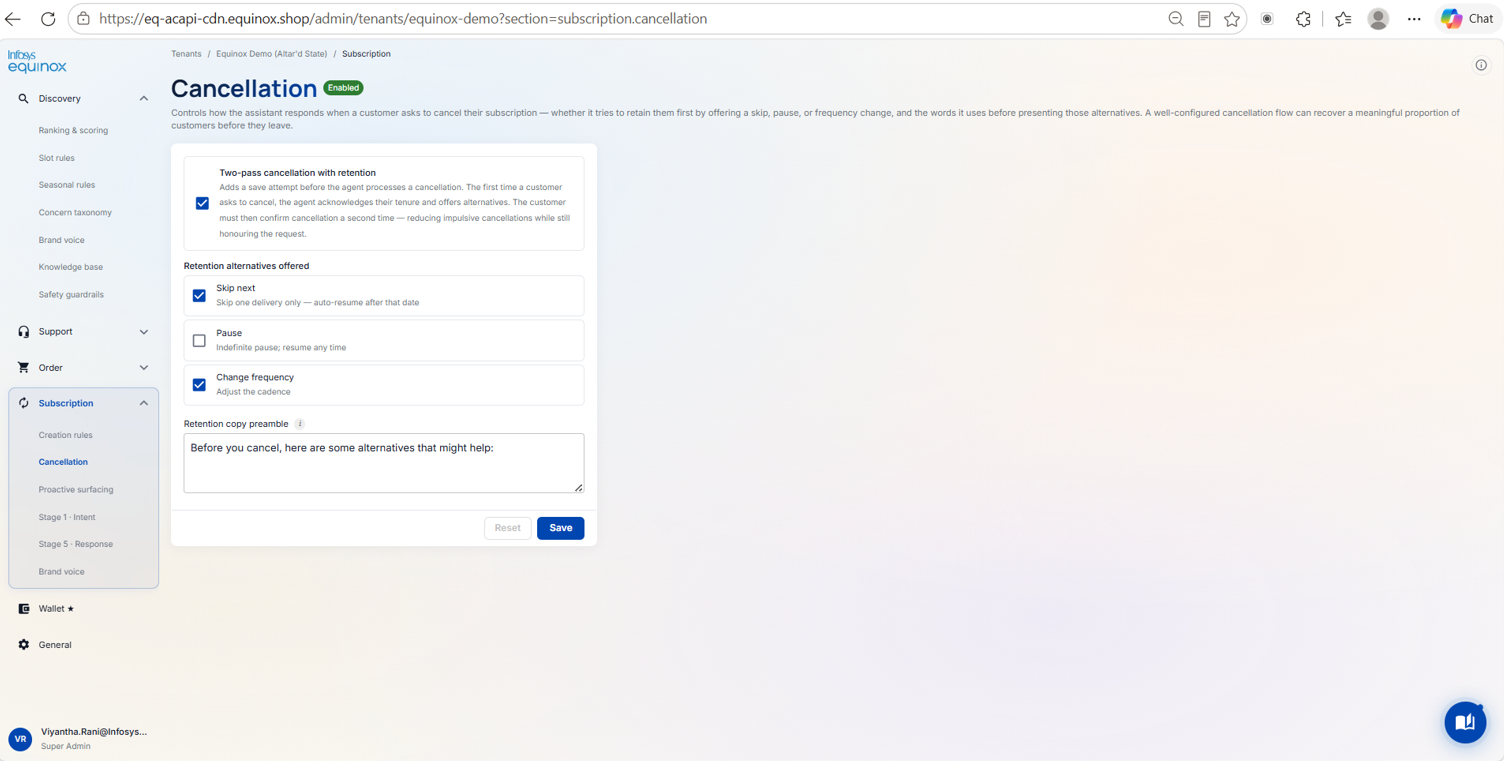
| Setting | Default | Description |
|---|---|---|
| Retention steps | Two-step | The AI offers alternatives (skip, pause, change frequency) before confirming cancellation |
| Reason capture | Enabled | The agent asks for a cancellation reason and tailors the retention offer accordingly |
Support — Brand Voice
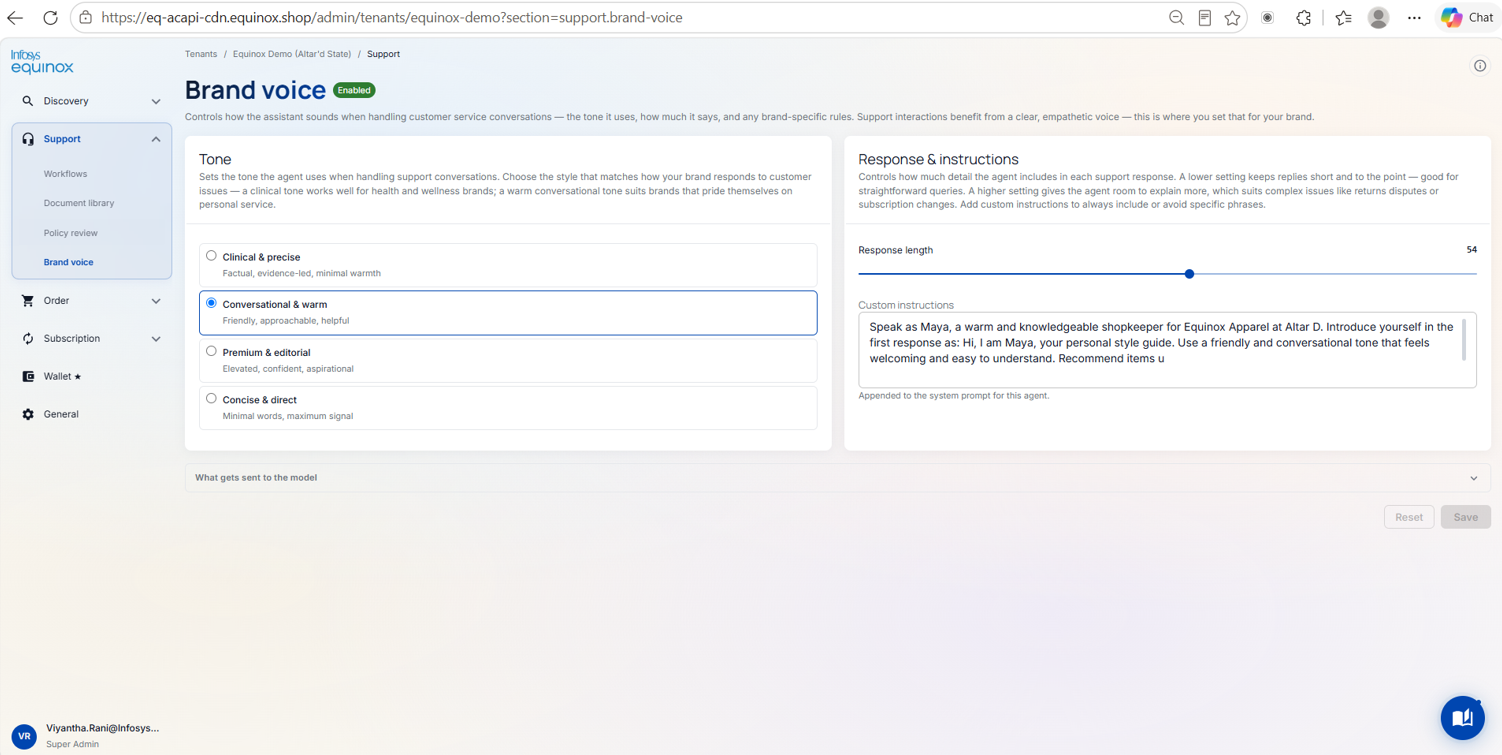
Go to Support Studio → Brand Voice to set the Support Agent’s tone.
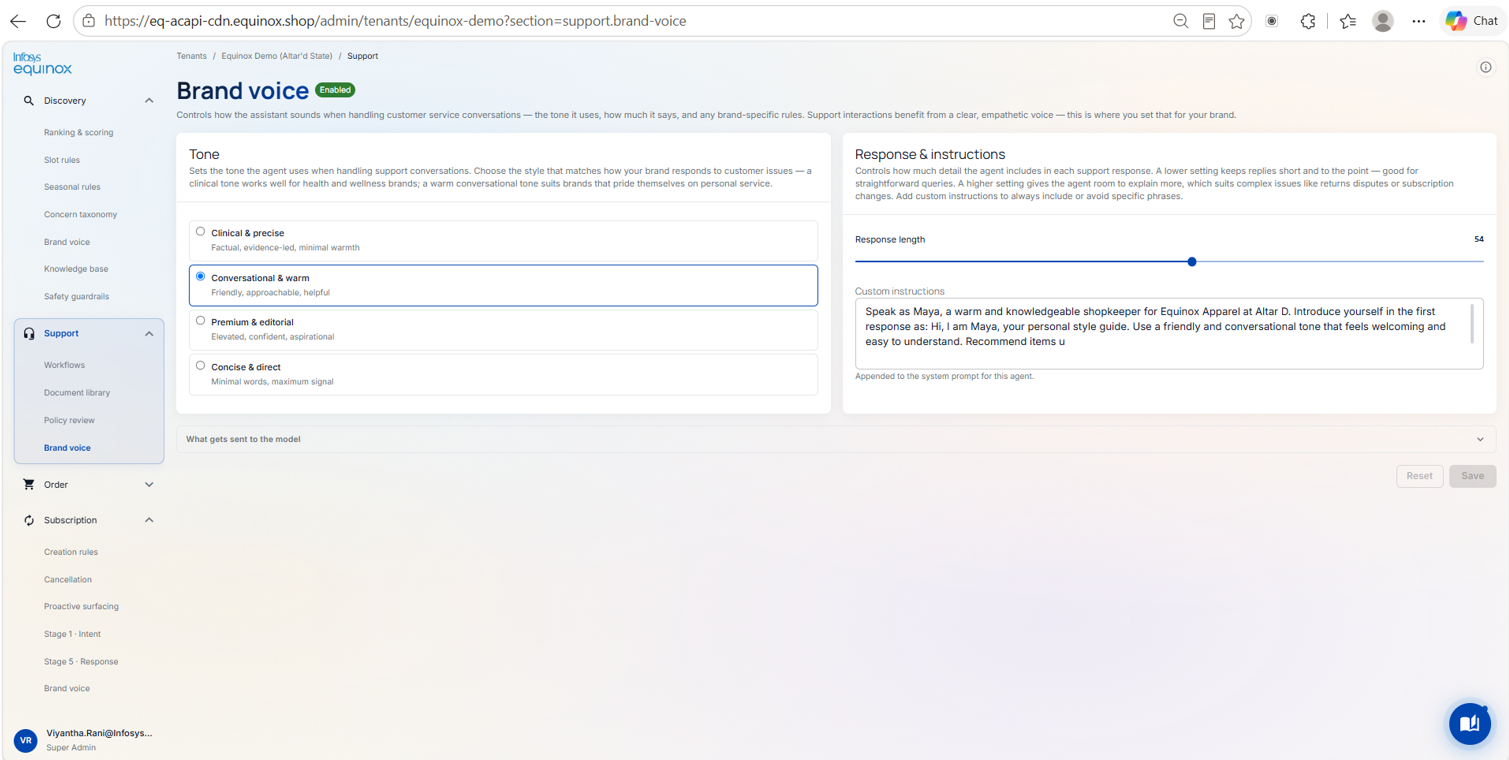
| Tone option | Best for |
|---|---|
| Formal | Enterprise / B2B brands |
| Conversational | Direct-to-consumer brands |
| Empathetic | Health, wellness, or sensitive product categories |
Step 7 — Invite Your Team
- Go to Tenant Management → Users and click Invite User.
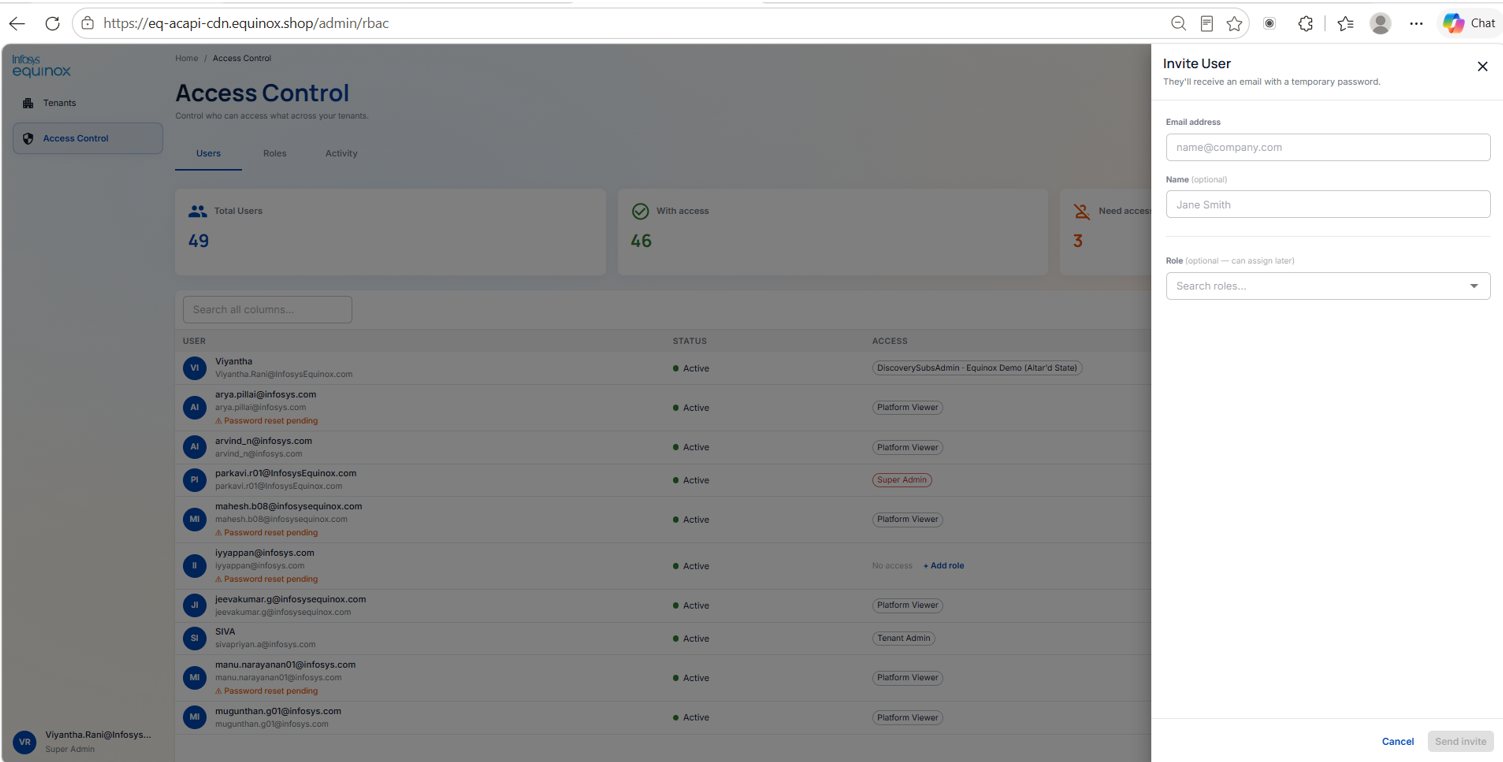
- Enter the person’s email address, assign a role, and click Send Invite. The invited user receives an email to set their password and access the console.
| Role | Permissions | Best for |
|---|---|---|
| Tenant Operator | Can configure and publish; cannot delete or access shopper data | Day-to-day operations team |
| Discovery Manager | Full control of catalog, ranking, and campaigns | Merchandising team |
| Support Manager | Full control of playbooks and workflows | Customer support team |
| Tenant Read-Only | View access only; no edit permissions | Stakeholders and leadership |
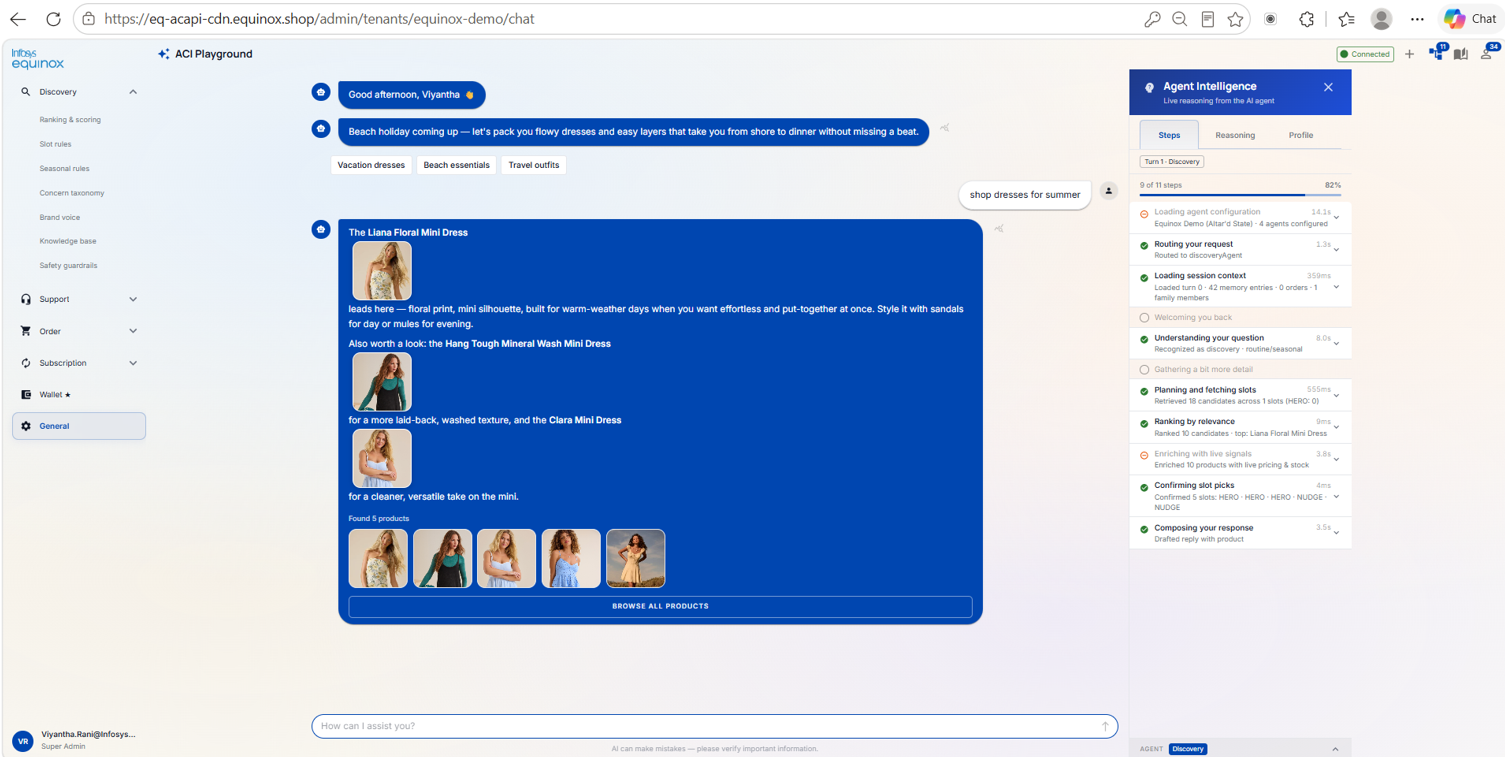
Step 8 — Test in the Live Playground
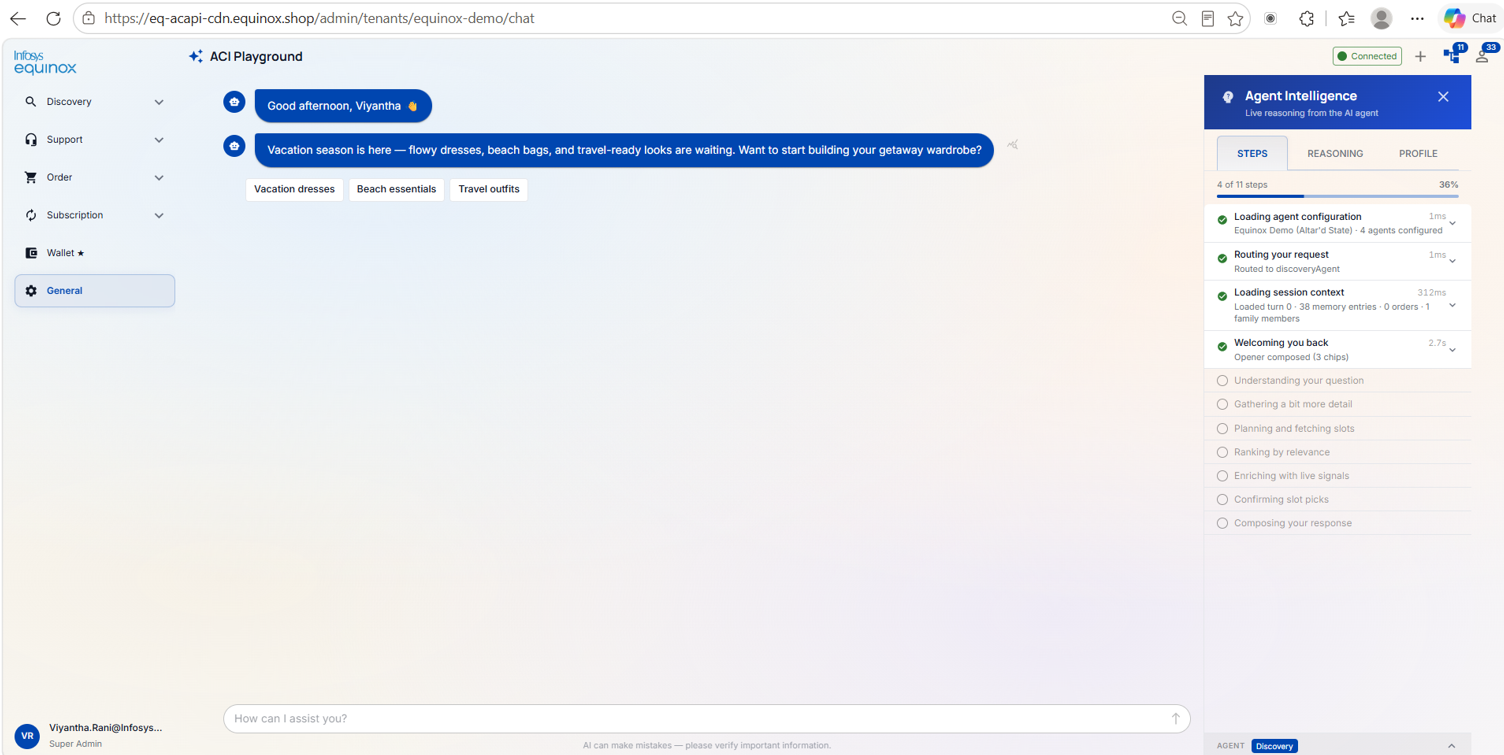
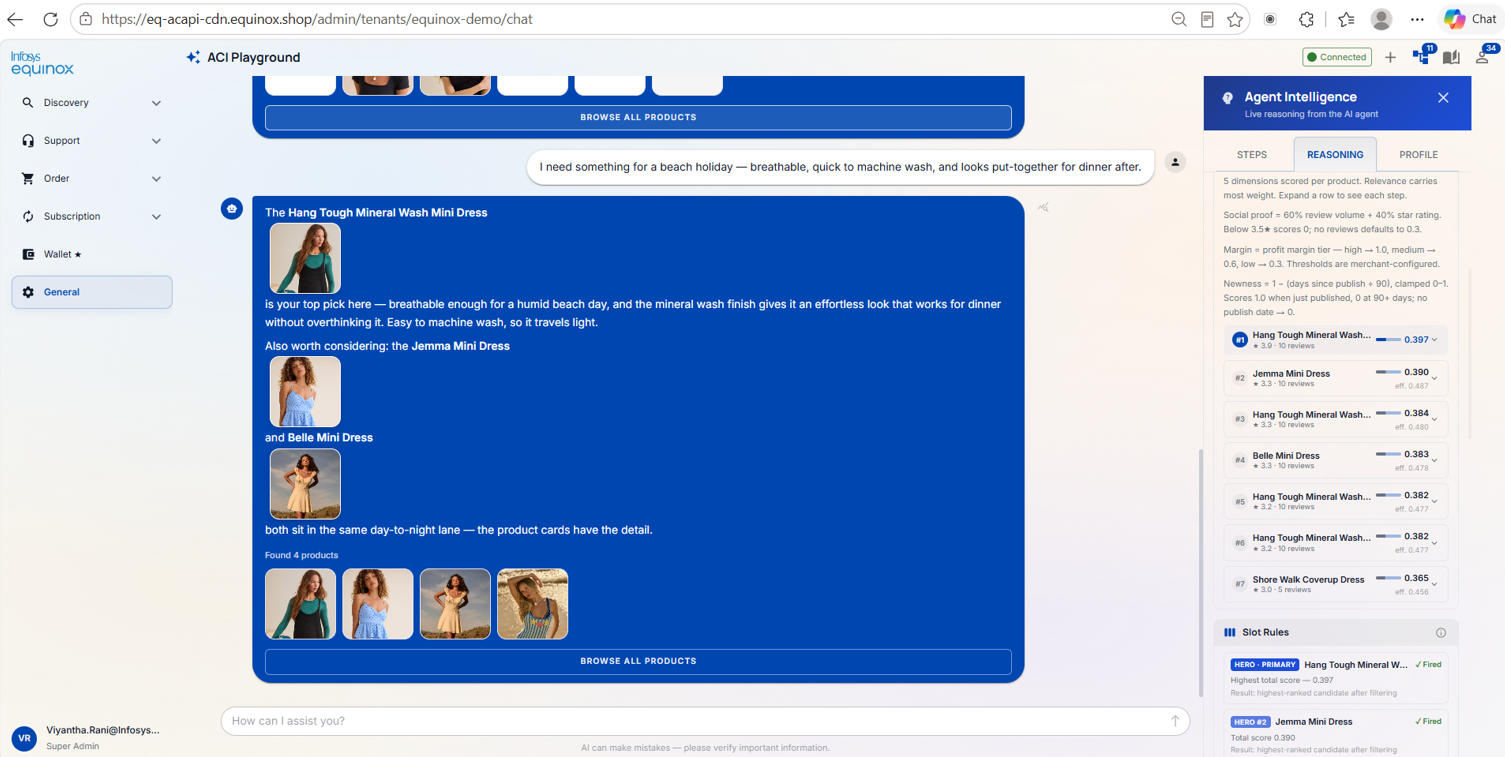
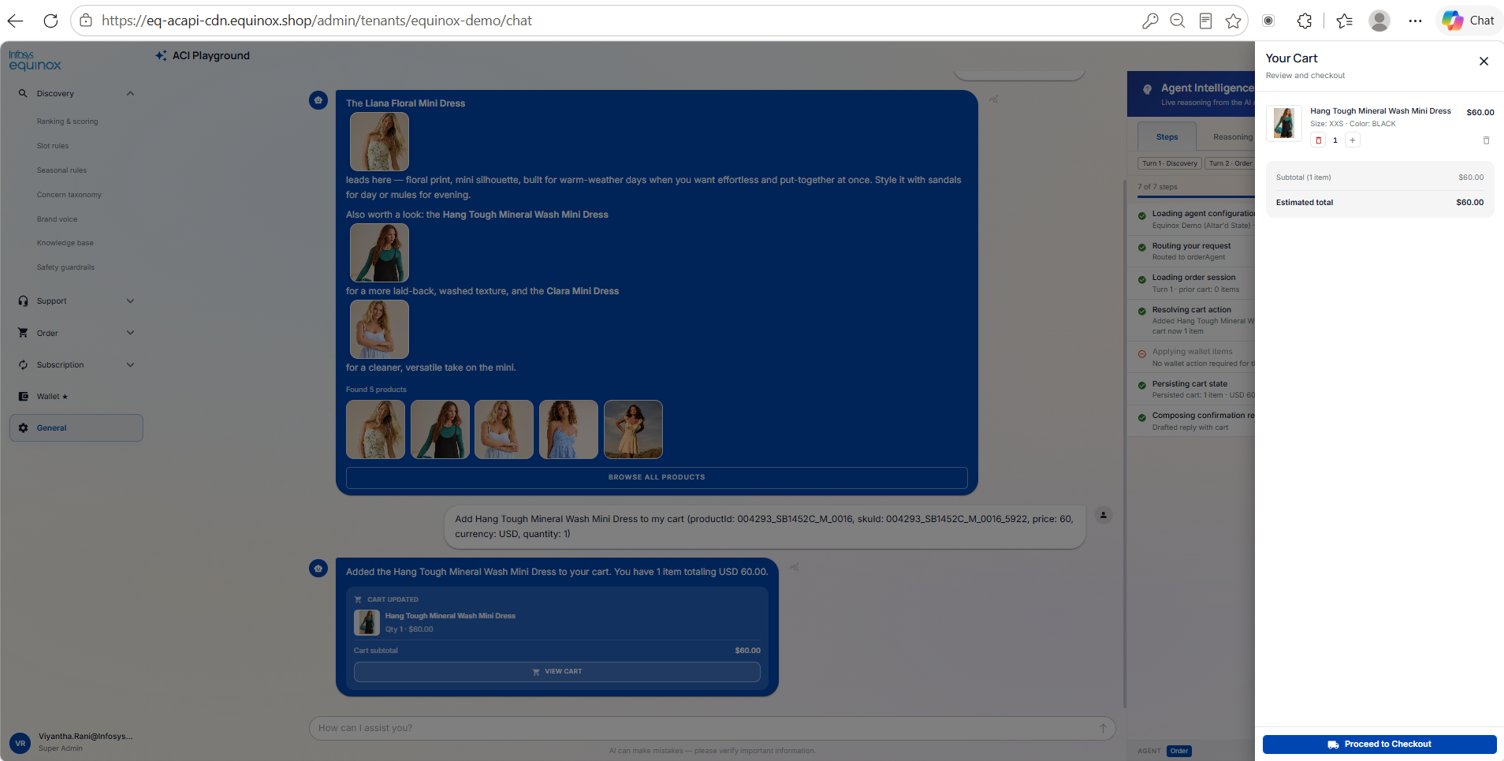
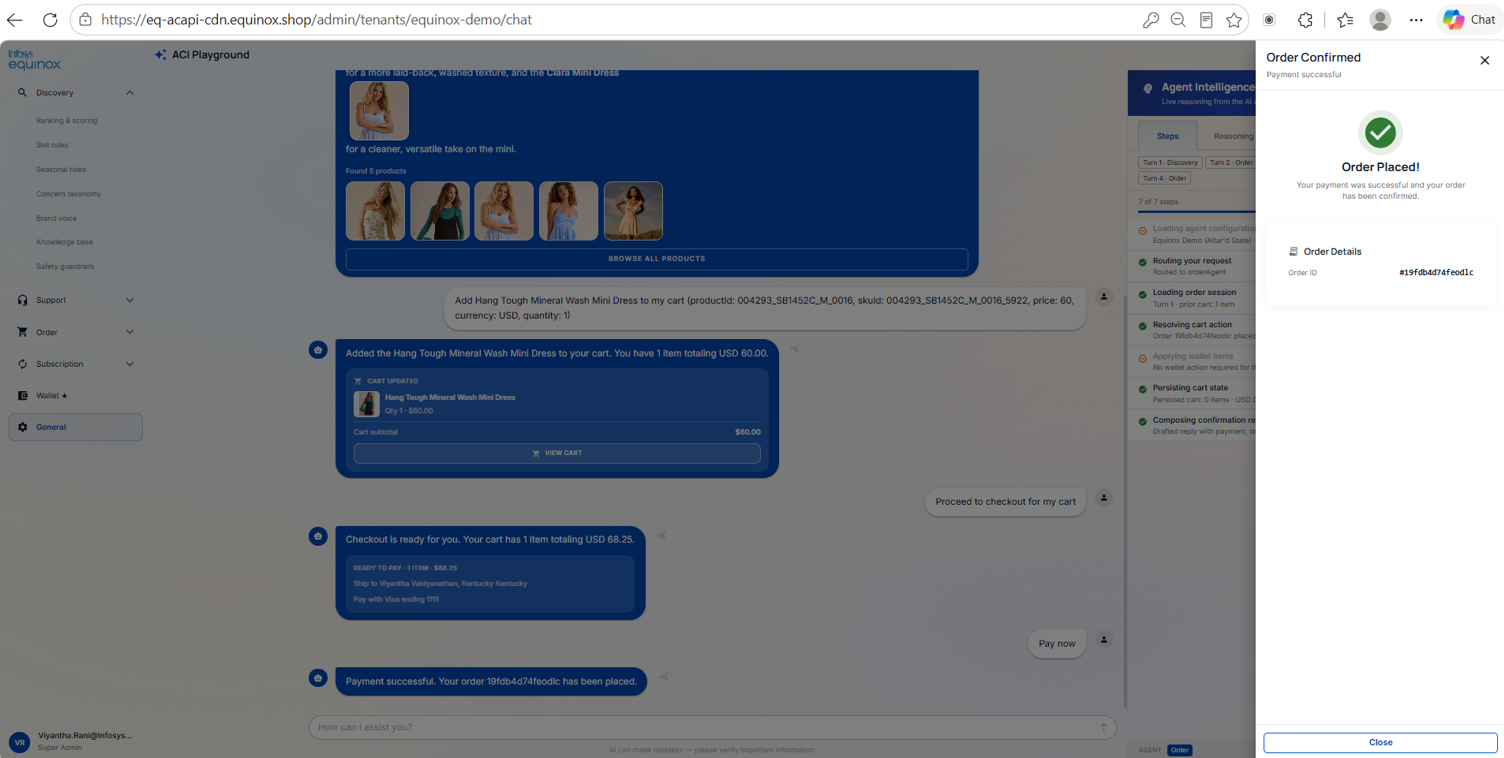
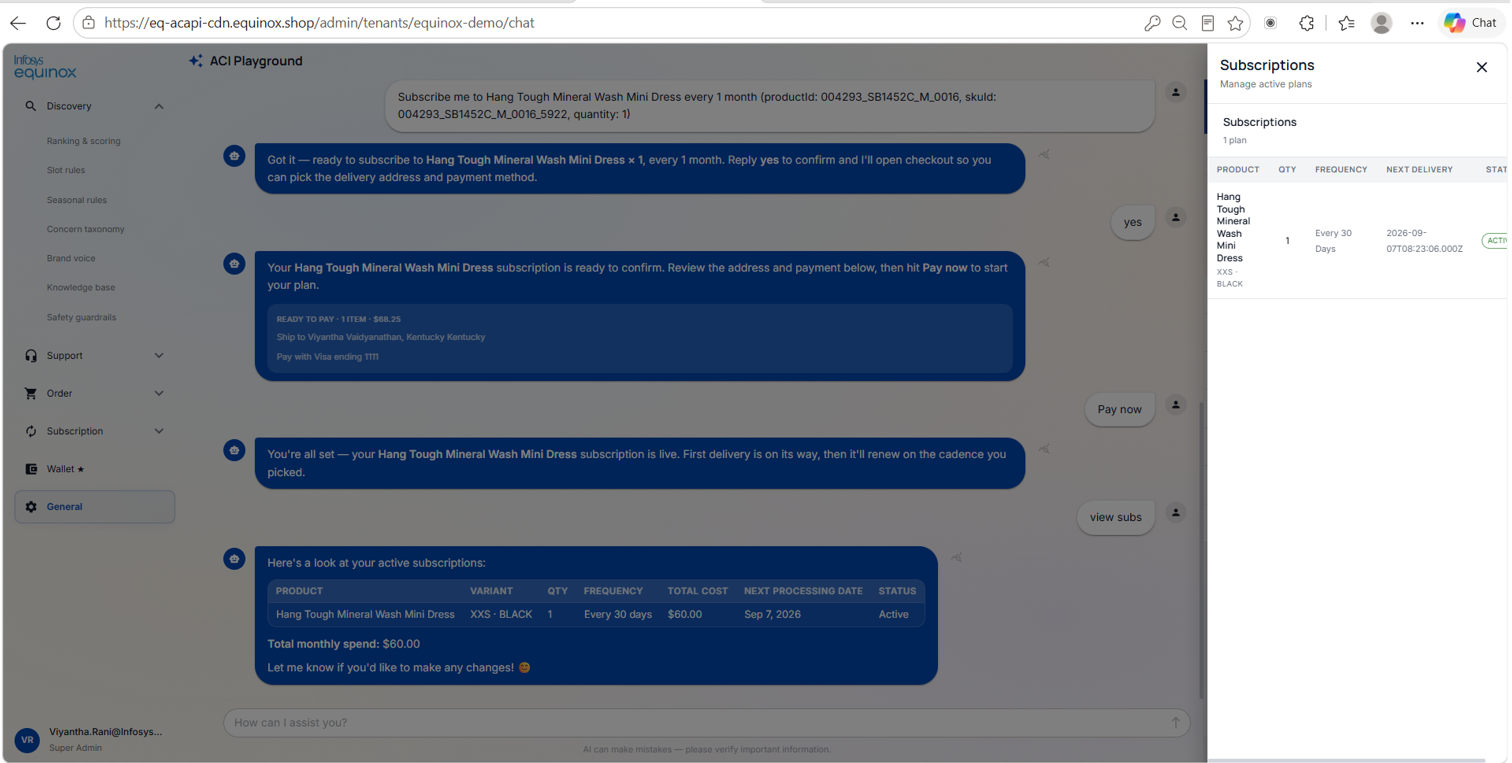
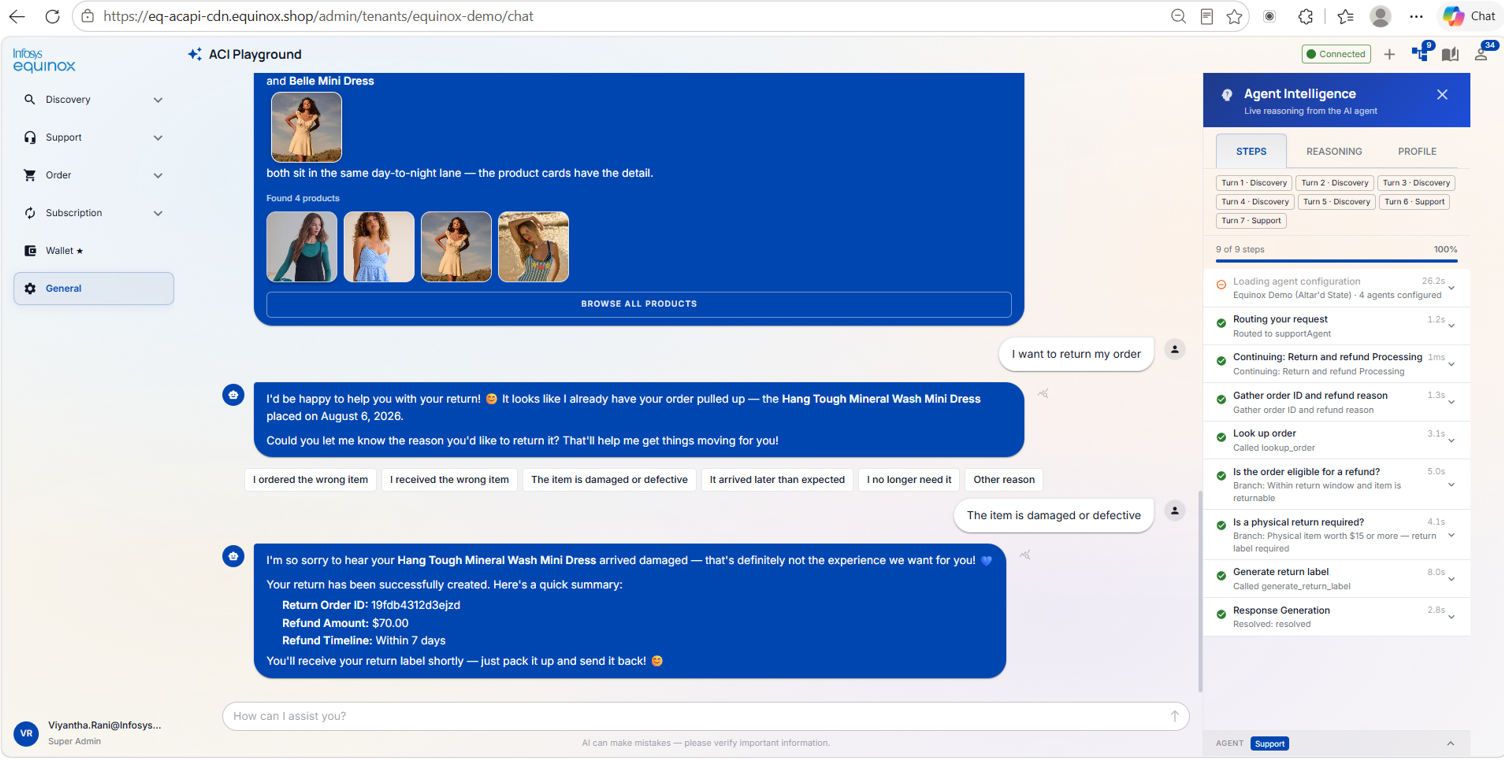
Go to ACI Chat in the Admin Console to test the full tenant experience before going live.
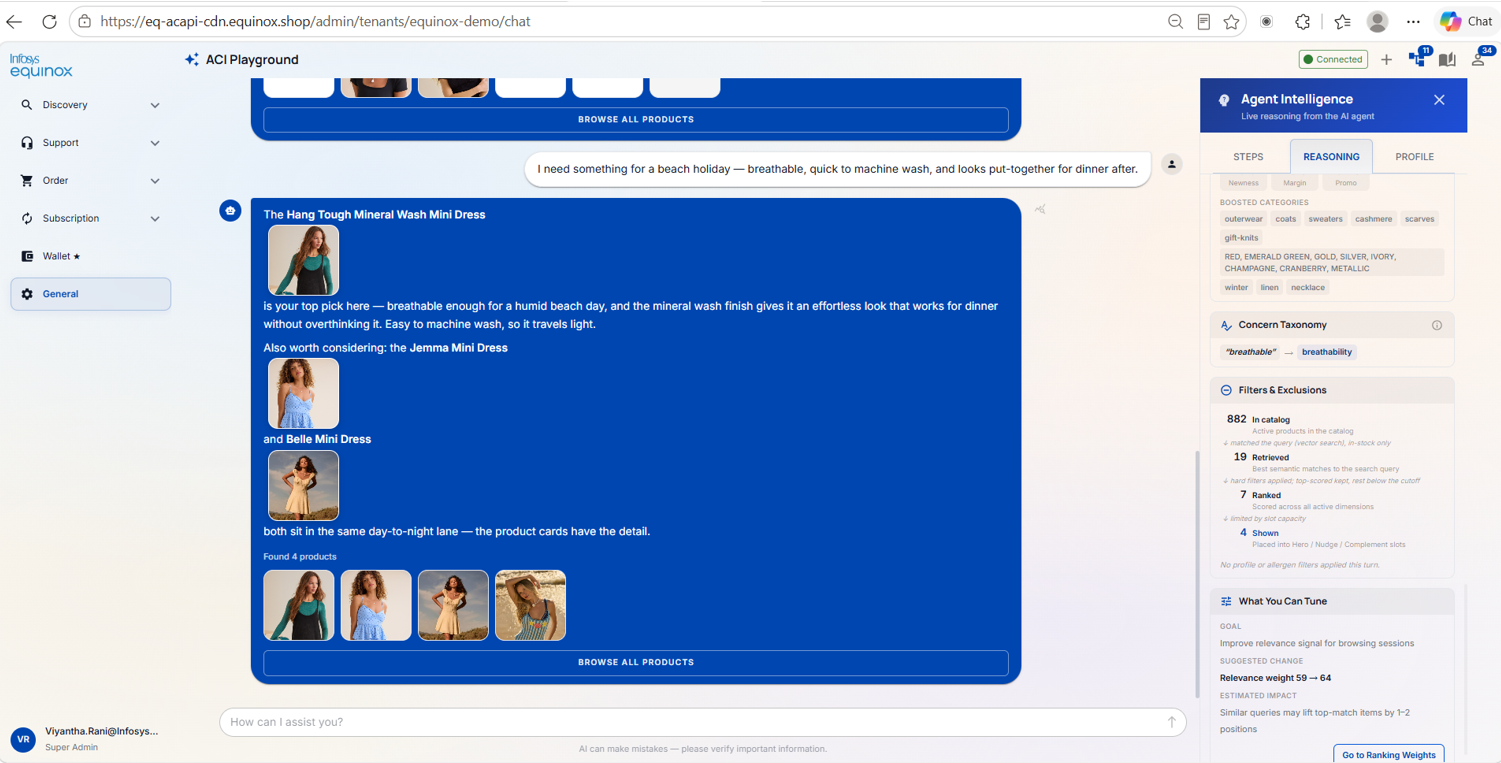
| Check | What to do | What to look for |
|---|---|---|
| Product search | Type a query relevant to the catalog | AI returns relevant, correctly ranked products |
| Concern matching | Test queries using concern phrases approved in Step 4 | Products matched to the concern appear in the response |
| Support | Raise a test support request | Agent responds accurately using uploaded policy content |
| Brand voice | Read the responses | Language matches the configured Store Context and tone |
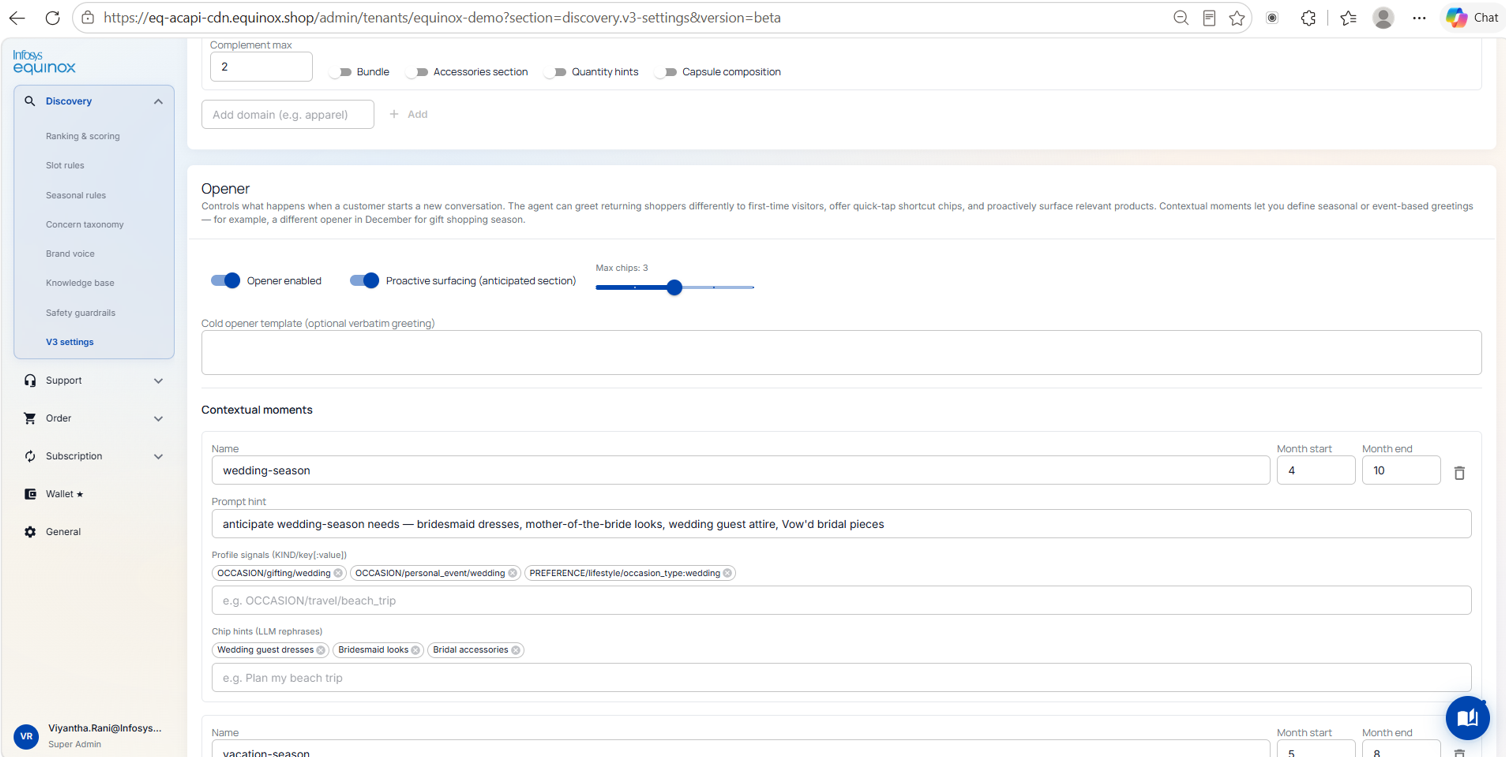
| Opener | Open a fresh chat session | Greeting and quick-reply chips display correctly |
Tip: If something looks wrong, adjust the relevant settings and re-test immediately — changes take effect without delay.
Keeping Data Current — Event-Driven Updates
Once the tenant is live, ACI keeps its data in sync with the commerce platform automatically.
Updates automatically
| Change | How it reaches ACI |
|---|---|
| Price change (markdown, promotion, price increase) | Fetched live from the commerce platform on every shopper interaction |
| Stock availability | Fetched live on every recommendation turn |
| Order status changes | Read live from the platform — shoppers always see the current state |
| Subscription changes | Reflected immediately, whether made in chat or on the platform directly |
Requires manual re-upload
| Change | Action required |
|---|---|
| New products added | Upload updated catalog in Discovery Studio → Catalog Import |
| Product descriptions updated | Re-upload catalog |
| New formulations or ingredients | Upload updated PIPs and review in Discovery Studio → Concerns & Ingredients |
| Updated return policy or FAQs | Upload updated document and review in Support Studio → Policy Review |
Integration Playbooks — Shopify & Salesforce
Shopify
ACI integrates with Shopify through the ACI Shopify App, available from the Shopify Partner Dashboard.
Setup steps
| Step | Action |
|---|---|
| 1 | Merchant installs the ACI app from the Shopify Partner Dashboard |
| 2 | App handles authentication and registers the tenant automatically — no manual credential entry required |
| 3 | App writes the tenant ID and gateway URL to the shop as metafields |
| 4 | Merchant activates the ACI Chat App Embed Block in the Shopify Theme Editor |
| 5 | Widget appears on the storefront; ACI picks up product/collection page context automatically |
Merchants can configure greeting text, widget position, and accent colour directly in the Theme Editor — no code changes needed.
Note: The ACI Shopify App handles all Shopify GDPR compliance webhooks automatically — customer data requests, customer redact, and shop redact.
Capability notes: Shopify supports product search, cart management, orders, and subscriptions. Native in-widget checkout is not available — shoppers complete checkout on Shopify’s standard checkout page.
Salesforce Commerce Cloud
ACI connects to Salesforce Commerce Cloud through a Salesforce Connected App. Enter credentials on the Tenant Edit page during setup:
| Field | Description |
|---|---|
| Instance URL | Salesforce Commerce Cloud instance URL |
| Client ID | Connected App client ID |
| Client Secret | Connected App client secret |
| Organisation ID | Salesforce organisation ID |
Capability notes: Salesforce supports product search, cart management, and order management. Subscription management is limited compared to Equinox — Equinox Cloud is recommended for the full ACI feature set.
Platform Capability Comparison
| Capability | Equinox | Shopify | Salesforce |
|---|---|---|---|
| Product search | Yes | Yes | Yes |
| Cart management | Yes | Yes | Yes |
| Order management | Yes | Yes | Yes |
| Native in-widget checkout | Yes | No | No |
| Subscriptions | Full | Yes | Limited |
Chat Widget Activation
The chat widget is the shopper-facing entry point to ACI. Activation steps vary slightly by platform:
| Platform | How the widget goes live |
|---|---|
| Equinox Cloud | Enabled automatically once the tenant is connected (Step 2) and passes Live Playground testing (Step 8) |
| Shopify | Activate the ACI Chat App Embed Block in the Shopify Theme Editor (see Section 4.2 — Shopify) |
| Salesforce Commerce Cloud | Embed the widget snippet provided by the Infosys Equinox onboarding team into the storefront template |
Configurable, no-code options
| Setting | Where |
|---|---|
| Greeting text / opener behaviour | Discovery Studio → V3 Settings |
| Widget position & accent colour | Shopify Theme Editor (Shopify) or Tenant Edit → Widget Settings (Equinox, Salesforce) |
| Brand voice / tone | Support Studio → Brand Voice, Discovery Studio → V3 Settings |
Tip: Always confirm the widget in the Live Playground (Step 8 of Section 4.1) before pointing shoppers at the live storefront.
MCP Connectivity — Claude & ChatGPT
ACI exposes its commerce capabilities as an MCP (Model Context Protocol) server. Claude Desktop, Claude.ai, ChatGPT, or any MCP-compatible client can connect to ACI and drive commerce operations directly — searching products, managing carts, looking up orders, and handling support — without a separate integration layer.
What you can do once connected
| Task | Example prompt |
|---|---|
| Search the product catalog | “Find moisturisers for dry skin from my store” |
| Manage a cart | “Add the Hydra-Boost Serum to the cart for customer 12345” |
| Look up orders | “What is the current status of order ORD-9982?” |
| Handle support | “Raise a return request for order ORD-9982” |
| Manage subscriptions | “Pause the subscription for customer 12345 for 4 weeks” |
Connecting Claude Desktop to ACI
Add the following to the Claude Desktop MCP configuration file:
{
  "mcpServers": {
    "aci": {
      "type": "sse",
      "url": "https://your-aci-gateway/mcp",
      "headers": {
        "Authorization": "Bearer your-admin-token",
        "X-Tenant-ID": "your-tenant-id"
      }
    }
  }
}| Placeholder | Replace with |
|---|---|
| your-aci-gateway | Your ACI gateway domain |
| your-admin-token | A valid admin API token |
| your-tenant-id | Your tenant identifier |
Both values are available from the Infosys Equinox onboarding team.
Connecting ChatGPT to ACI
- In your ChatGPT client’s connector/plugin settings, add a new MCP connection.
- Enter the ACI gateway URL (https://your-aci-gateway/mcp) as the endpoint.
- Provide the admin token and tenant ID as bearer/header credentials, matching the values used for Claude Desktop above.
- Save and test the connection with a simple product search prompt.
Tools exposed
| Category | What it covers |
|---|---|
| Product search & retrieval | Search by query, concern, ingredient, occasion; retrieve product detail |
| Cart management | Add, remove, update, view, and clear cart items |
| Order management | List orders, get order status, cancel orders |
| Subscription management | View, pause, skip, change frequency, cancel subscriptions |
| Support | Raise tickets, check ticket status, submit return requests |
Go-Live Checklist
Use this checklist before directing real shopper or client traffic to a new tenant — whether traffic arrives through the storefront widget or through an MCP-connected AI client.
Website (chat widget) go-live
| Check | Confirm |
|---|---|
| Tenant created and commerce platform connected (Steps 1–2) | ☐ |
| Product catalog imported and PIPs approved (Steps 3–4) | ☐ |
| Support content uploaded and policy facts approved (Step 5) | ☐ |
| Agent behaviour configured — ranking, brand voice, retention flow (Step 6) | ☐ |
| Team invited with correct roles (Step 7) | ☐ |
| All Live Playground checks pass (Step 8) | ☐ |
| Widget activated on the storefront (4.3) | ☐ |
| Widget appearance and opener verified on a real product/category page | ☐ |
Claude / ChatGPT (MCP) go-live
| Check | Confirm |
|---|---|
| ACI gateway URL, admin token, and tenant ID issued by the onboarding team | ☐ |
| MCP connection configured and tested in Claude Desktop or ChatGPT (4.4) | ☐ |
| Each tool category (search, cart, orders, subscriptions, support) tested with a sample prompt | ☐ |
| Admin token scoped and rotated per your organisation’s security policy | ☐ |
Revision History
2026-08-08 | JP – Created the page and added the content.