CSR Admin Guide
Overview
The Infosys Equinox CSR Admin is the web-based administrative portal for customer service representatives (CSRs). It enables CSR agents to manage customer accounts, process orders, handle subscriptions, and assist customers with a broad range of service requests. The CSR Admin is part of the Ultra Admin suite, a unified administrative platform that consolidates key customer service operations into a single, efficient interface.
To access the CSR Admin, navigate to the login URL provided by your system administrator and sign in with your assigned credentials.
Key Features and Enhancements
- Unified Customer and Order Search: Search for customers, orders, and accounts from a single search interface using identifiers, email addresses, phone numbers, or keywords.
- Order Management: View, cancel, return, exchange, and replace customer orders. Add notes and manage invoices associated with each order.
- Customer Profile Management: View and update customer profiles, including personal details, saved addresses, payment methods, and consent records.
- New Order Placement: Place new orders on behalf of registered and guest customers, with support for multiple fulfillment and delivery options.
- Subscription Management: Create, update, pause, resume, retry, and cancel subscriptions on behalf of customers. Manage subscription items individually or in bulk.
- Account and Contract Management: Create and manage B2B accounts, account-level attributes, and pricing contracts.
- Customer Attribute Management: Define and manage custom attributes to capture additional information about customers beyond the standard profile fields.
- Act on Behalf: Access the storefront as a specific customer to assist with browsing or order placement.
- Cart Viewing: View a customer’s active cart, including items, applied promotions, and order totals.
- Customer Notes: Log notes on customer records for interactions, special instructions, or follow-up actions.
- Account Status Management: Activate, deactivate, or unlock customer accounts, or resend account invitations.
Managing Orders, Customers, Accounts by a CSR
Overview
The Infosys Equinox CSR Admin provides a unified interface for customer service representatives to search and manage orders, customers, and accounts across B2B, B2C, and B2B2C store types. CSRs handle a range of customer service tasks including order management, placing orders on behalf of customers, managing customer profiles, and resolving customer issues. The CSR Admin is designed to help CSRs manage and address customer needs efficiently from a single interface.
Customizing Extensions
Overview
Certain features of the CSR Admin can be configured through store-level settings. Administrators can adjust store properties to control how specific operations behave, such as the subscription management mode and other order or customer-related settings.
Using Quick Search & Advanced Filters
Use a Quick Search
Quick Search is available from the landing page of the CSR Admin and allows a CSR agent to quickly locate a specific order, customer, or account.
To use a quick search by a CSR Admin user,
- Log in to the CSR Admin using the URL provided by your system administrator.
- From the home page, navigate to the Quick Search section.
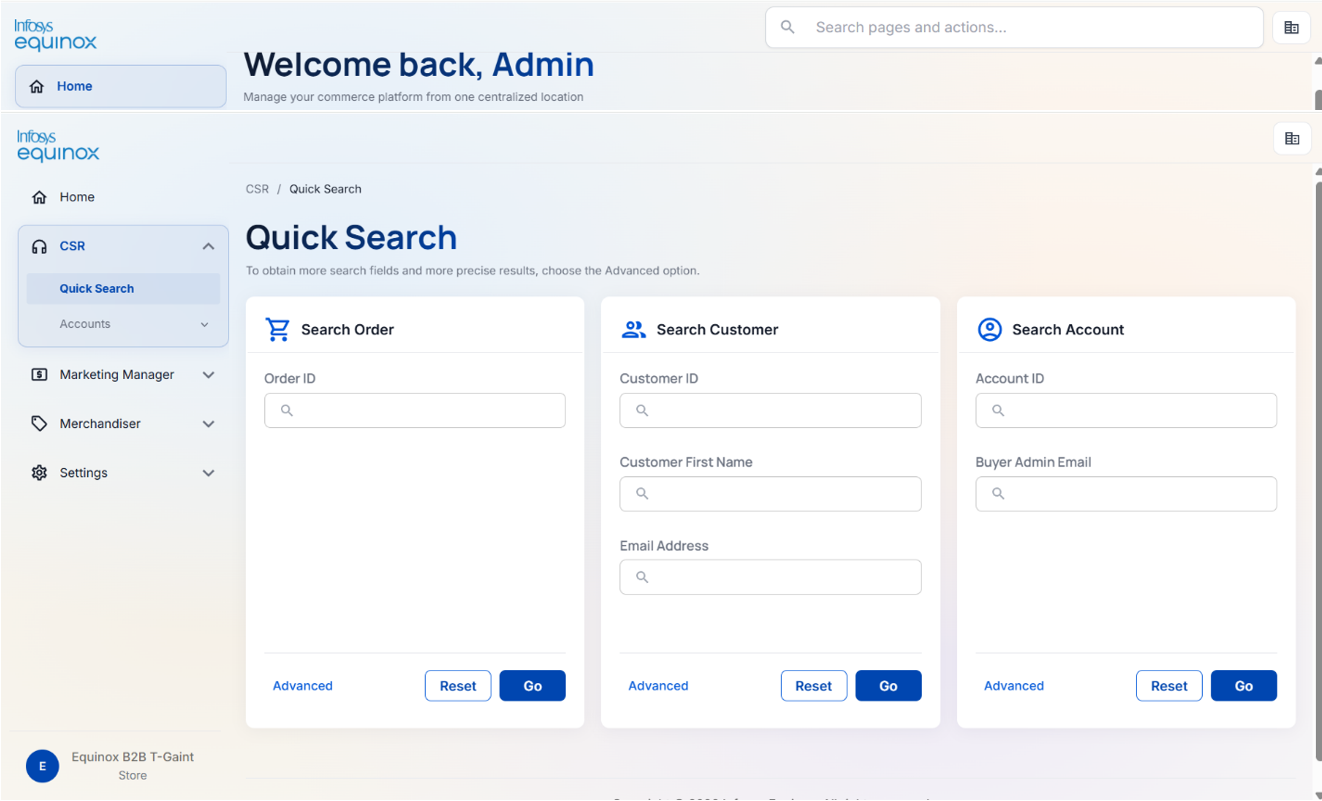
- Select the type of record to search for: Order, Customer, or Account.
- Enter the search term and click the search button.
The following details can be used as search terms:
| Record type | Search by |
|---|---|
| Order | Order ID |
| Customer | Customer ID, Customer First Name, email address |
| Account | Account ID, Buyer Admin Email |
Use an Advanced Filter
Advanced filters allow a CSR agent to apply more specific conditions to narrow down search results. Conditions can include exact match, range, or pattern match. Results can also be sorted by any field in ascending or descending order.
To use an advanced filter,
- From the Search page, select the Advanced Filter option.
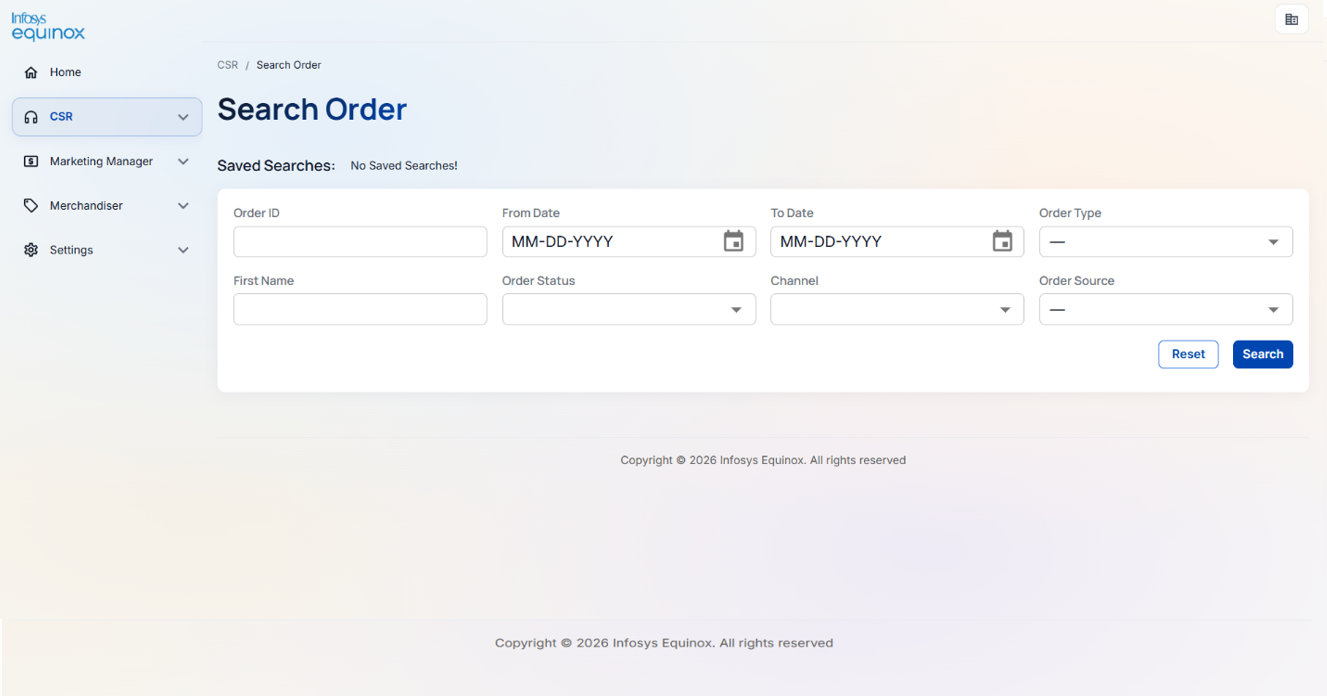
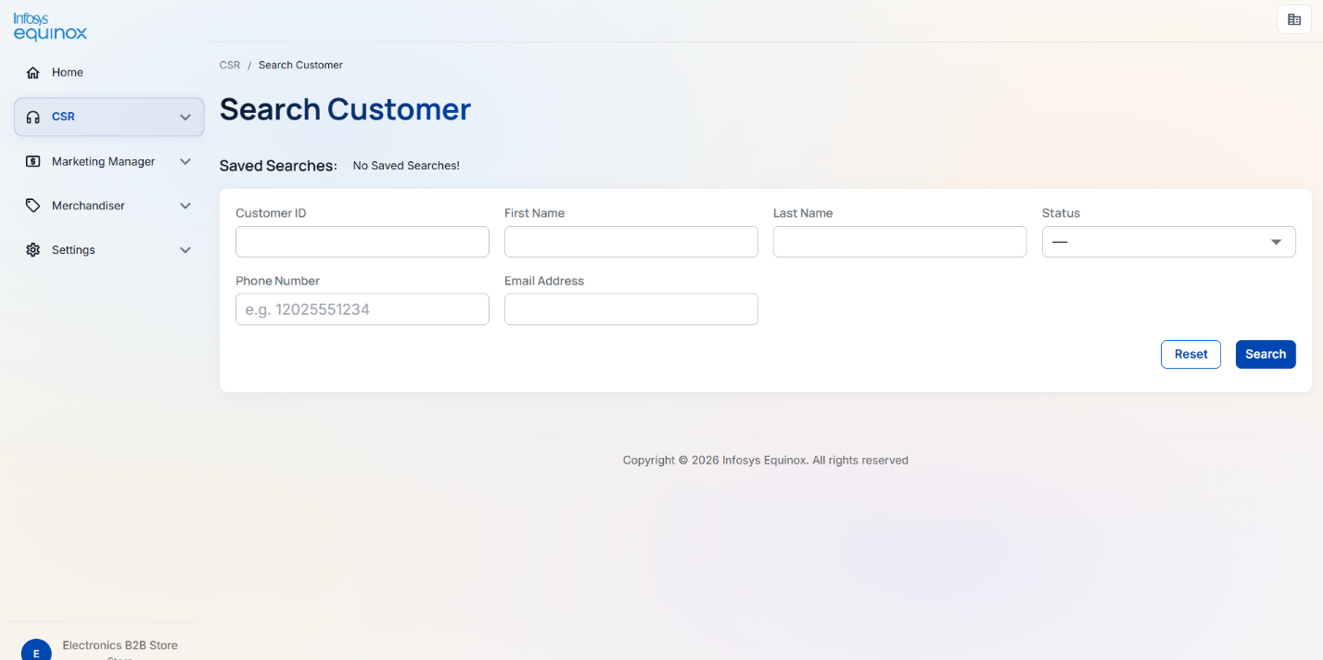
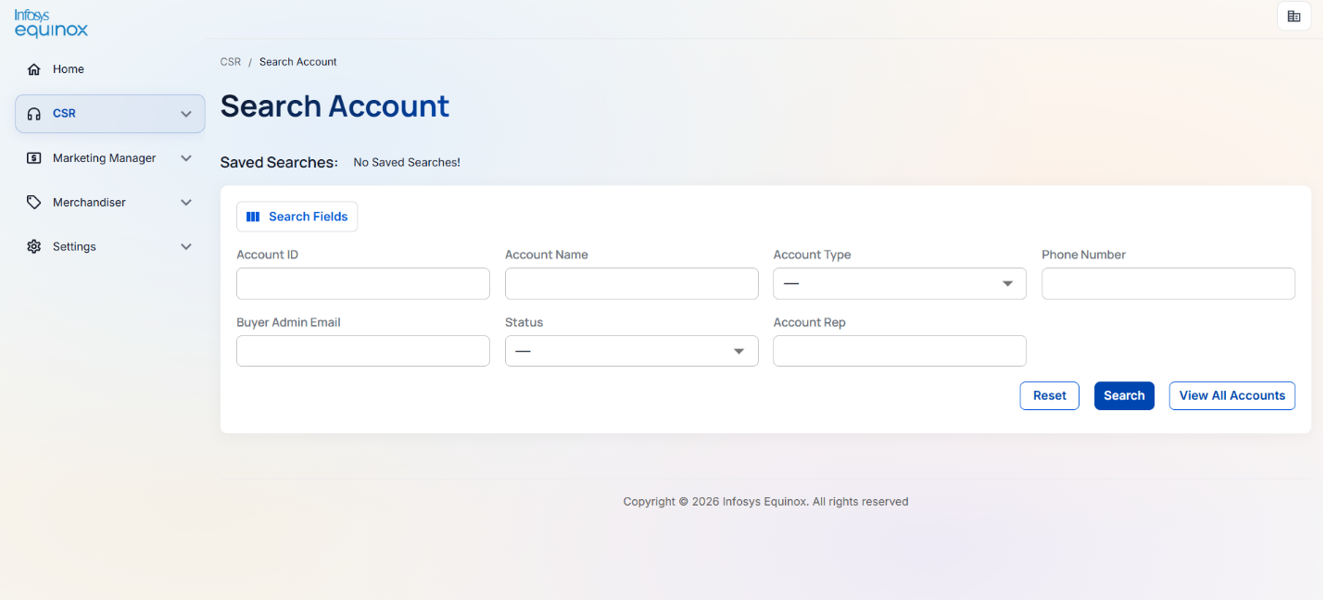
- Select a filter field.
- Click the Go button to apply the filters and view the results.
Adding Attributes to a Customer Account in B2B store
Overview
When creating a new customer account, users can select and assign these predefined attributes to capture additional account-specific information.
Only active account attributes are available for selection during account creation.
Adding Attributes While Creating a Customer Account
To add attributes to a customer account:
- Log in to the CSR portal.
- Navigate to CSR > Accounts > Add New Account.
- Enter the required account information.
- In the Attributes section, click Add Attributes.
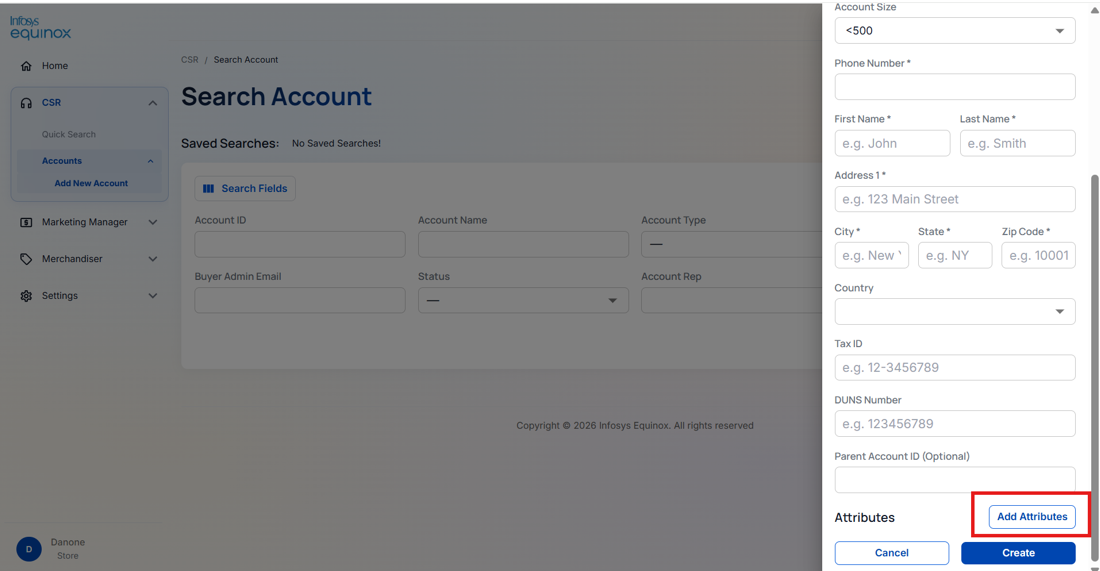
- The Attribute List panel is displayed, showing all available active account attributes.
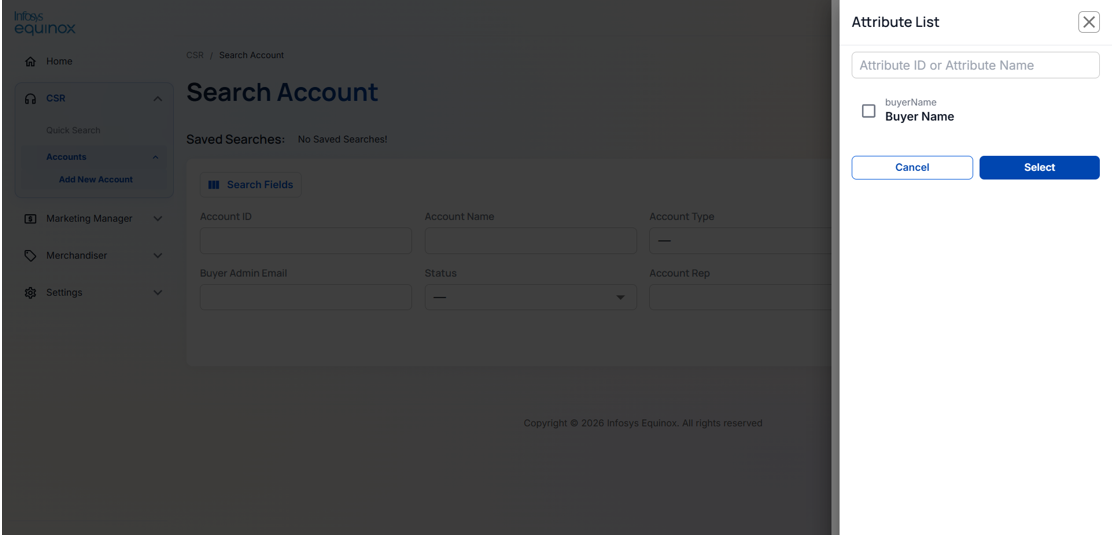
- Use the search field to locate a specific attribute by Attribute ID or Attribute Name, if required.
- Select one or more attributes from the list.
- Click Select.
- The selected attributes are added to the account creation form.
- Click Create to create the customer account.
Working With Accounts
Adding a New Account
To add a new account,
- Log in to the CSR Admin.
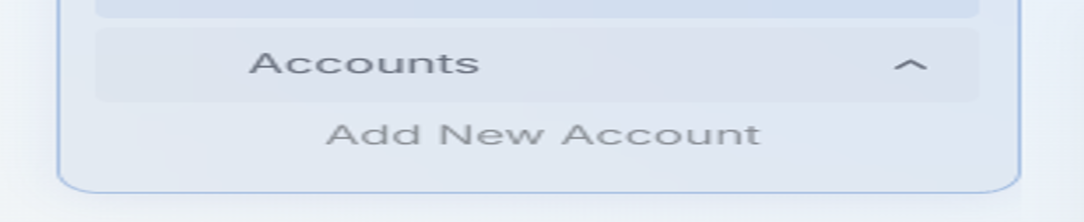
- In the left navigation panel, click Accounts > Add New Account:
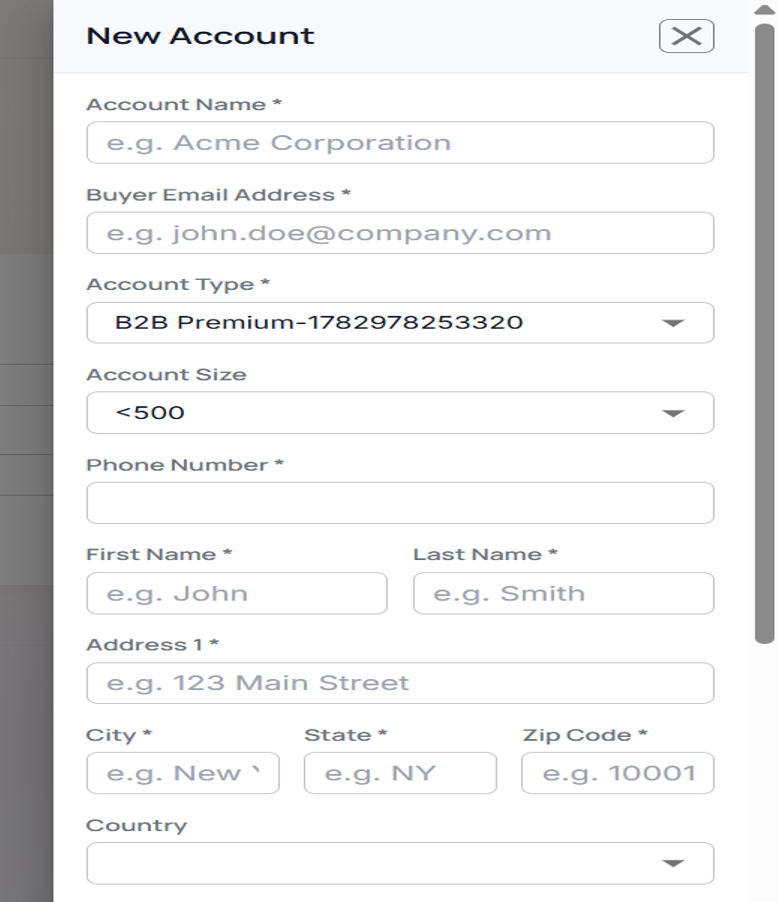
- Complete the account details and click Save.
Managing Contracts
Contracts define the pricing method, payment terms, and catalog access for a B2B account. Each contract is associated with a specific account and controls how that account is billed and what products it has access to. Contract management is available within the account record.
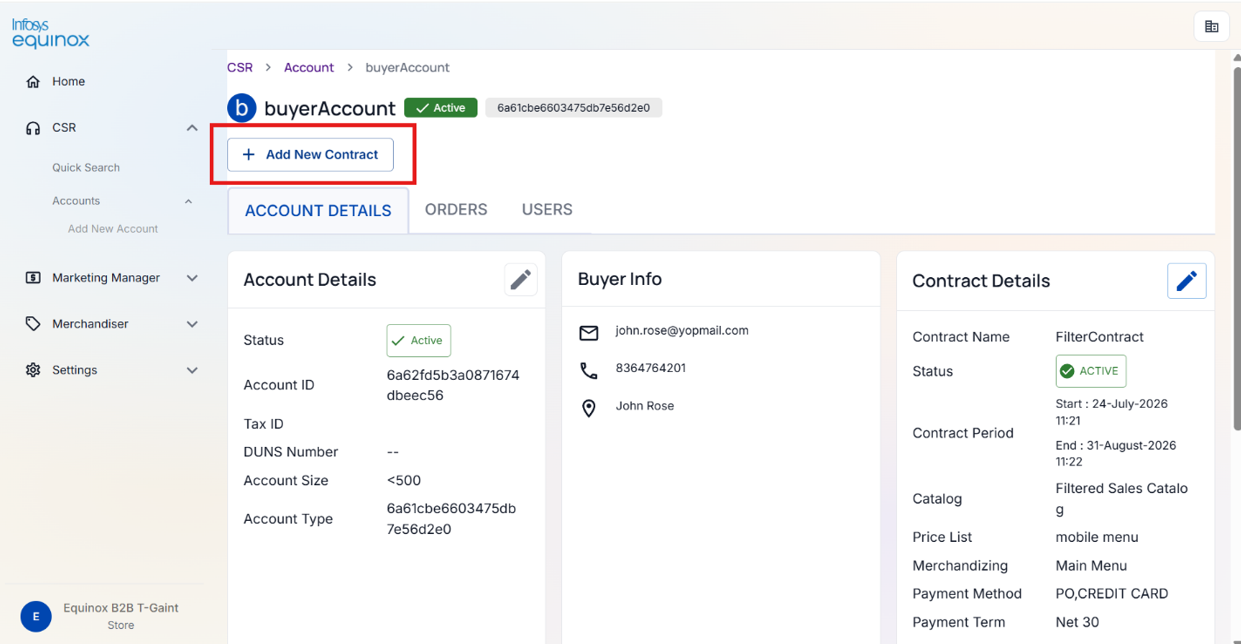
To create a new contract,
- Open the account record for which the contract is being created.
- Click the option to create a new contract.
- Complete the following contract fields:
- Click Save. The contract is created with a status of Active and is automatically assigned a contract number.
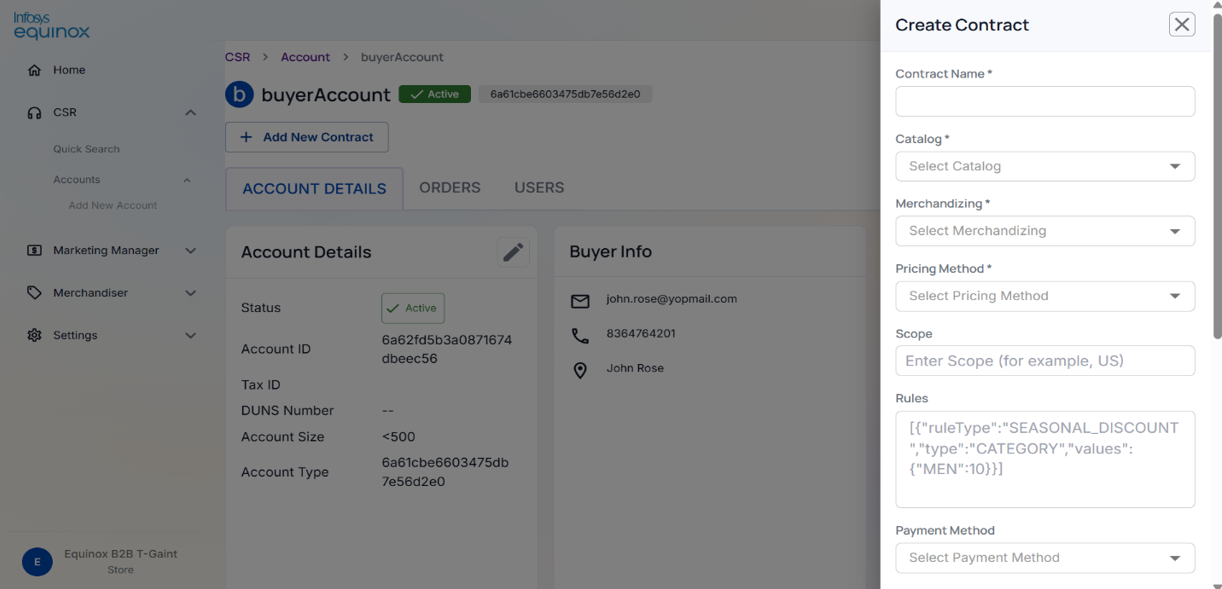
| Field | Required | Description |
|---|---|---|
| Contract Name | Yes | A unique name for this contract within the account |
| Catalog | Yes | The product catalog the account will have access to under this contract |
| Merchandizing | Yes | The catalog navigation that controls the category hierarchy and browse experience for the account’s buyers |
| Pricing Method | Yes | Select Price List for fixed list pricing, or Price Rule for rule-based pricing |
| Price List | Conditional | Required when Pricing Method is set to Price List |
| Price Rule | Conditional | Required when Pricing Method is set to Price Rule |
| Scope | No | The geographic or organizational jurisdiction the contract applies to, for example: US. If left blank, the contract applies without any regional restriction. Maximum 100 characters. |
| Rules | No | A JSON array of pricing overrides applied to orders placed under this contract. Each rule defines a ruleType, a target type (e.g. CATEGORY), and a values map. Must be a valid JSON array if provided. |
| Payment Method | Yes | The payment methods accepted under this contract, for example: Purchase Order, Credit Card, Company Bill To |
| Credit Limit | No | The maximum credit available to the account under this contract |
| Payment Term | No | The payment term applicable to this contract |
| Start Date | No | The date from which the contract becomes effective |
| End Date | No | The date on which the contract expires |
| Custom Properties | No | Additional key-value fields for any custom contract information |
To attach a document to a contract,
- Open the contract record.
- Click the option to attach a document.
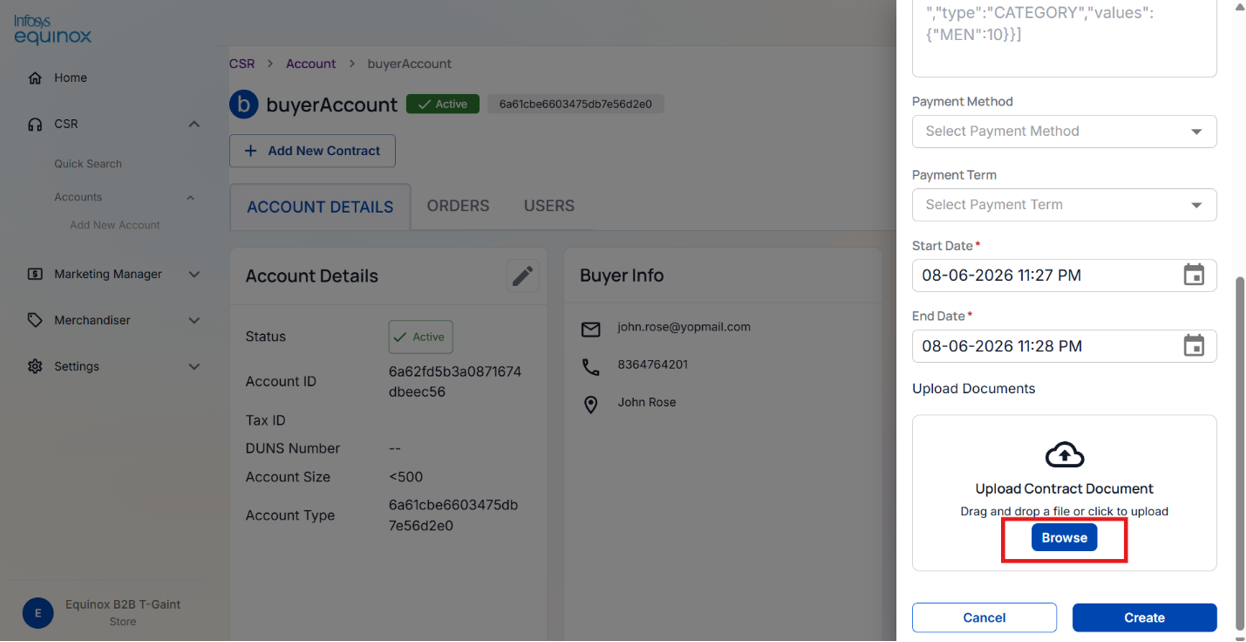
- Select and upload the file. The document is linked to the contract upon successful upload.
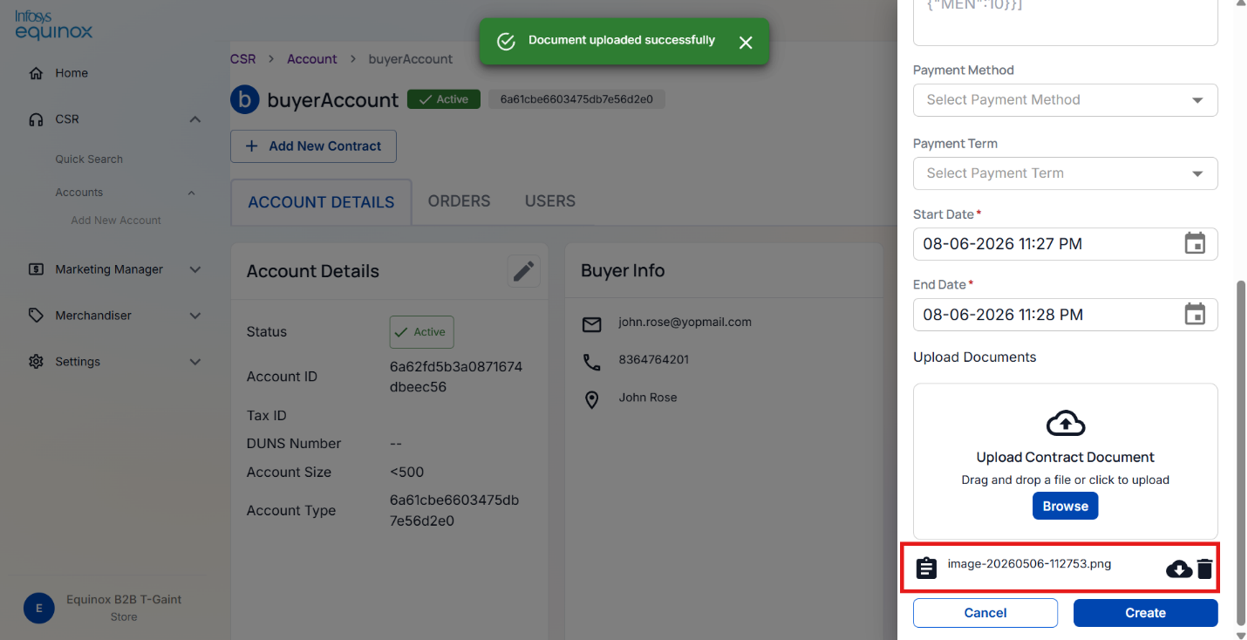
To remove or download a document from a contract,
- Open the contract record.
- Locate the document to be removed.
- Click the remove option to remove the document and Click the download option near delete option and confirm.
Actions Available for Registered Customers
Placing a New Order for a Registered User
CSR agents can place a new order on behalf of a registered customer, using the customer’s saved profile information for shipping and payment.
To place a new order for a registered customer,
- Open the customer record.
- Click Orders tab and click the New Order to place a new order.

- Add the required items to the order.
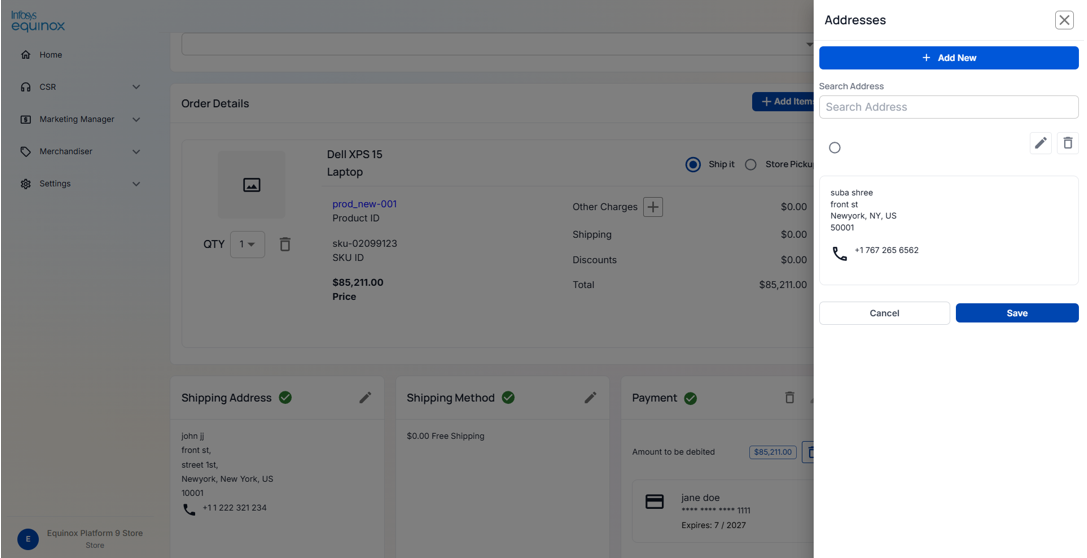
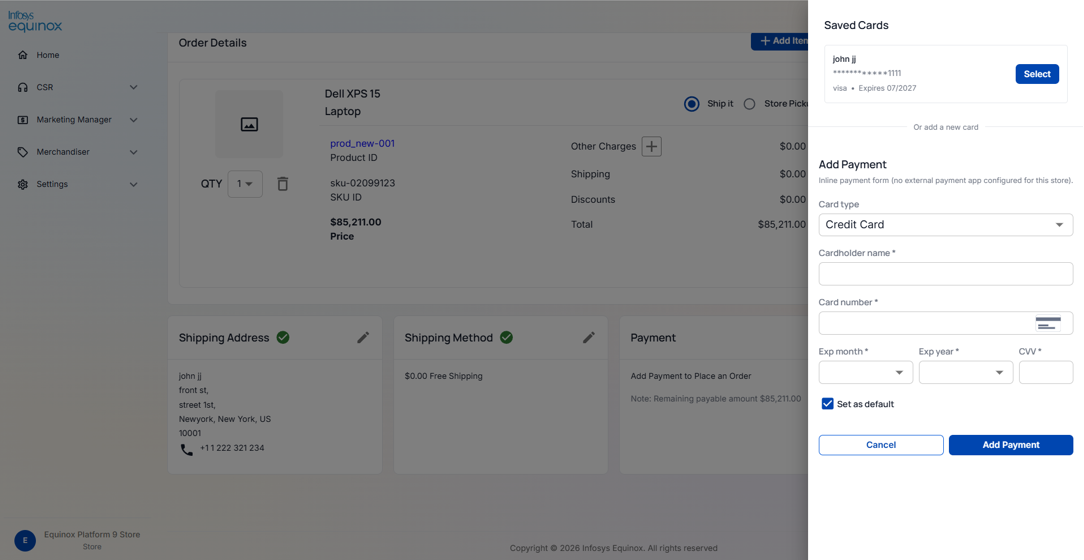
- Set the shipping address, shipping method, and payment method. A saved payment method from the customer’s profile can be selected or we can create new payment and shipping address while placing order.
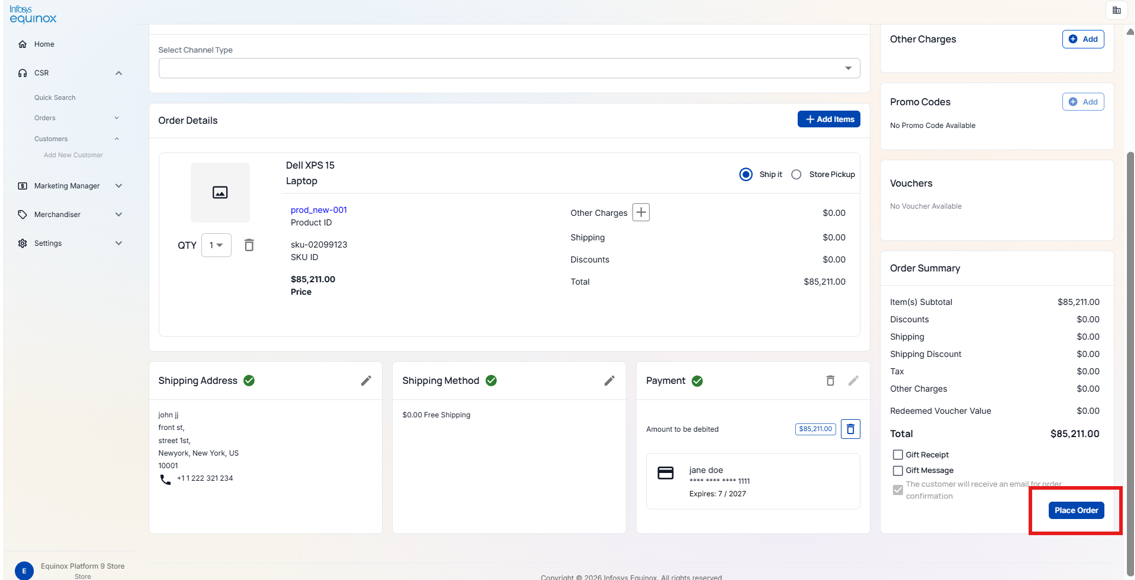
- Review the order summary and click Place Order.
Note: For B2B customers, the associated account can be selected to apply contract-based pricing to the order.
Resetting a Customer’s Password
To reset a customer’s password,
- Open the customer record.
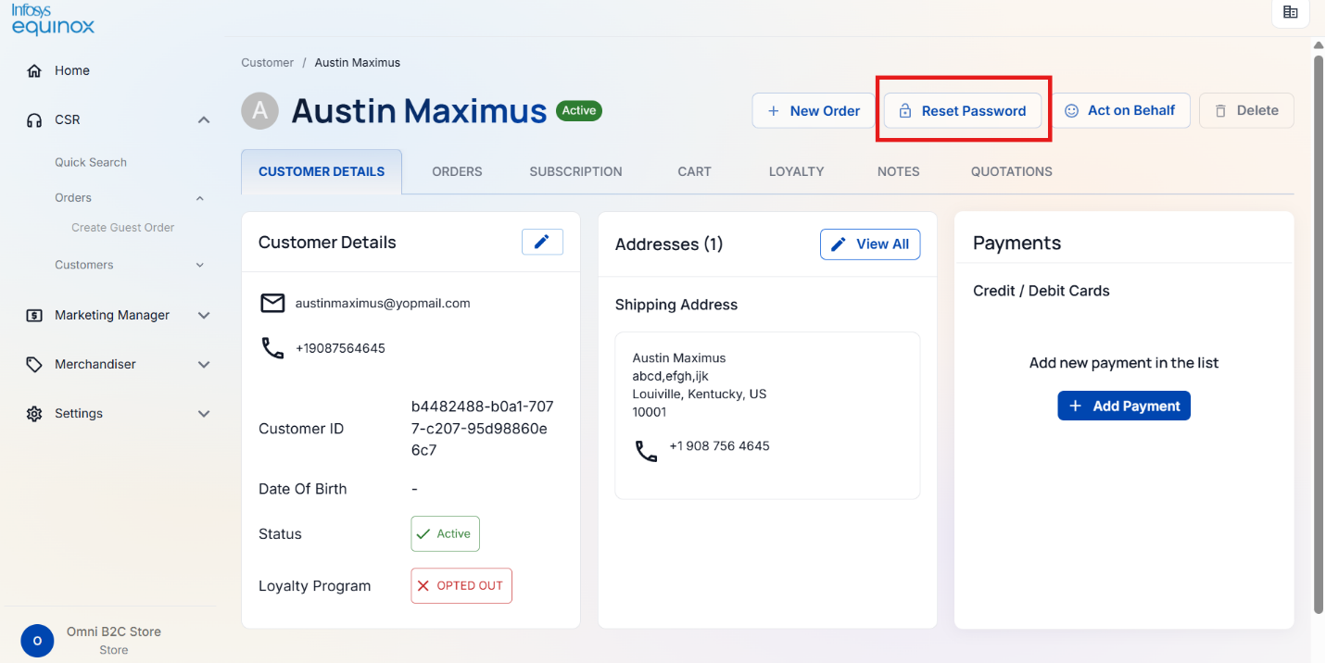
- Click the password reset option.
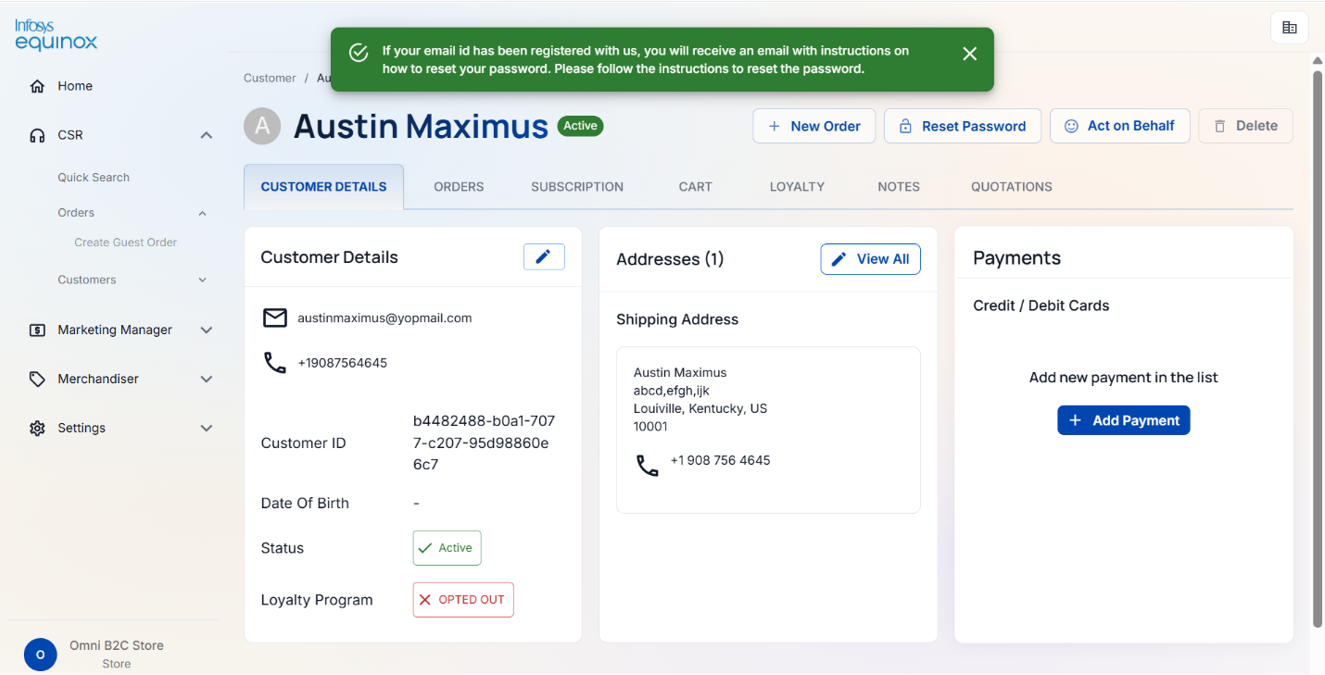
A reset link or code is sent to the customer’s registered email address or phone number. The customer can then follow the link to set a new password. A CSR agent can also trigger an administrative password reset directly from the customer’s record, without requiring the customer to initiate the process.
Acting on Behalf of a Registered Customer to Place Orders
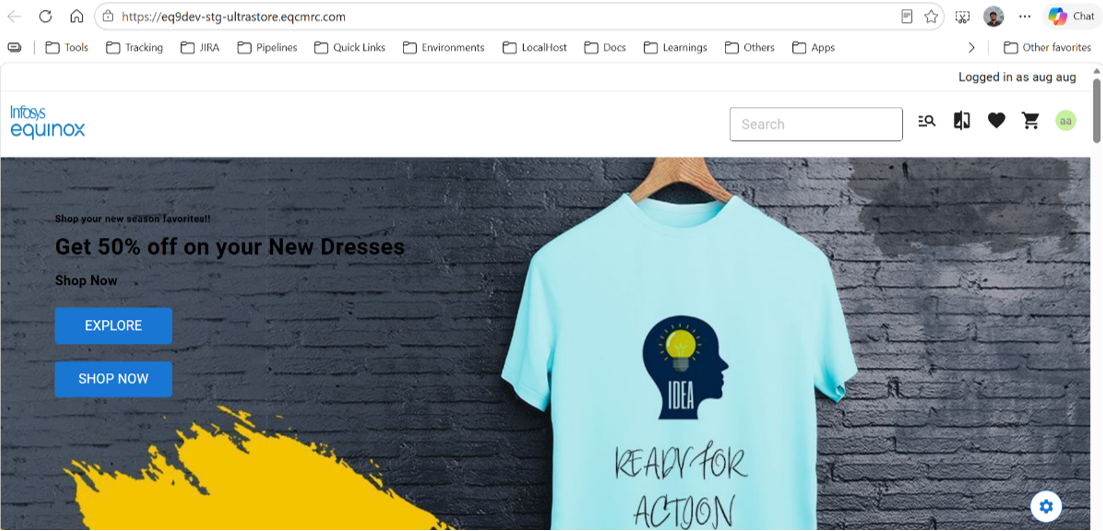
A CSR agent can access the storefront as a specific customer, allowing them to browse and place orders as that customer.
To act on behalf of a registered customer,
- Open the customer record.
- Click the Act on Behalf option.
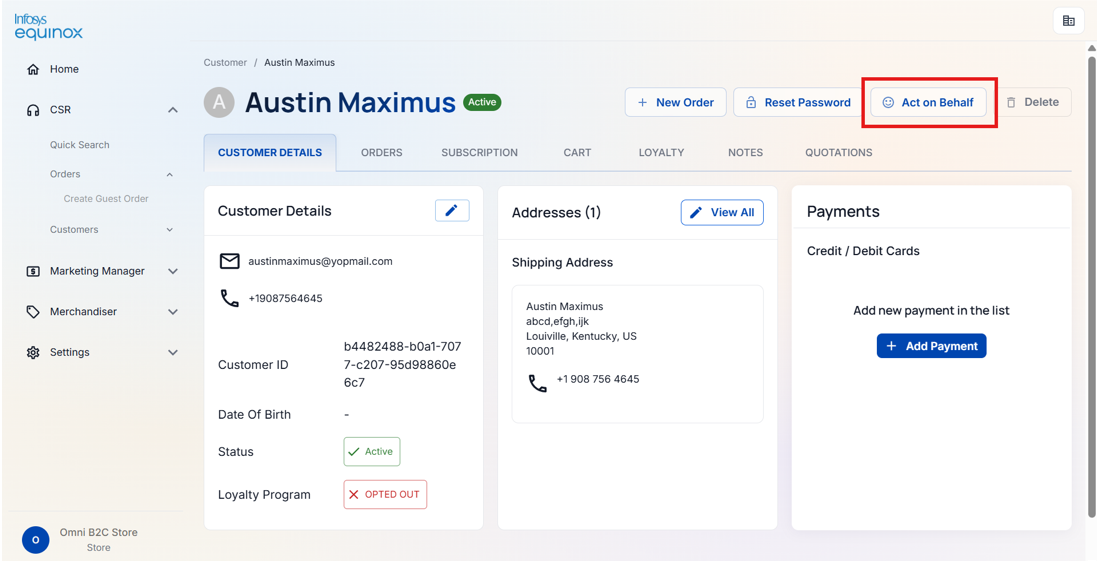
- A session link is generated. Opening this link launches the storefront with the customer’s session active.
Customer Details Tab
Customers Overview
The Customer Details tab provides access to the customer’s profile information, saved addresses, payment methods, consent records, and account status. From this tab, a CSR agent can view and update all aspects of the customer’s profile and perform account status management actions.
The following account status actions are available from the customer details page: Active or Inactive.
Viewing or Updating Customer Details
Profile
The customer profile shows the customer’s personal information. The following fields can be viewed and updated:
B2C :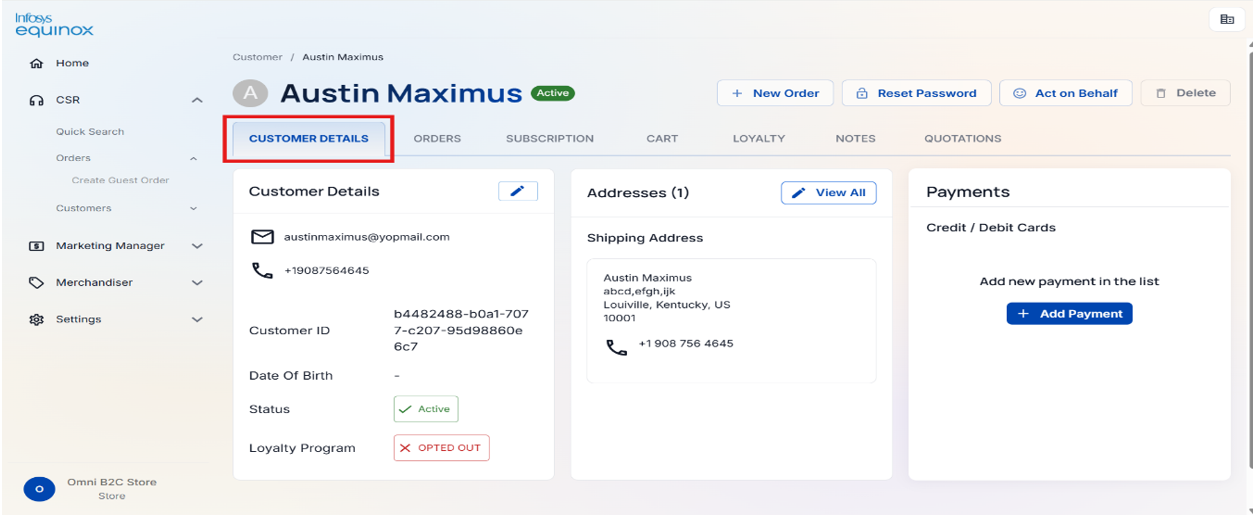
B2B: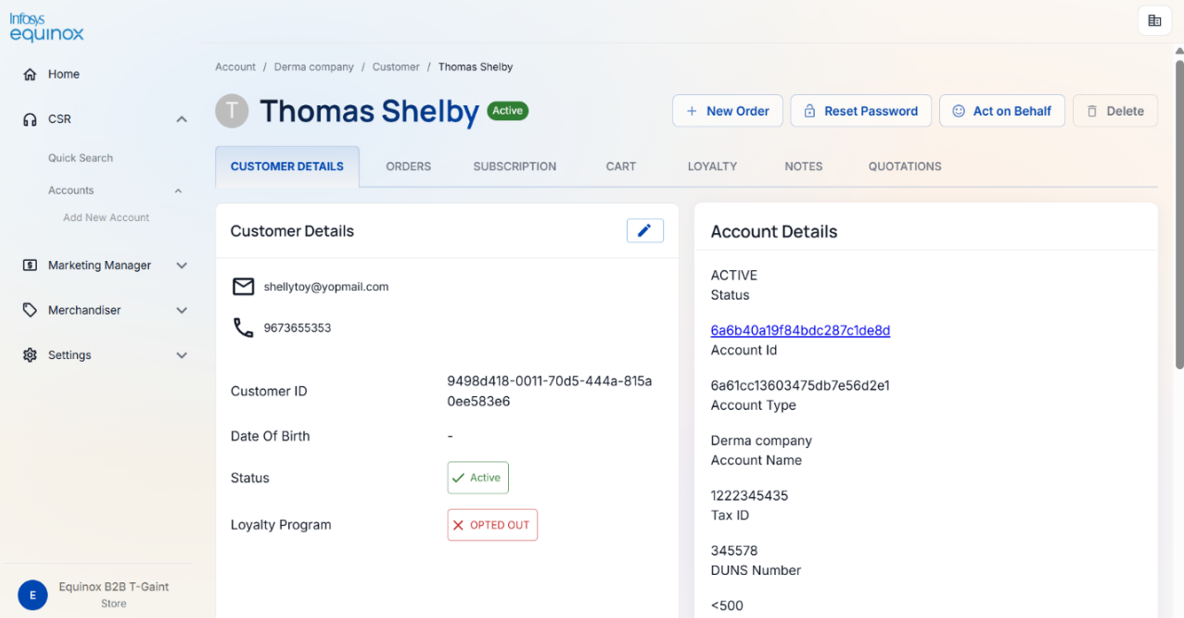
Addresses
The Addresses section shows all saved delivery addresses for the customer. A CSR agent can add, update, or remove addresses from this section.
The following fields are required when adding or updating an address: first name, last name, address line 1, city, state or province, country, postal code, and phone number.
Payment Methods
The Payment Methods section shows the customer’s saved payment profiles. A CSR agent can view, add, update, or remove payment methods. Payment tokens are stored securely and are not displayed.
When removing a payment method, the agent can choose between a standard removal (the profile is marked as removed) or a permanent removal.
Orders of a Customer
Overview
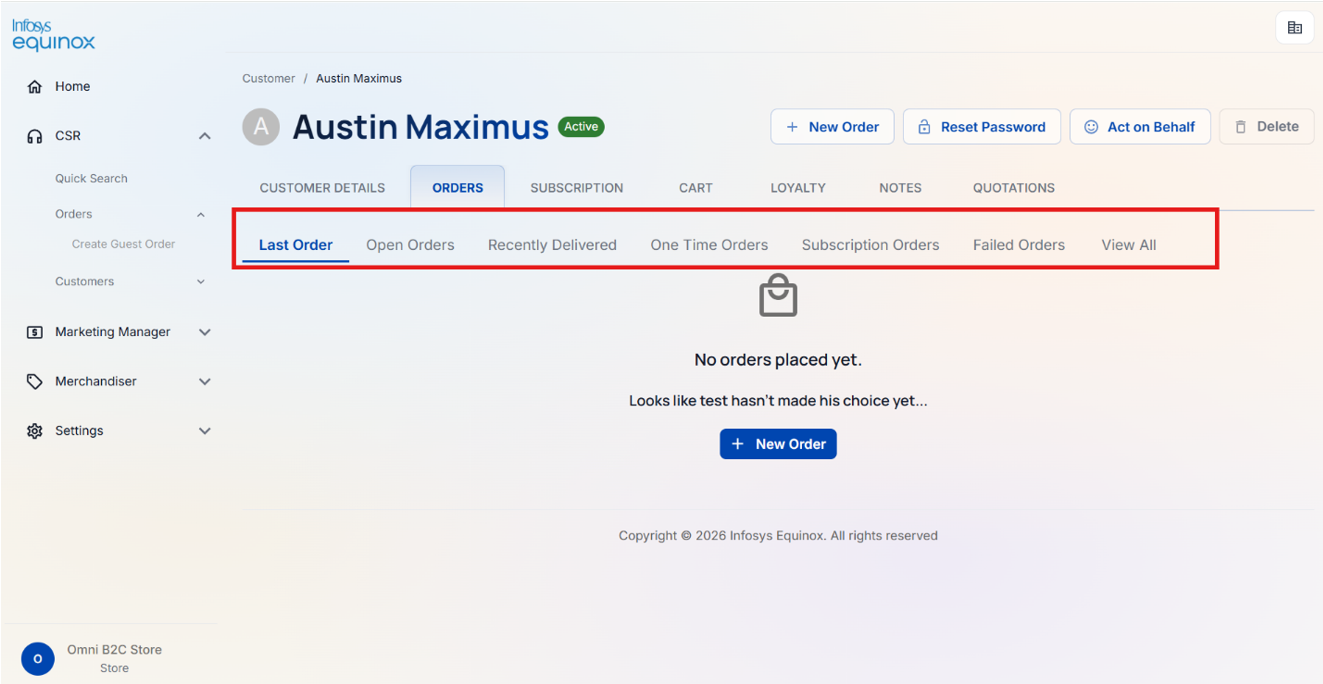
The Orders tab allows CSR agents to view and manage all orders created by a customer. After selecting a customer profile, the CSR can access the following views within the Orders tab:
- Open Orders: Shows orders that are currently in progress and not yet fulfilled.
- Recently Delivered: Shows orders that have been recently delivered to the customer.
- One-Time Orders: Shows standard one-time orders.
- Subscription Orders: Shows orders placed as part of an active subscription.
- Failed Orders: Shows orders that are failed.
- View All: Shows all orders for the customer, with options to filter and sort the results.
CSR agents can click on individual orders to view detailed information. In addition, a CSR agent can:
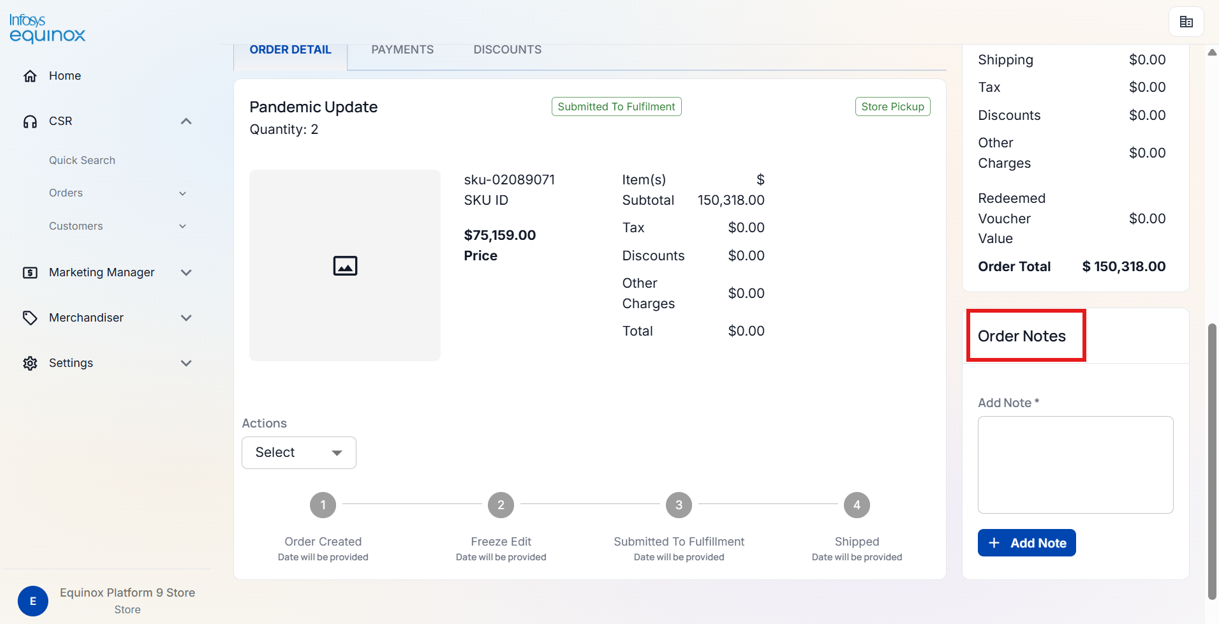
- Add notes to any order. Notes can be categorised as: General, Customer-facing, Internal, Shipping, Payment, Fraud, or Return.
- View and manage order invoices. Invoice statuses progress through: Draft, Issued, Paid, Refunded, and Cancelled.
Order status:
Order status values reflect the current stage of an order in the fulfilment lifecycle.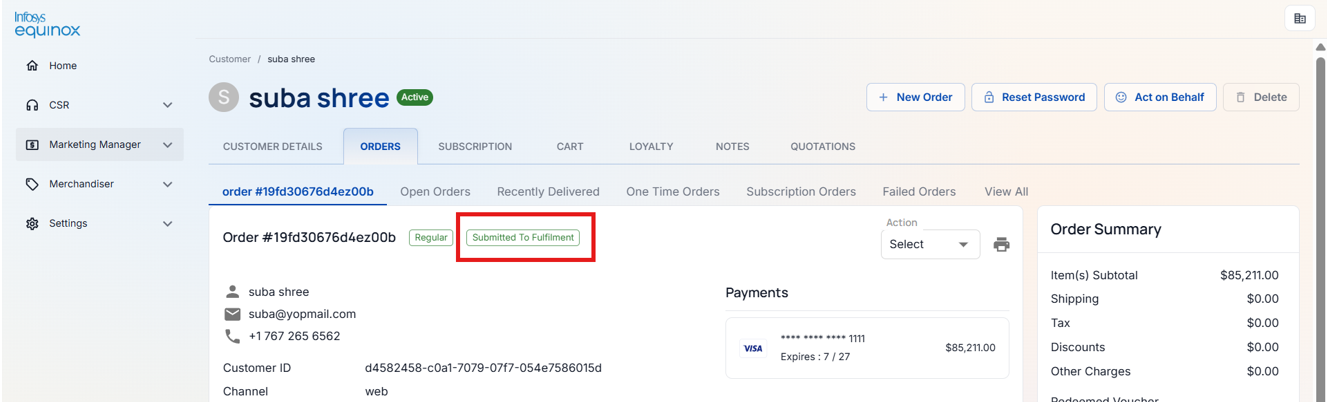
Cancelling an Order
Overview
Cancelling an order in the CSR Admin is straightforward. A CSR agent can cancel an order, or specific items within an order, by navigating to the order details, selecting the Cancel option, specifying the cancellation source, and confirming. The cancellation source and any notes are recorded against the order.
How to Cancel an Order
To cancel an already placed order,
- Open the customer record and go to the Orders tab.
- Provide the order ID in the Quick Search or navigate to the order from the order list.
- In the Action dropdown list, select the Cancel option. The items in the order are automatically selected for cancellation.
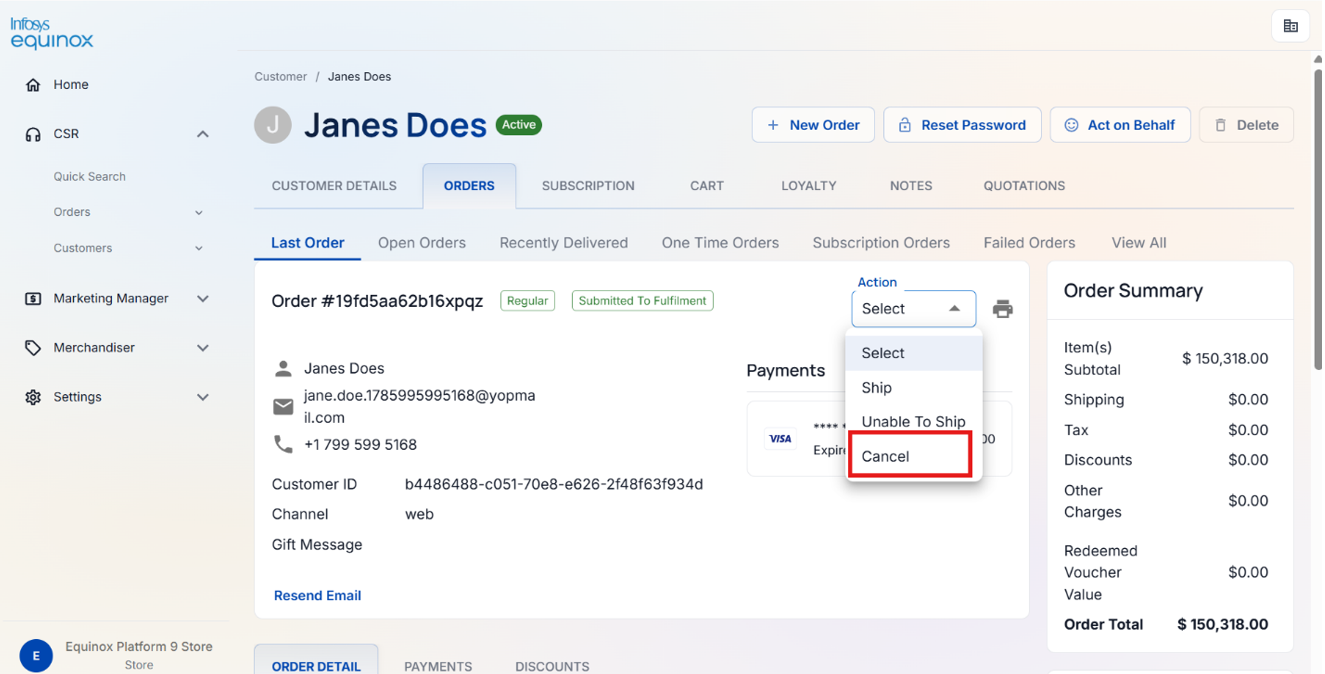
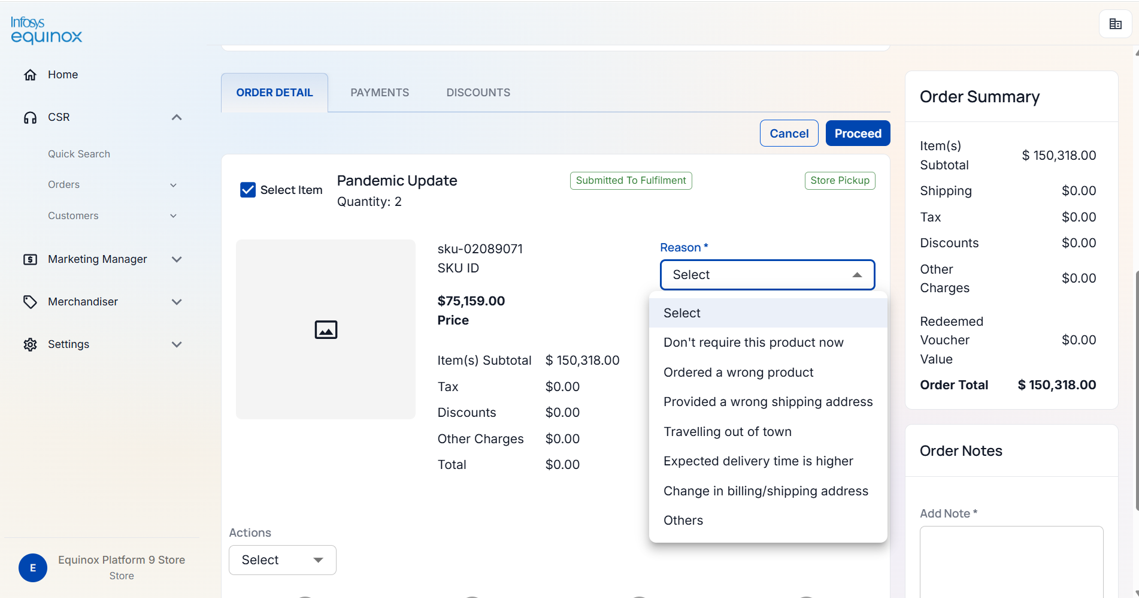
Note: If there are multiple items in the order and you want to cancel only specific items, select only those items before proceeding.
- Add any notes or reasons for the cancellation in the designated fields.
- Click Proceed to confirm. The selected items or the entire order are cancelled, and the order status is updated to Cancelled.
Managing Subscriptions of a Customer
Subscription Methods
The CSR Admin supports two subscription management methods. The active method is determined by the Preference-Based Subscription store setting.
- Preference-Based Subscription (Single): Each customer has one unified subscription. All subscribed items are managed under a single subscription record with a shared schedule, payment method, and delivery address.
- Multiple Subscriptions: Each customer can have multiple independent subscriptions, each with its own items, schedule, payment method, and delivery address.
Configuring Store & Collection Properties
The subscription management method is configured using the Preference-Based Subscription store setting in the store administration. Enabling this setting activates single-subscription mode for the store. Disabling it activates multiple-subscription mode.
Preference-Based Subscription
Subscribing Item(s) on Behalf of a Customer
In the Subscriptions tab, CSR agents can create and manage a single unified subscription for the customer, including adding items, setting the delivery frequency, and configuring the payment method and shipping preferences.
To create a subscription for a customer,
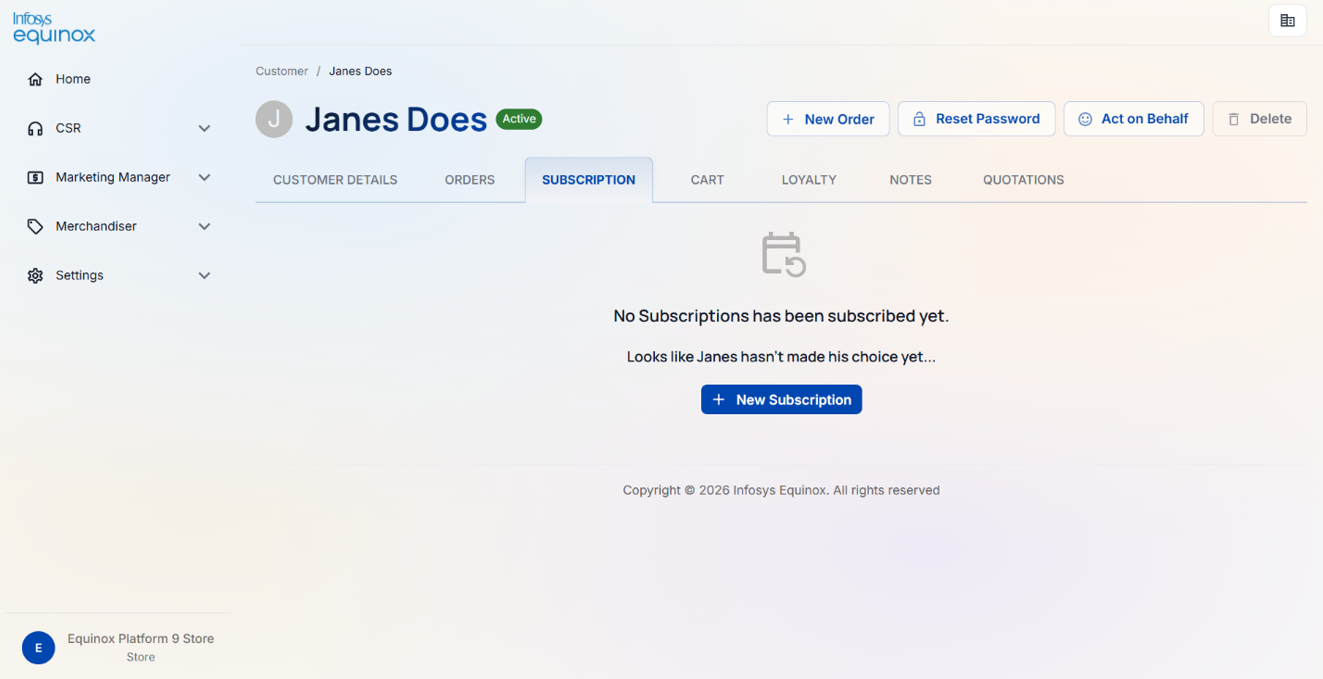
- Open the customer record and navigate to the Subscriptions tab.
- Click the option to create a new subscription.
- Add the required items to the subscription.
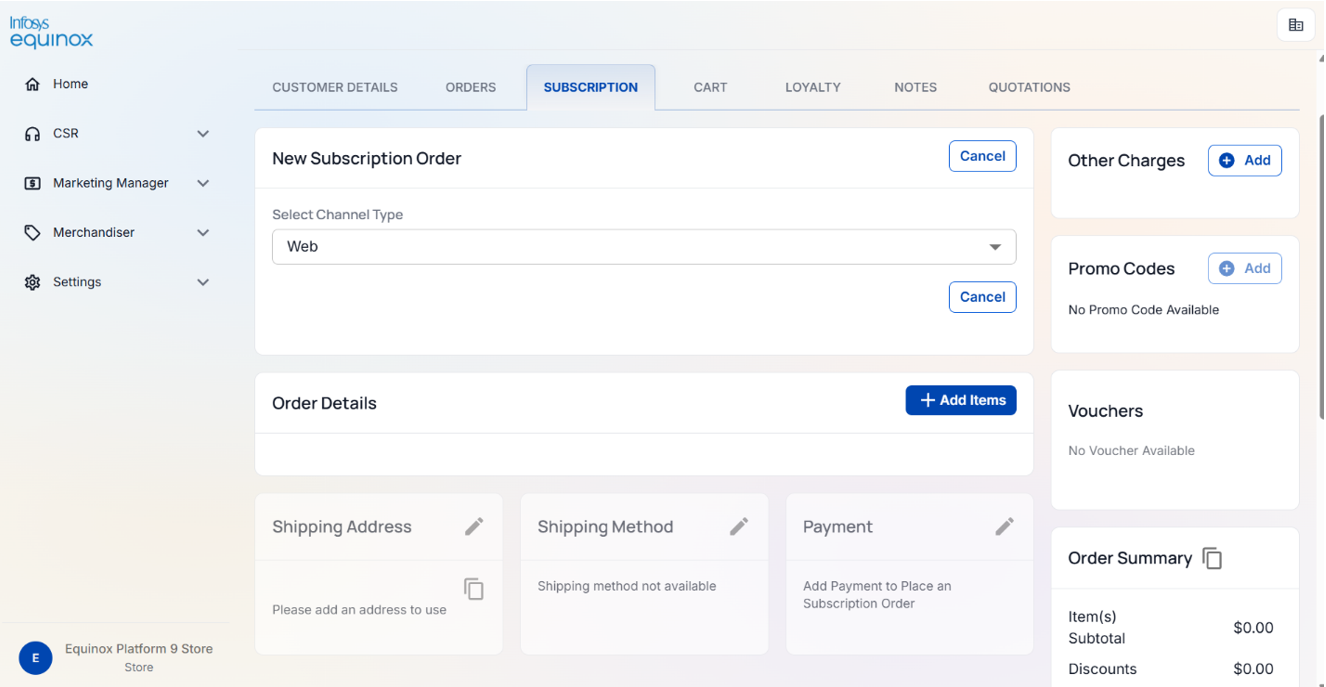
- Set the subscription details:
- Set the delivery address and payment method.
- Click Save. The subscription is created and becomes active.
The following management actions are available on an active subscription:
| Action | Description |
|---|---|
| Cancel | Cancels the subscription |
| Update order processing date | Changes the date on which the next order is processed |
| Update payment method | Updates the payment method used for the subscription |
The following item-level actions are available within a subscription:
| Action | Description |
|---|---|
| Add item | Adds a product to the subscription |
| Update item | Updates the quantity or frequency of a subscribed item |
| Remove item | Removes an item from the subscription |
| Skip or unskip a single item | Skips or unskips the delivery of a specific item for one cycle |
| Bulk skip items | Skips the delivery of multiple items in a single action |
View/Update an Existing Subscription Details
In the Subscriptions tab, CSR agents can view the full details of the active subscription, including all items, the delivery schedule, payment method, and shipping address, and make changes as required.
To view or update an existing subscription,
- Open the customer record and navigate to the Subscriptions tab.
- Click View All Subscriptions.
- Select the subscription to view or update.
- Make the required changes and click Save.
Note: To discard changes, click the Cancel button.
Working with Multiple Subscriptions
Subscribing Item(s) on Behalf of a Customer
When the store is configured for multiple subscriptions, a CSR agent can create and manage multiple independent subscriptions for the customer. Each subscription has its own items, schedule, payment method, and delivery address.
To create a subscription for a customer,
Follow the same steps as for a preference-based subscription. Each subscription created is independent of the others.
View/Update an Existing Subscription Details
In the Subscriptions tab, CSR agents can view all active and past subscriptions for the customer and manage each one independently. Each subscription can be updated, paused, cancelled, or otherwise managed without affecting the others.
To view or manage a customer’s subscriptions,
- Open the customer record and navigate to the Subscriptions tab.
- Click View All Subscriptions. All subscriptions for the customer are listed.
- Select a subscription to view its details or make changes.
- Make the required changes and click Save.
Cart Details of a Customer
The Cart tab shows the customer’s current active cart, including items, quantities, applied promotions, delivery details, and order totals. CSR agents can use this view to review what the customer has in progress before assisting with checkout.
The cart summary includes the item count, subtotal, total discount, delivery charge, applicable taxes, and grand total.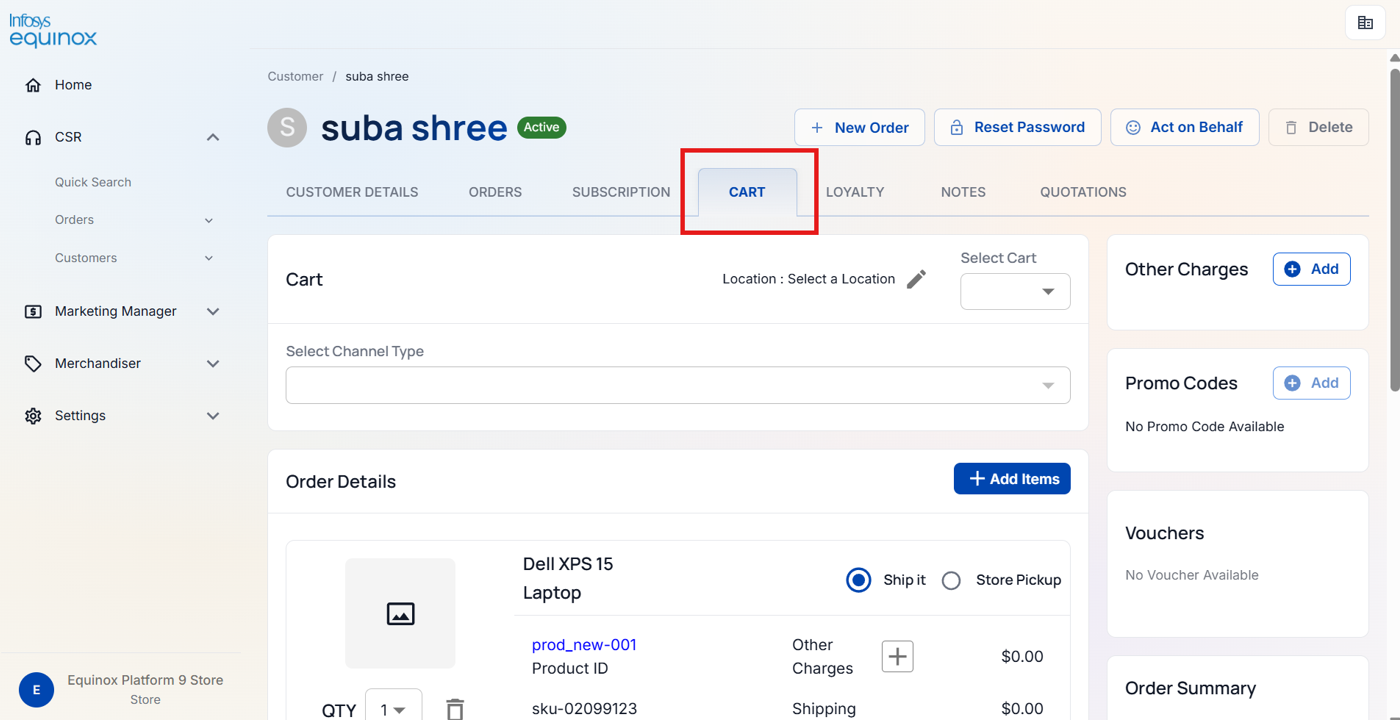
For B2B customers, the cart also displays the associated account, cost centre, and any applicable approval workflow information.
Additional Notes of a Customer
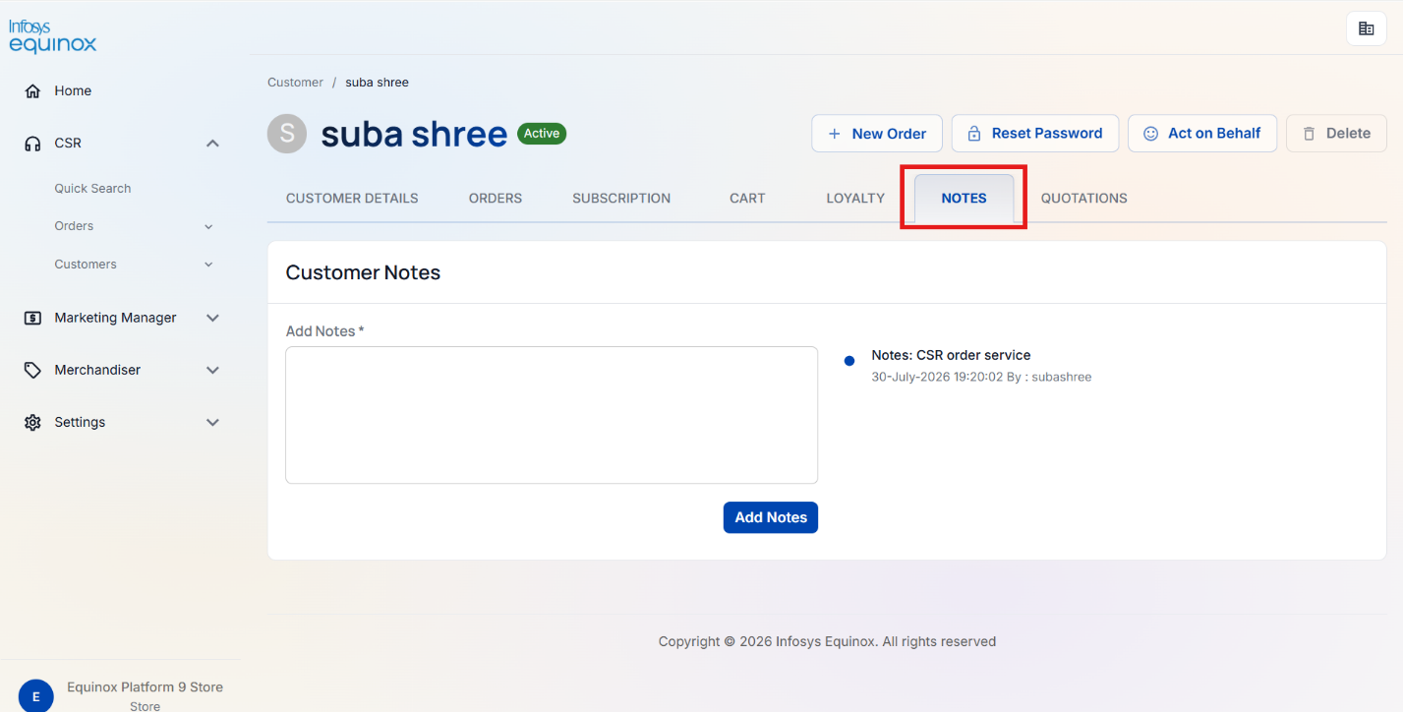
The Notes tab of a customer record allows CSR agents to log additional information about the customer, such as interaction records, special instructions, or follow-up actions. Notes can be added, viewed, and deleted from this section.
To add a note to a customer record,
- Open the customer record.
- Navigate to the Notes tab.
- Enter the note content.
- Click Save.
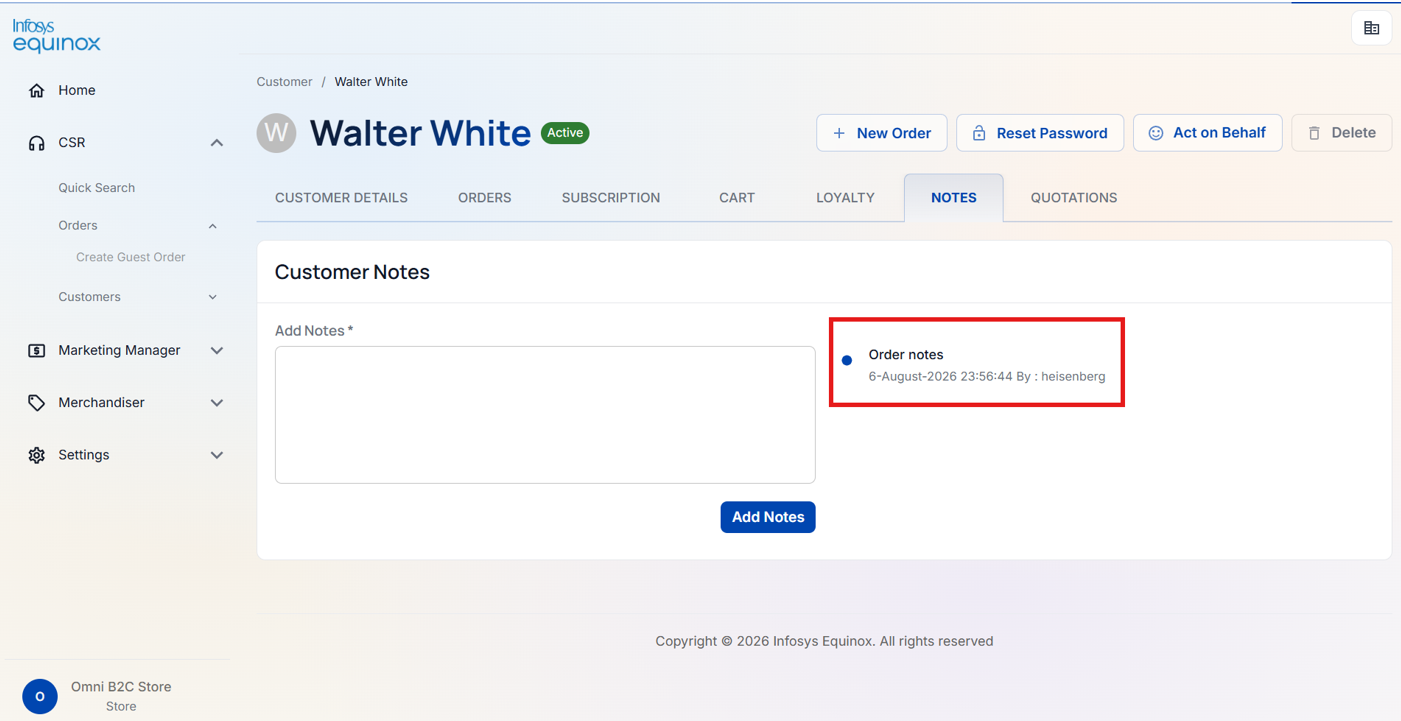
To view all notes for a customer,
- Open the customer record.
- Navigate to the Notes tab. All notes recorded for the customer are listed.
Revision History
2026-08-07 | JP – Created the page and added the content.