Merchandiser Admin Guide
Overview
Service Glossary
- Approver – a user (typically a Business Admin) authorized to review submitted draft records and publish or schedule them for storefront delivery.
- Catalog – a top-level container that organizes products and SKUs. Each store can have multiple catalogs of different types (Default, Filter).
- Live – the published state of a record that is visible to storefront customers.
- Lot – a batch or grouping of inventory items tracked together, typically sharing a common manufacture date, expiry date, or quality grade.
- Price List – a named collection of SKU prices effective for a specific date range and currency.
- Price Rule – a configurable business rule that modifies base prices, implemented as a BPMN workflow definition.
- Reference Value – a defined entry within a data model used to standardize classification, tagging, or attribute values across catalog records.
- Replenishment Policy – a rule that defines when and how inventory for a given SKU and location should be restocked.
- Reservation – a hold placed on available inventory for a specific sales channel or order fulfillment request.
- Semantic ID – the unique identifier used for a category in storefront URLs and navigation paths.
- Site Navigation – a named container that defines a menu hierarchy — including top-level items, sub-menus, and links — independent of the underlying catalog category tree.
- SKU – a Stock Keeping Unit; the purchasable variant of a product, associated with specific price and inventory data.
- Transfer – a movement of inventory quantity from one location to another.
Accessing Merchandiser Admin
The Infosys Equinox Ultra Admin console is accessible via your environment-specific URL in the format:
<environment>/admin/v2/merchandiser/en/<business_id>/<store_id>
To access Merchandiser Admin:
- Navigate to your Infosys Equinox Ultra Admin URL.
- Sign in using your assigned credentials. Authentication is managed by the configured identity provider.
- Select your business and store from the store selector.
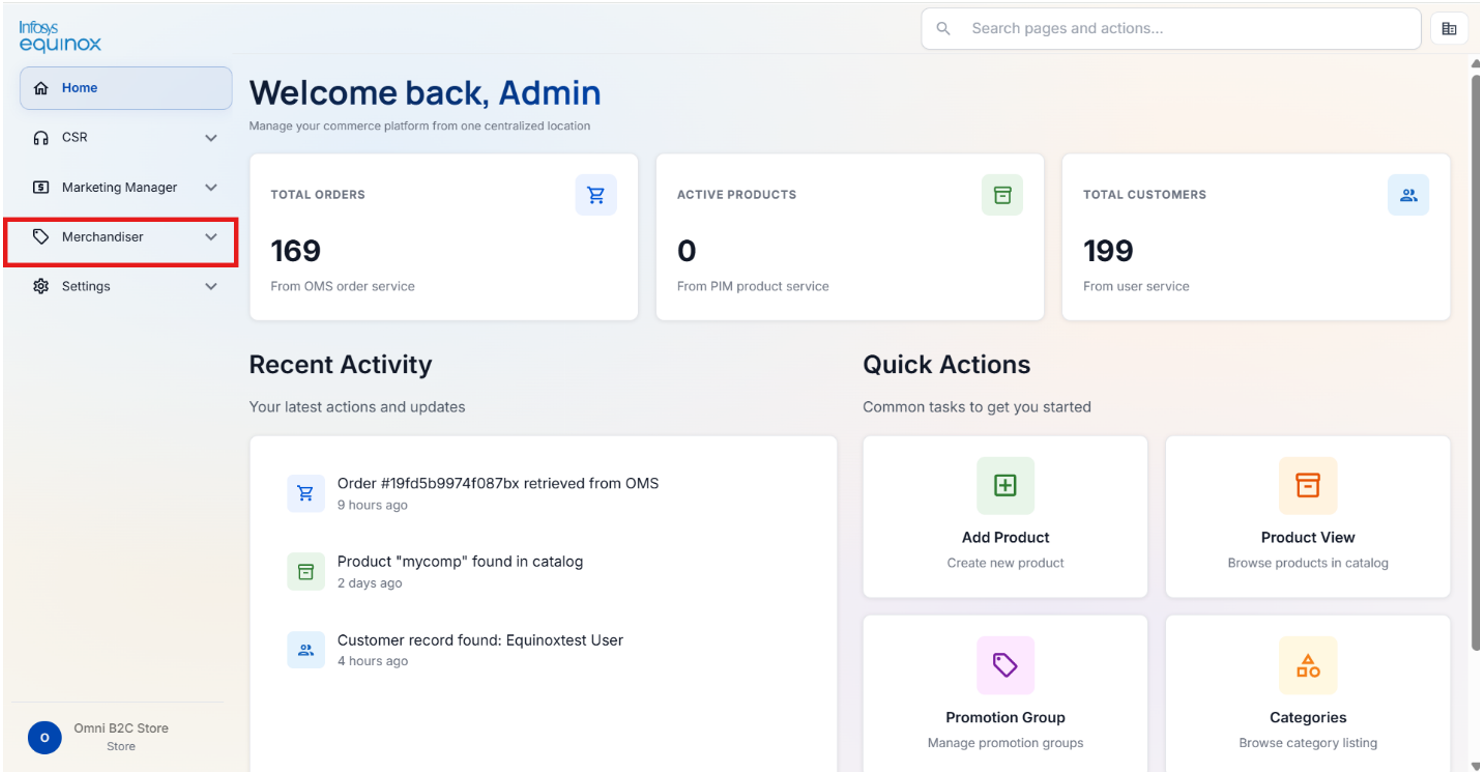
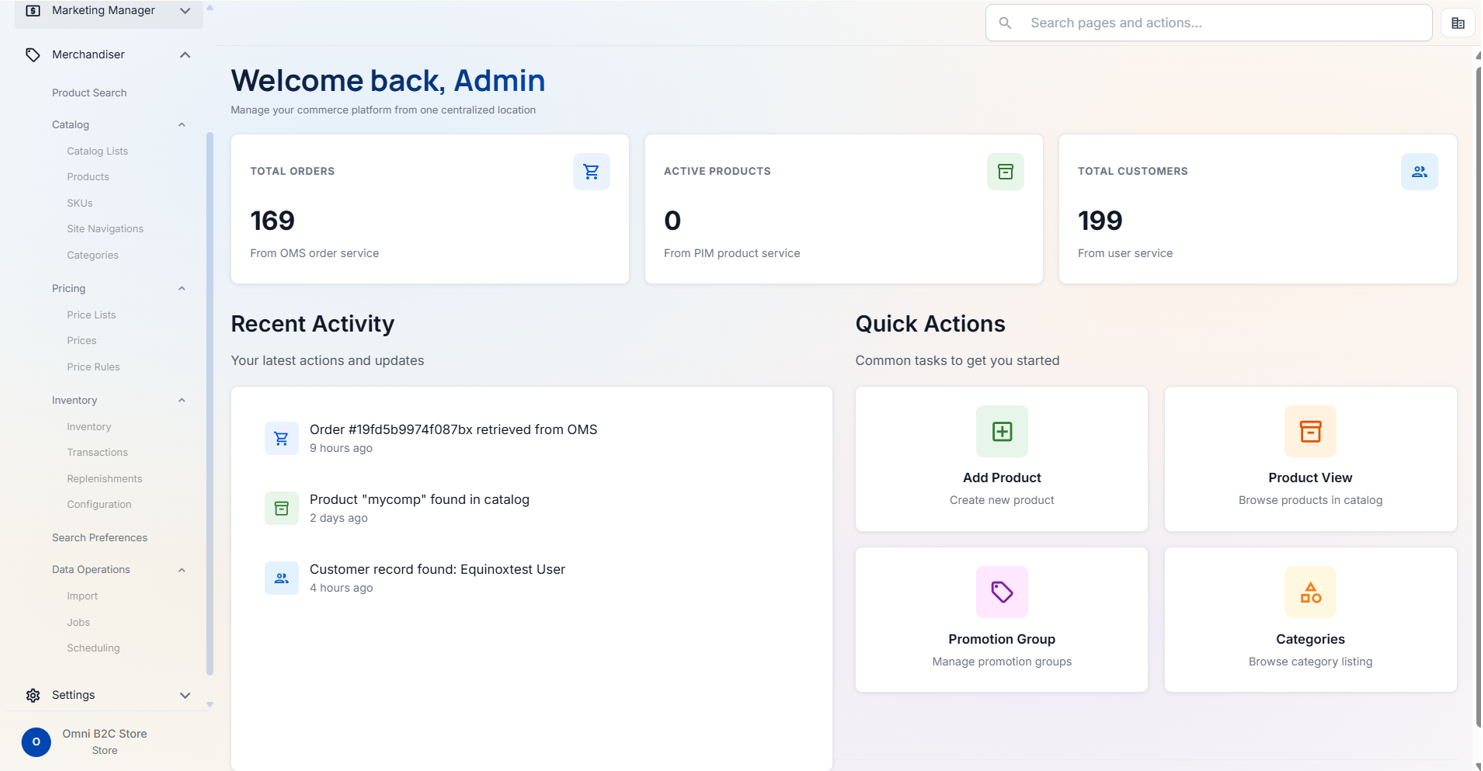
- In the left navigation, select Merchandiser to expand the module menu.
| menu | Description |
|---|---|
| Product Search | Central workspace for searching, filtering, and managing products and SKUs |
| Catalog Management | View, create, and manage catalogs — the top-level containers that organize products and SKUs. |
| Products | Manage all products within the master catalog |
| SKUs | Manage all SKUs within the master catalog |
| Site Navigation | Create and manage storefront navigation menus and their hierarchical category structures. |
| Categories | Create, organize, and manage the category tree that defines the browsing structure of the storefront. |
| Price Lists | View and manage price lists and SKU-level pricing across currencies and date ranges. |
| Data Operations | Import and export catalog, pricing, inventory, and category data in bulk. Monitor batch job execution. |
| Search Configuration | Manage search synonyms and search redirects for the store’s search experience. |
| Inventory | Manage inventory positions, lots, SKUs, transfers, reservations, replenishments, and channel allocation policies. |
Product Search
Overview
The Product Search page in Merchandiser Admin is the central workspace for managing product, SKU, and category catalog data. You can search, filter, and act on records across multiple states from a single view.
Searching for Products
To search for products on the Product Search page:
- In the Merchandiser Admin, navigate to Merchandiser > Product Search
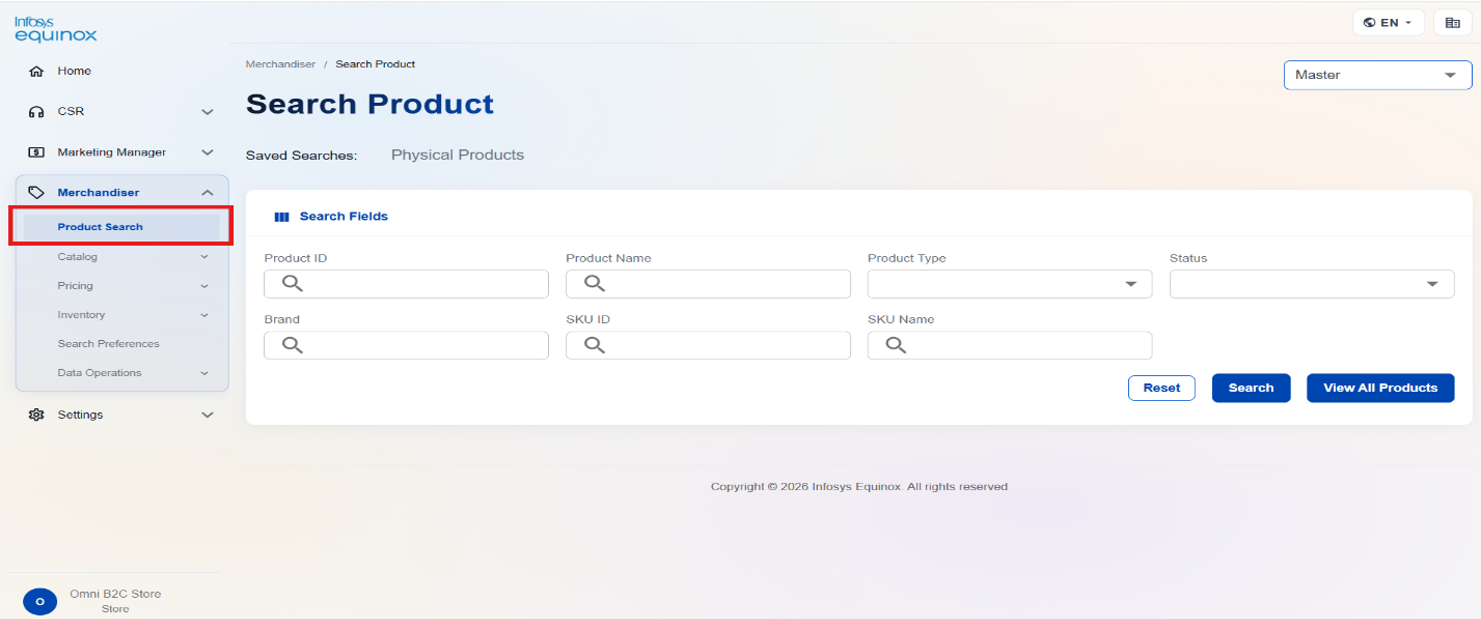
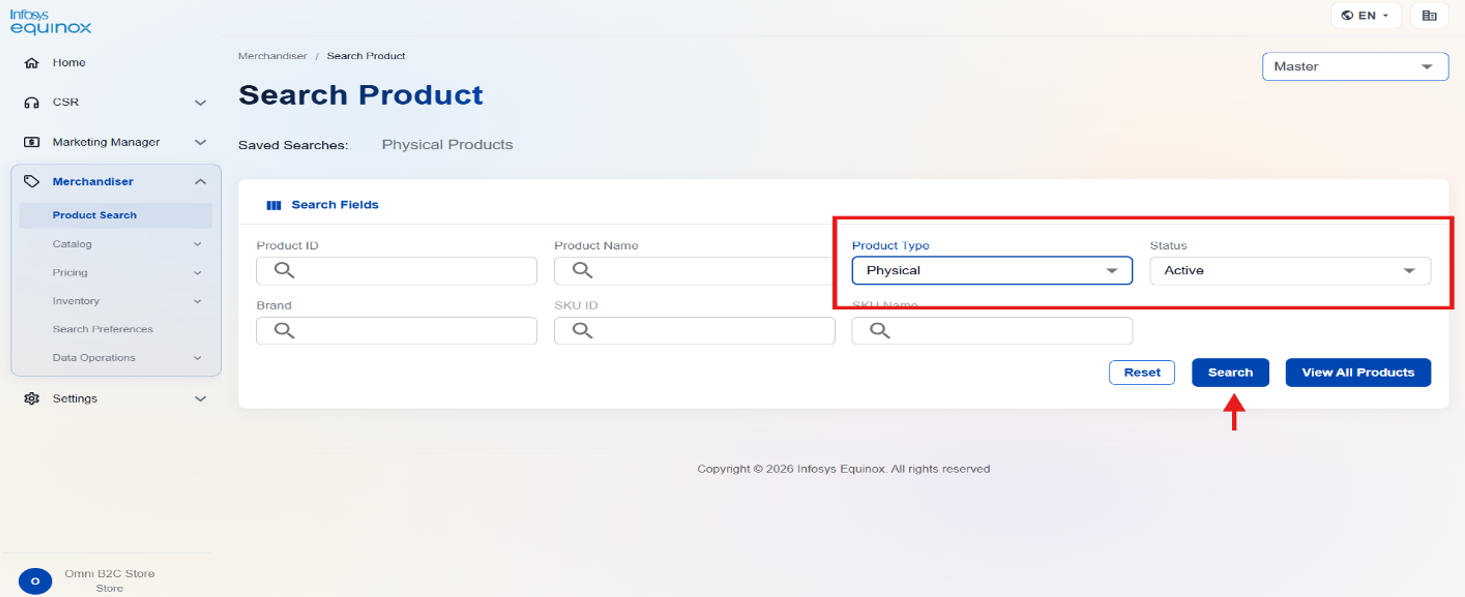
- Apply one or more filters using the available filter fields.
- Press Enter or click Search to retrieve results.
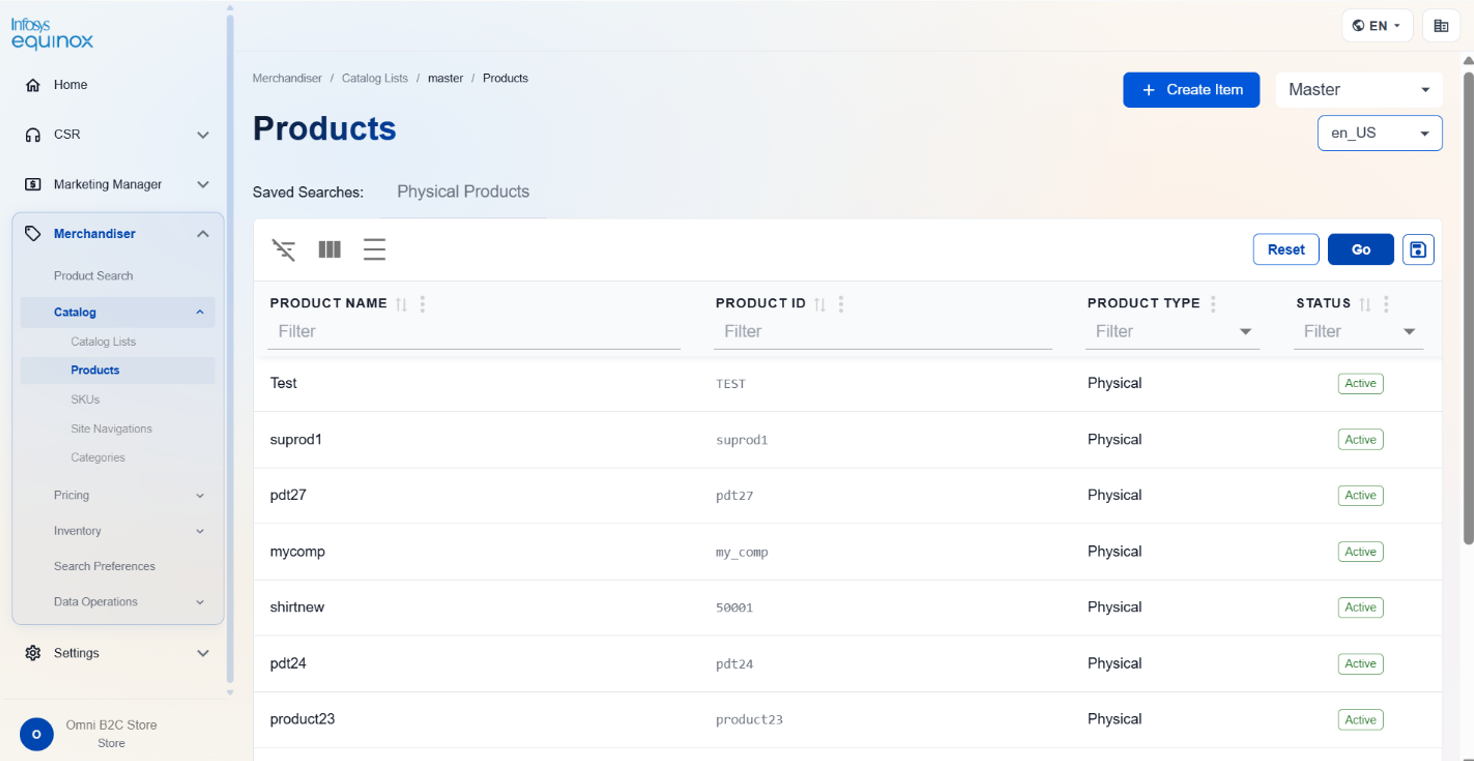
Viewing All Products
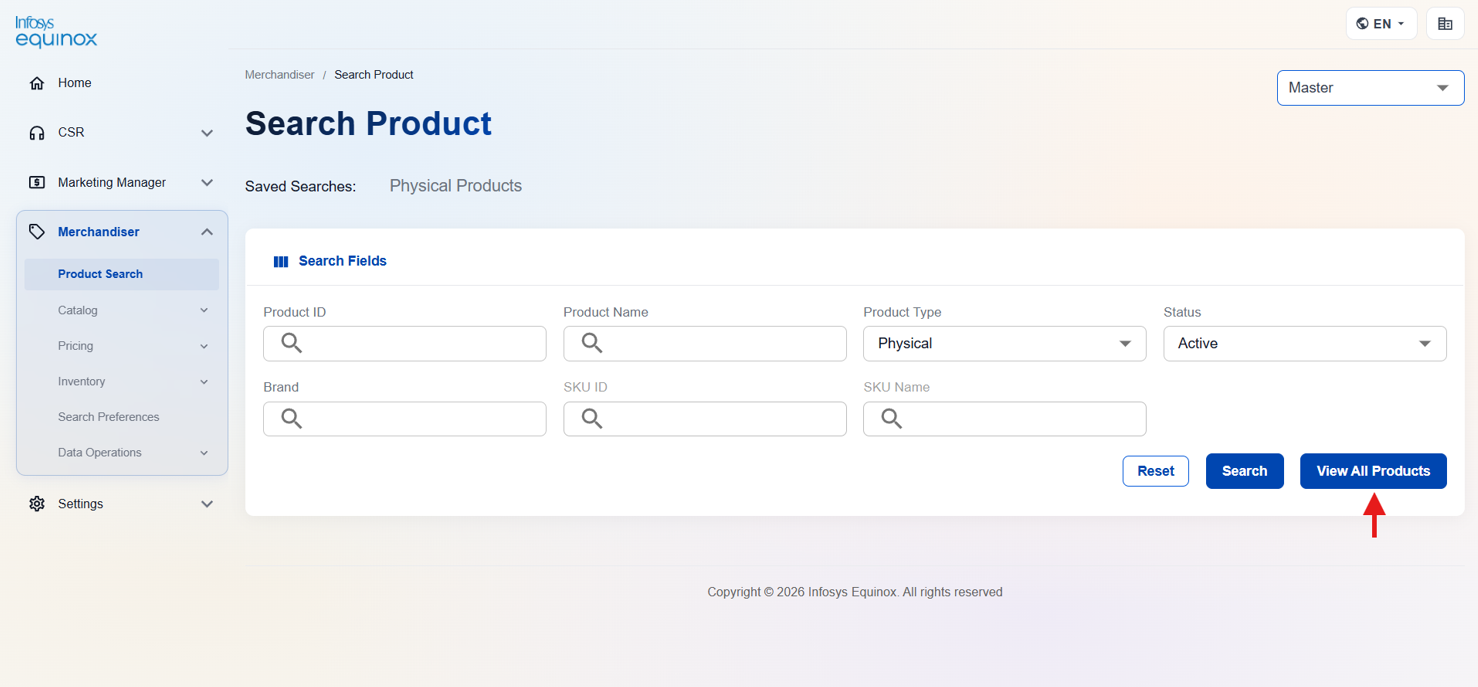
To view all products without a search filter:
- In the Merchandiser Admin, navigate to Merchandiser > Product Search
- Leave the search bar empty and click View All Products.
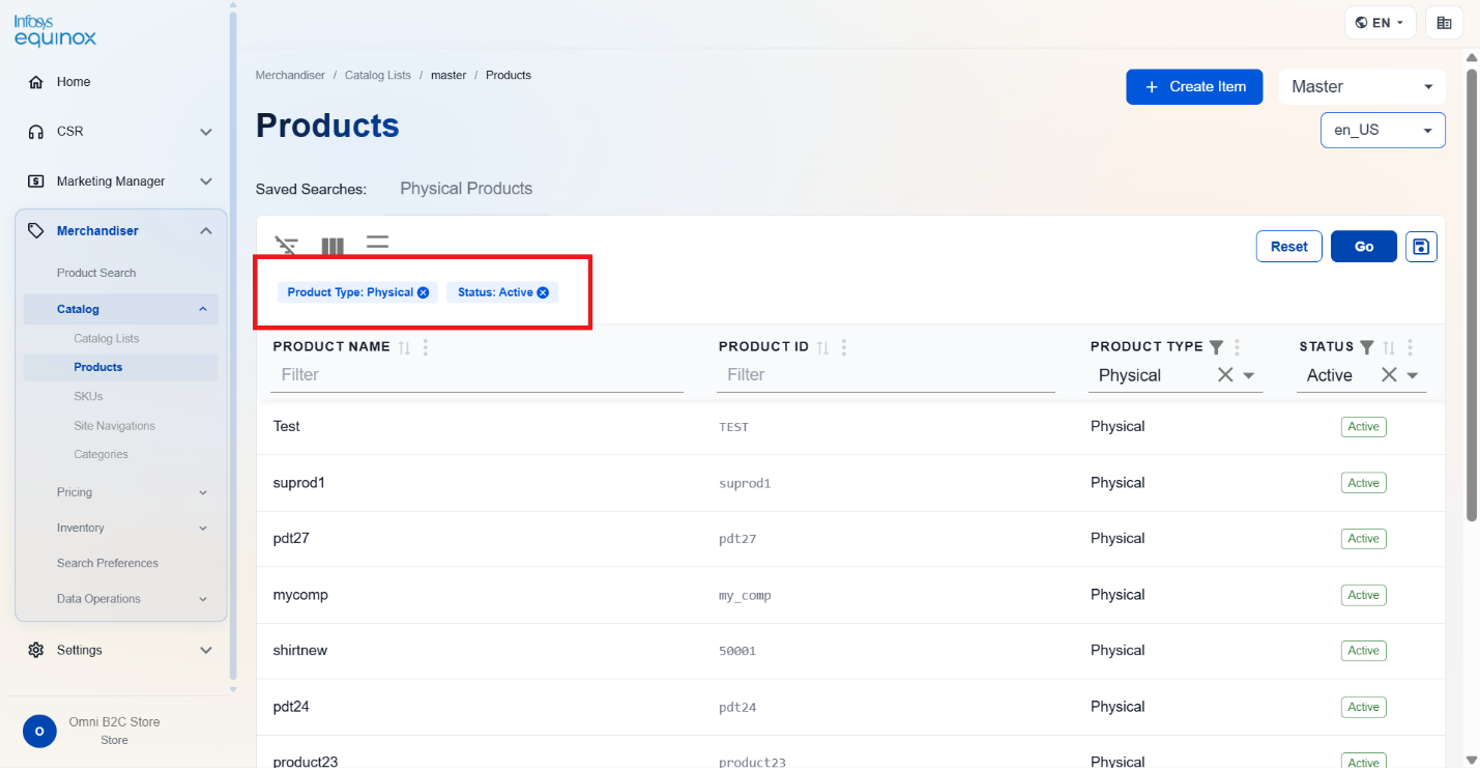
Saving Search Presets
You can save a configured set of search filters as a named preset for reuse.
To save a search preset:
- Configure your search filters on the Product Search page.
- Click Save Preset. The Save Preset dialog opens.
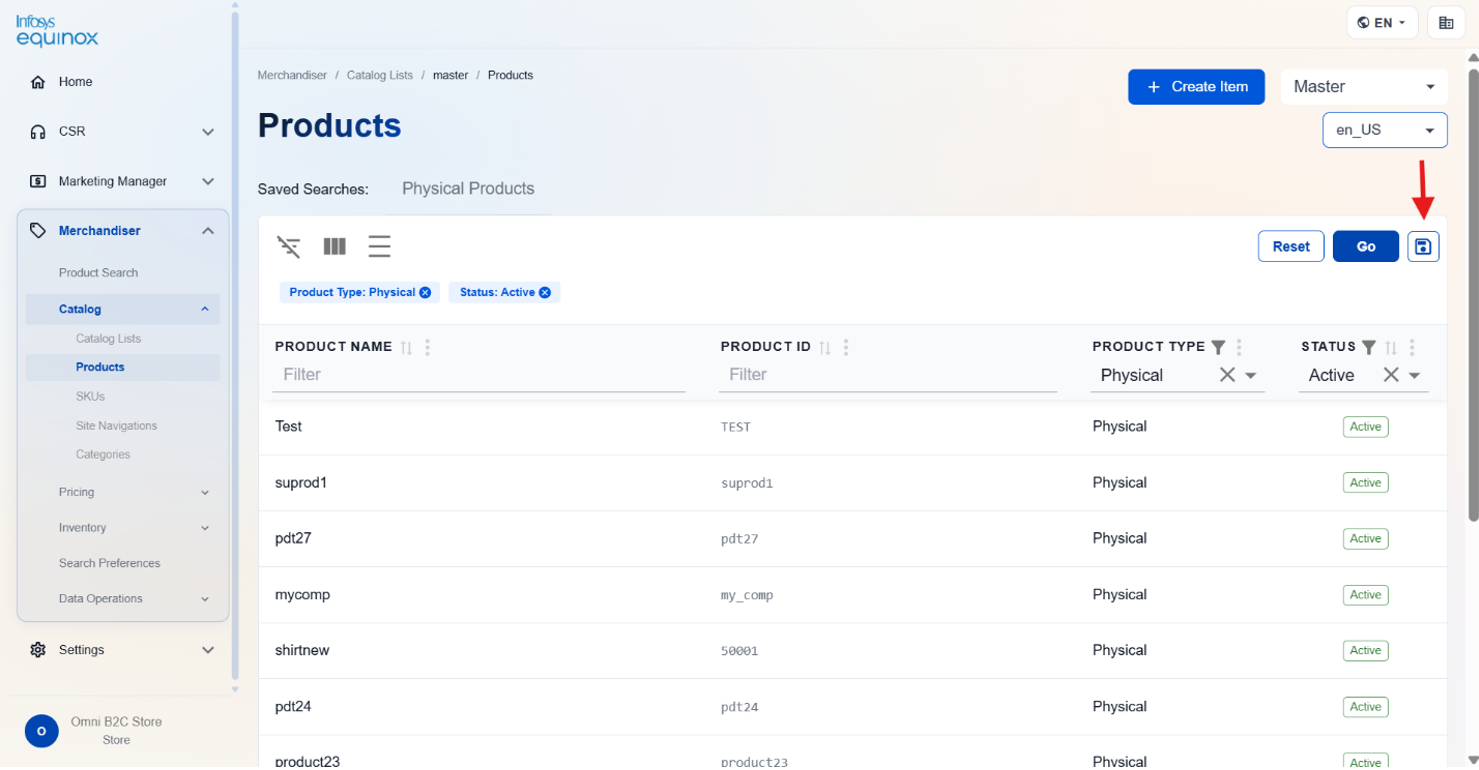
- Enter a name for the preset.
- Click Save. The preset is saved to your user profile and appears in the preset selector.
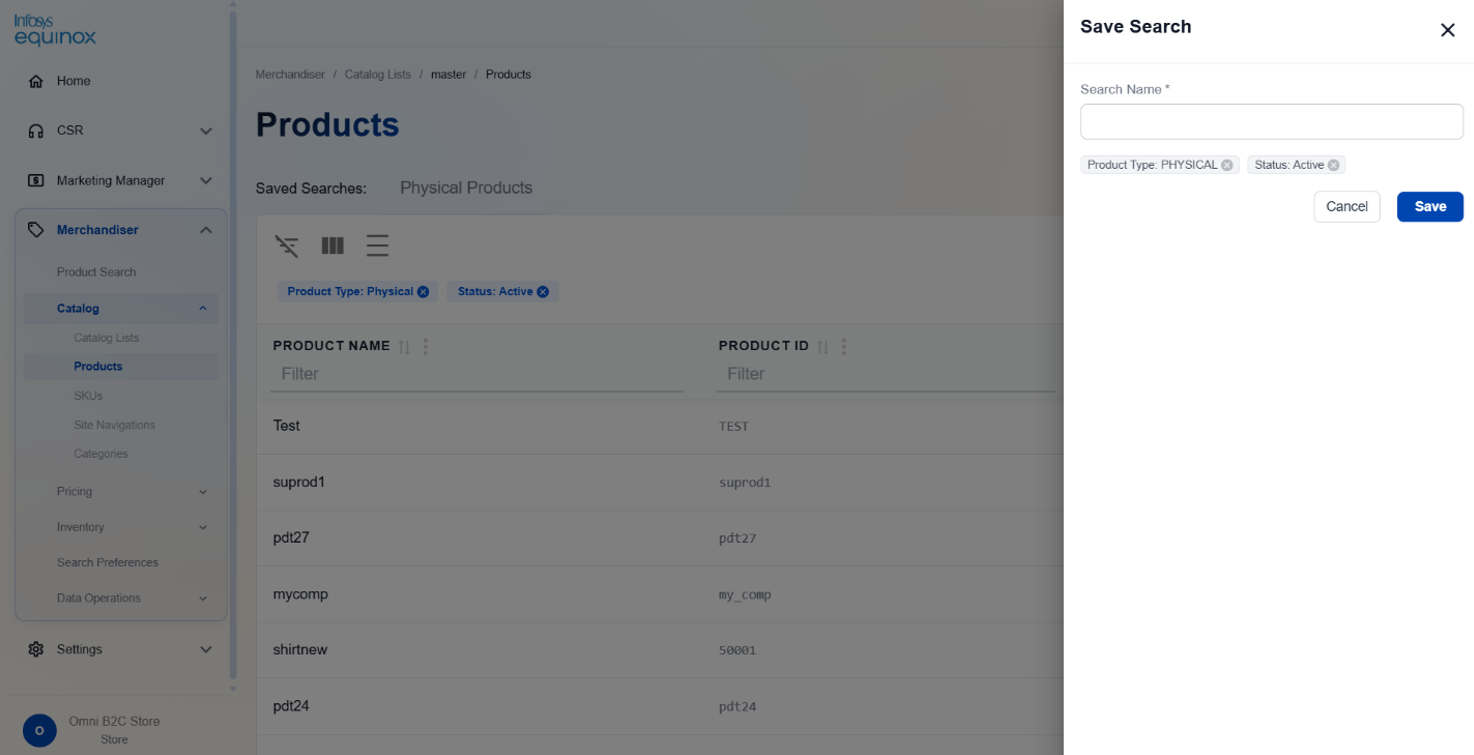
To load a saved preset:
- Click the preset selector on the Product Search page.
- Select a preset from the list. The saved filter configuration is applied to the search.

Catalog Management
Overview
The Catalog Lists page in Merchandiser Admin provides a centralized view of all catalogs configured for your store. A catalog is the top-level container that organizes products and SKUs for a defined effective period.
Viewing and Searching Catalogs
To view all catalogs:
- In the Merchandiser Admin, navigate to Catalog > Catalog Lists.
- The Catalog Lists page displays all catalogs for the current store.
| Column | Description |
|---|---|
| Catalog Name | The display name of the catalog. |
| Catalog ID | The unique identifier for the catalog. |
| Type | The catalog type, such as Default or Filter. |
| Status | Indicates whether the catalog is Active or Inactive. |
To search for a specific catalog, use the search bar at the top of the Catalog Lists page.
Creating a Catalog
To create a catalog:
- In the Merchandiser Admin, navigate to Catalog > Catalog Lists.
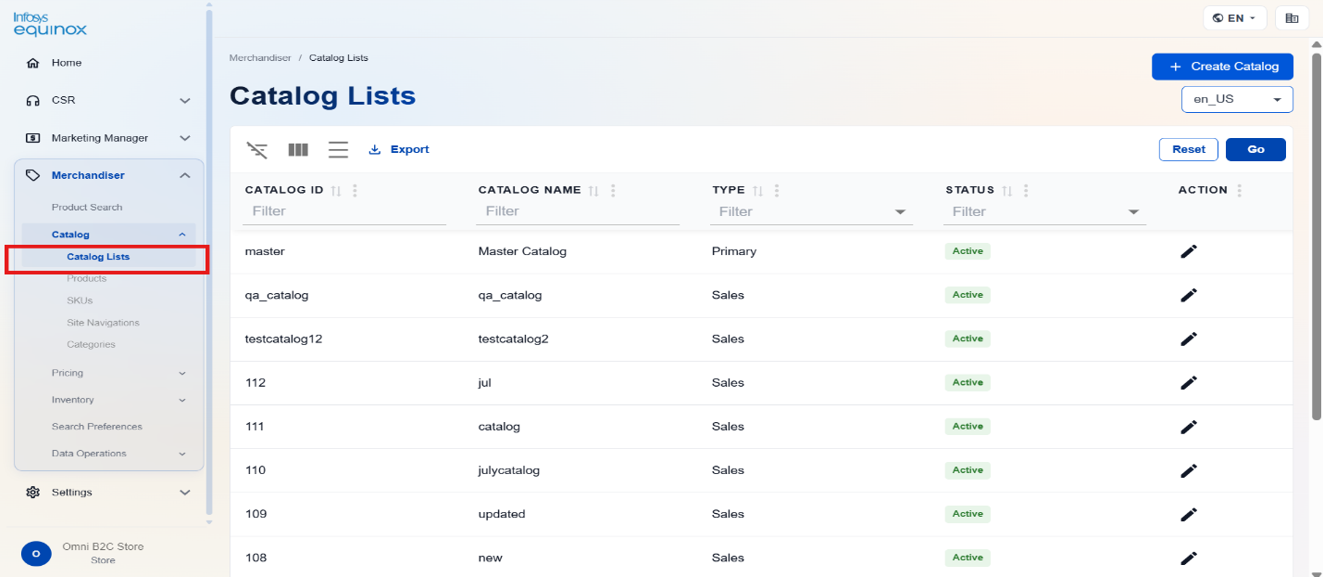
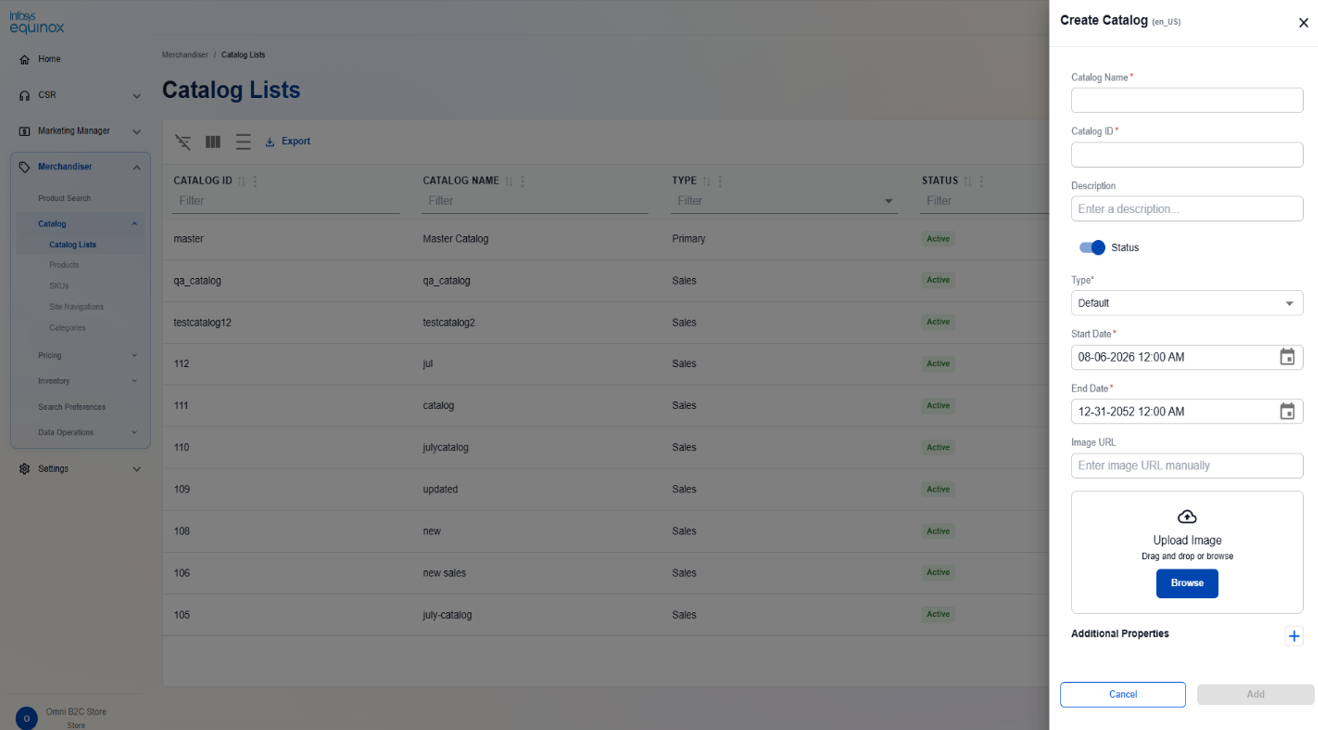
- Click Create Catalog. The Create Catalog panel opens on the right side of the page.
- Complete the following fields:
| Field | Required | Description |
|---|---|---|
| Catalog Name | Yes | Enter a display name for the catalog. Maximum 200 characters. Alphanumeric characters and standard special characters are supported. |
| Catalog ID | Yes | Enter a unique identifier for the catalog. Maximum 200 characters. Alphanumeric characters, hyphens, and underscores only. Cannot be edited after the catalog is created. |
| Description | No | Enter an optional description. Maximum 500 characters. |
| Status | Yes | Toggle on to set the catalog as Active, or toggle off for Inactive. Enabled by default. |
| Type | Yes | Select the catalog type from the dropdown. Default creates a standard master catalog. Filter creates a sales catalog. Cannot be changed after creation. |
| Start Date | Yes | Select the date and time from which the catalog becomes effective. |
| End Date | Yes | Select the date and time when the catalog expires. Defaults to 12-31-2052 12:00 AM. |
| Image URL | No | Enter a URL for the catalog image, drag and drop an image file, or click Browse to upload an image from your device. Accepted formats: PNG, JPG, JPEG, TIF, TIFF. |
| Additional Properties | No | Click the expand icon to add custom key-value properties to the catalog. Multiple properties can be added. To remove a property, click Delete next to that property. |
Important: Both Catalog Name and Catalog ID are mandatory. The Catalog ID must be unique across all catalogs and cannot be edited after the catalog is created.
- Click Add to create the catalog.
Products
Overview
The Products page under Catalog Lists provides a centralized workspace for managing all products in the master catalog. You can create, edit, and publish products through the full authoring lifecycle.
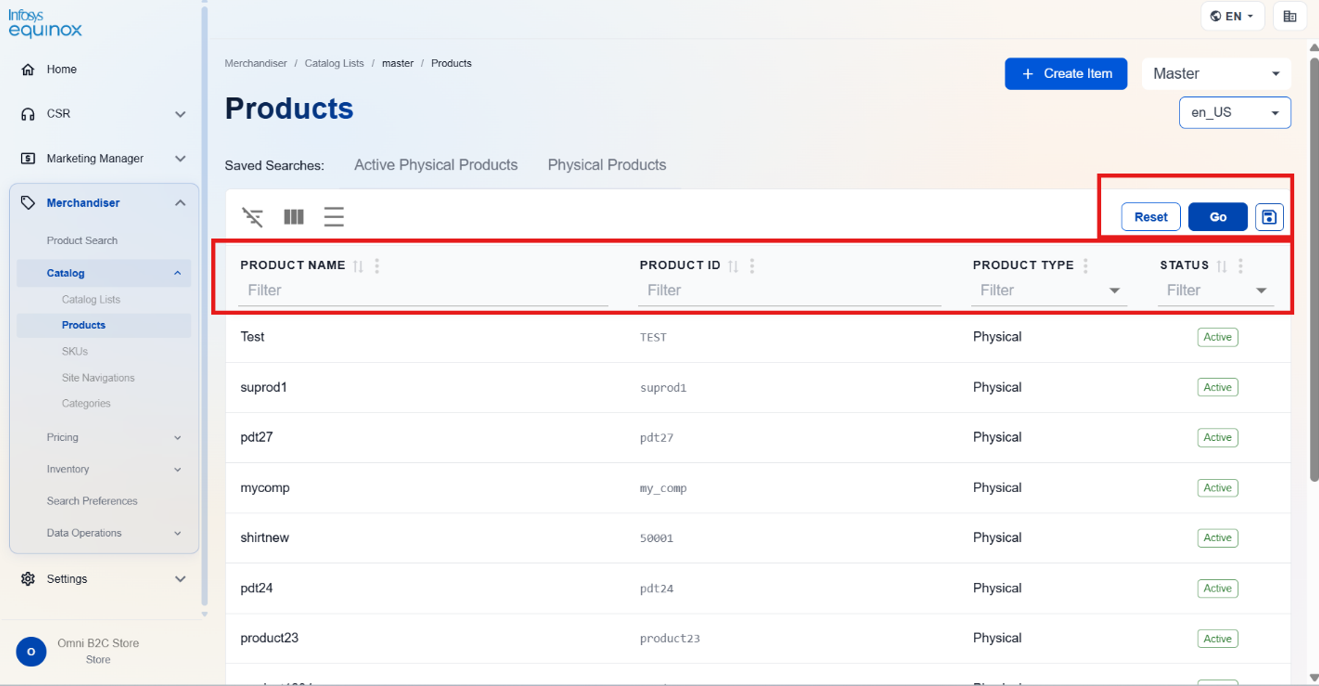
Searching & Viewing Products :
To navigate to the products list:
- In the Merchandiser Admin, navigate to Catalog > Products.
- Select the master catalog from the list.
- The Products page opens, displaying all products in the selected catalog.
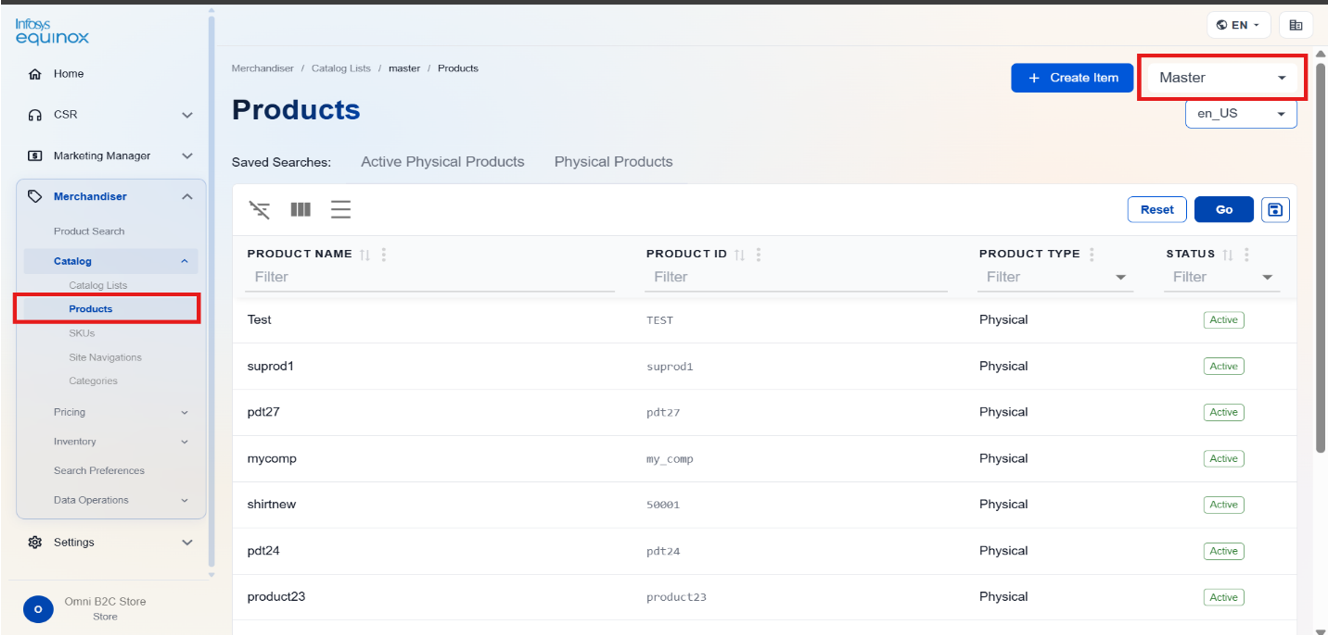
| Column | Description |
|---|---|
| Image | Thumbnail image associated with the product. |
| Product Name | The display name of the product. |
| Product ID | The unique identifier for the product. |
| Product Type | The product type, such as Physical. |
| Status | Indicates whether the product is Active or Inactive. |
Use the Filter row beneath each column header to narrow results. Click Go to apply filters or Reset to clear them. Use the locale selector in the page header to switch the display locale.
To search using a saved filter set, select a preset from the Saved Searches bar. If no presets exist, the bar displays No Saved Searches!
Understanding the Product page sections
When you open a product record, the following sections are available:
| Sections | Description |
|---|---|
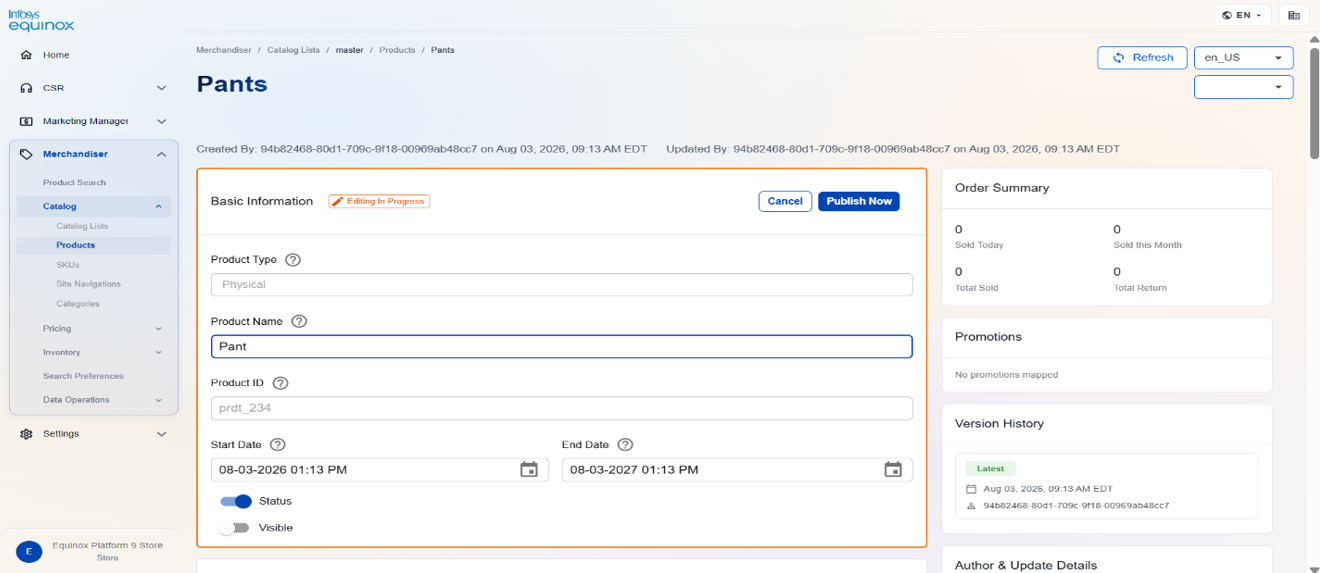
| Basic Information | Core product attributes including Product Type (read-only), Product Name, Product ID (read-only), Start Date, End Date, Status toggle, and Visible toggle. The Publish Now button is in this card’s header. |
| Images and Digital Assets | Upload and manage product images via URL input or DAM/Asset Manager modal. Supports a primary image drop zone and up to 6 thumbnails. Drag a thumbnail to the primary zone to set it as the main image. |
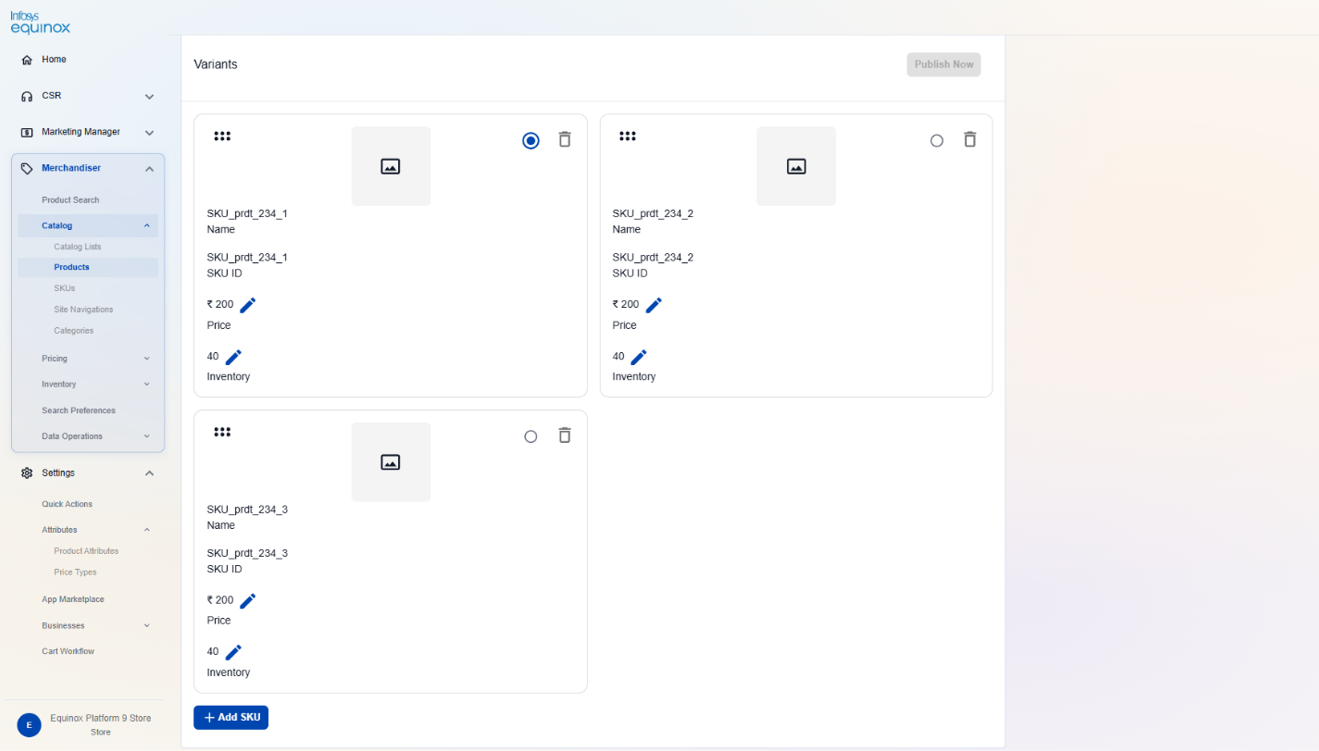
| Variants | Lists all SKUs linked to the product as cards. Each card shows SKU Name, SKU ID, Price, available inventory count, and variant attribute values. Supports adding, removing, and reordering SKUs. |
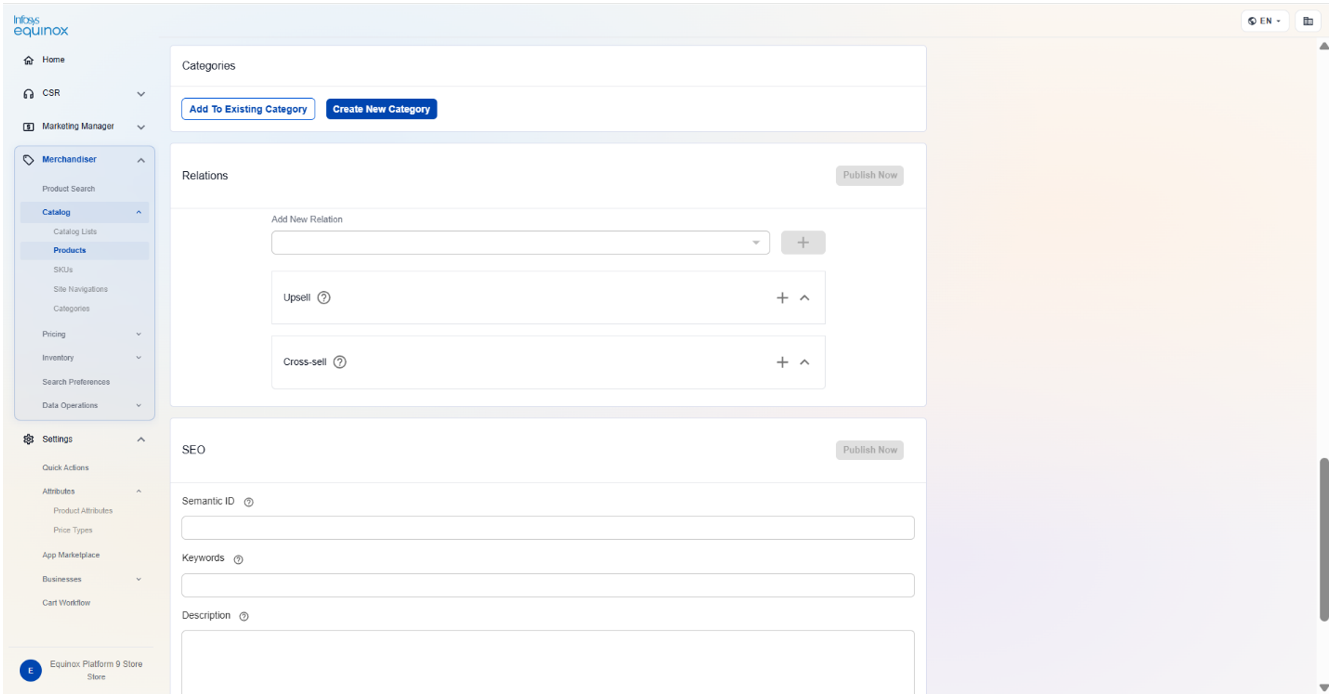
| Categories | Displays all categories the product is mapped to as path strings (e.g. Parent > Child). Supports adding to existing categories via a hierarchical tree drawer or creating a new category inline. |
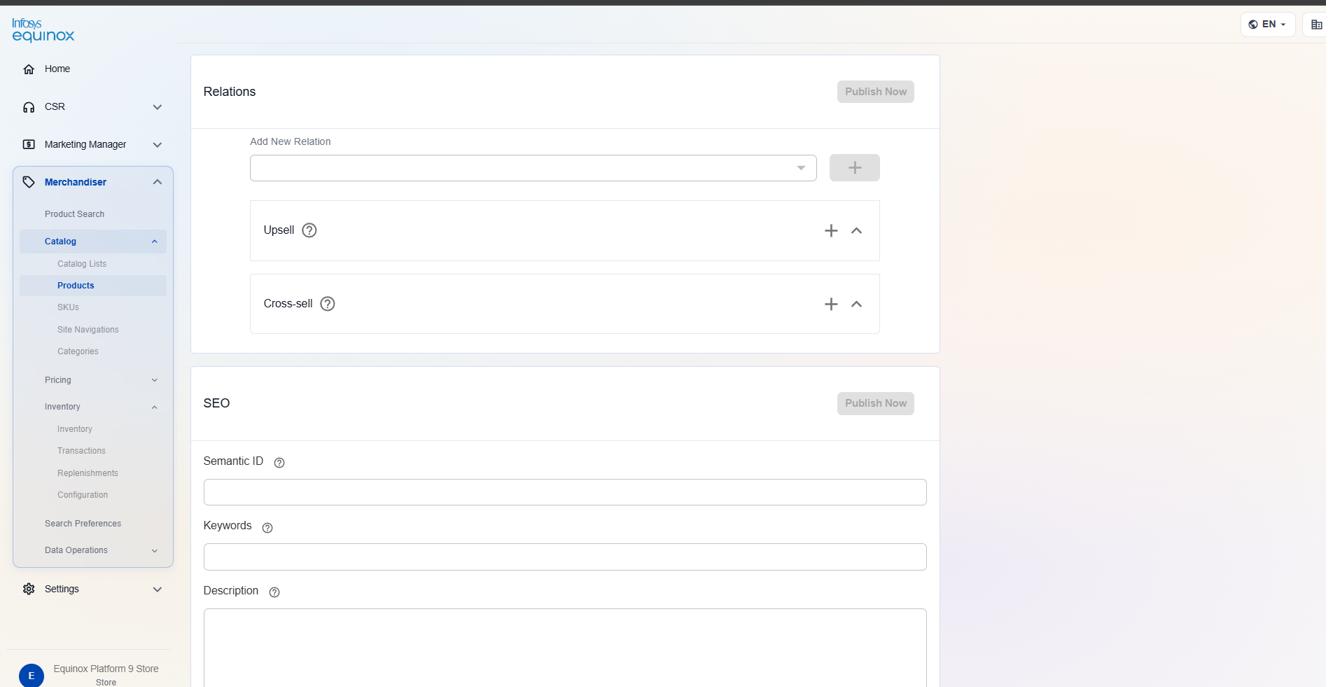
| SEO | Manages search optimization data including Semantic ID chips, Keywords chips, Description, and any additional SEO fields configured by the tenant. Shown for products only, not on SKU pages. |
| Relations | Links related products to the current product using three relation types: Upsell, Cross-sell, and any tenant-configured Custom relation types. Each type appears as a collapsible accordion showing a table of linked products (Image, Product ID, Name) with a remove icon per row. Click Add in an accordion header to open a searchable drawer (70vw) and select products to link. Custom relation types can also be deleted from the accordion header. A Save All button in the section header commits all relation changes at once. |
Variants sections:
Lists all SKUs linked to the product. Each SKU appears as a card showing its Name, SKU ID, Price, available inventory count, variant attribute values, and an image.
Actions per SKU card:
- Add SKU button — opens a searchable drawer to find and link existing SKUs (with attribute-based filtering and infinite scroll)
- Price icon — opens a side drawer with the full price table for that SKU (inline-editable: Start/End Date, Min/Max Qty, Transactional Price, Bundle Price, Subscription %)
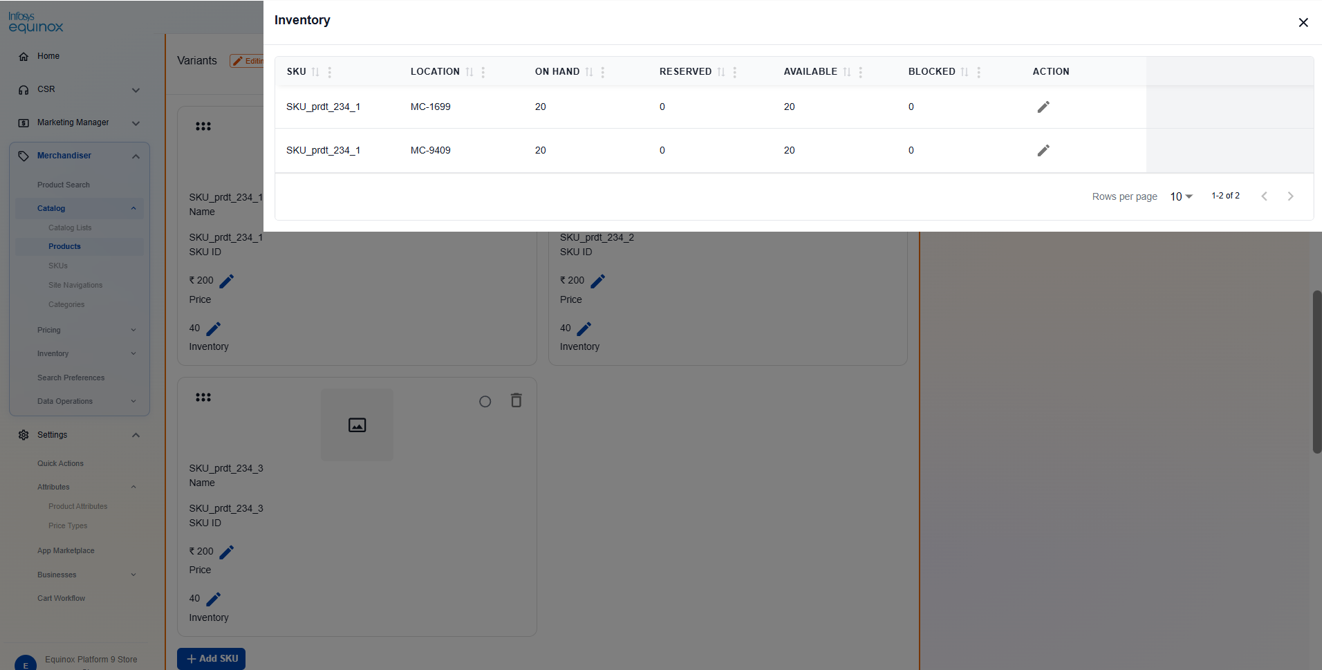
- Inventory icon — opens the Inventory Drawer (see below)
- Click card — navigates to the individual SKU detail page
- Delete — unlinks the SKU from the product
SKU Inventory Edit (from Variants)
The Inventory icon on a SKU card opens a drawer showing a table of positions (SKU, Location, On Hand, Reserved, Available, Blocked). Clicking the edit action in that table opens a second inner drawer — Edit Position — with editable number fields: On Hand, Reserved, Available, Blocked, In Transit. Save/Cancel buttons commit the change.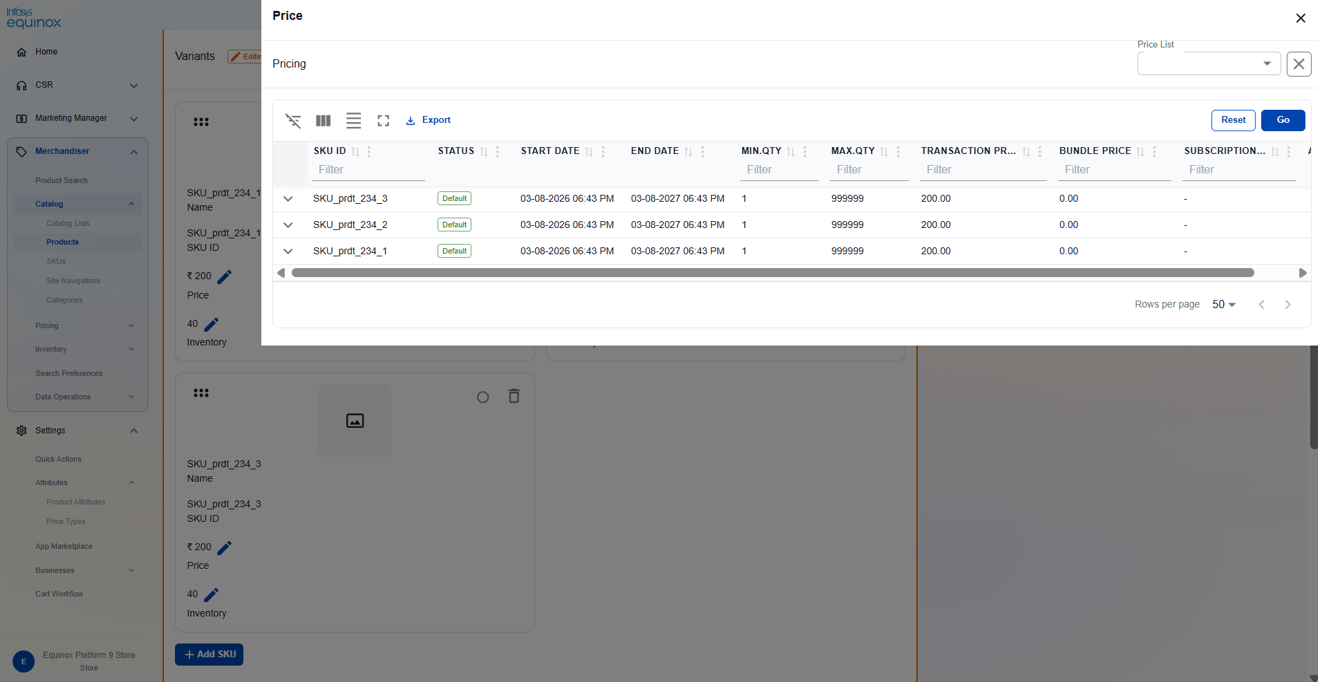
Categories
Shows all categories the product is mapped to, displayed as path strings (e.g. Parent > Child). A label shows the total count (“Mapped to N Categories”). Each row has a drag handle for reordering and a delete icon to remove the mapping.
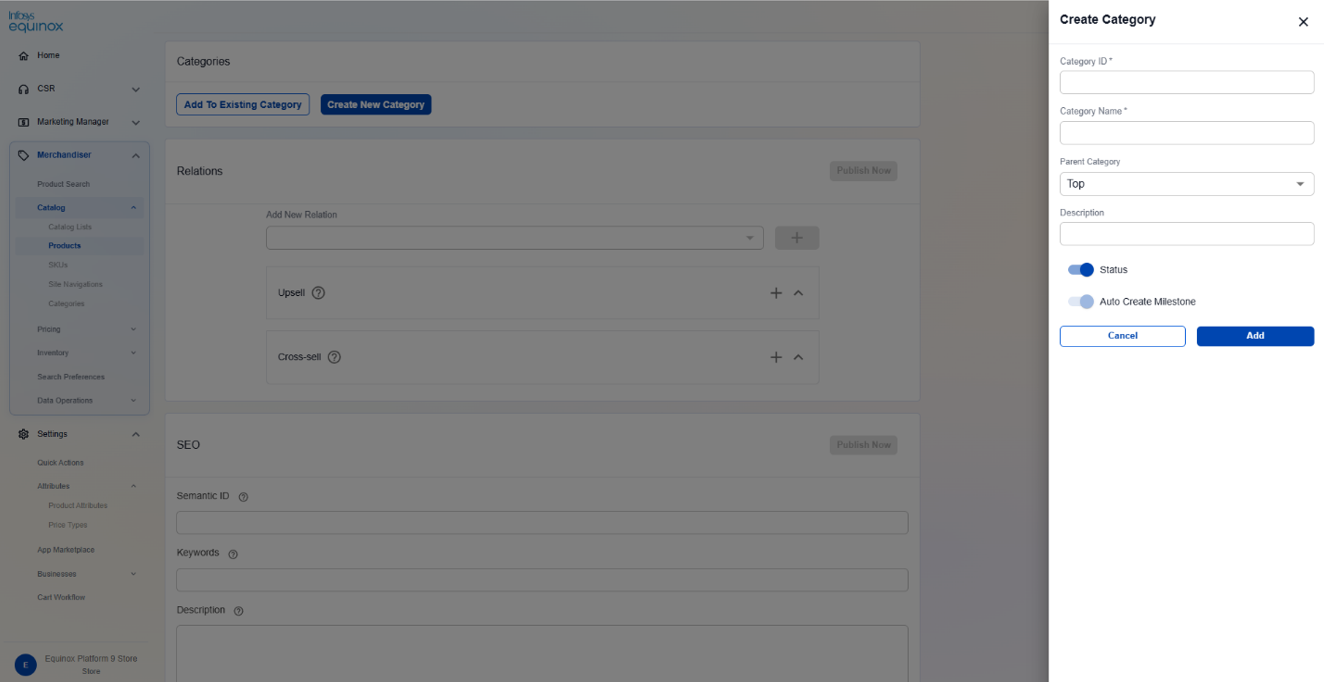
Two actions to add categories:
- Add to Existing — opens a drawer with a hierarchical checkbox tree to select from existing categories; supports navigation selector and search
- Create New Category — opens a create form inline in the drawer to define a new category and link it simultaneously
Relations and SEO section:
Creating a Product
To create a product:
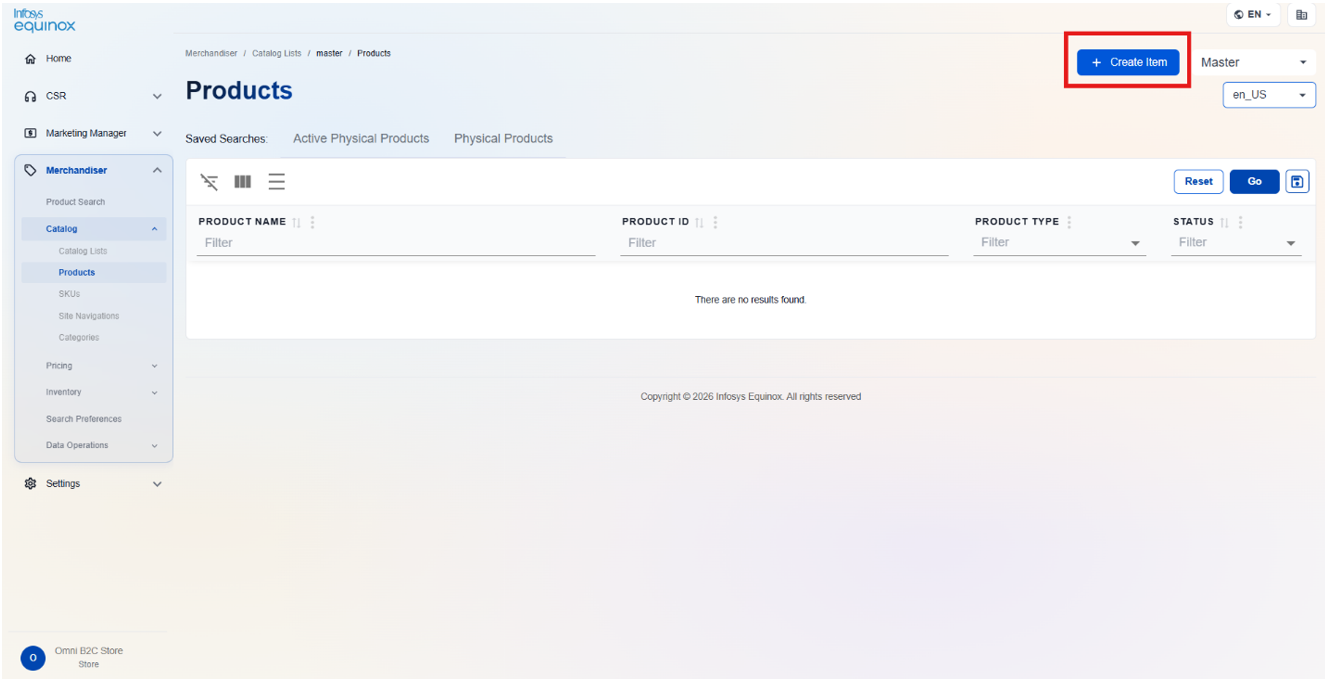
- In the Merchandiser Admin, navigate to Catalog Products
- Click Create Item. The product create form opens.
- Enter the required product attributes.
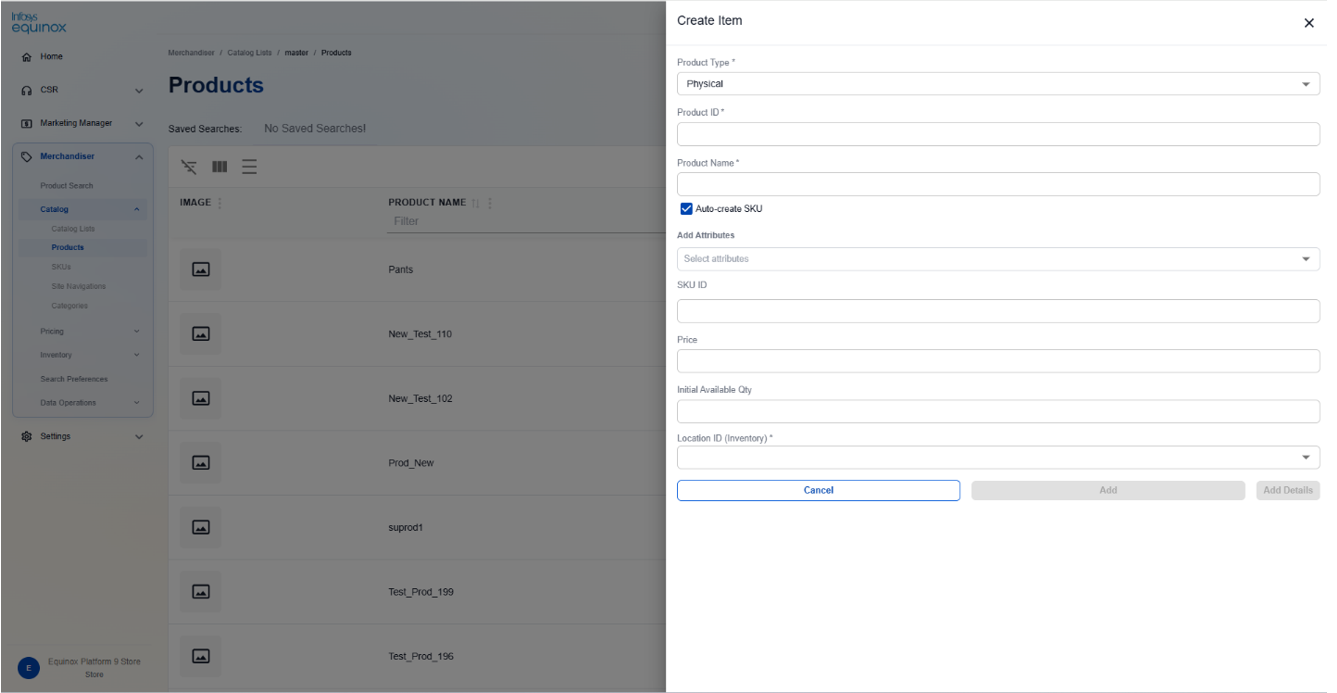
- The record saves automatically. Click Add details to make the product available on the storefront.
Editing a Product
To edit an existing product:
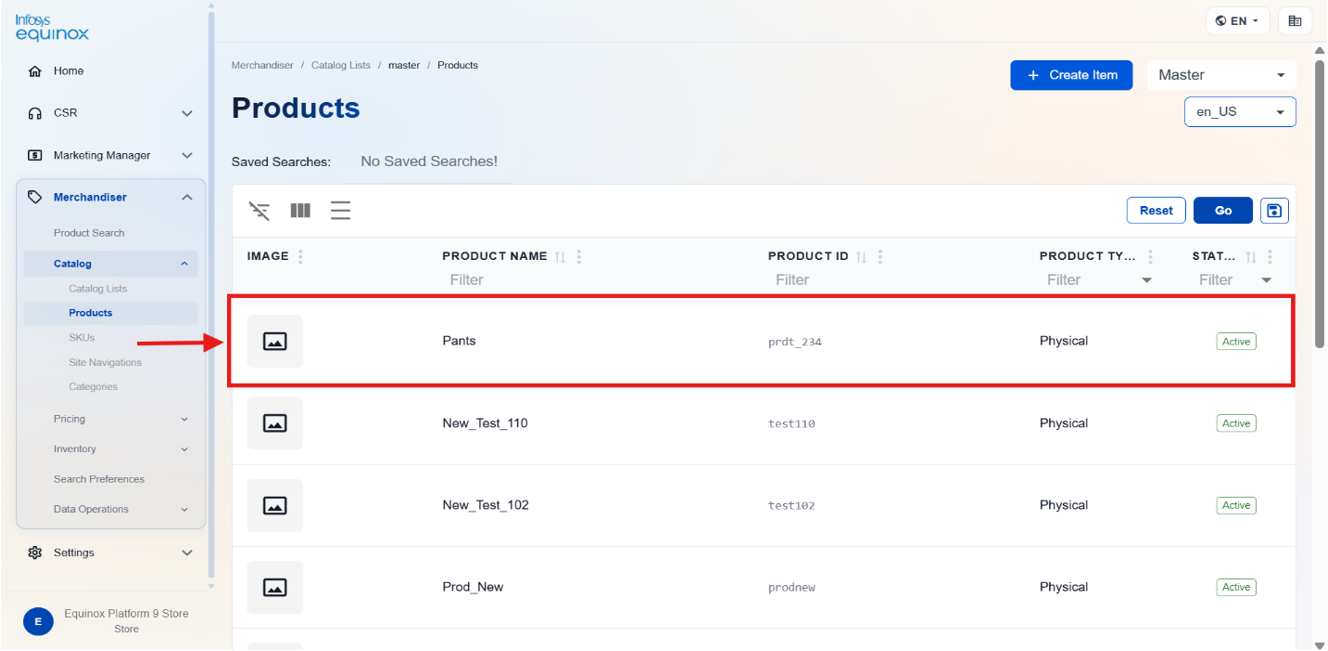
- In the Merchandiser Admin, navigate to Catalog > Products.
- Locate the product using the search bar or column filters.
- Click the product name to open the product detail page.
- Update the required attributes. Changes save automatically (indicated by the Saved status chip).
- Click Publish Now to publish the updated product to the storefront.
Refreshing the Product Search Index
To trigger a product search index rebuild:
- Open the product detail page.
- Click Refresh in the page header.
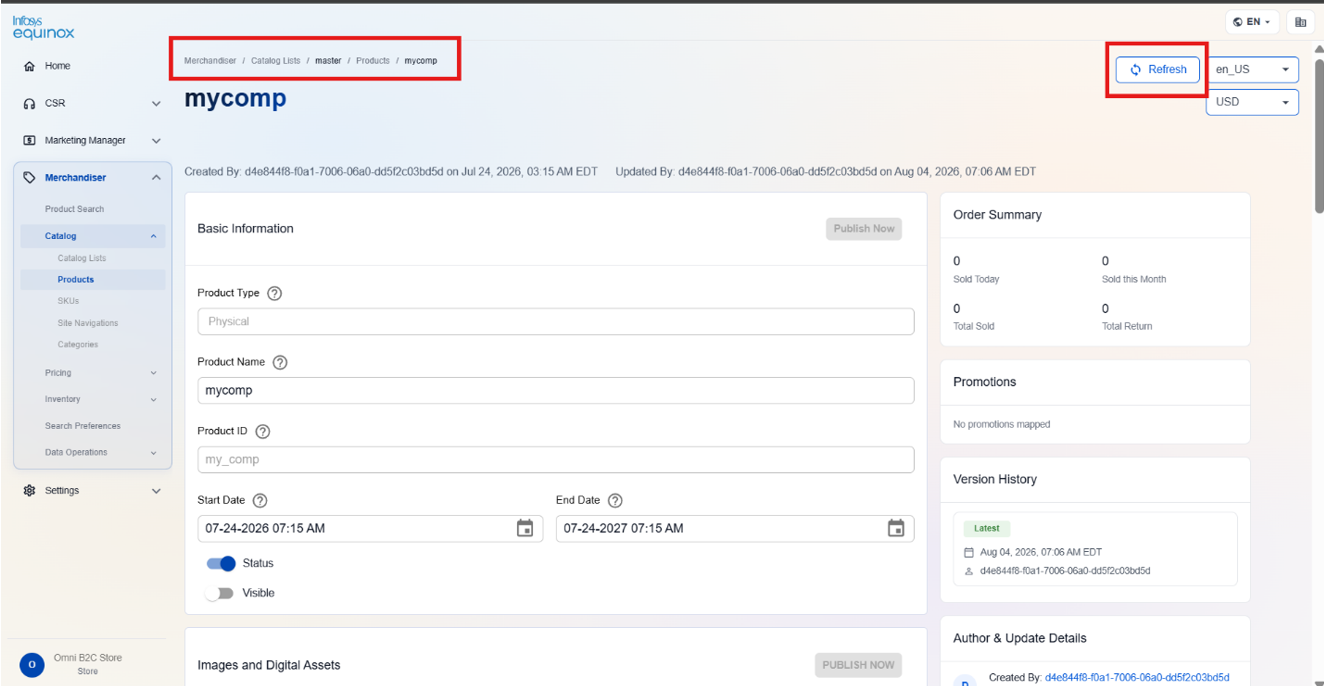
- Confirm the refresh in the dialog. The PIM search index rebuild is triggered for the product.
SKUs
Overview
The SKUs page under Catalog Lists provides a centralized workspace for managing all SKUs in the master catalog. SKUs represent the purchasable variants of products and carry pricing and inventory associations.
Searching & Viewing SKUs
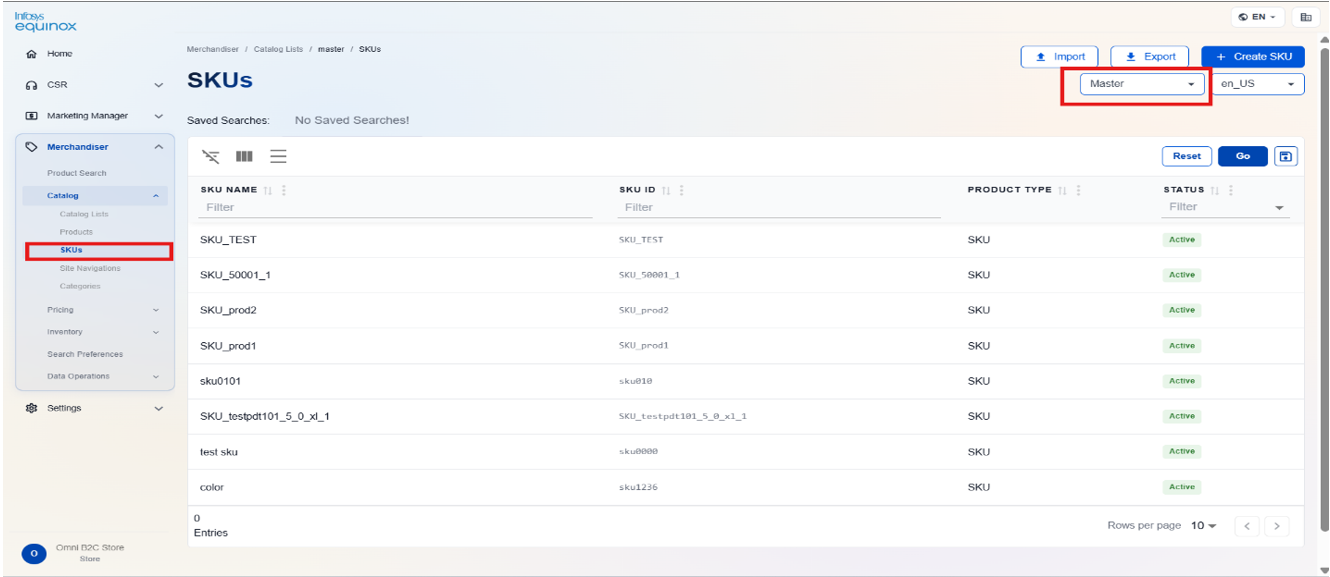
To navigate to the SKU list:
- In the Merchandiser Admin, navigate to Catalog > Skus
- Select the master catalog from the list.
- Select SKUs from the catalog sub-navigation. The SKUs page displays all SKUs in the selected catalog.
Creating a SKU
To create a SKU:
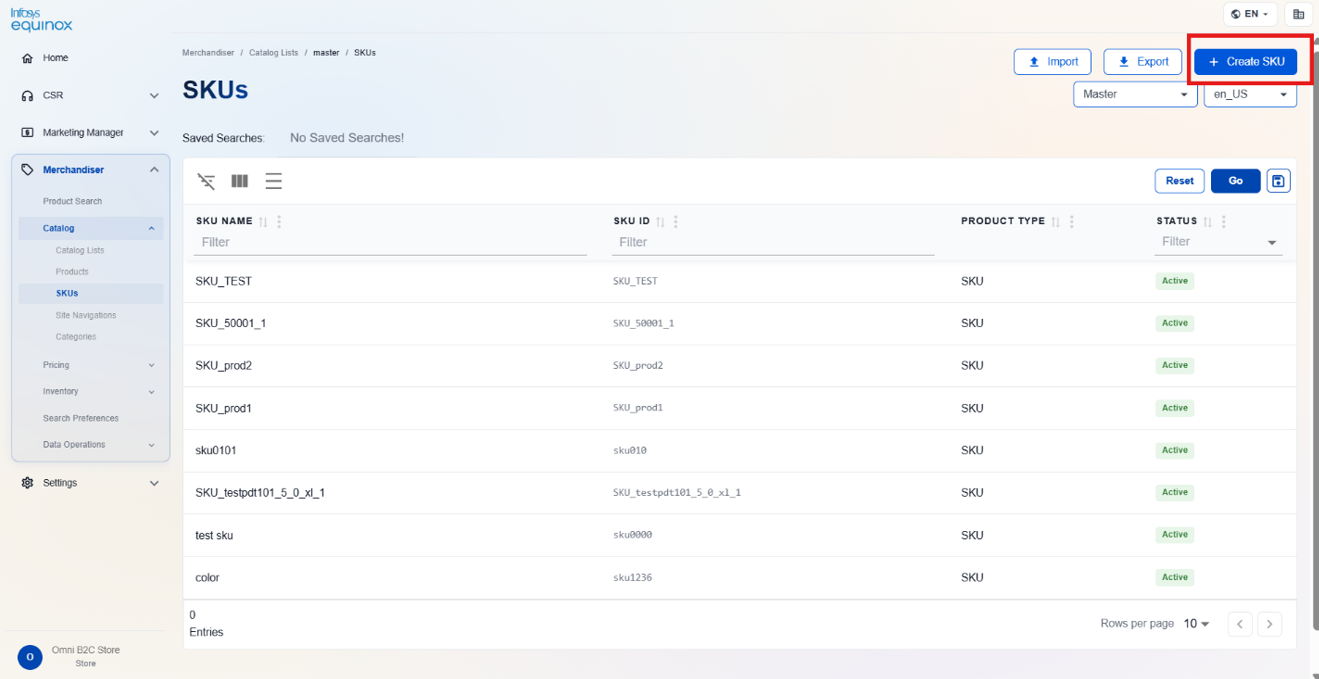
- In the Merchandiser Admin, navigate to Catalog > Skus
- Select SKUs from the sub-navigation and click + Create Sku. The SKU create form opens.
- Enter the required fields.
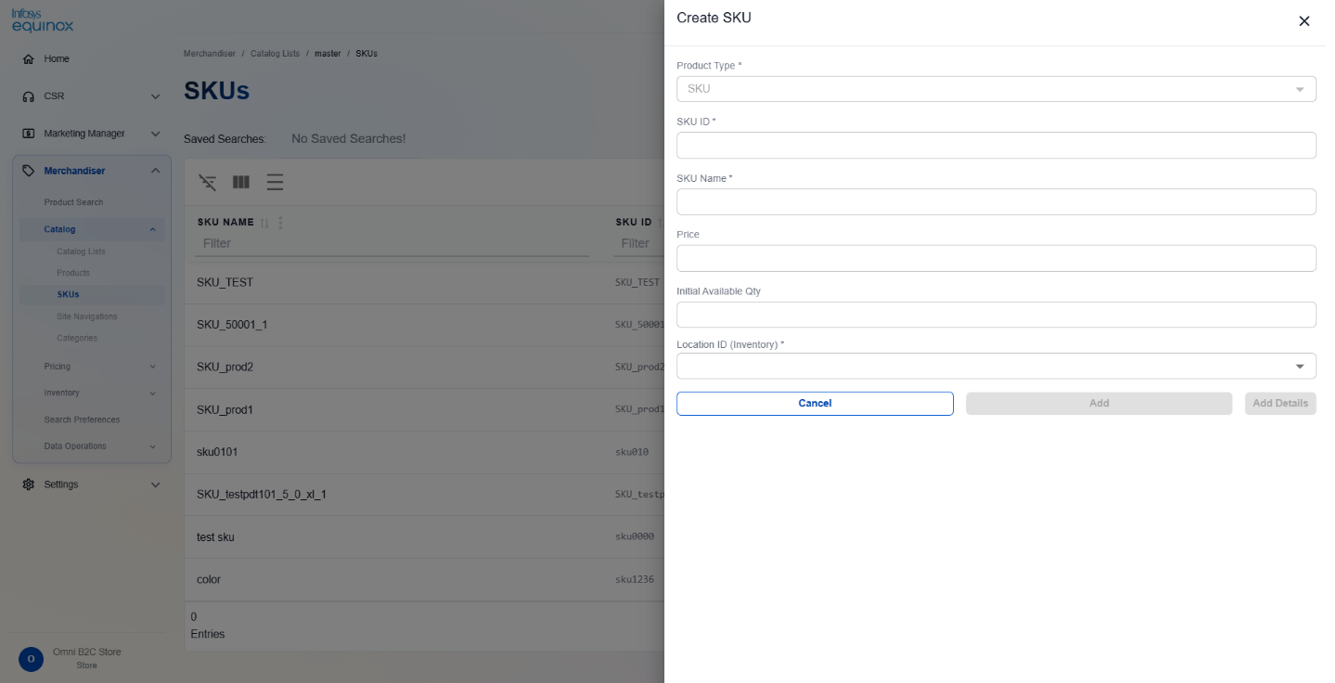
- Click Add details.
Editing a SKU
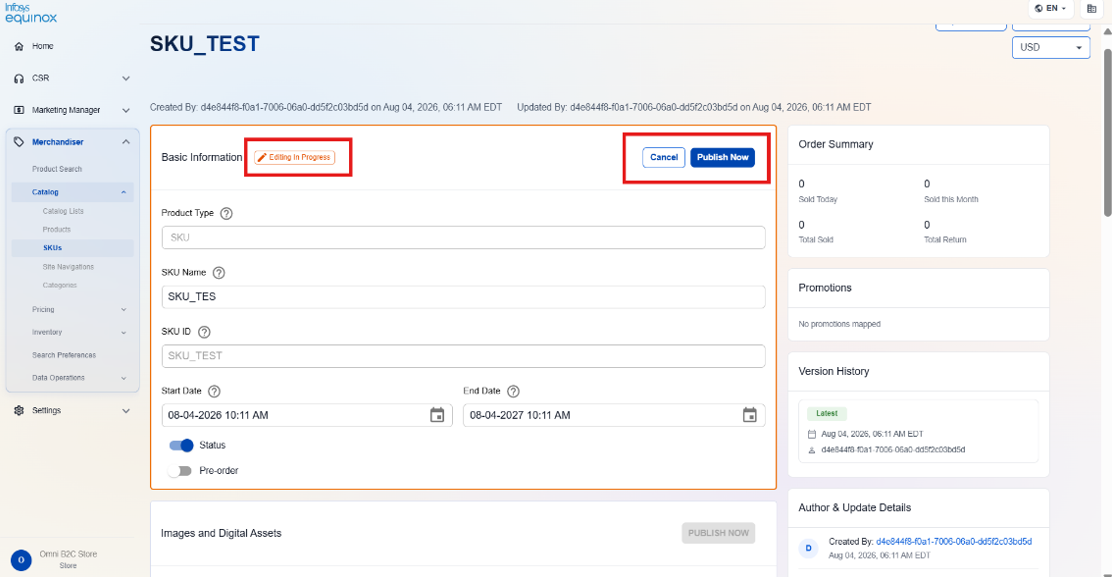
To edit an existing SKU:
- Navigate to Catalog > SKUs.
- Locate the SKU using the search bar or column filters.
- Click the SKU identifier to open the SKU detail page.
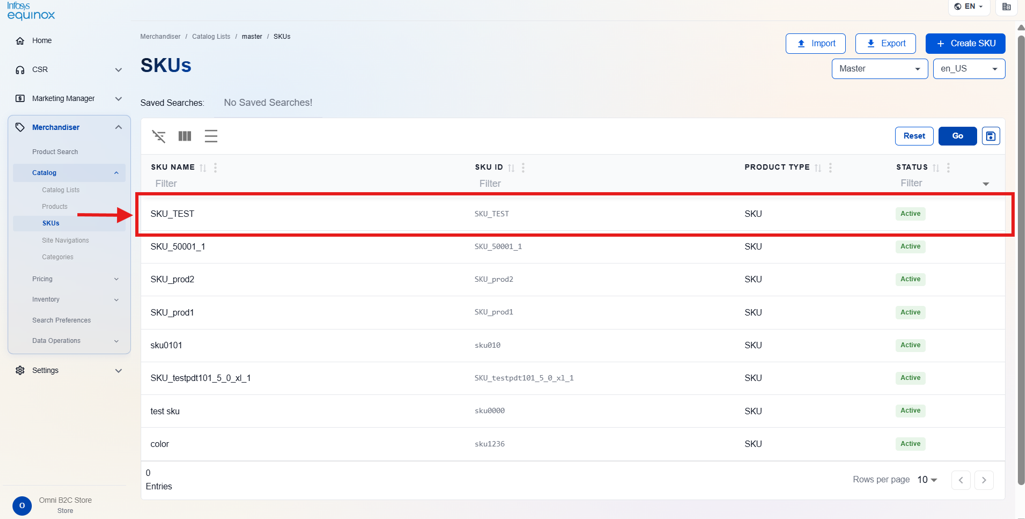
- Update the required attributes
- Click Publish Now to publish the updated SKU.
Refreshing the Sku Search Index
To trigger a Sku search index rebuild from the Sku detail page:
- Open the Sku detail page.
- Click Refresh in the page header. A confirmation dialog appears.
- Confirm the refresh. The PIM search index rebuild is triggered for the product.

Site Navigation
Overview
The Site Navigation page in Merchandiser Admin allows you to create and manage the navigational structures used across your storefront. Each site navigation defines a named hierarchy that the Categories module uses to scope its category tree.
You can maintain multiple site navigations for different storefronts or navigation contexts.
Searching & Viewing Site Navigation
To view all site navigations:
- In the Merchandiser Admin, navigate to Catalog > Site Navigation.
- The Site Navigation page displays all navigations configured for the current store.
| Column | Description |
|---|---|
| Navigation ID | The unique identifier for the site navigation. |
| Name | The display name of the site navigation. |
| Status | Indicates whether the navigation is Active or Inactive. |
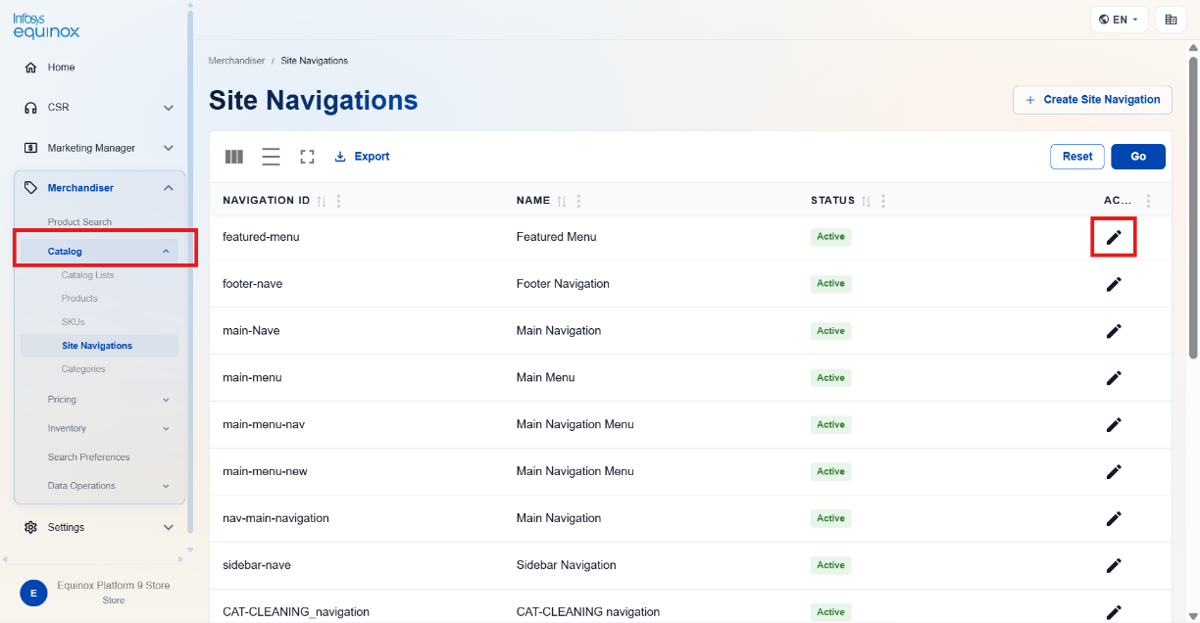
| Action | Edit icon to open and modify the site navigation. |
Creating a Site Navigation
To create a site navigation:
- In the Merchandiser Admin, navigate to Catalog > Site Navigation.
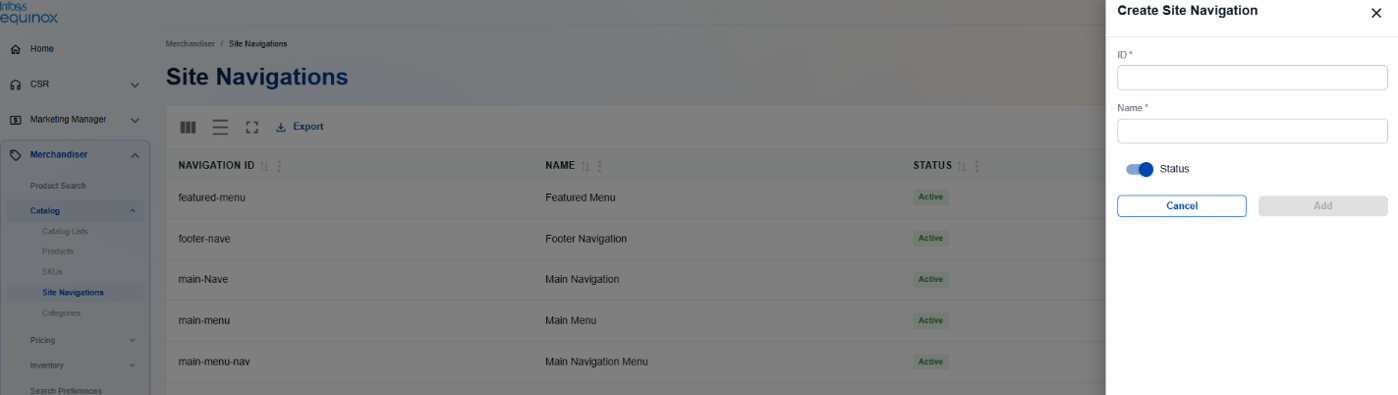
- Click Create Site Navigation. The Create Site Navigation drawer opens.
- Complete the following fields:
| Field | Required | Description |
|---|---|---|
| Identifier | Yes | Enter a unique identifier for the navigation. Alphanumeric characters, hyphens, and underscores only. Maximum 100 characters. Cannot be edited after creation. |
| Name | Yes | Enter a display name for the navigation. Minimum 2 characters, maximum 100 characters. |
| Status | Yes | Toggle on to set the navigation as Active, or toggle off for Inactive. |
- Click Add to create the site navigation.
Editing a Site Navigation
To edit a site navigation:
- In the Merchandiser Admin, navigate to Catalog > Site Navigation.
- Click the edit icon in the Action column for the navigation you want to modify.
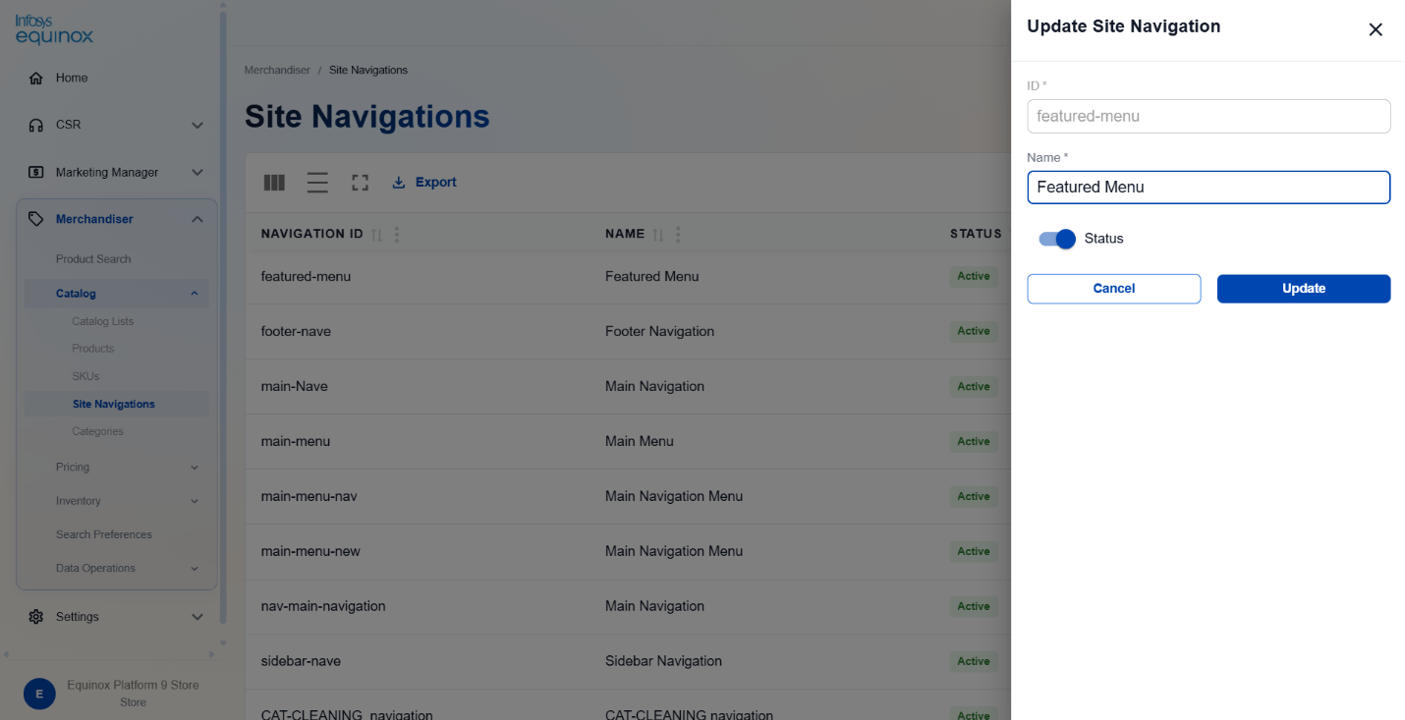
- Update the Name or Status fields as required. The Identifier field cannot be edited after creation.
- Click Update to save your changes.
Categories
Navigating to the Categories Page
To open the Categories page:
- In the Merchandiser Admin, navigate to Merchandiser > Categories.
- The Categories page displays the full category tree for the current store.
Switching Between Site Navigations
The category tree on the Categories page is scoped to the selected site navigation.
To switch the site navigation context:
- On the Categories page, click the Site Navigation dropdown in the page header.
- Select the desired site navigation. The category tree updates to display categories associated with the selected navigation.
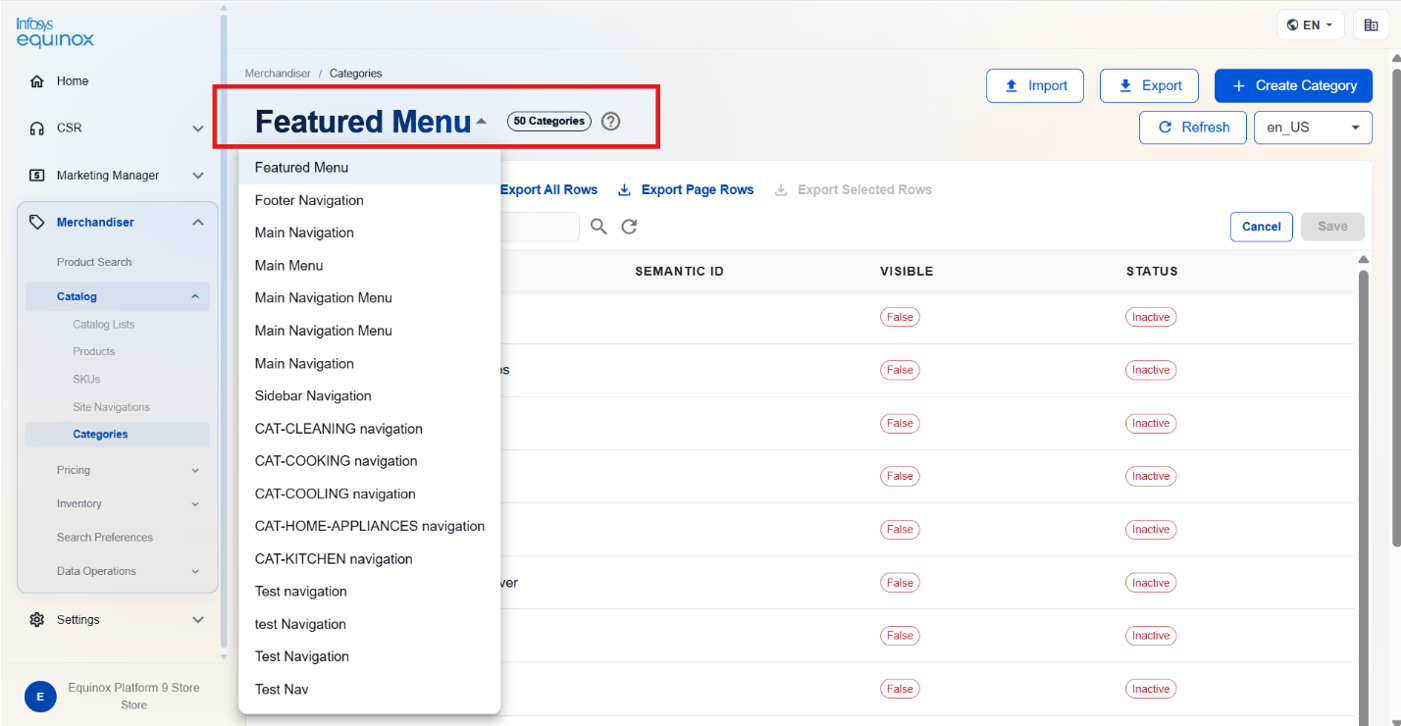
Understanding the All Categories Tree
The category tree on the left side of the Categories page displays all categories in a hierarchical structure. Expand a parent category to view its child categories. Click any category to open its detail panel on the right.
Creating a Category
To create a category:
- In the Merchandiser Admin, navigate to Merchandiser > Categories.
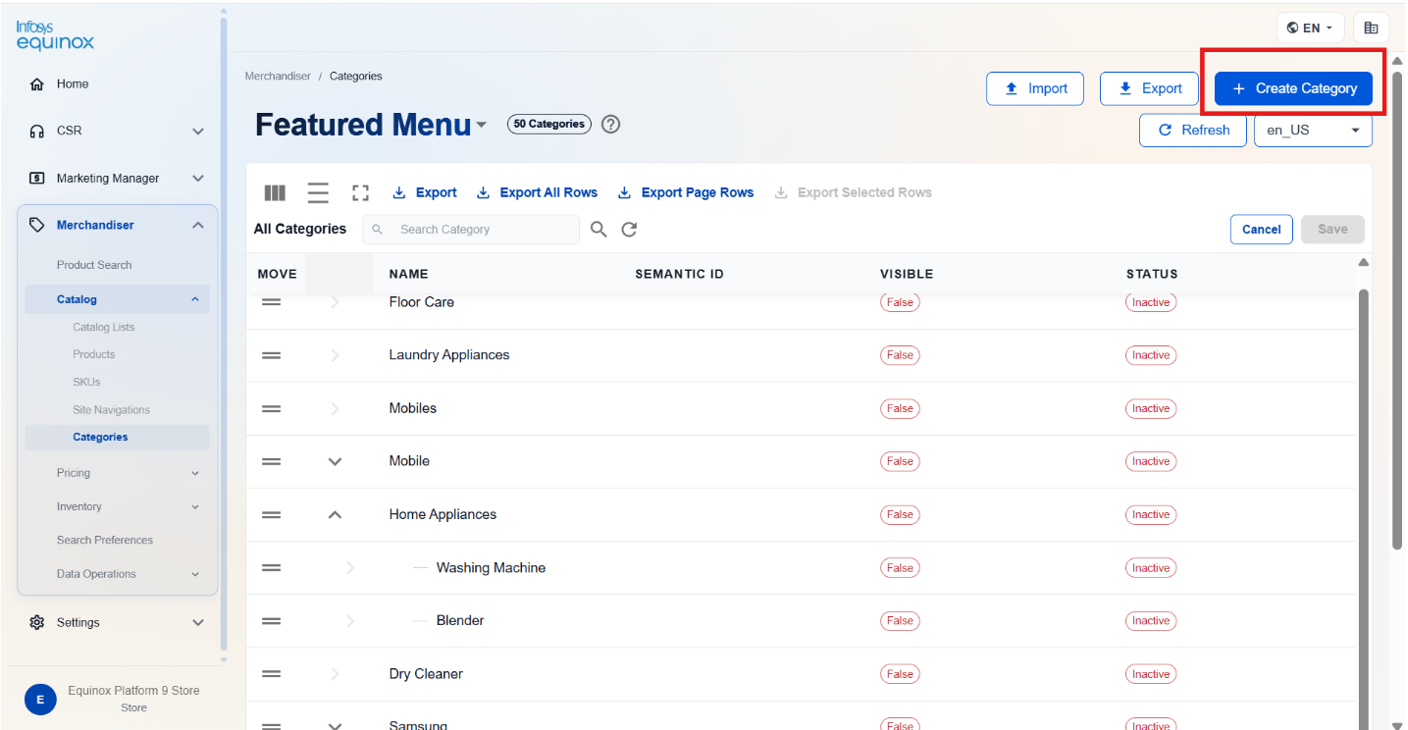
- Click Create Category. The Create Category panel opens.
- Complete the required fields.
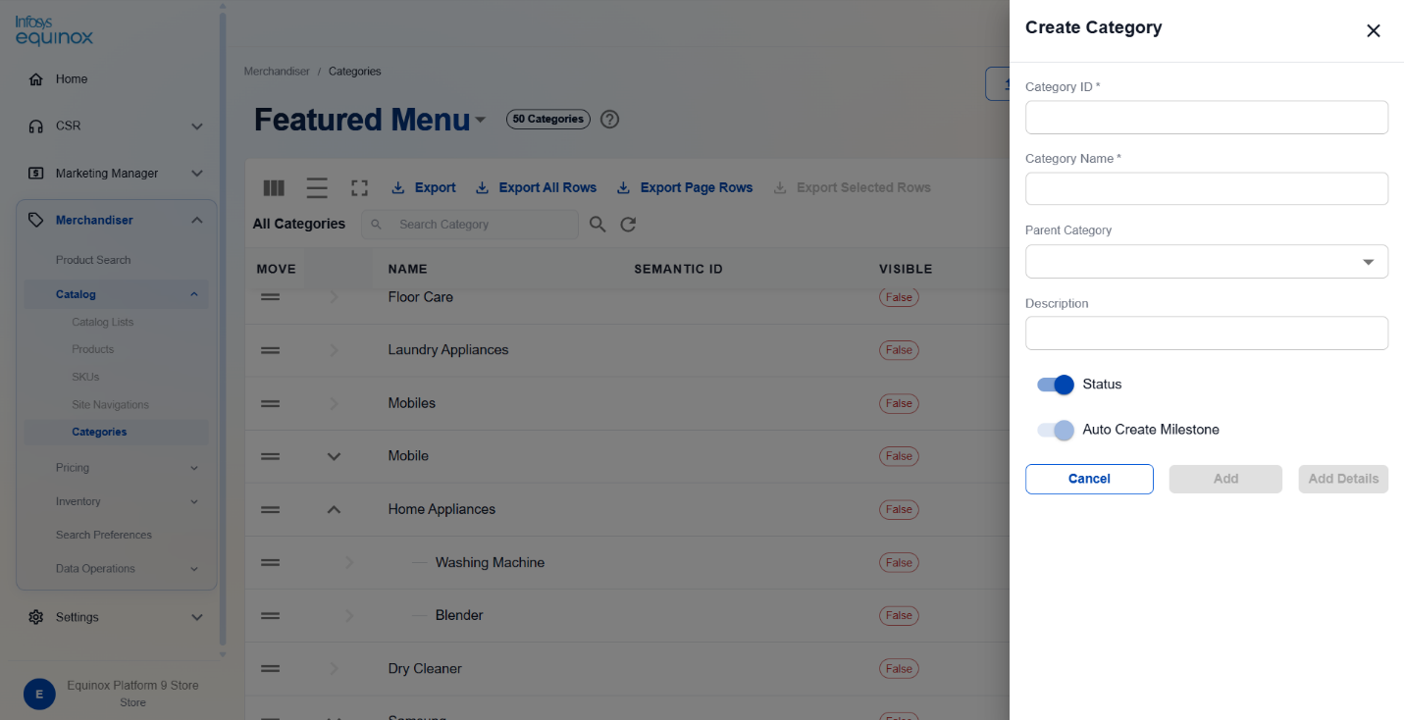
- Click Save to create the category.
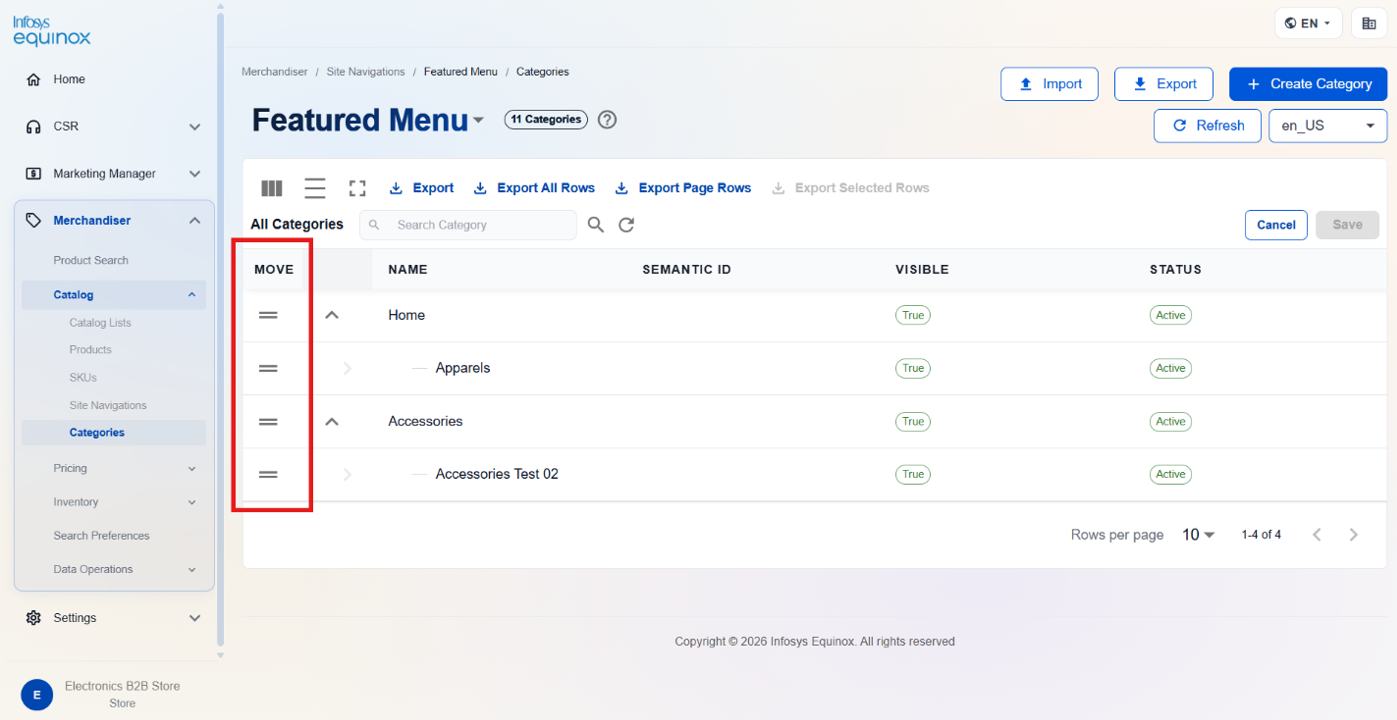
Reordering Navigation Items
To reorder categories within the navigation tree:
- On the Categories page, locate the category you want to reorder in the tree.
- Drag the category to the desired position within its parent node. The updated order is saved automatically.
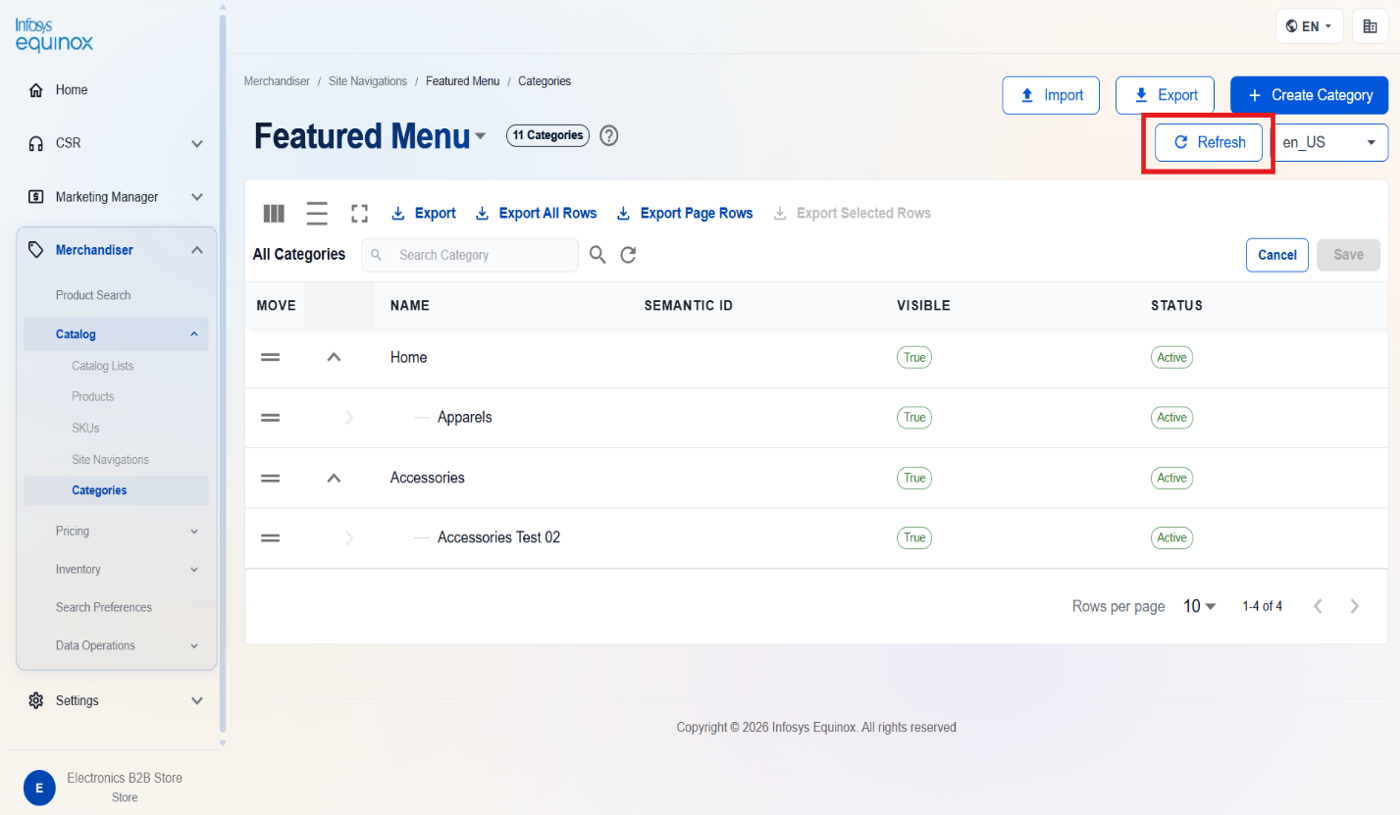
Refreshing the Category Search Index
To trigger a category search index rebuild:
- On the Categories page, click Refresh in the page header. A confirmation dialog appears.
- Confirm the refresh. The PIM search index rebuild is triggered for categories.
Pricing Overview
The Pricing section in Merchandiser Admin allows you to manage price lists and price rules for your store. Price lists associate specific prices with SKUs for a defined currency and date range. Price rules define dynamic pricing logic using BPMN workflow definitions.
Price Lists
Viewing and Searching Price Lists
To view all price lists:
- In the Merchandiser Admin, navigate to Pricing > Price Lists.
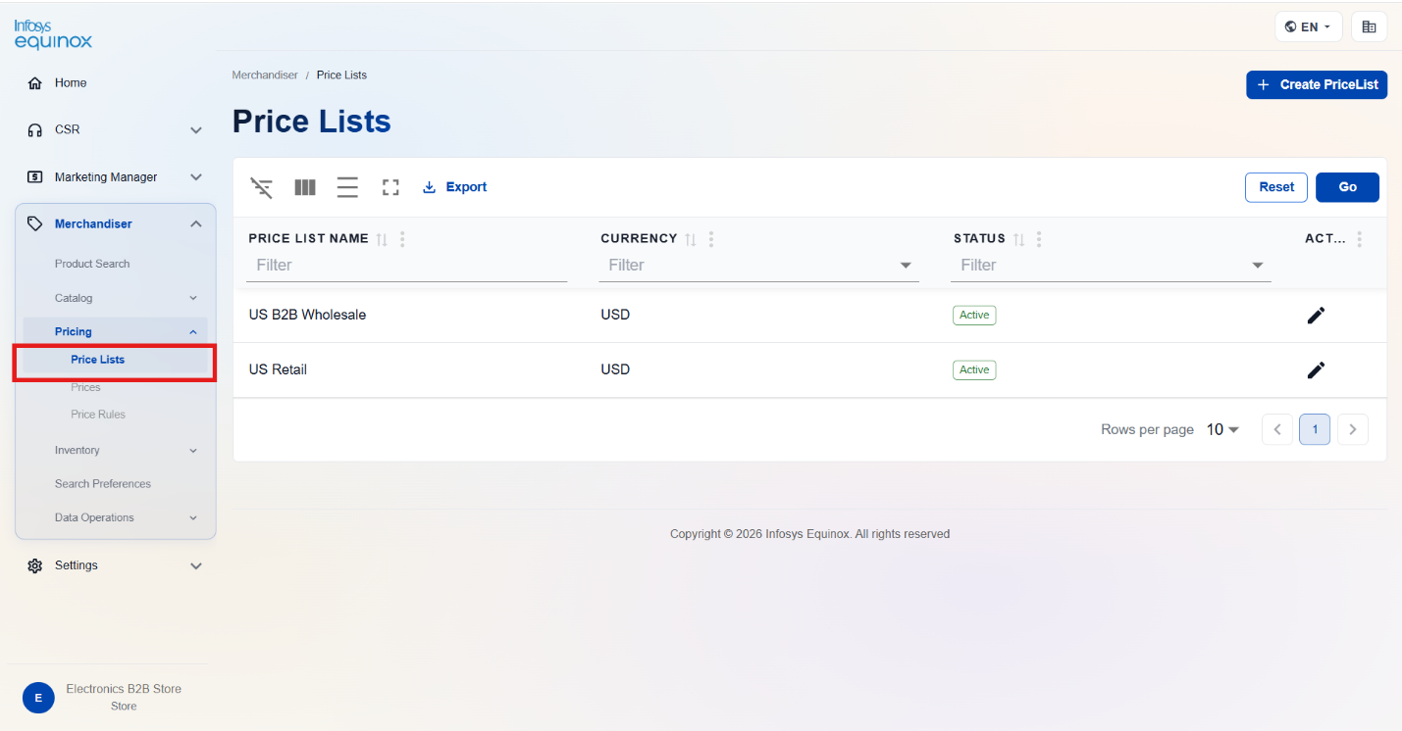
- The Price Lists page displays all price lists configured for the current store.
| Column | Description |
|---|---|
| Name | The display name of the price list. |
| Currency | The currency associated with the price list. |
| No. of SKUs | The number of SKUs with prices defined in this price list. |
| Status | Indicates whether the price list is Active or Inactive. |
| Action | Edit icon to open and modify the price list. |
To filter price lists, use the Name (text match) or ID (exact match) filter options in the search bar.
Creating a Price List
To create a price list:
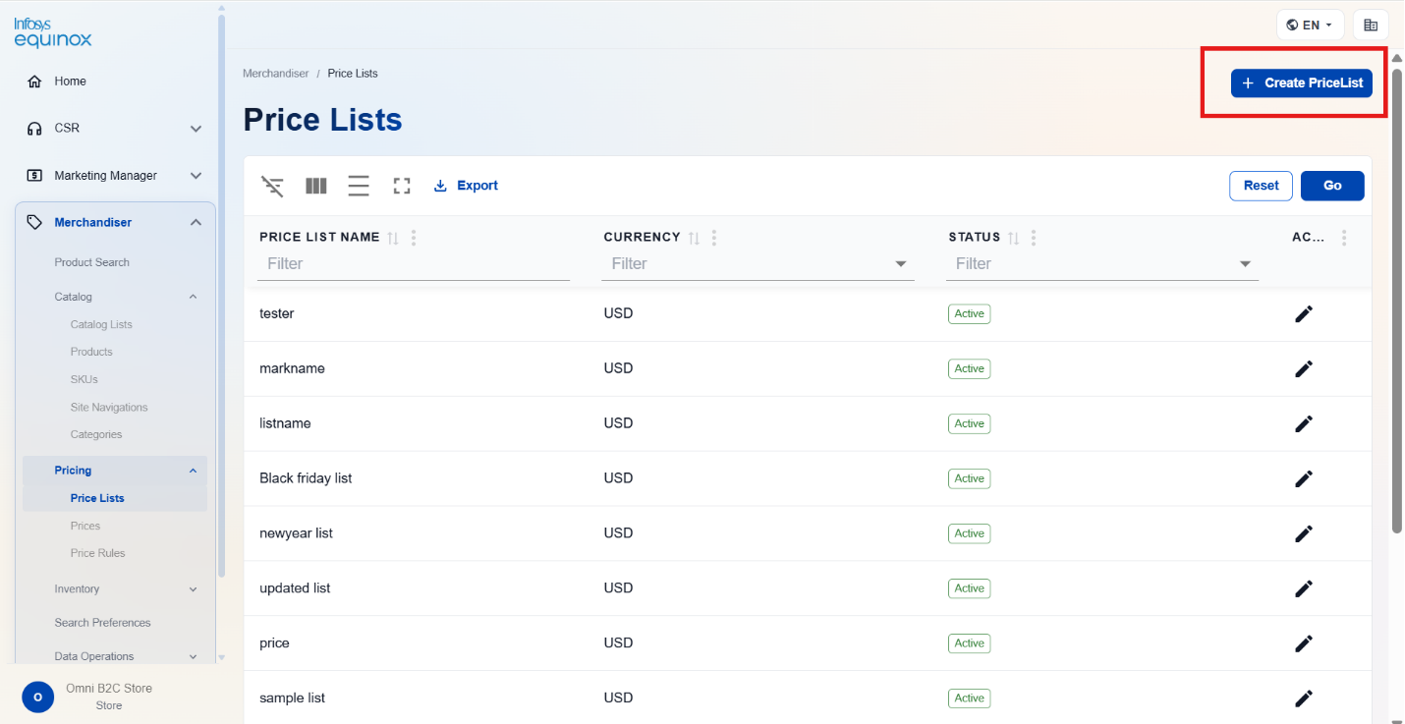
- In the Merchandiser Admin, navigate to Pricing > Price Lists.
- Click Create Price List. The create form opens.
- Enter the required price list details.
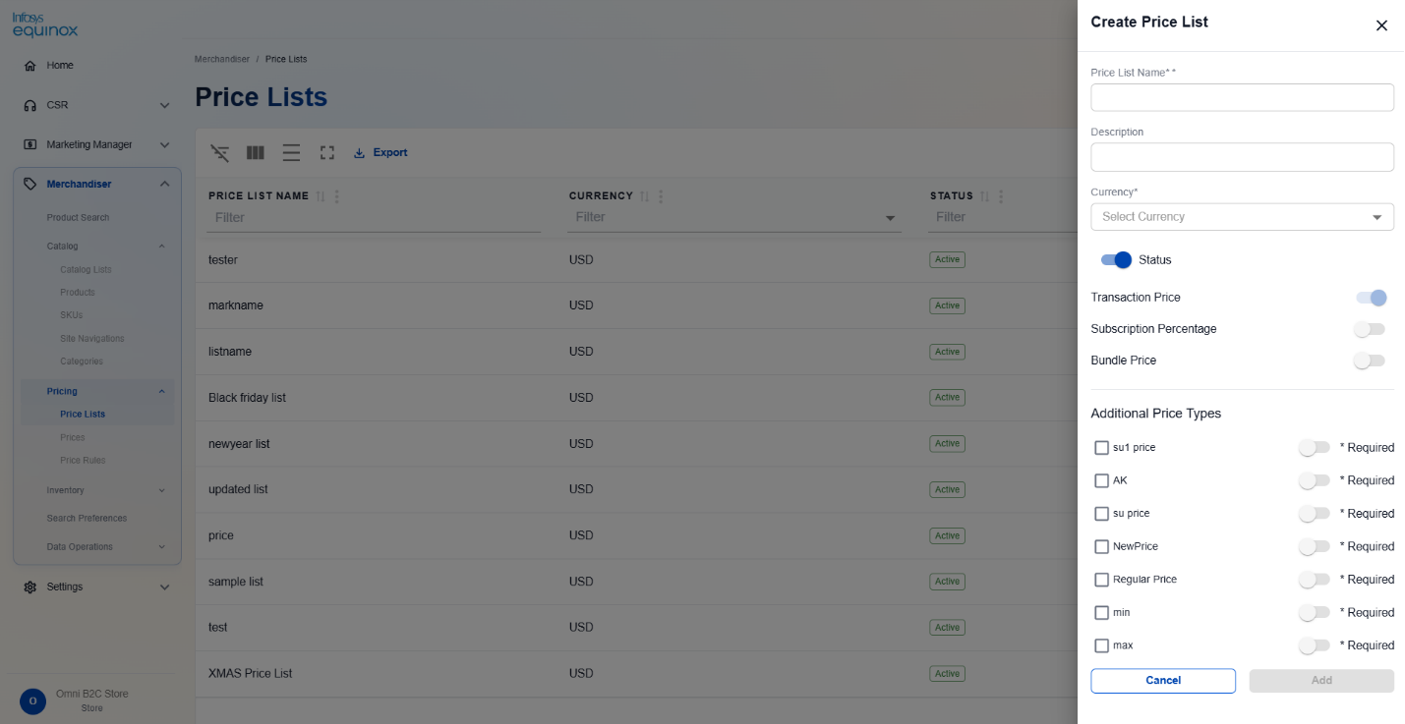
- Click Add to create the price list.
Managing SKU Prices Within a Price List
To add or edit a price entry for a SKU within a price list:
- On the Price Lists page, click the price list name or the edit icon in its row. The price list detail page opens.
- Locate the SKU entry and click Add Sku, or click the edit icon next to an existing SKU entry. The Add Sku drawer opens.
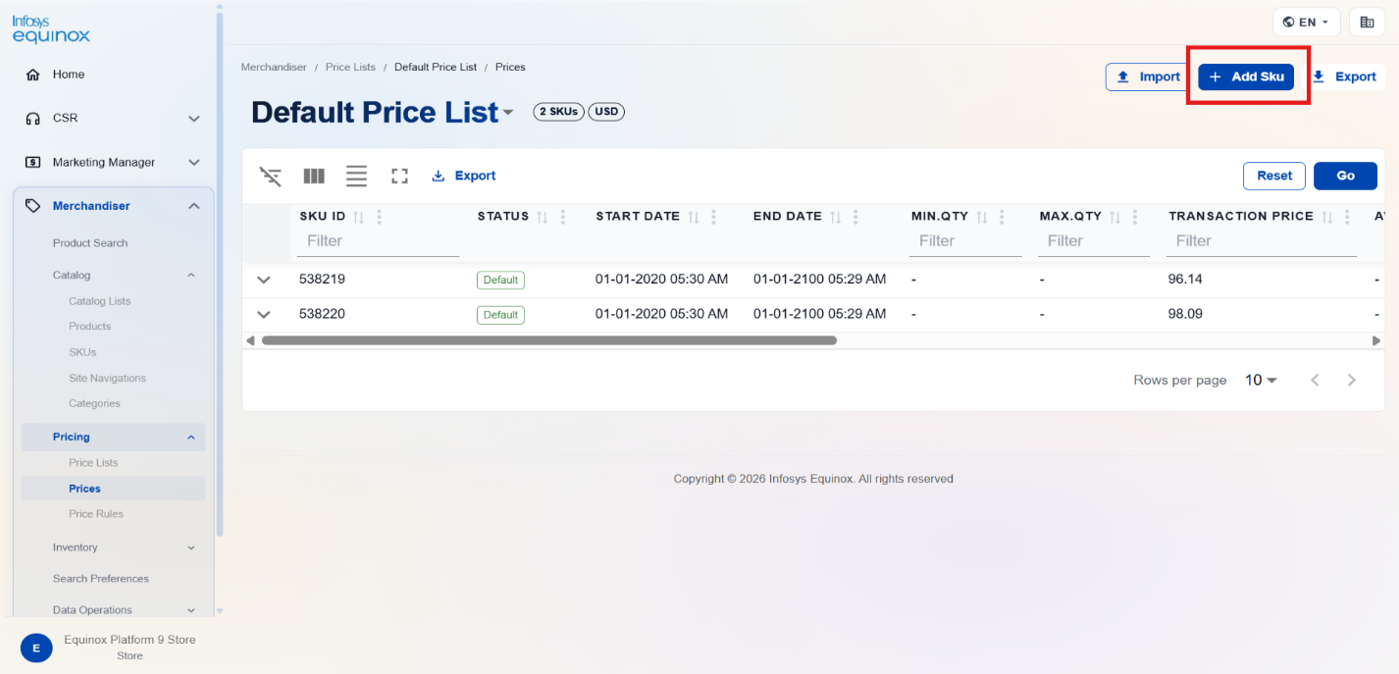
- Complete the required fields.
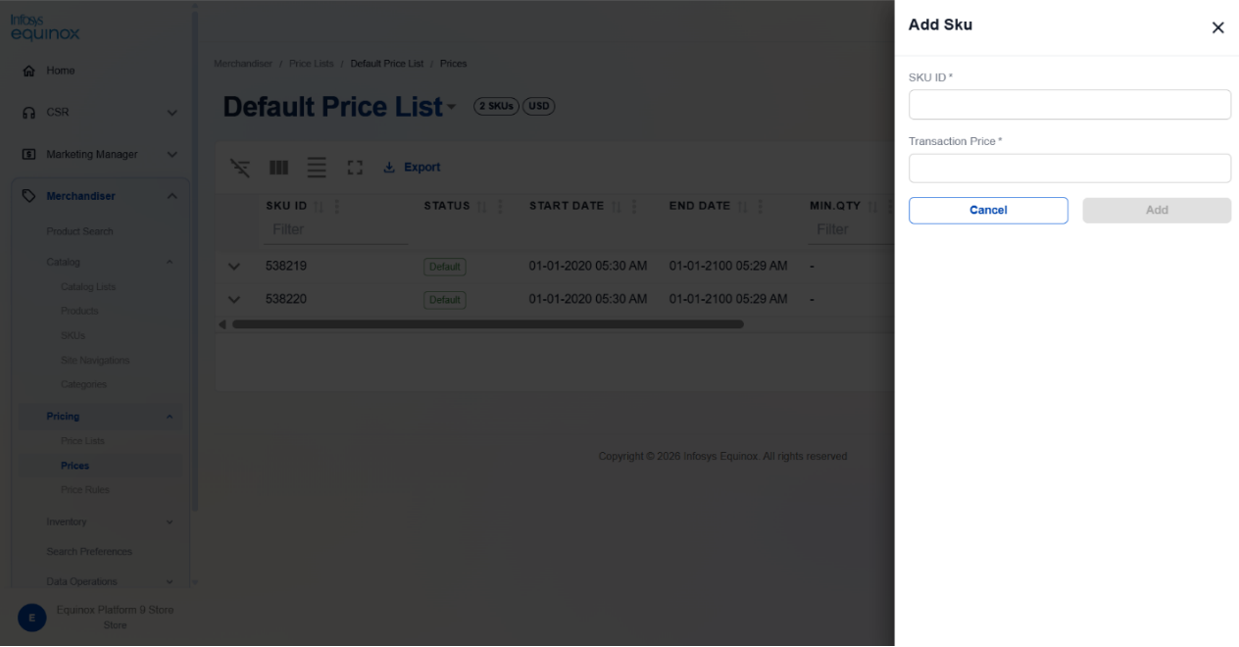
- Click Add to save the price entry.
Prices page: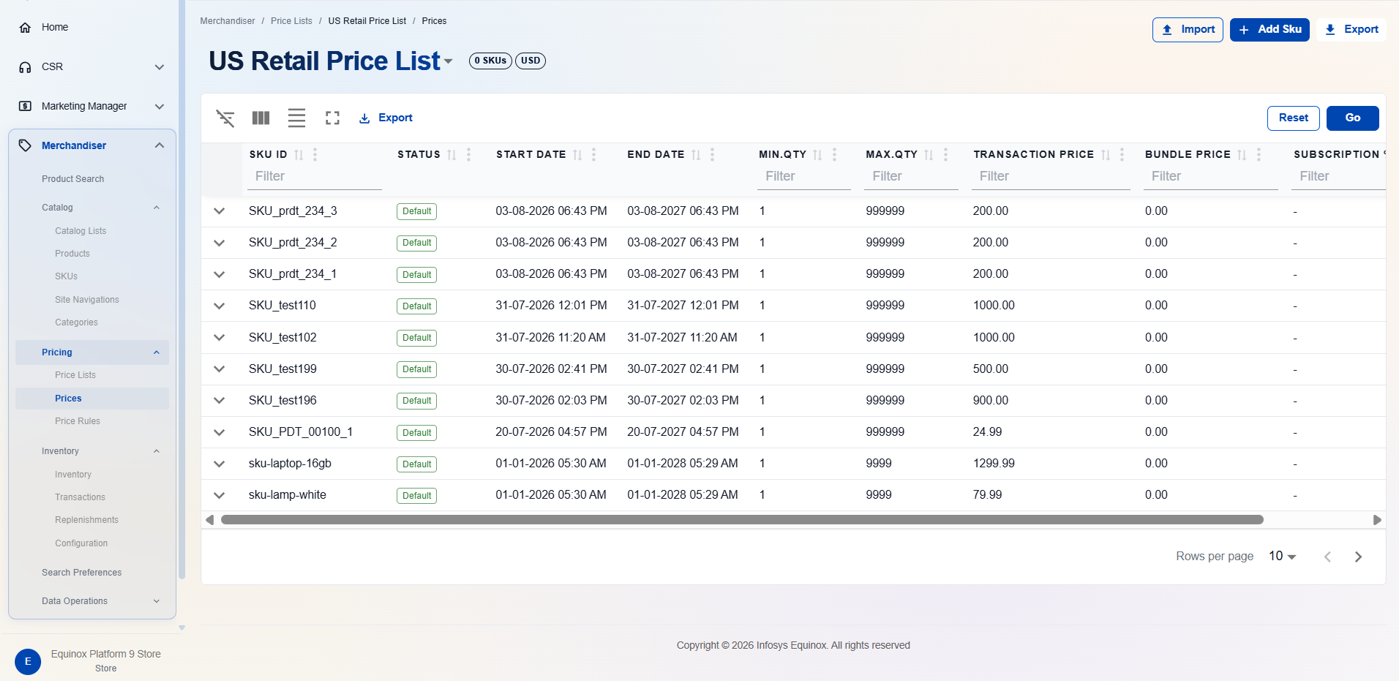
Data Operations — Merchandiser Admin
Overview
The Data Operations page in Merchandiser Admin provides a centralized interface for bulk importing and exporting catalog, pricing, inventory, and category data. It also allows you to monitor batch job execution history and manage import schedules.
Importing Data
To import data:
- In the Merchandiser Admin, navigate to Data Operations.
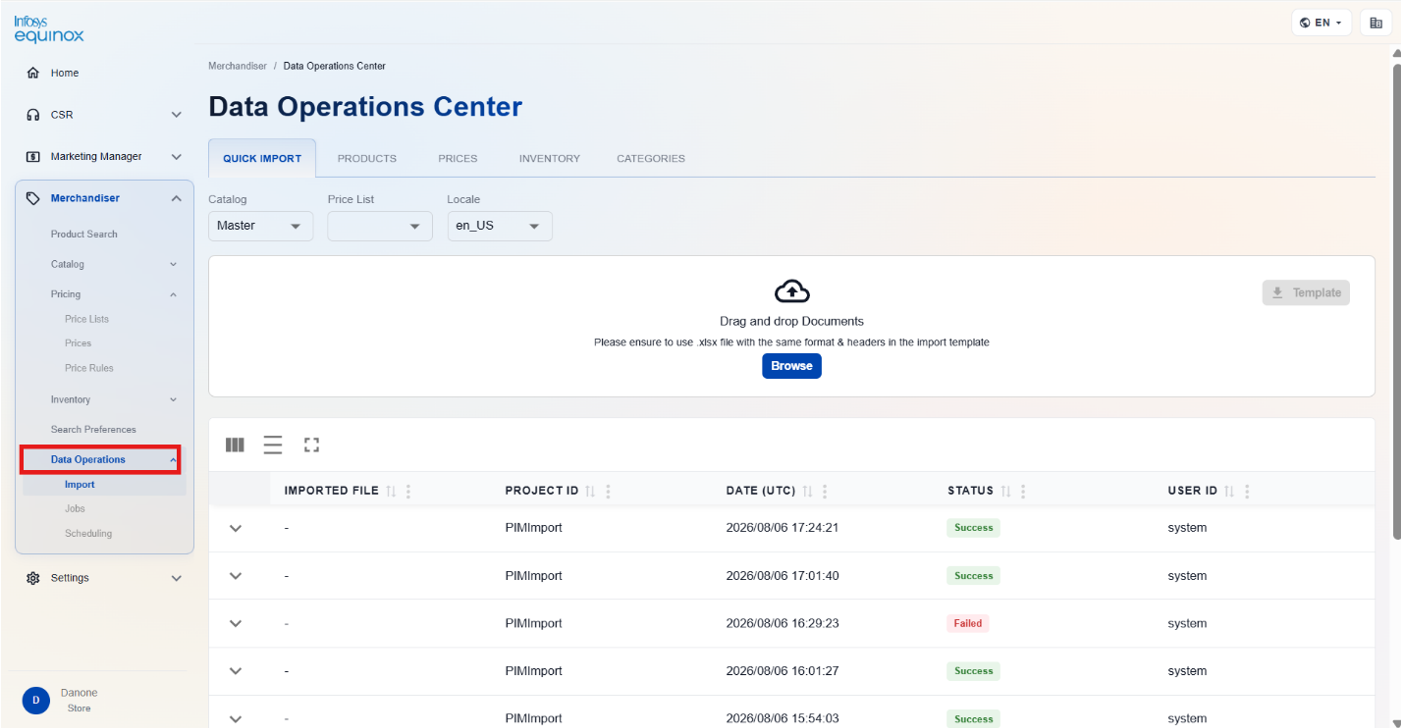
- Select the appropriate tab for the entity type you want to import.
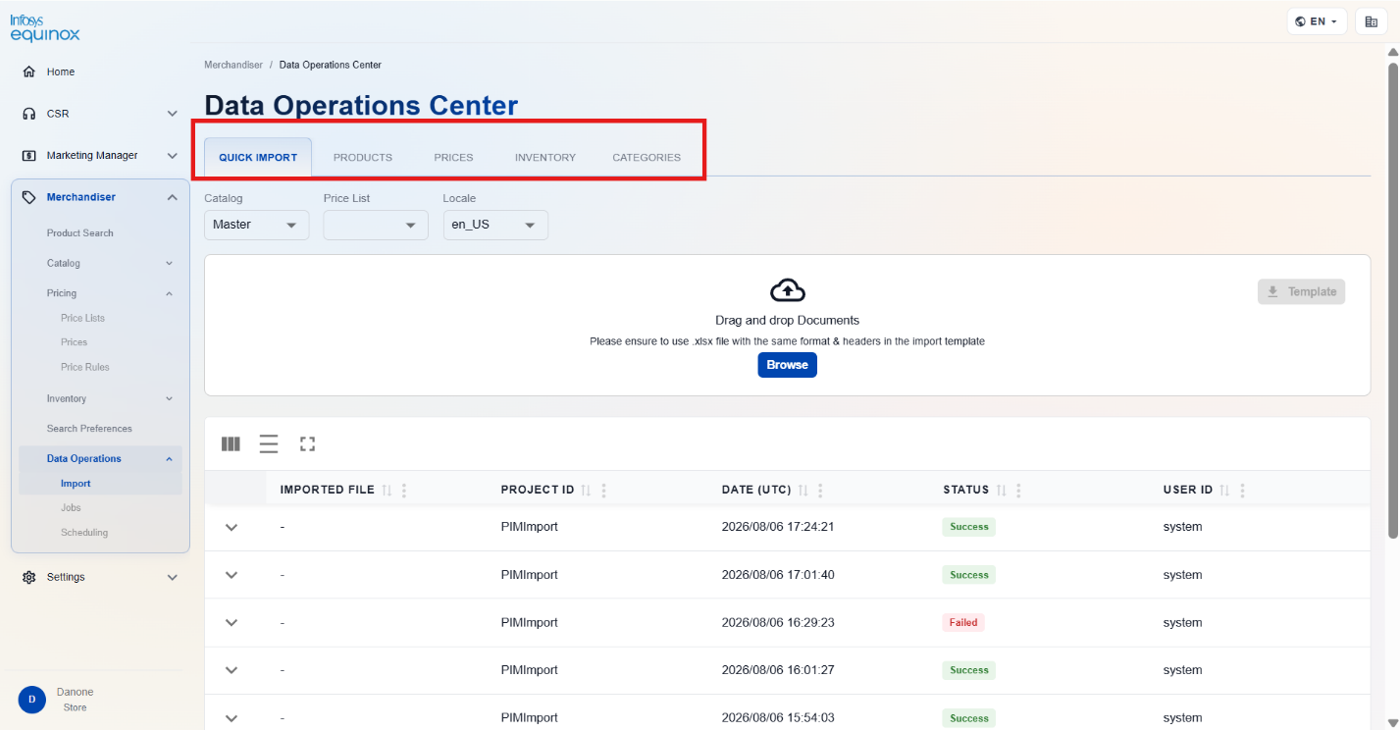
| Tab | Required Context | Description |
|---|---|---|
| Quick Import | Catalog, Price List, Locale | General-purpose import supporting multiple entity types in a single file upload. |
| Products | Catalog, Locale | Import product data for a specific catalog and locale. |
| Prices | Price List | Import SKU price data into a specific price list. |
| Inventory | None | Import inventory position data. |
| Categories | Locale | Import category data for a specific locale. |
- Select the required context values (catalog, price list, or locale) from the dropdowns on the selected tab.
- Click Download Template to download the import template for the selected entity type.
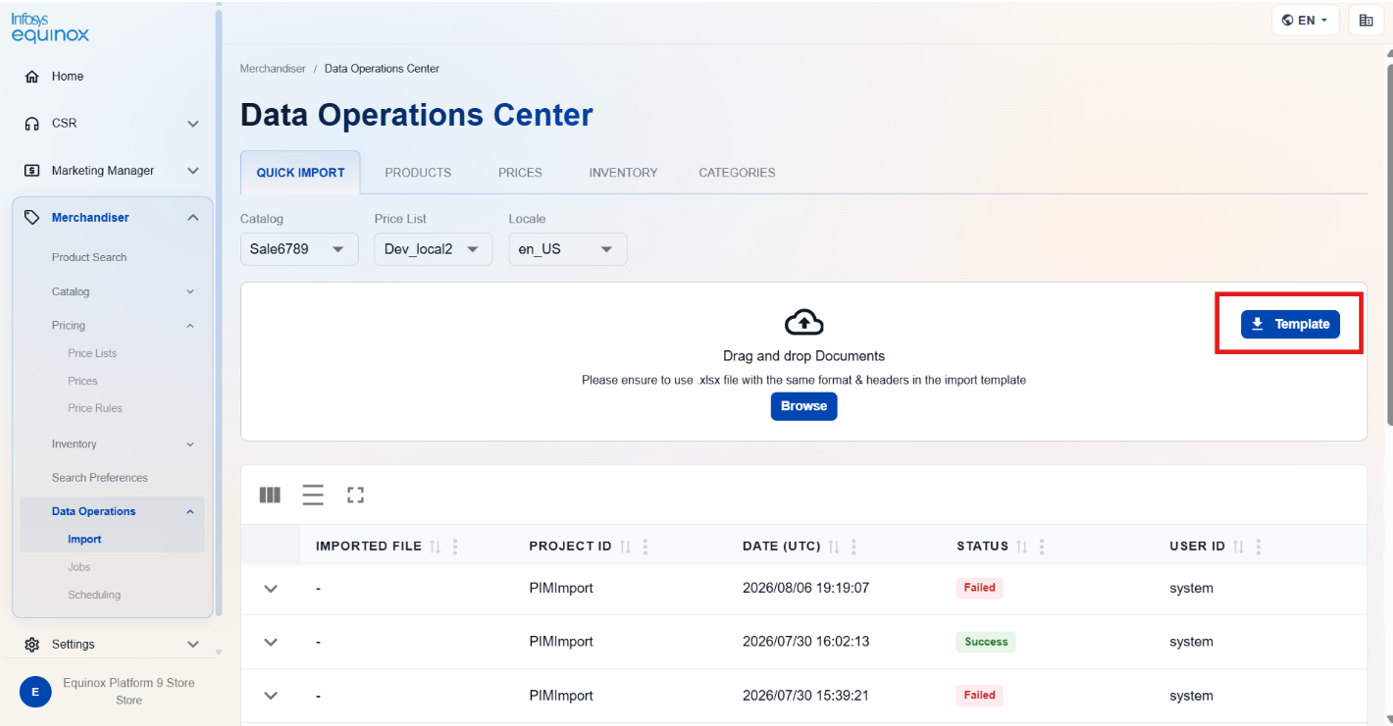
- Populate the template file with your data, preserving all column headers exactly as provided.
- Upload the completed file using the file upload control on the tab.
- Click Start Import to submit the job.
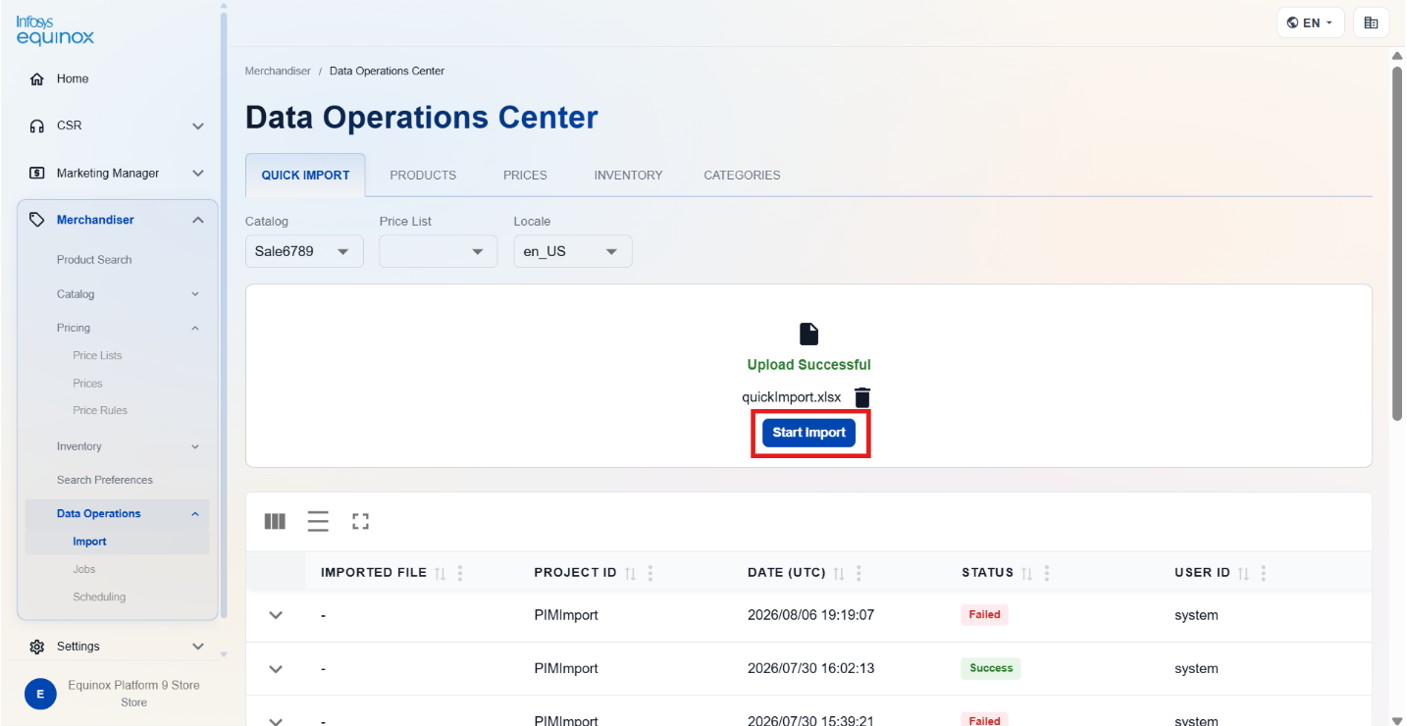
Note: Import templates are generated based on your store’s PIM instance configuration. Always use the template downloaded from your specific environment, as column headers and field configurations may vary.
We can also download Failed Import File.
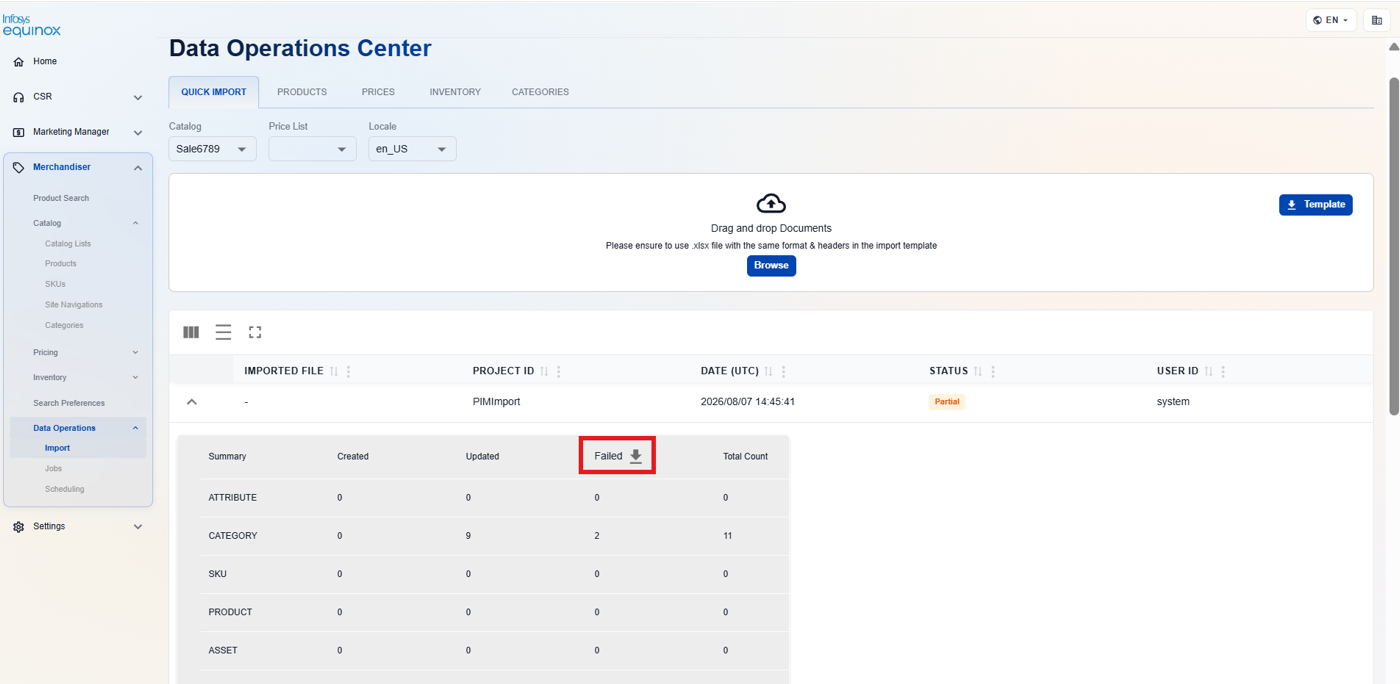
Monitoring Job Execution
To monitor the status of import and export jobs:
- In the Merchandiser Admin, navigate to Data Operations and select the Job.
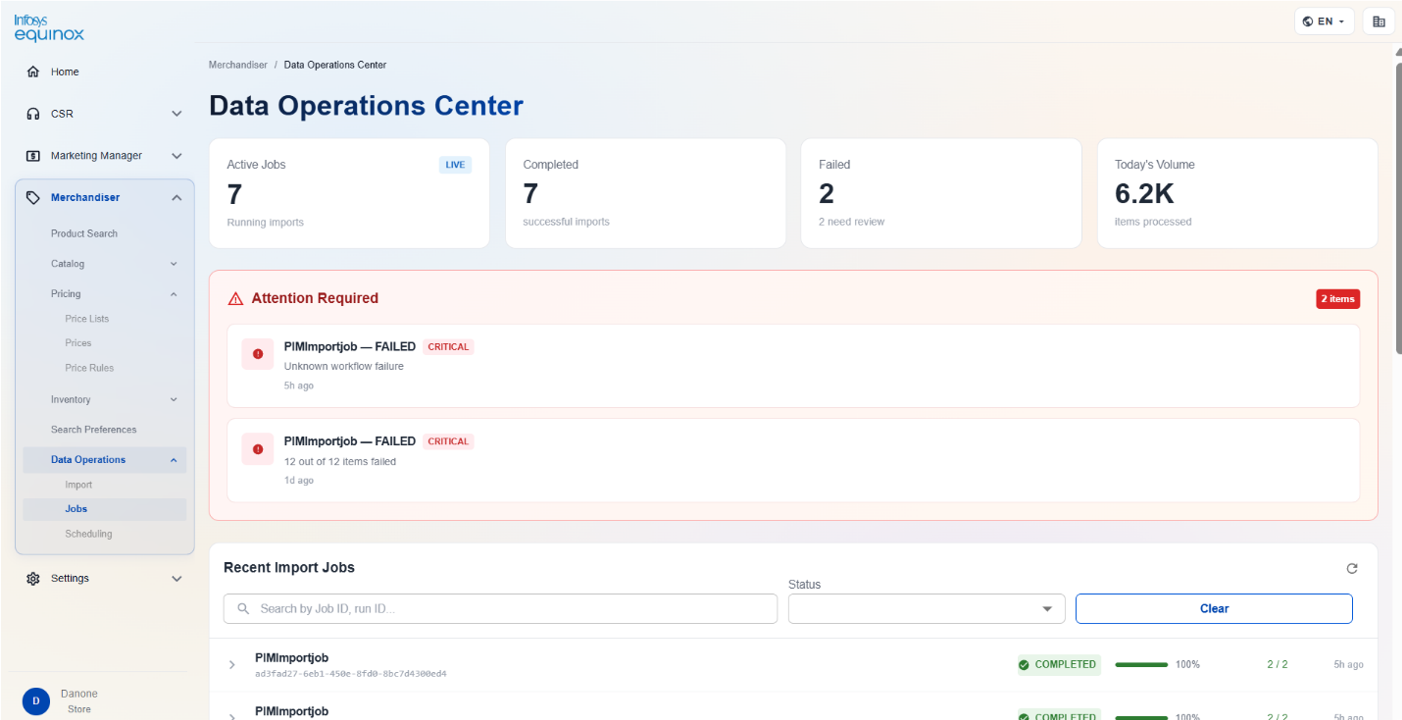
- The dashboard displays the following summary metrics:
| Metric | Description |
|---|---|
| Active Jobs | The number of jobs currently running. |
| Completed | The number of jobs completed successfully. |
| Failed | The number of jobs that failed. |
| Today’s Volume | The total number of jobs executed today. |
The Attention Required section highlights all jobs in the following states: Failed, Error, Partial Success, Stopped.
The Recent Import Jobs table displays job history with the following columns:
| Column | Description |
|---|---|
| Job Identifier | The unique name of the batch job. |
| Status | The current execution status: Running, Completed, Failed, or Partial Success. |
| Started | The date and time the job started. |
| Duration | The elapsed execution time. |
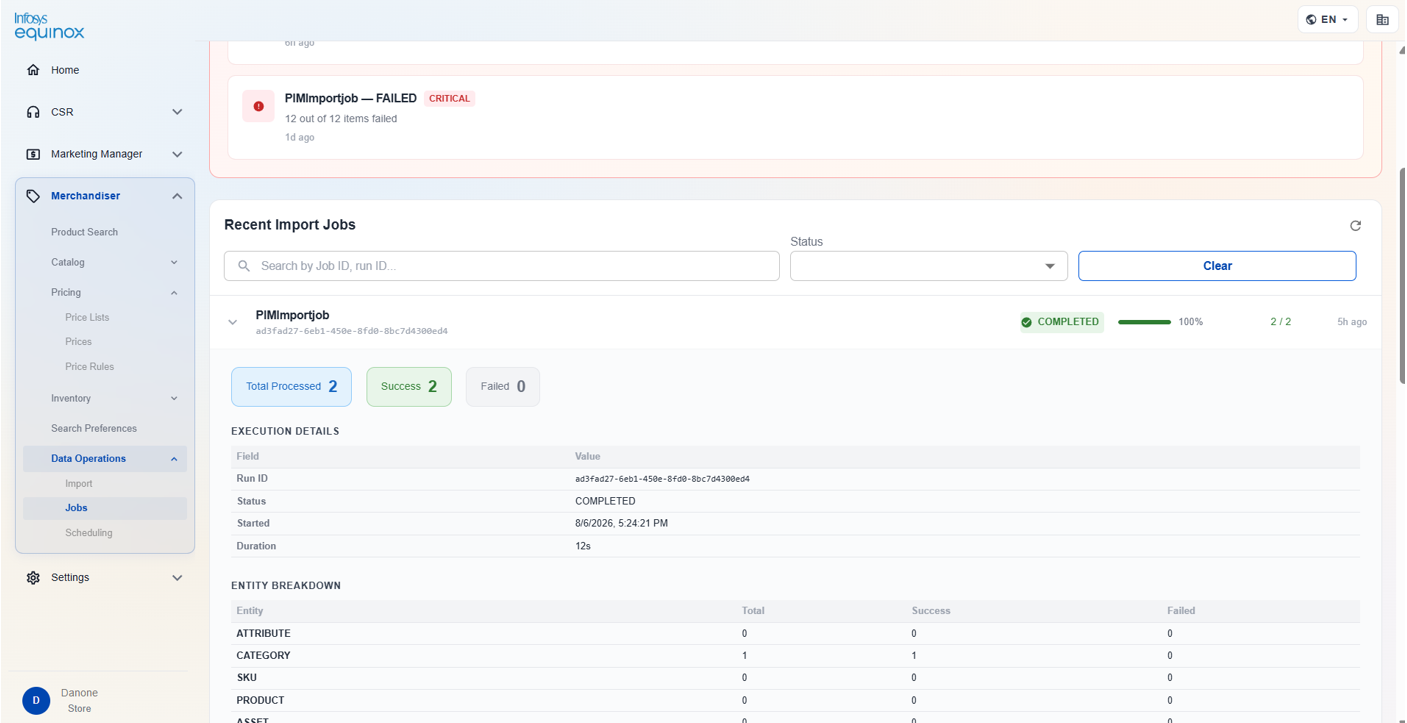
Click a job row to expand its details, including the run ID, current processing step, entity-level breakdown, and an error file download link if errors occurred.
Search Configuration — Merchandiser Admin
Overview
The Search Configuration page in Merchandiser Admin allows you to manage search synonyms and search redirects for your store’s search experience. Synonyms improve search relevance by mapping related terms to the same results. Redirects send users to a specific page when a defined search term is entered.
Managing Search Synonyms
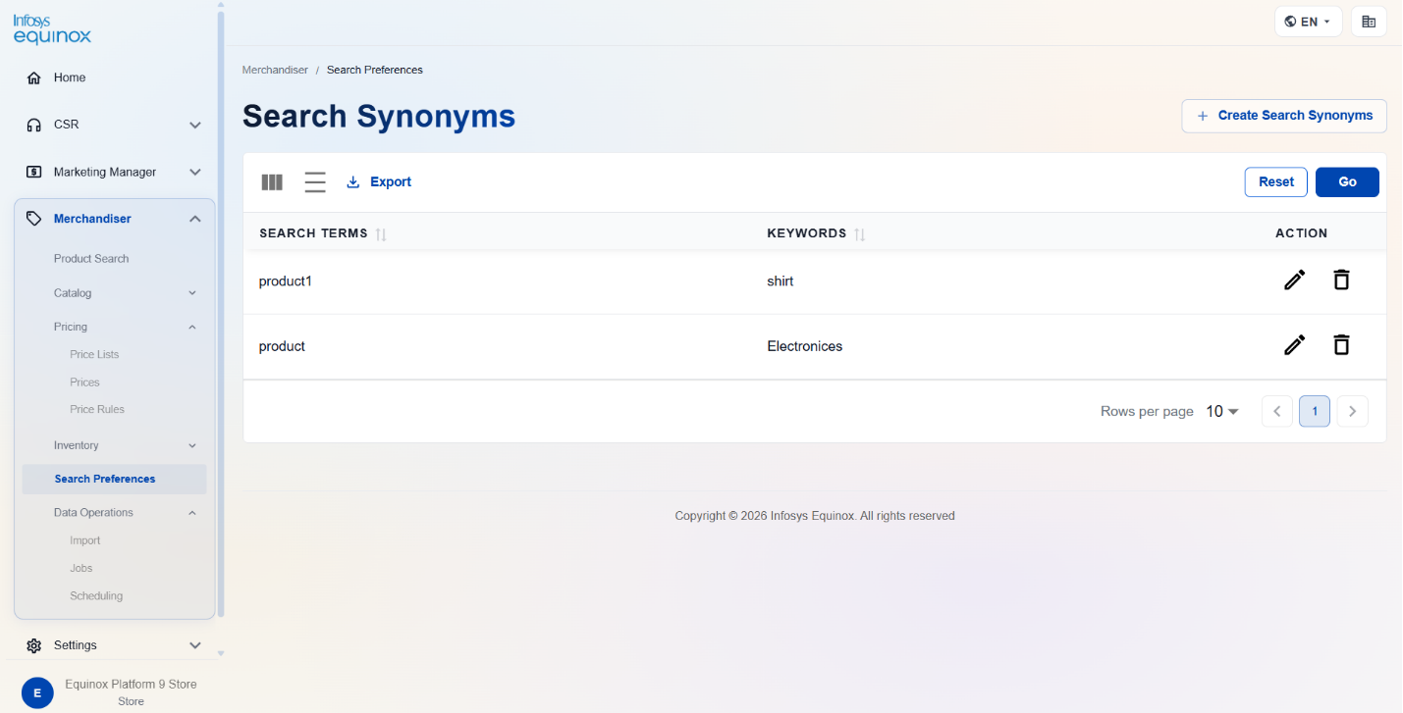
To view all search synonyms:
- In the Merchandiser Admin, navigate to Search Preferences.
- Select the Search Synonyms tab.
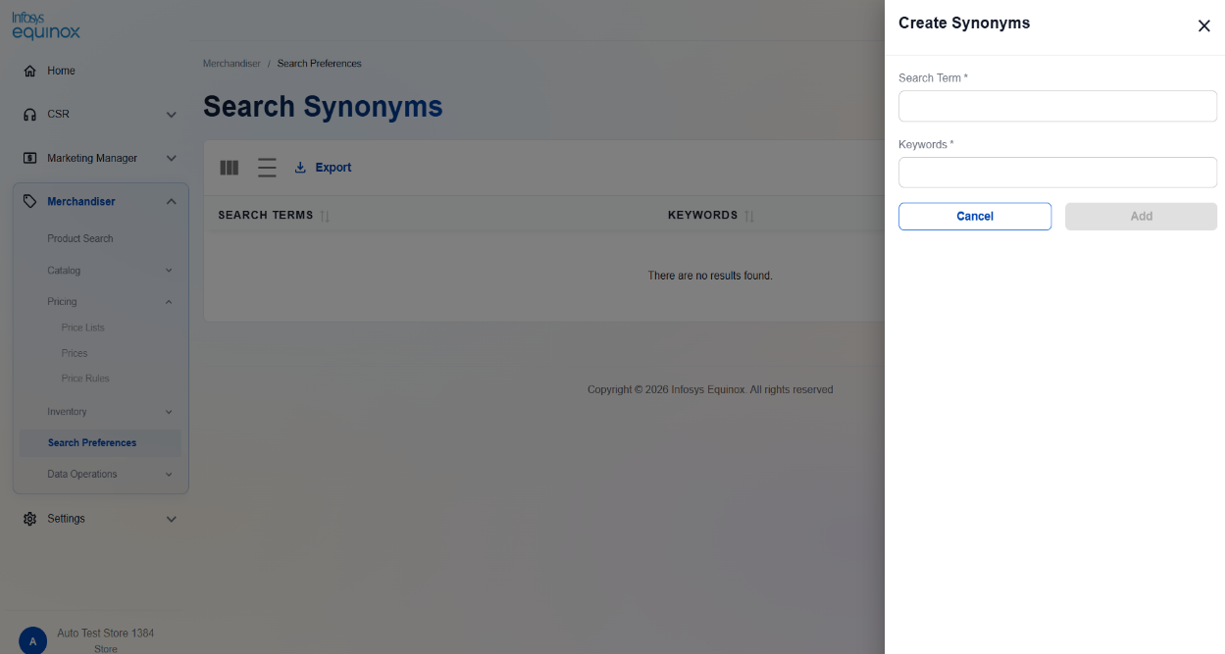
Creating a Search Synonym
To create a search synonym:
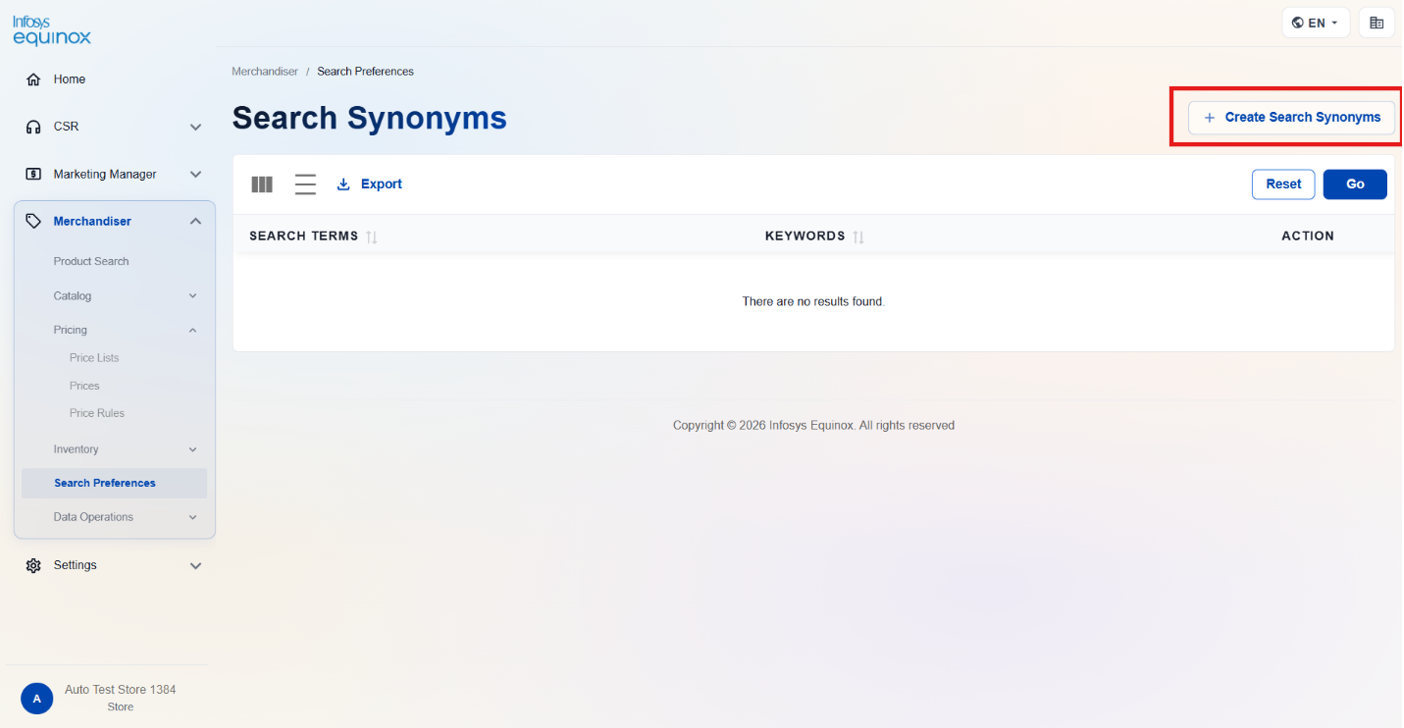
- On the Search Synonyms tab, click Create. The create form opens.
- Enter a Search Term — the primary keyword to which synonyms are mapped.
- Enter one or more Synonym Words — the terms that should return the same results as the search term.
- Click Save to create the synonym group.
Editing a Search Synonym
To edit an existing synonym group:
- On the Search Synonyms tab, locate the synonym group.
- Click the edit icon. The edit form opens with the existing values.
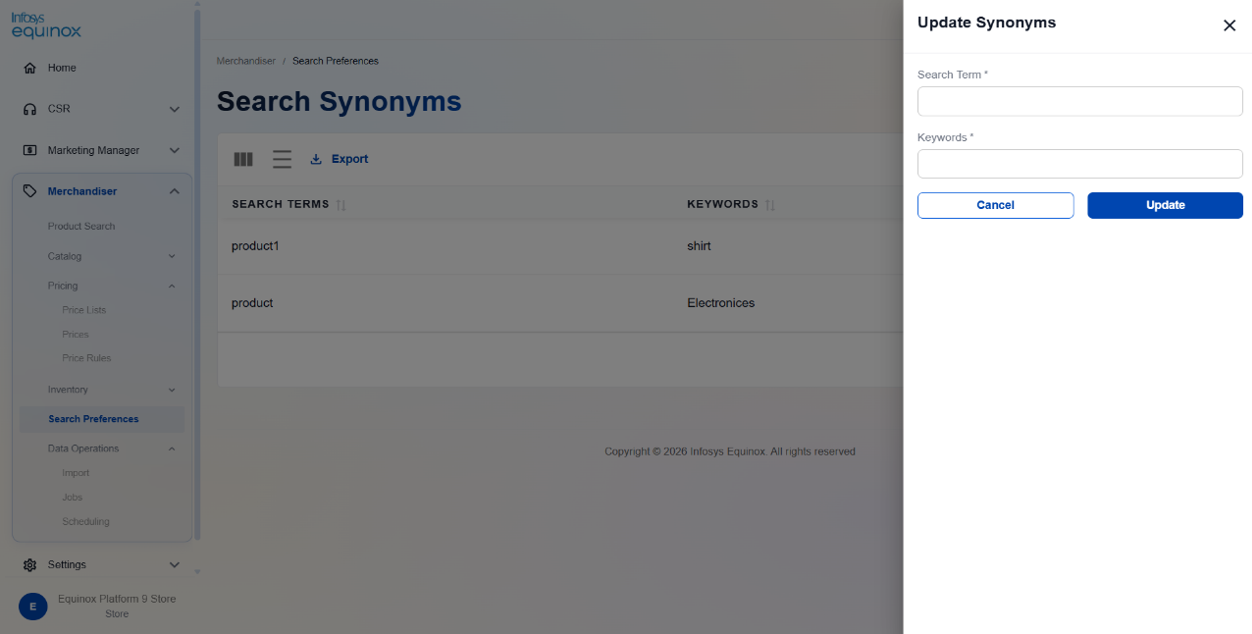
- Update the Search Term or Synonym Words as required.
- Click Save to apply your changes.
Deleting a Search Synonym
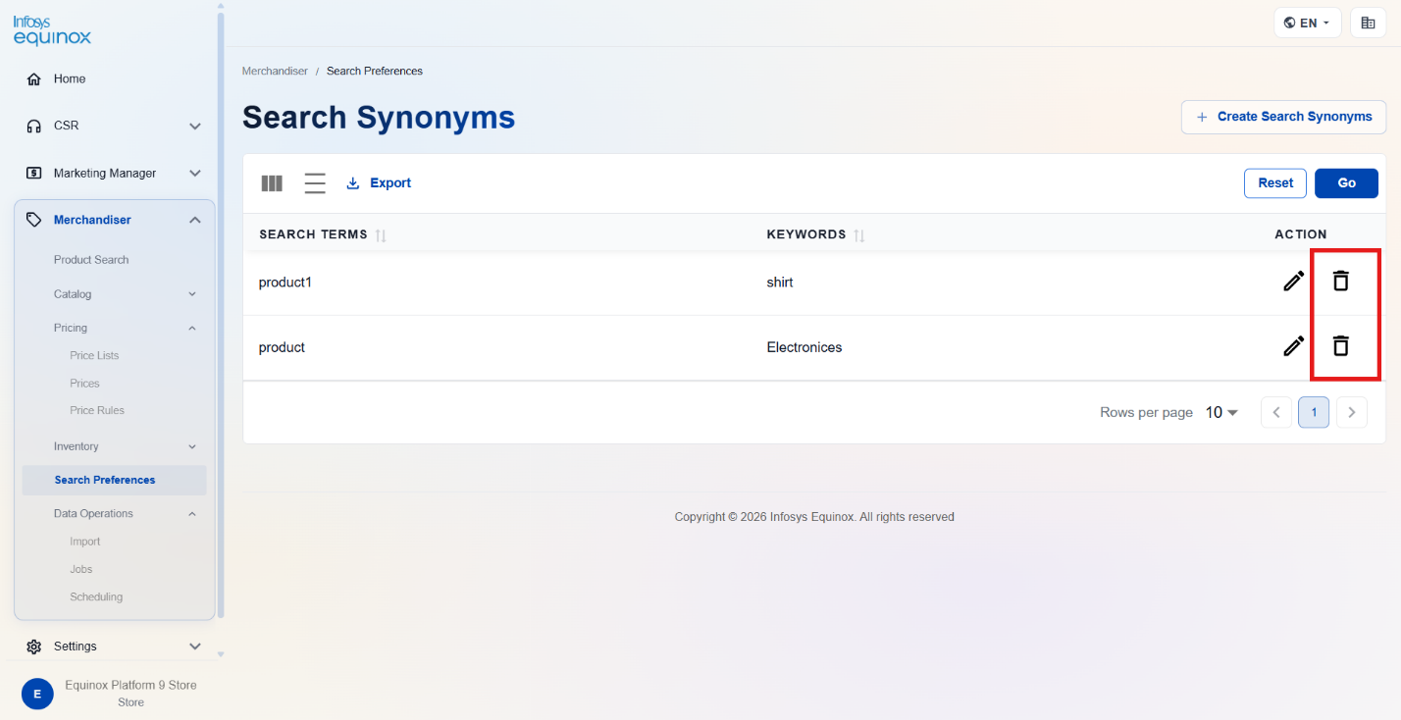
To delete a synonym group:
- On the Search Synonyms tab, locate the synonym group.
- Click the delete icon and confirm the deletion in the dialog.
Inventory
Overview
The Inventory section in Merchandiser Admin provides a comprehensive suite of tools for managing stock positions, lot tracking, transfers, reservations, replenishment, and channel allocation policies.
Locations
Overview
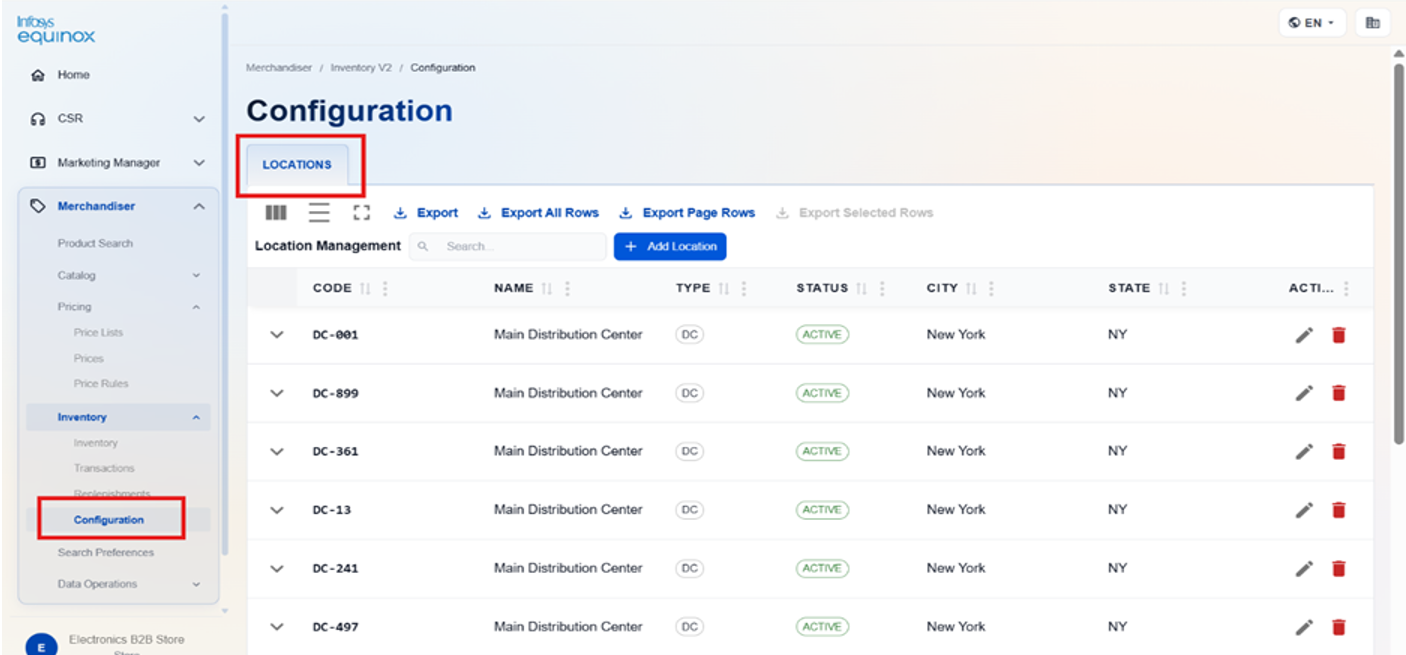
The Locations page displays all inventory locations configured for the store, such as warehouses, fulfillment centers, and retail stores.
Viewing Locations
To view all locations:
1. In the Merchandiser Admin, navigate to Inventory > Configuration > Locations.
2. The Locations table displays all configured locations for the store.
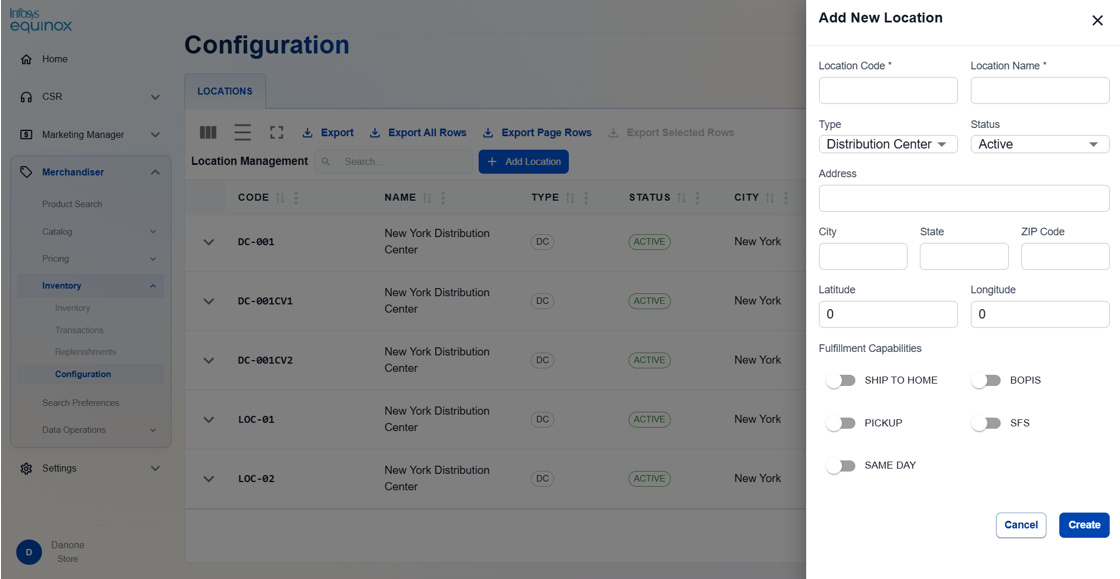
Creating a Location
- Navigate to Inventory > Configuration > Locations tab
- Click + Add location. The location create form opens.
- Enter the required details.
- Click Save.
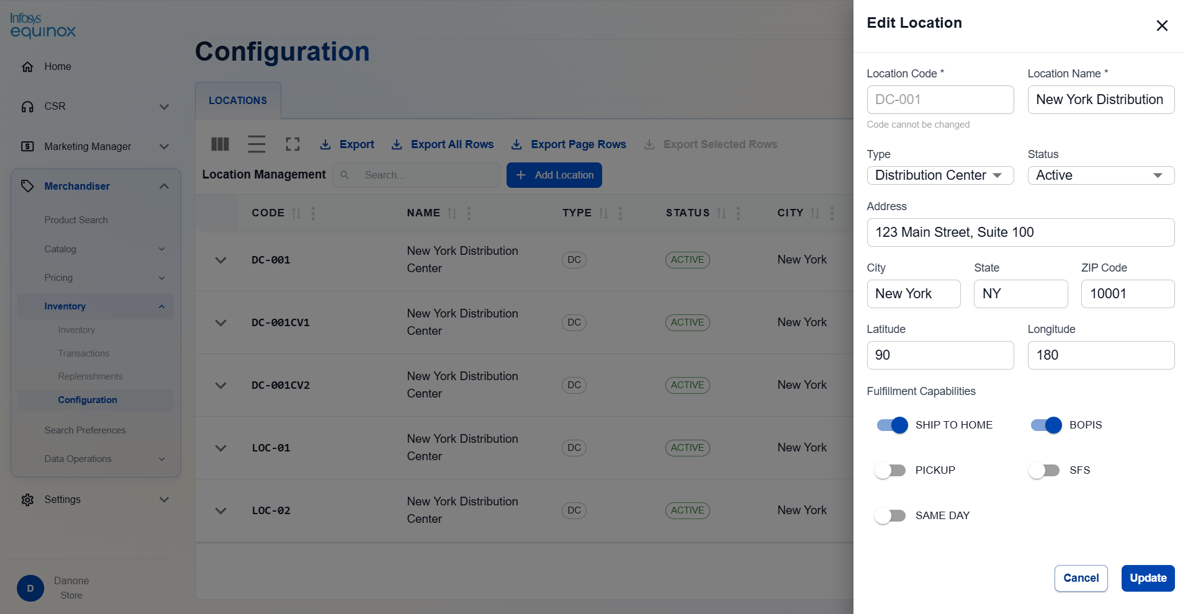
Editing a Location
- Navigate to Inventory > Configuration > Locations tab
- Click the edit action for the location row.
- Modify the required fields. The Code field is read-only and cannot be changed.
- Click Update.
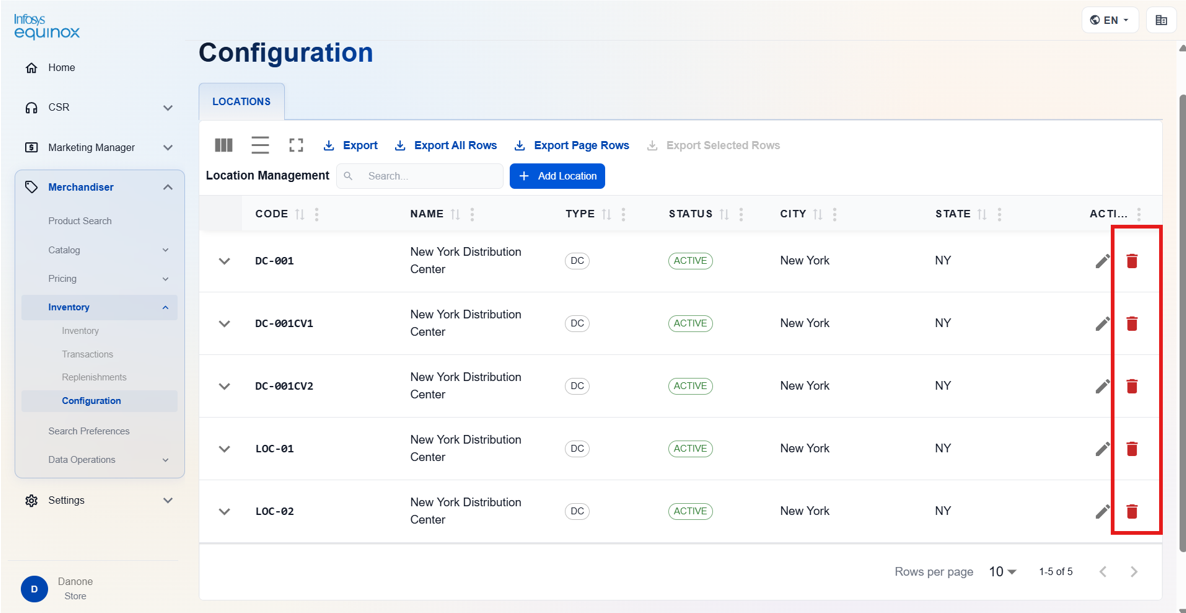
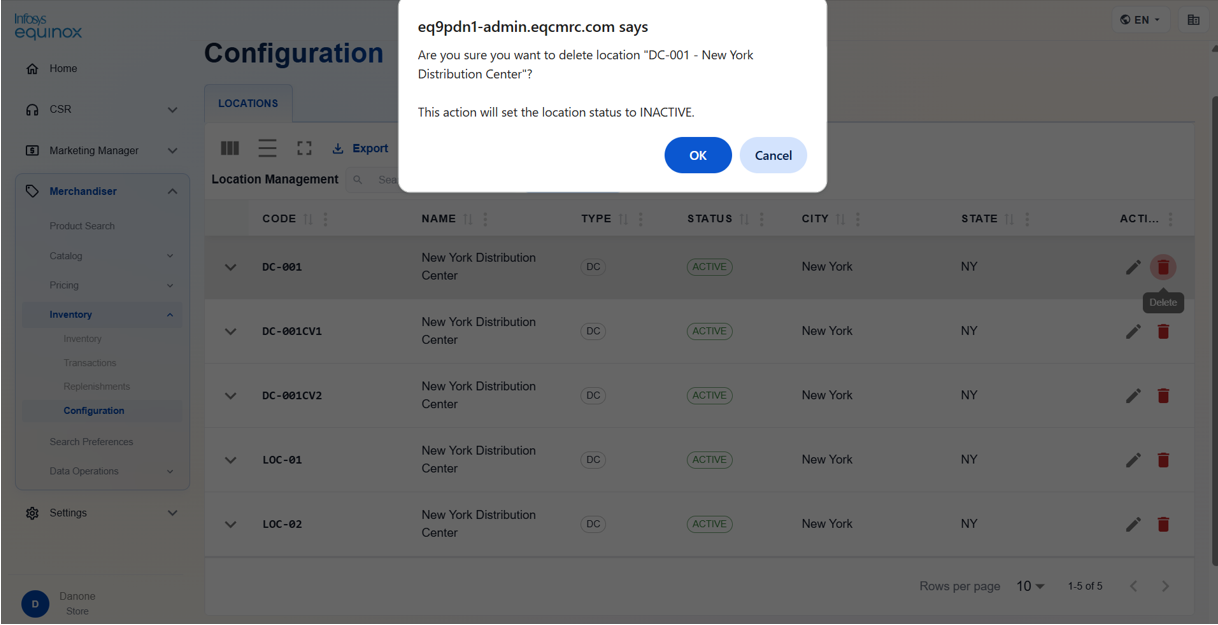
Deleting a Location
- Navigate to Inventory > Configuration > Locations tab
- Click the delete action for the location row.
- Confirm the deletion in the dialog. It will make the location status as inactive.
Inventory SKUs
Overview
The SKUs inventory view displays inventory-specific data for all SKUs tracked in the inventory system, including reorder points and available quantities.
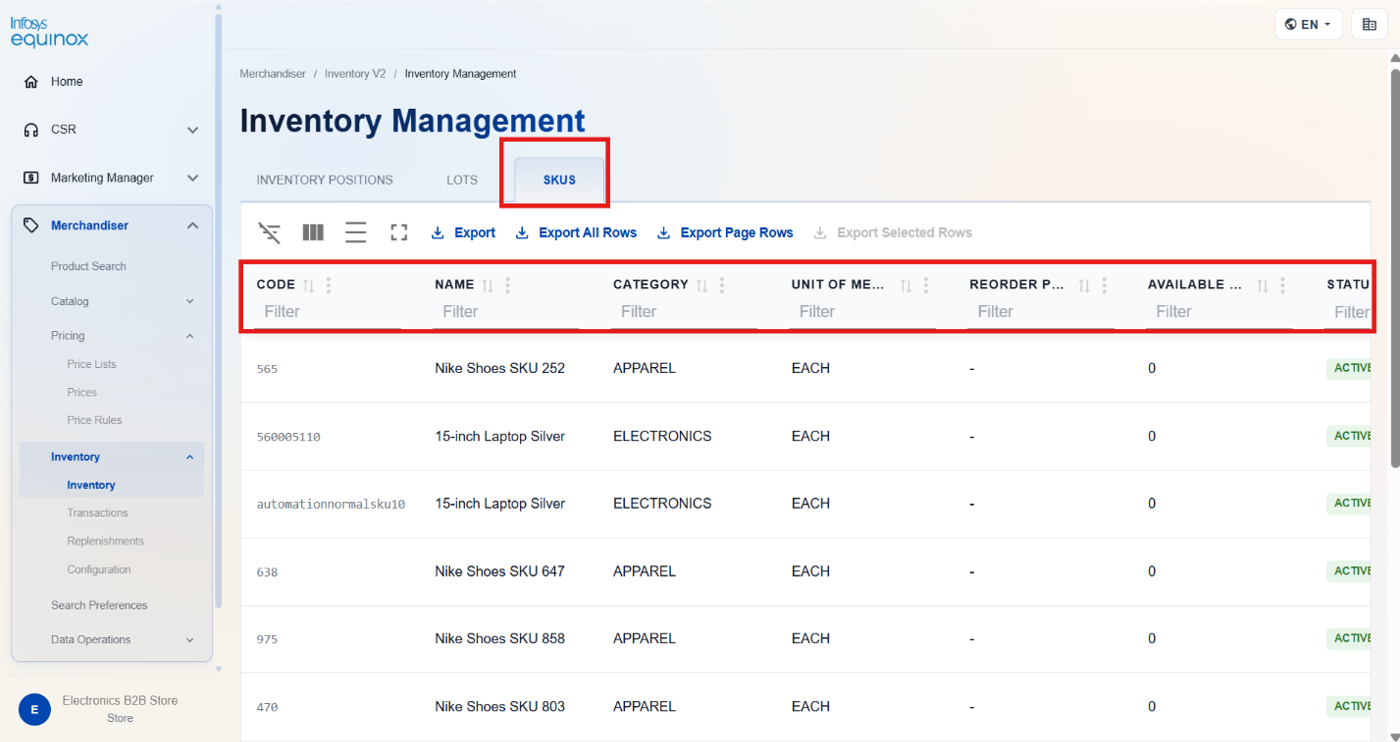
Viewing Inventory SKUs
To view inventory SKUs:
- In the Merchandiser Admin, navigate to Inventory > Inventory > SKU tab.
- The SKUs table displays all SKUs with inventory data.
| Column | Description |
|---|---|
| Code | The SKU code. |
| Name | The SKU display name. |
| Category | The category associated with the SKU. |
| Unit of Measure | The unit of measure for the SKU. |
| Reorder Point | The quantity threshold that triggers a replenishment recommendation. |
| Available Qty | The total quantity available across all locations. |
| Status | The SKU status: Active, Inactive, or Pending. |
Creating an Inventory SKU
- Navigate to Inventory >Inventory > SKUs tab.
- Click + Add Sku
- Enter the following details:
| Field | Required | Description |
|---|---|---|
| Code | Yes | Unique SKU identifier. Immutable after creation. |
| Name | Yes | Display name. |
| Description | No | Free-text description. |
| Category | No | Product category classification. |
| Unit of Measure | No | Inventory unit. Defaults to Each. |
| Status | No | Active, Inactive, or Discontinued. Defaults to Active. |
| Weight (lbs) | No | Physical weight. |
| Length / Width / Height (in) | No | Physical dimensions in inches. |
| Cost Price | No | Cost price. |
| Selling Price | No | Selling price. |
| Currency | No | ISO 3-letter currency code. Defaults to USD. |
| Requires Lot Tracking | No | When enabled, lots must be created and associated with this SKU before inventory positions can be recorded. |
| Requires Serial Number | No | When enabled, individual unit serial numbers are tracked. |
| Is Perishable | No | When enabled, the SKU supports expiry date tracking on lots. |
- Click Save.
Note: If Requires Lot Tracking is enabled, you must create at least one Lot for this SKU before recording inventory positions.
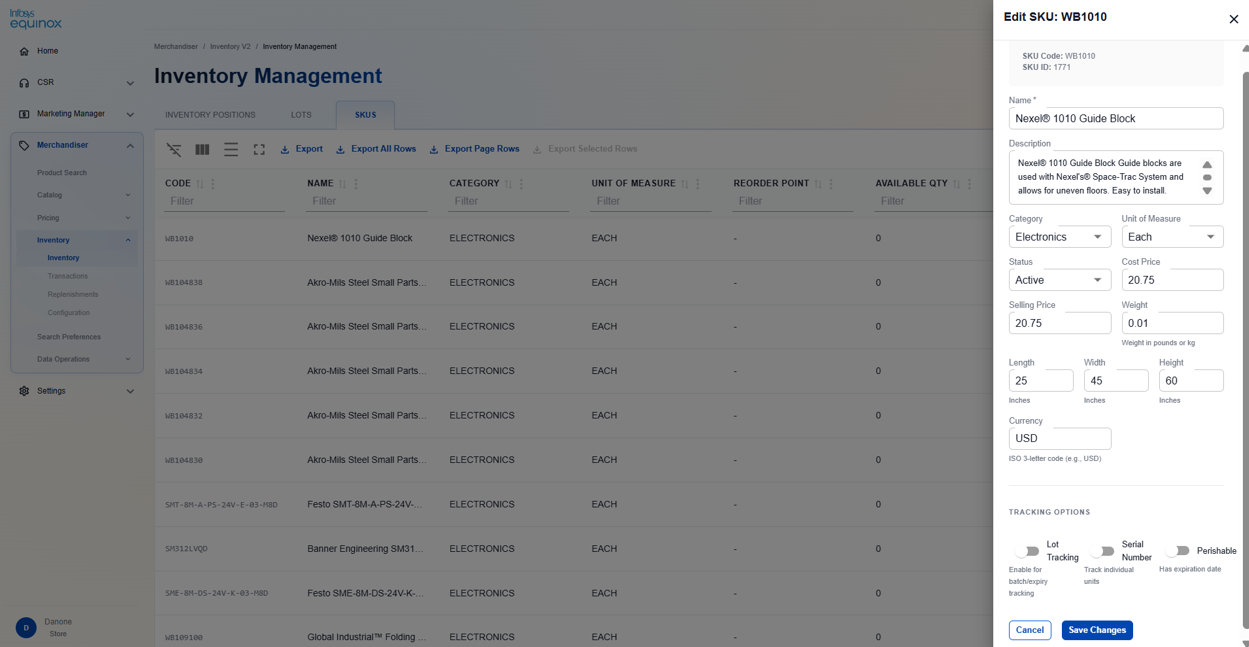
Editing an Inventory SKU
- Navigate to Inventory >Inventory > SKUs tab.
- Click the edit action for the SKU row.
- Modify the required fields. The Code field is read-only.
- Click Save.
Deleting an Inventory SKU
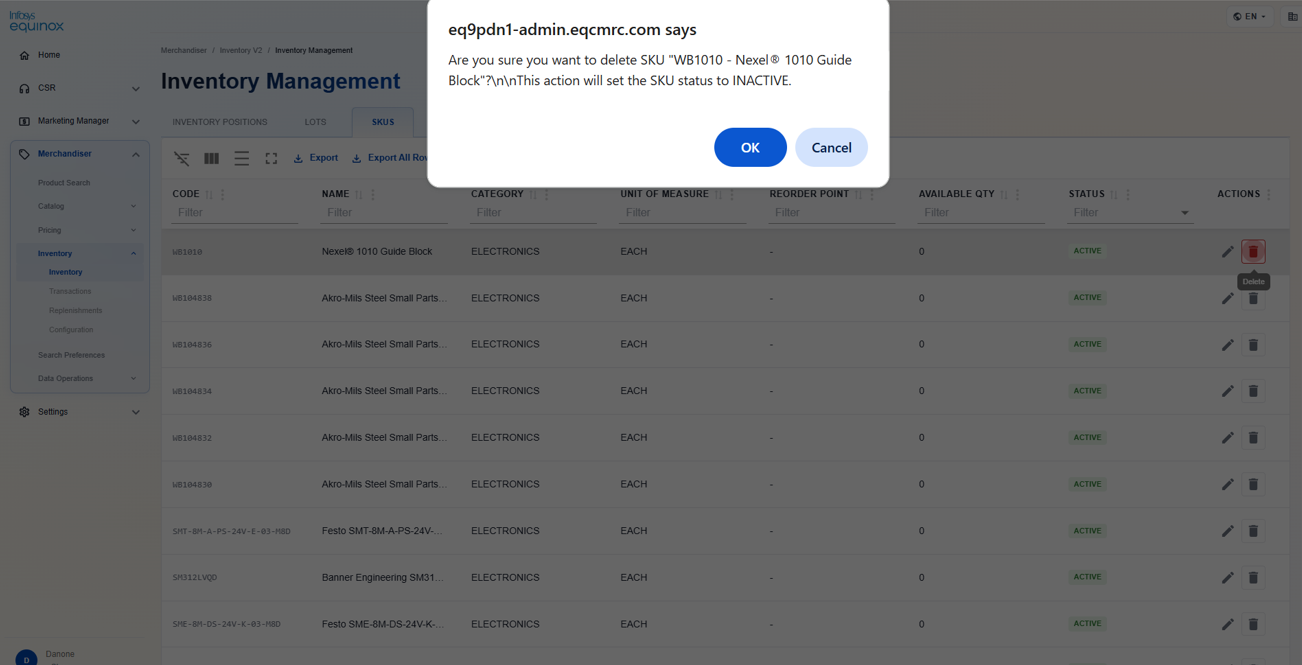
- Navigate to Inventory >Inventory > SKUs tab.
- Click the delete action for the SKU row and confirm. It makes the Sku inactive.
Inventory Positions
Overview
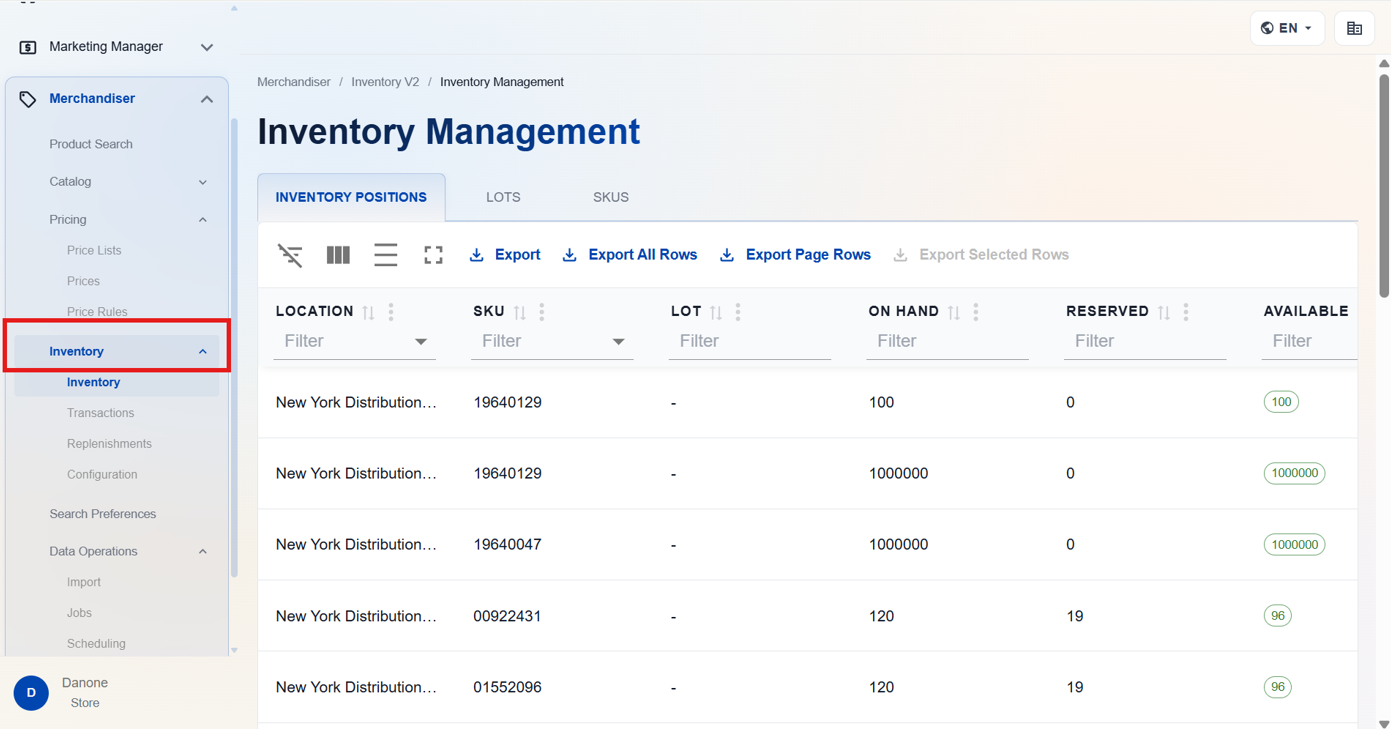
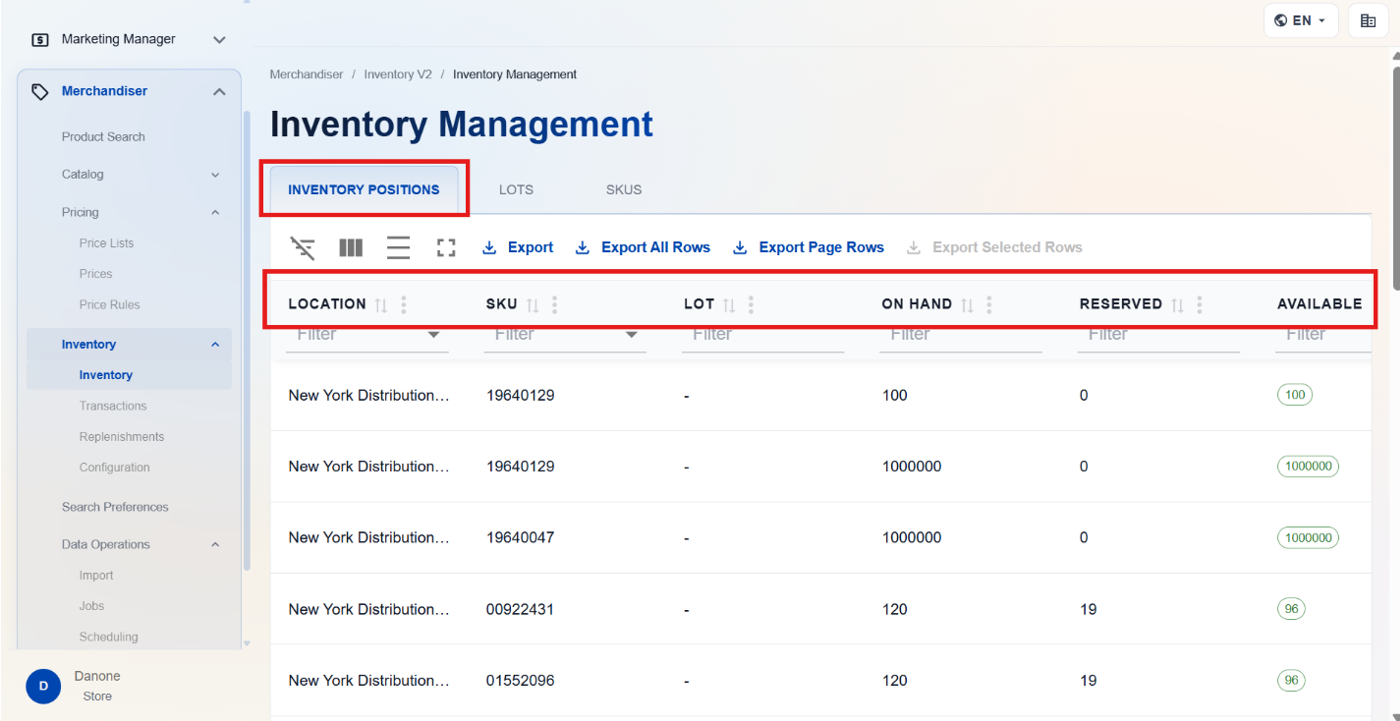
The Inventory Positions page displays stock quantities for each SKU-and-location combination. Use this page to view current on-hand, reserved, and available quantities, and to add or edit position records.
Viewing Inventory Positions
To view inventory positions:
- In the Merchandiser Admin, navigate to Inventory > Inventory Positions.
- The Inventory Positions table displays all configured positions.
| Column | Description |
|---|---|
| Location | The inventory location associated with the position. |
| SKU | The SKU identifier for the position. |
| Lot | The lot identifier, if the position is lot-tracked. |
| On Hand | The total quantity physically present at the location. |
| Reserved | The quantity reserved for pending orders or reservations. |
| Available | The quantity available for new orders. Color-coded: green (adequate), yellow (low), red (critical). |
| Blocked | The quantity currently blocked from allocation. |
| Status | The position status: Active, Inactive, or Pending. |
| Actions | Edit and delete icons for the position record. |
Creating an Inventory Position
- Navigate to Inventory > Inventory > Inventory Positions tab.
- Click + Add Inventory Position.
- Enter the following details:
| Field | Required | Description |
|---|---|---|
| Location | Yes | Select the location where stock is held. |
| SKU | Yes | Select the SKU. |
| Lot | No | Select a lot if the SKU has lot tracking enabled. |
| Quantity On Hand | No | Physical stock count. Defaults to 0. |
| Quantity Reserved | No | Stock allocated to orders. Defaults to 0. |
| Quantity Available | No | Stock available for sale. Defaults to 0. |
| Quantity Blocked | No | Stock quarantined or blocked. Defaults to 0. |
| Quantity In Transit | No | Stock in transit from another location. Defaults to 0. |
- Click Save.
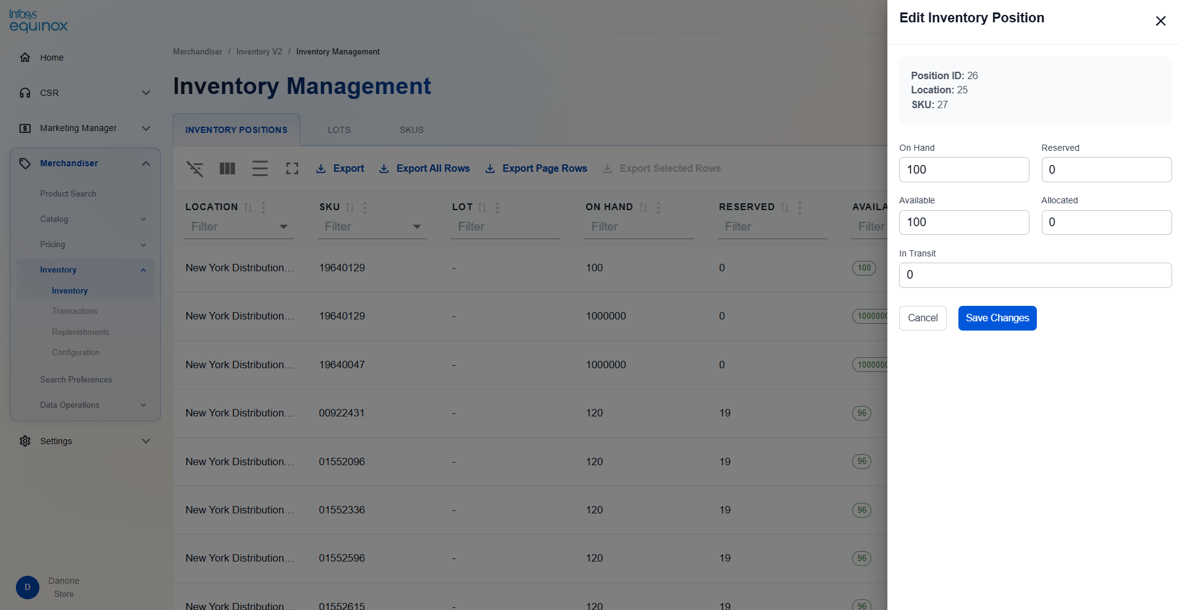
Editing an Inventory Position
- Navigate to Inventory > Inventory > Positions tab.
- Click the edit action for the position row.
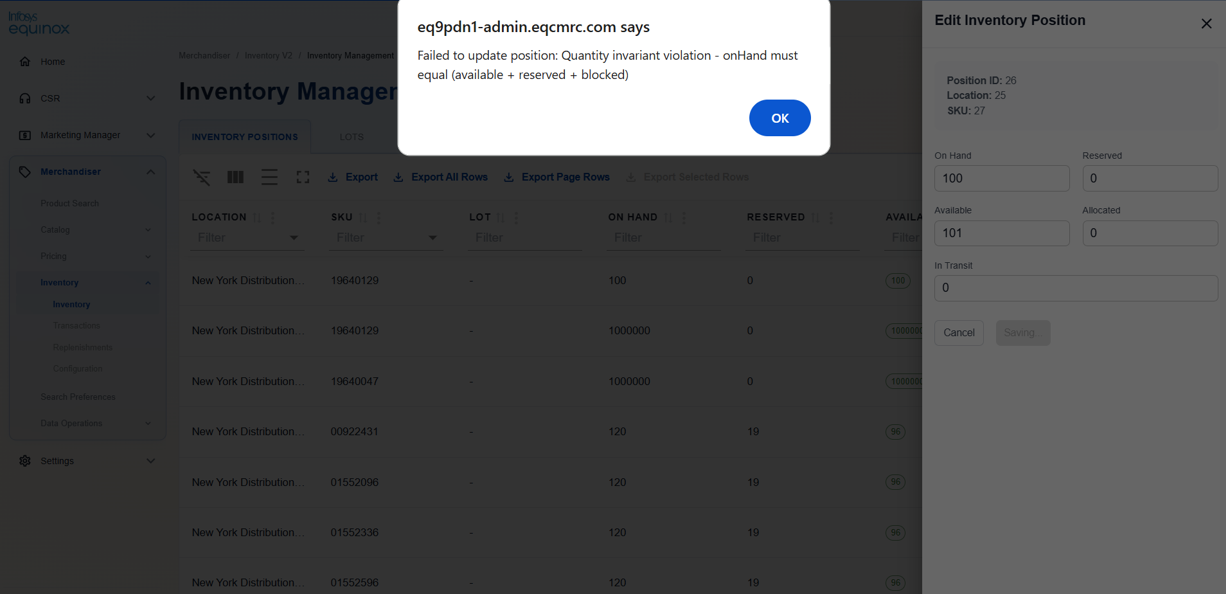
- Update the quantity fields as required.
- Click Save. Edits use optimistic concurrency — the system validates the version to prevent conflicting updates.
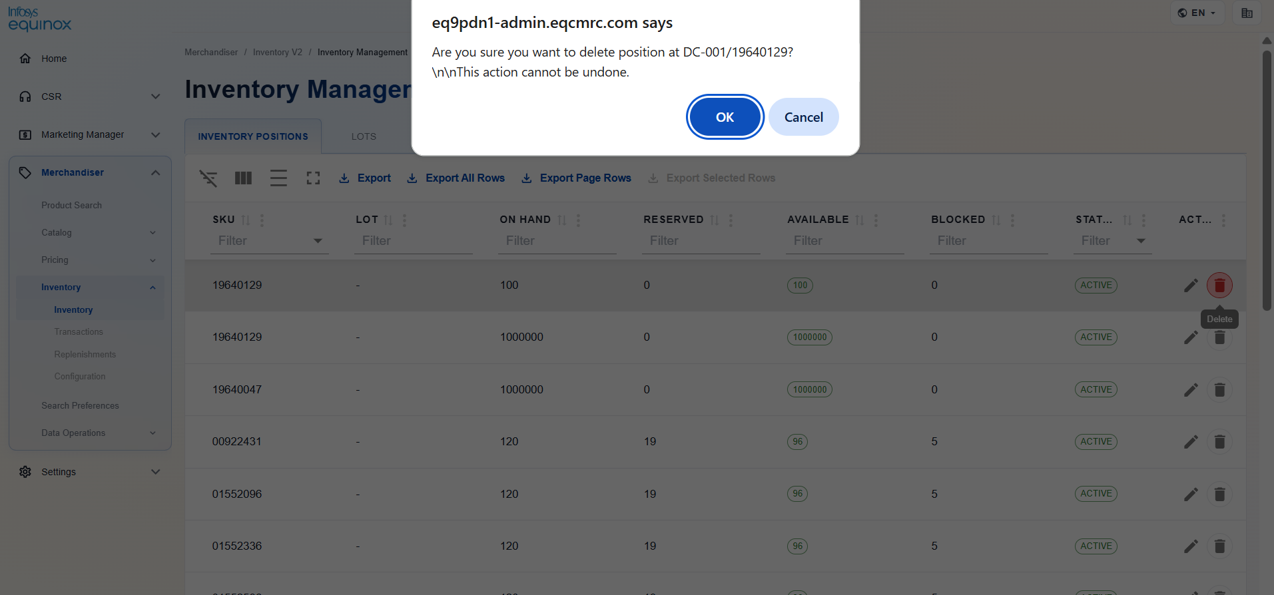
Deleting an Inventory Position
- Navigate to Inventory > Inventory > Positions tab.
- Click the delete action for the position row and confirm. It makes it inactive.
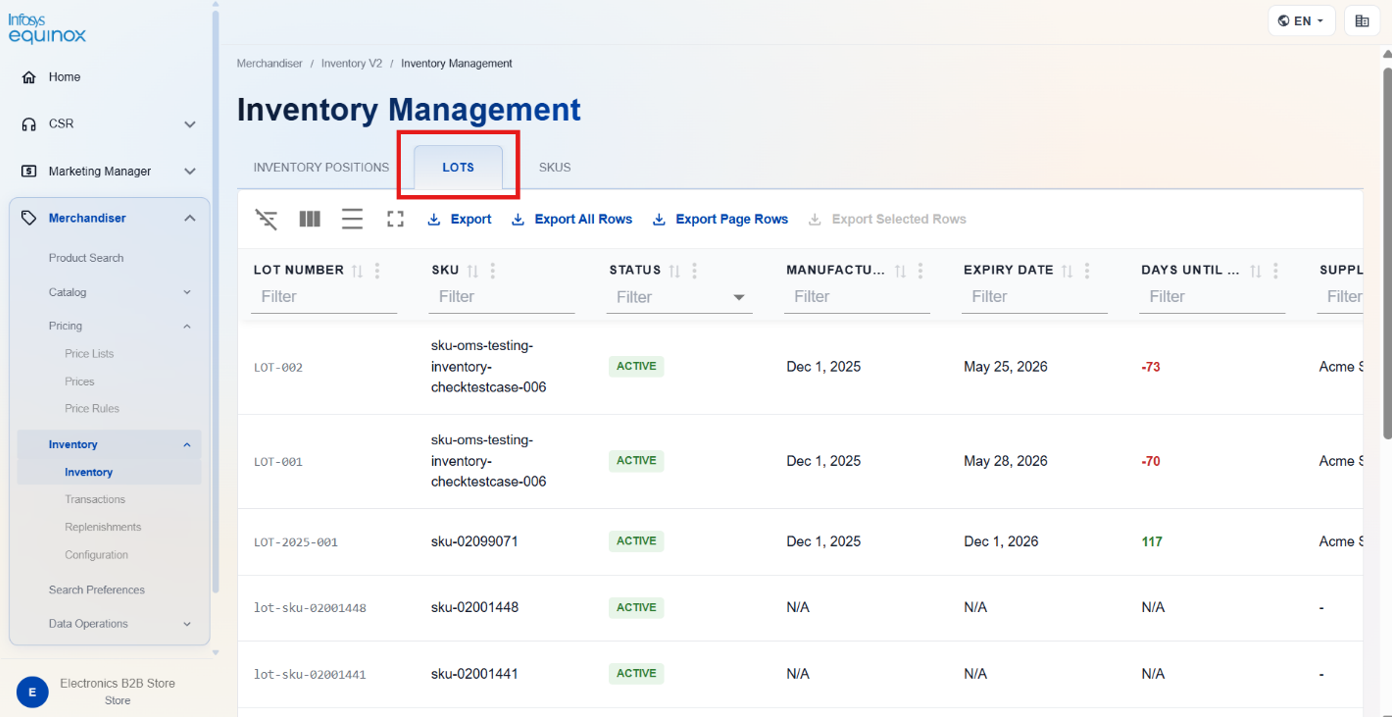
Lots :
Overview
The Lots page enables tracking of inventory by lot. Lots group inventory items that share common attributes such as manufacture date, expiry date, supplier, and quality grade.
Viewing Lots
To view all lots:
- In the Merchandiser Admin, navigate to Inventory > Inventory Management > Lots Tab
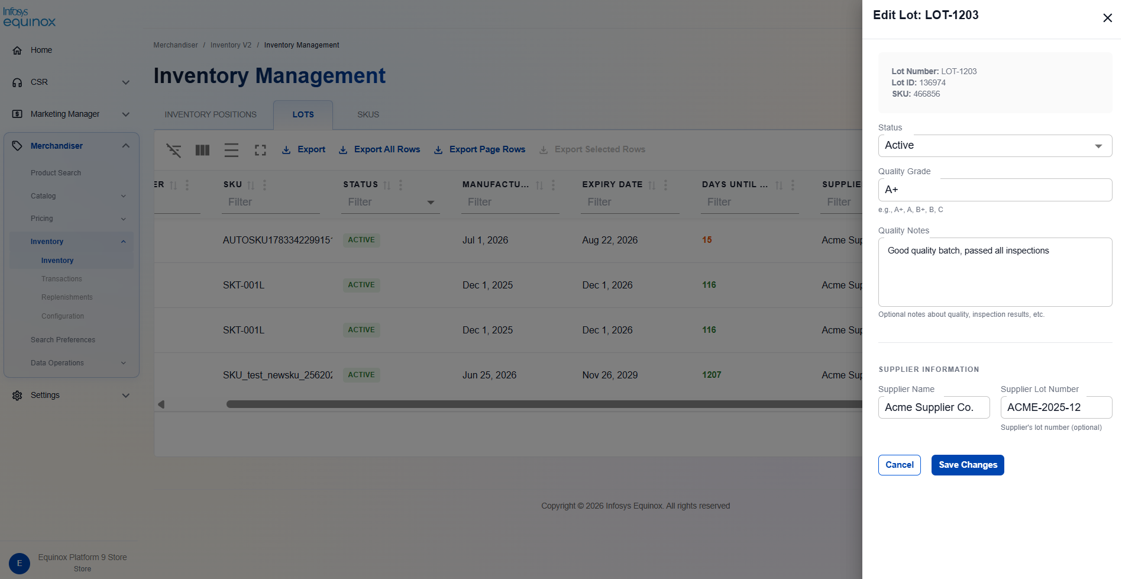
- The Lots table displays all configured lots.
| Column | Description |
|---|---|
| Lot Number | The unique identifier for the lot. |
| SKU | The SKU associated with the lot. |
| Status | The lot status: Active, Inactive, Expired, or Quarantine. |
| Manufacture Date | The date the lot was manufactured. |
| Expiry Date | The date the lot expires. |
| Days Until Expiry | Days remaining before expiry. Color-coded: red (expired), orange (fewer than 30 days remaining), green (adequate). |
| Supplier | The supplier associated with the lot. |
| Quality Grade | The lot quality classification: A, B, C, or Reject. |
Creating a Lot
- Navigate to Inventory > Inventory > Lots tab.
- Click + Add lots.
- Enter the following details:
| Field | Required | Description |
|---|---|---|
| Lot Number | Yes | Internal batch identifier, e.g. LOT-2025-001. Immutable after creation. |
| SKU | Yes | Select the SKU this lot belongs to. Immutable after creation. |
| Manufacture Date | No | Date the batch was produced. |
| Expiry Date | No | Expiry date used for FEFO ordering. |
| Received Date | No | Date the batch was received. Defaults to today. |
| Quality Grade | No | Grade assigned by quality inspection (A+, A, B+, B, C). |
| Quality Notes | No | Free-text quality inspection notes. |
| Supplier Name | No | Name of the supplying vendor. |
| Supplier Lot Number | No | The supplier’s own reference number for the batch. |
- Click Save.
Editing a Lot
- Navigate to Inventory > Inventory > Lots tab
- Click the edit action for the lot row.
- Modify available fields. Lot Number and SKU are read-only after creation.
- Update the Status as needed: Active, Quarantined, Expired, or Consumed.
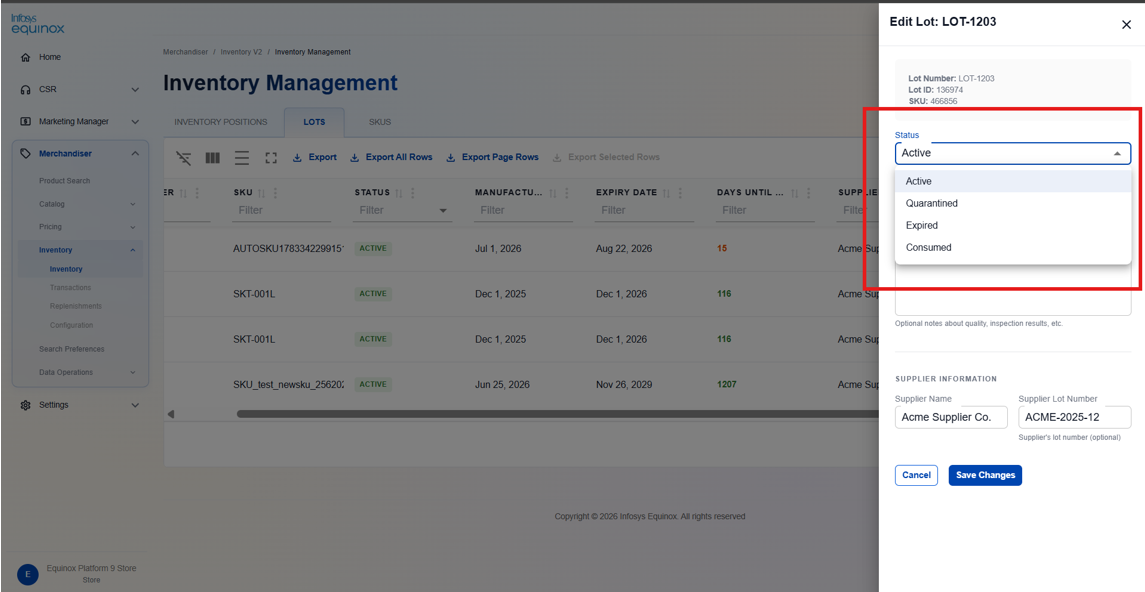
- Click Save changes.
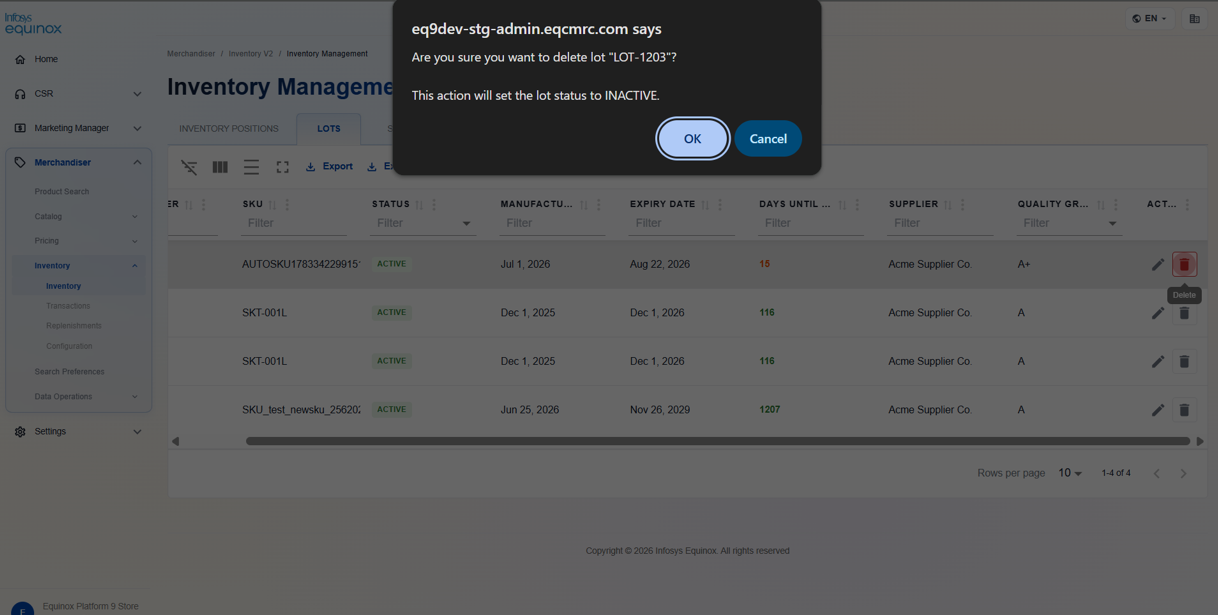
Deleting a Lot
- Navigate to Inventory > Inventory > Lots tab.
- Click the delete action for the lot row and confirm. It makes it inactive.
Transactions
Overview
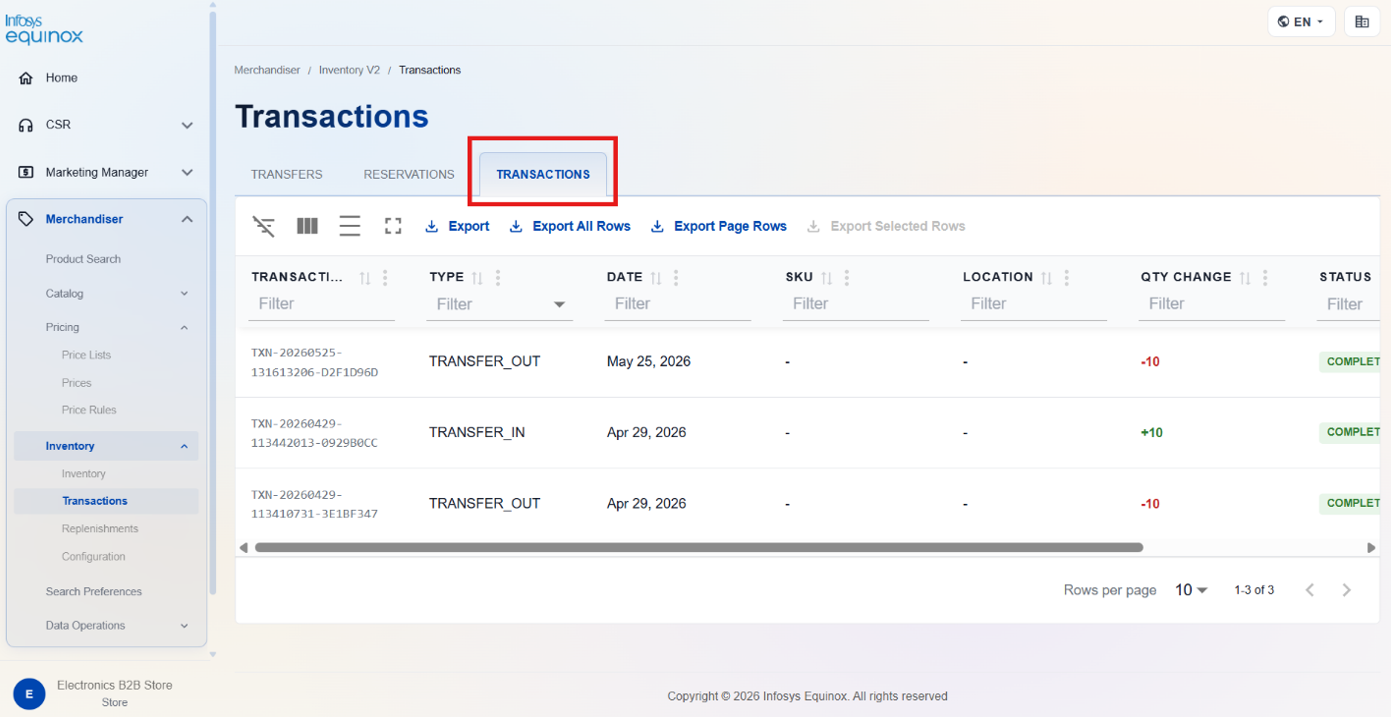
The Transactions page provides a complete audit trail of all inventory movements, including receipts, issues, transfers, adjustments, returns, and reservation activities.
Viewing Transactions
To view transactions:
- In the Merchandiser Admin, navigate to Inventory > Transactions > Transaction Tab.
- The Transactions table displays all inventory transaction records.
| Column | Description |
|---|---|
| Transaction | The unique transaction identifier. |
| Type | The transaction type: Receive, Issue, Transfer, Adjustment, Return, or Reservation. |
| Date | The date and time the transaction was recorded. |
| SKU | The SKU involved in the transaction. |
| Location | The location where the transaction occurred. |
| Qty Change | The quantity change applied by the transaction. Positive values are shown in green; negative values in red. |
| Status | The transaction status: Pending, Completed, Failed, or Cancelled. |
| Performed By | The user who performed the transaction. |
Transfers
Overview
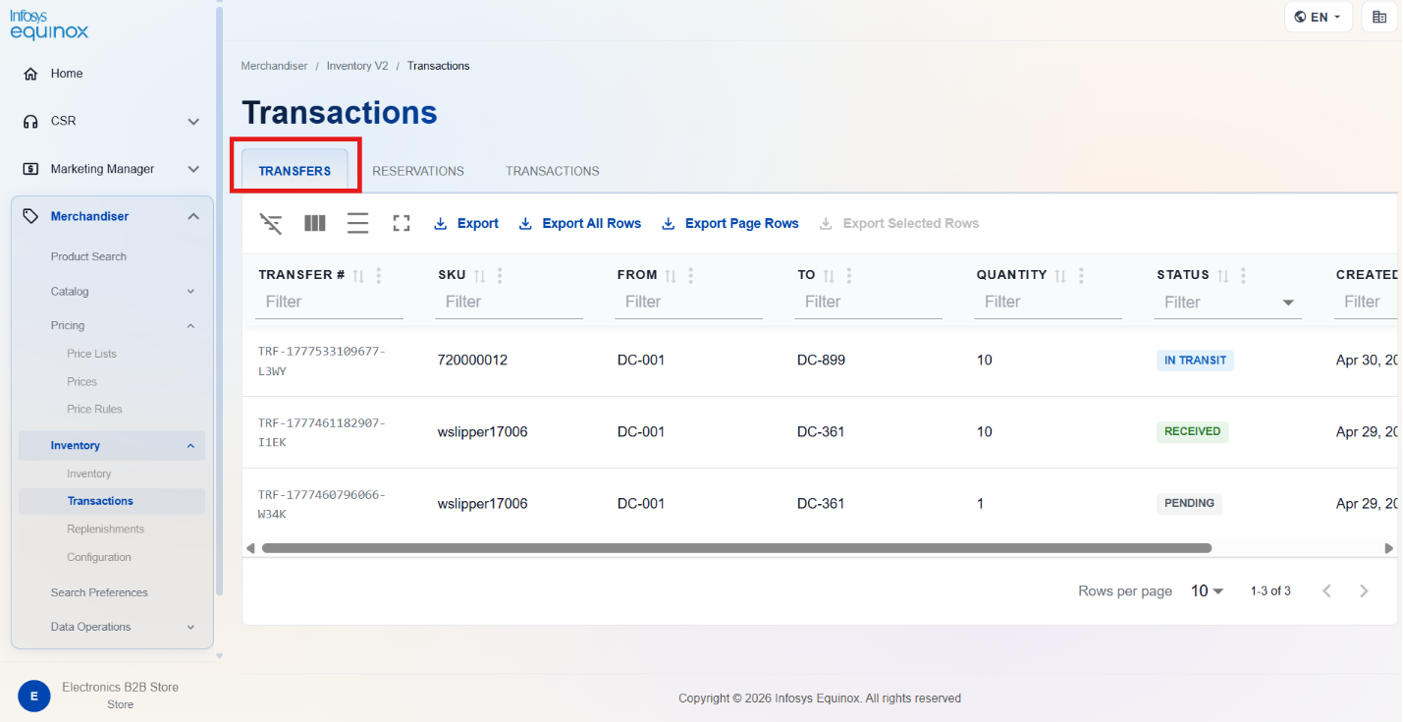
The Transfers page allows you to view and manage inventory movements between locations.
Viewing Transfers
To view all transfers:
- In the Merchandiser Admin, navigate to Inventory > Transaction > Transfers tab
- The Transfers table displays all transfer records.
| Column | Description |
|---|---|
| Transfer | The unique transfer identifier. |
| SKU | The SKU being transferred. |
| From | The source location. |
| To | The destination location. |
| Quantity | The quantity being transferred. |
| Status | The transfer status: Draft, In Transit, Received, or Cancelled. |
| Created | The date and time the transfer was created. |
Transfer Status Workflow
| Status | Description |
|---|---|
| Draft | Transfer has been created but not yet dispatched. |
| In Transit | Transfer has been dispatched from the source location. |
| Received | Transfer has been received at the destination location and inventory has been updated. |
| Cancelled | Transfer has been cancelled. |
Reservations
Overview
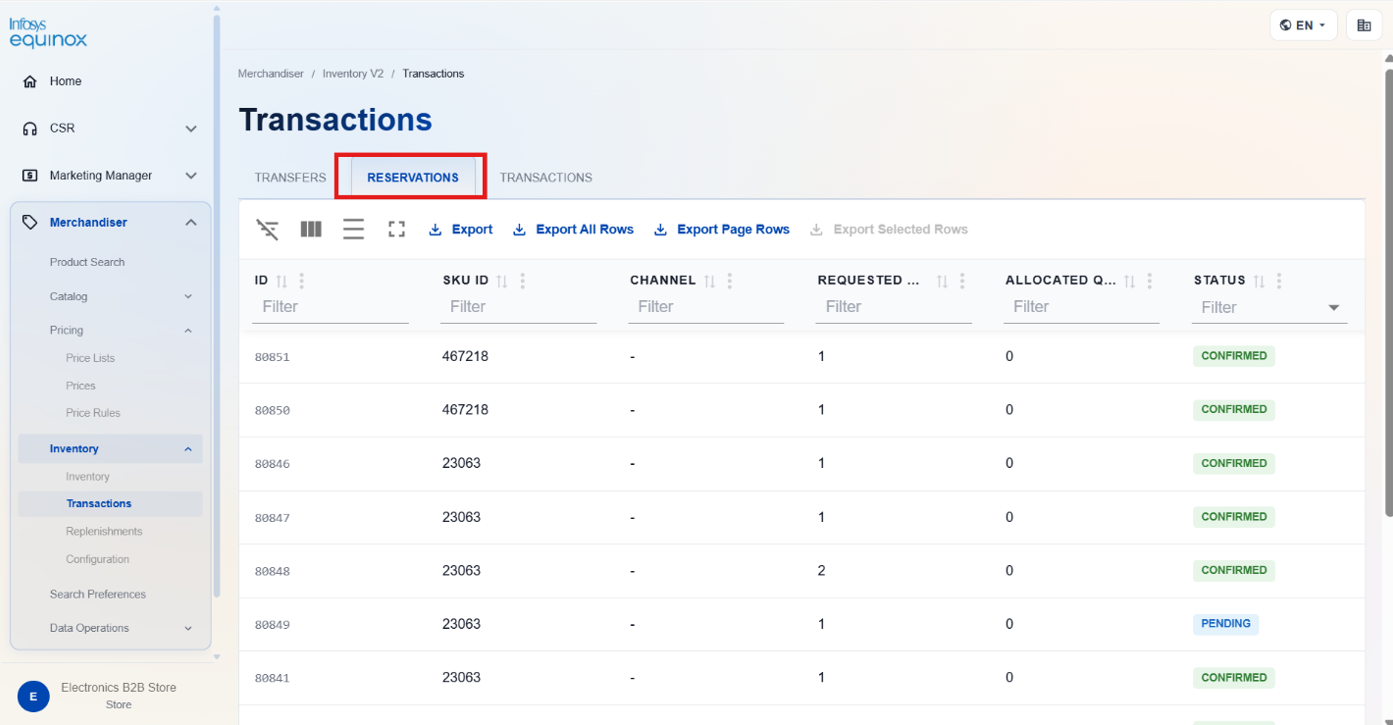
The Reservations page displays all inventory reservations placed by sales channels for specific SKUs.
Viewing Reservations
To view all reservations:
- In the Merchandiser Admin, navigate to Inventory > Transactions > Reservations Tab.
- The Reservations table displays all reservation records.
| Column | Description |
|---|---|
| ID | The unique reservation identifier. |
| SKU ID | The SKU for which inventory is reserved. |
| Channel | The sales channel that placed the reservation. |
| Requested Qty | The quantity requested for reservation. |
| Allocated Qty | The quantity that was actually allocated. |
| Status | The reservation status: Pending, Confirmed, Fulfilled, Cancelled, or Expired. |
Replenishments
Overview
The Replenishments section provides tools to manage replenishment orders and replenishment policies that govern restocking of inventory.
Replenishment Orders
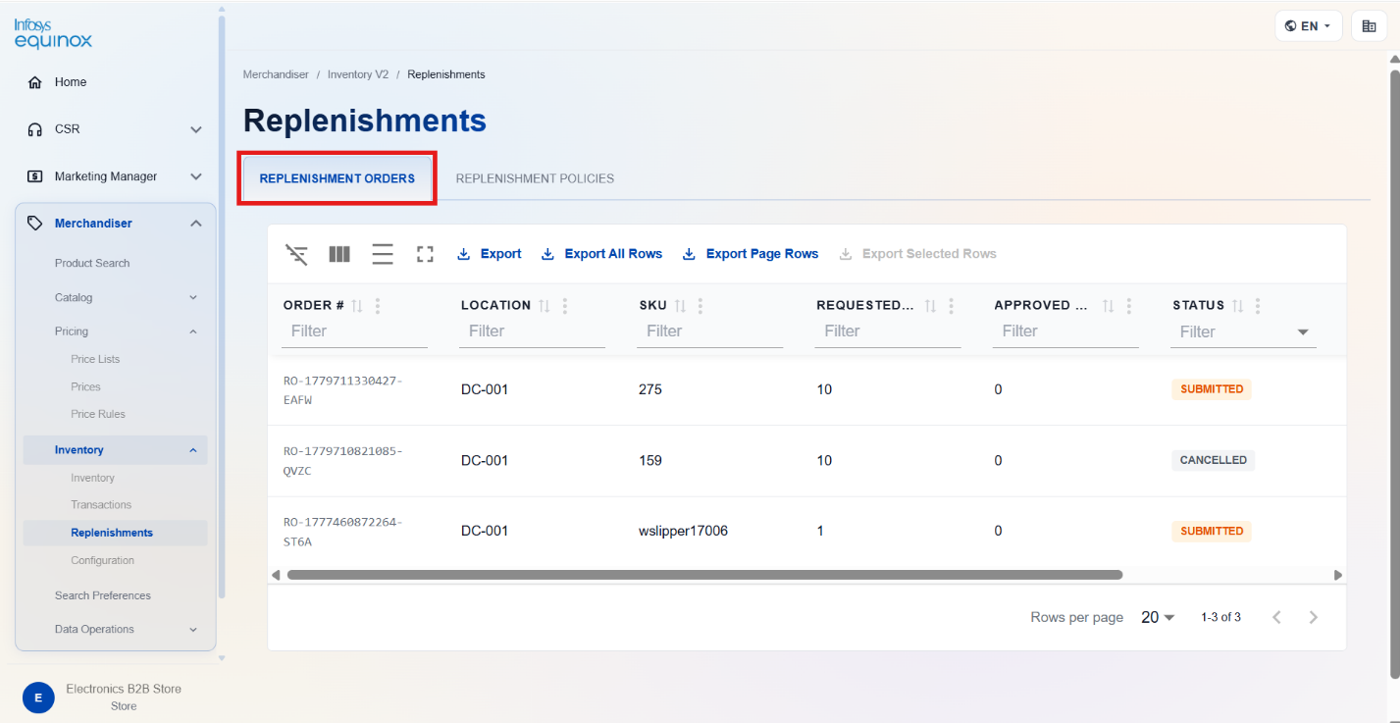
To view all replenishment orders:
- In the Merchandiser Admin, navigate to Inventory > Replenishments.
- Select the Replenishment Orders tab.
- The table displays all replenishment orders.
| Column | Description |
|---|---|
| Order | The unique replenishment order identifier. |
| Location | The location receiving the replenishment. |
| SKU | The SKU being replenished. |
| Requested Qty | The quantity requested in the replenishment order. |
| Approved Qty | The quantity approved for fulfillment. |
| Status | The current status of the replenishment order. |
| Created | The date and time the order was created. |
Creating a Replenishment Order
- In the Merchandiser Admin, navigate to Inventory > Replenishments > Replenishment order tab.
- Enter the following details:
| Field | Required | Description |
|---|---|---|
| Location | Yes | Select the destination location. |
| SKU | Yes | Select the SKU to replenish. |
| Requested Quantity | Yes | Quantity to request. |
| Replenishment Policy | No | Optionally link this order to an existing replenishment policy. |
| Notes | No | Free-text notes for the order. |
- Click Save.
Replenishment Policies
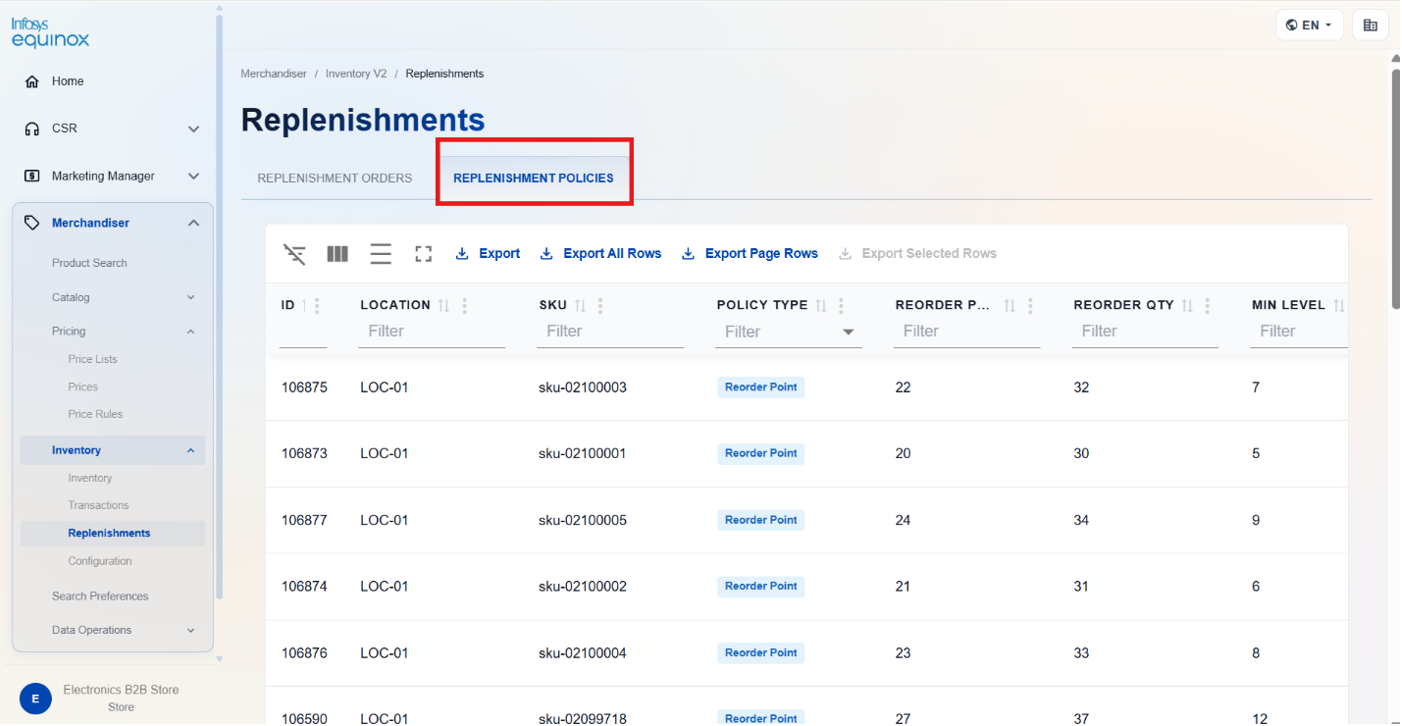
To view all replenishment policies:
- In the Merchandiser Admin, navigate to Inventory > Replenishments > Replenishment Policies.
- Select the Replenishment Policies tab.
- The table displays all configured policies.
| Column | Description |
|---|---|
| ID | The unique policy identifier. |
| Location | The inventory location governed by this policy. |
| SKU | The SKU governed by this policy. |
| Policy Type | The type of replenishment rule: Reorder Point, Min/Max, or Periodic Review. |
| Reorder Point | The quantity threshold that triggers replenishment for Reorder Point policies. |
| Reorder Qty | The quantity to order when the reorder point is reached. |
| Min Level | The minimum inventory level for Min/Max policies. |
| Max Level | The maximum inventory level for Min/Max policies. |
| Lead Time (days) | The number of days between order placement and receipt. |
| Status | Indicates whether the policy is Active or Inactive. |
Creating a Replenishment Policy
- In the Merchandiser Admin, navigate to Inventory > Replenishments > Replenishment Policies.
- Click Add replenishment policy.
- Enter the following details:
| Field | Required | Description |
|---|---|---|
| Location | Yes | Select the location. |
| SKU | Yes | Select the SKU. |
| Policy Type | Yes | Select Reorder Point, Min/Max, or Periodic Review (see below). |
| Lead Time Days | No | Number of days from order to receipt. Defaults to 0. |
| Safety Stock | No | Buffer stock quantity to maintain above the reorder trigger. |
| Active | No | Toggle to activate or deactivate the policy. Defaults to active. |
Additional fields by policy type:
| Policy Type | Additional Fields |
|---|---|
| Reorder Point | Reorder Point (qty at which order is triggered), Reorder Quantity (qty to order). |
| Min/Max | Min Level (minimum stock to maintain), Max Level (target maximum stock level). |
| Periodic Review | Review Period (days) (frequency of review), Target Level (stock level to replenish to at each review). |
- Click Save.
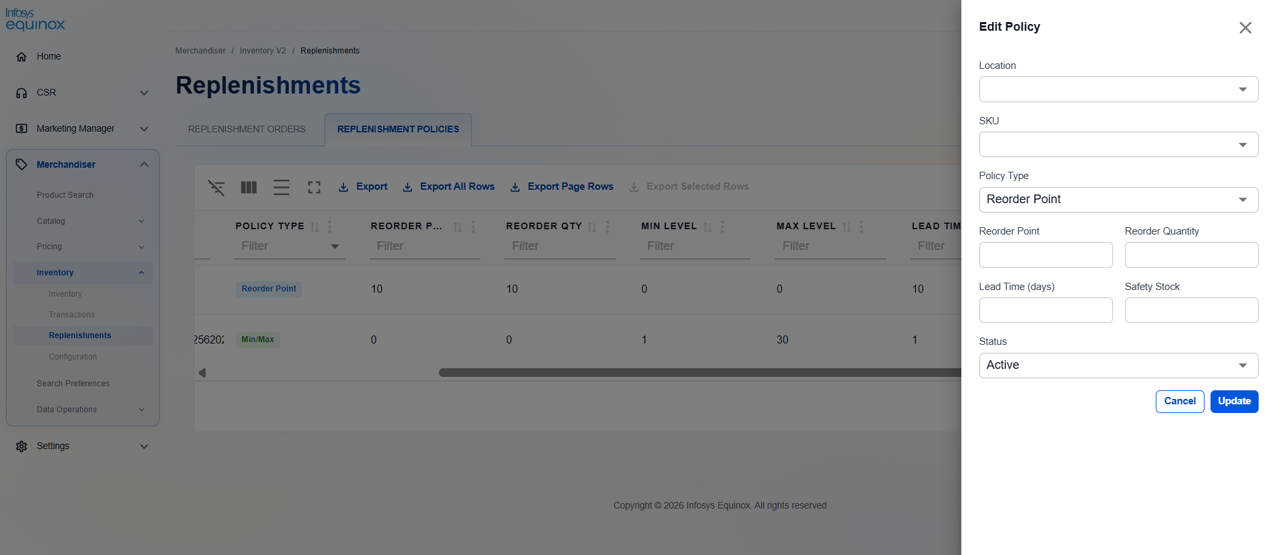
Editing a Replenishment Policy
- In the Merchandiser Admin, navigate to Inventory > Replenishments > Replenishment Policies tab.
- Click the edit action.
- Modify the fields as required and click Update.
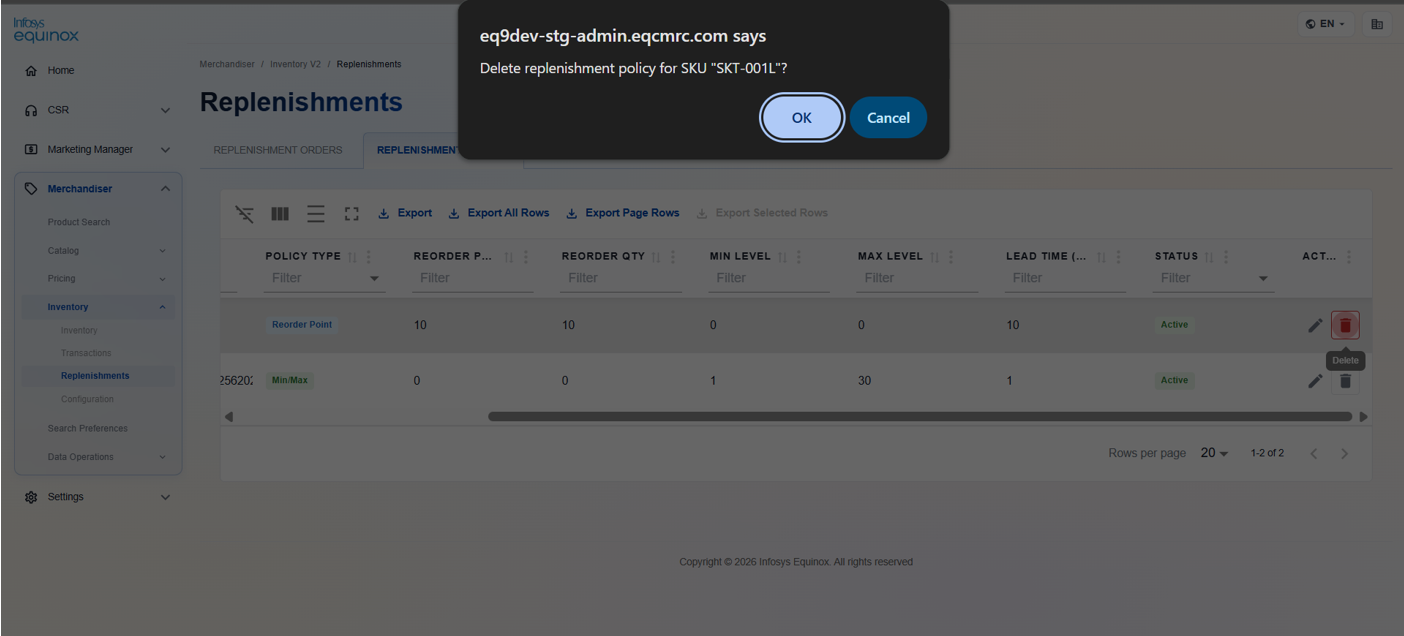
Deleting a Replenishment Policy
- In the Merchandiser Admin, navigate to Inventory > Replenishments > Replenishment Policies tab.
- Click the delete action and confirm.

Revision History
2026-08-10 | JP – Created the page and added the content.