Overview
This document is intended for business admin, technical team, and infra team who wants to set up voice commerce by integrating Infosys Equinox Commerce with Alexa. A user with the business admin role should refer to these sections:- Alexa Developer Console Setup – Creating and Building a Skill
- Alexa Integration Endpoint Setup
- Setting up the Alexa Developer Console – Linking an Account
- Creating a Client ID
- Testing the Alexa Skill
- Publishing the Alexa Skill
Overview of Alexa Setup Process
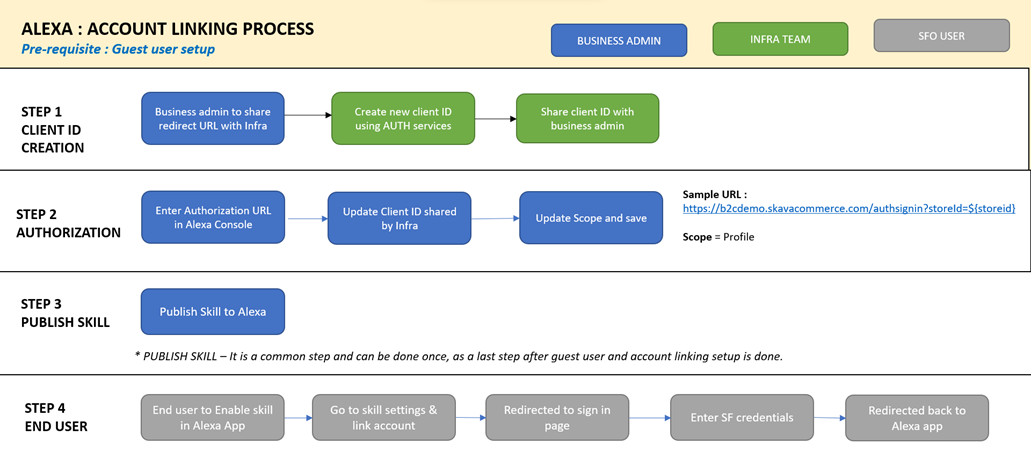
The following diagram shows the steps to be followed for setting up Alexa for a guest user process: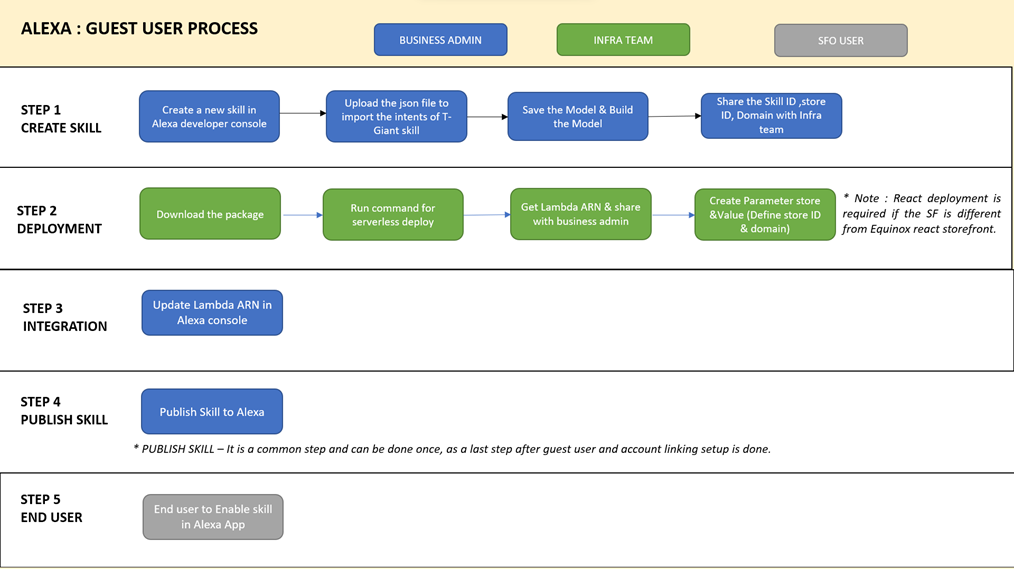 The following diagram shows the steps to be followed for setting up Alexa for account linking process:
Alexa Developer Console Setup (For Business Admin)
To set up the Alexa developer console as a buiness admin,- Log in to the Alexa developer console using the Amazon developer account.
- Go to Skills.

- Click Create Skill to create a new skill.
- Provide a name for the skill.

- Choose the template Start from Scratch.

Note: You can also test the already created skills. For example, T-Giant skill link is Developer Console (amazon.com). - Click on a skill to launch it.
The Build tab appears:

Note: To launch a particular skill, you need an invocation name. - Click Invocations.
- Click Skill Invocation Name in the left navigation panel.

- Provide a launch name in Skill Invocation Name. Note: You can refer to Skill Launch Phrases and Intent Launch Phrases under Invocations to understand the launch phrases.
- Click Interaction Model.
Note: In the Interaction Model > Intents section, you can find all the custom intents and the built-in intents are configured by Alexa.

- Click Intents.
- Click on an intent. For example, SearchProductIntent

- Add the intents. Note: Each intent (under Intents) has sample utterances and intent slots with dynamic value(s) provided by the user while using the skill. For example, SearchProductIntent which has name as slot and browse {name} products as the sample utterance, where name is the dynamic value.
(Or)
Upload a JSON file directly for a skill which updates the invocation name and intents in that skill automatically.
- Check the invocation name after inserting the JSON editor as it might update the invocation name as in the JSON file.
Note:- Invocation name should be unique for each skill.
- Once you add an invocation name and intents, you can find all these details in the JSON editor where it shows the built-in intents first and then the custom intents.

- Click Assets.

Note: Under Assets, you can find the Slot Types with few built-in slot types. Each slot type shows all the intents using that slot type. - Click Slot Types.
- Add a custom slot type if needed. For example, AMAZON.SearchQuery

- Click the Save Model button to save the model.
- Click the Build Model button to build the model.
- Check Utterance Conflicts once the model is built:

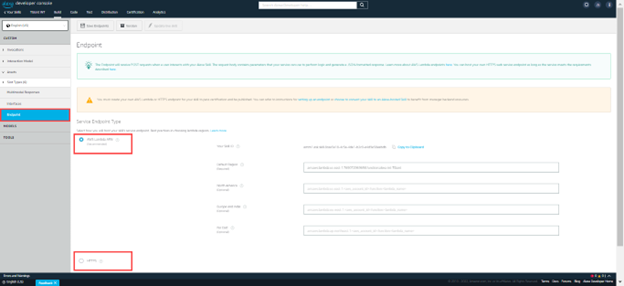
Alexa Integration Endpoint Setup (For Business Admin)
On the Alexa developer console, for the selected skill, go to the Endpoint tab. In this tab, there are two types of service endpoints:- AWS Lambda ARN
- HTTPS (This is not configured for Infosys Equinox Commerce.)
Setting up Endpoint using AWS Lambda ARN
To set up the AWS Lambda ARN endpoint as a business admin,- Copy the skill ID in the AWS Lambda ARN type.

- Sign in to your AWS Lambda account.
- Go to the AWS Lambda functions.

- Click Create Function to create a new Lambda function for the selected skill.

- Provide the function name.
- Select Node.js as runtime.
- Add a trigger in the function overview once the function is created.
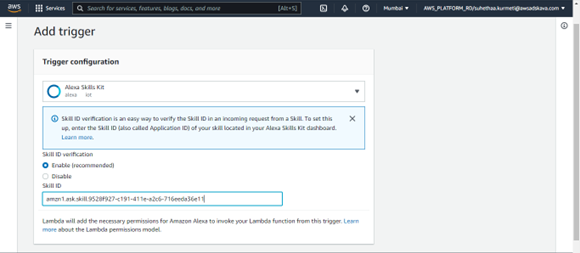
- Select Alexa Skills Kit.
- Paste the skill ID which you have copied from the Alexa developer console.
- Upload the Node.js code as a ZIP file or from an S3 bucket:

Note: For more details on Node.js code, see Structure of Node.js Code (For Technical Team). - Copy Function ARN.
- Paste it in the Default Region of the Alexa developer console AWS endpoint.

- Save the endpoint. Now, Alexa is linked with AWS Lambda function for the Node.js code.
Node Version Code
For Node.js code structure, refer to the section Structure of Node.js Code. For serverless deployment, refer to the section Serverless Deploy.Structure of Node.js Code (For Technical Team)
The folder structure of the Alexa node version is as follows:| – api
– endpoint.js – node_modules – index.js – local-debugger.js – package-lock.json – package.json – properties.js -serverless.yml |
The skill ID is provided at compile time, stored as the environment variables in the Lambda function, and fetched into the Node.js code using process.env.Skill_ID. The file and folder details are as follows:
| File or Folder | Description |
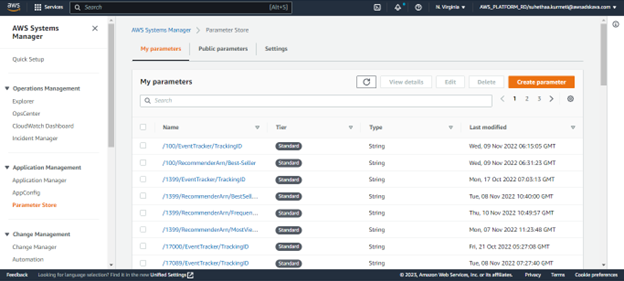
| properties.js | Using this file, you can fetch the storefront domain and store ID from the AWS parameter store using ssmClient. Install the ssmClient using the command given below: npm install @aws-sdk/client-ssm Check the properties.js for the function to fetch the properties from the AWS parameter store. The properties.js file contains all the speakouts for the intents and few other properties used while invoking an API like defaultLocale and pageSize. |
| package-lock.json | This package-lock.json file contains all the installed package details. The packages such as ask-sdk-core and aws-sdk are required for Alexa node version. |
| package.json | This package.json file contains the dependencies detail. |
| node_modules | This folder contains all the npm packages installed using the command npm install. |
| api -> endpoint.js | In the api folder, you have the file endpoint.js, which contains all the API operations using which you can connect to the server side. This file contains all the orchestration service APIs, which can be used based on the intent requests. You can get storeId, apiDomain, defaultLocale, and pageSize from the properties.js file using the propsConfig() and getProperties() functions. |
| index.js | This is the starting point of the code. When a user requests an intent from Alexa, Alexa sends the input JSON to Node.js. Using the input JSON, Node.js finds which intent handler to be invoked. You can get the input JSON from handlerInput. Based on the required operation, the intent handler returns the respective speakouts to Alexa. It also makes the API calls which are fetched from the endpoint.js file and uses the API response in the intent output speakouts. The intent handler returns the speakouts to Alexa using responseBuilder from ask-sdk-core. You need to add the alexaskillId and all the request handlers in the Alexa.SkillBuilders.custom()method. The alexaSkillId is fetched from the environmental variables of the Lambda function using process.env.Skill_ID which was provided to Lambda at the compile time. All the intent speakouts are fetched from the speakOutProps() function imported from the properties.js file. The Lambda function checks the input skill ID with the skill ID given in the Alexa.SkillBuilders.custom() using the withSkillId() method. |
| local-debugger.js | The file local-debugger.js contains all the local configuration and port connections. For the new incoming skill request a new socket connection is established. From the data received on the socket, the request body is extracted, parsed into a JSON, and passed to the skill invoker’s Lambda handler. The response is written on to the socket connection. |
Serverless Deploy (For Infra Team)
If you want to deploy the code directly into the Lambda function without uploading the ZIP file each time, then you can use the serverless deploy. Serverless creates the Lambda function on its own and deploys when you provide the command serverless deploy in the terminal. You need to add the function details in the serverless.yml file and once the Lambda function is created by serverless, provide the Function ARN in the developer console’s Alexa skill endpoint.serverless.yml File
Serverless helps to deploy the code into a separate Lambda function based on the provided skill. You need to add different function details for each skill. The serverless.yml file contains the service details based on which a Lambda function is created in the AWS lambda. The service name can be anything and the provider must be in AWS with the required details. Lambda function is created automatically once you provide serverless deploy command in the terminal. For example, alexa-pedev-tgiant, here alexa is the service name, pedev is the environment in which it is deployed and tgiant is the store name. While deploying the Lambda code, you can provide the skill ID and the specific environment to which the Node.js is to be deployed. For example,| serverless deploy –stage <EnvironmentName> –param=”skillId=<SkillID> |
Alexa Account Linking Setup
Once the skill is built and code from the Lambda function is uploaded as an endpoint in the Alexa developer console, you are ready to test the skill as a storefront guest user. If you want to link the storefront user account with Alexa skill, you need to activate the account linking in the developer console.Setting up the Alexa Developer Console (For Business Admin)
On the Alexa developer console, for the selected skill, go to Tools and click Account linking.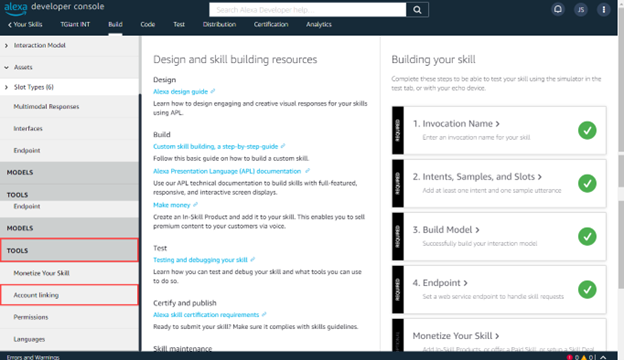
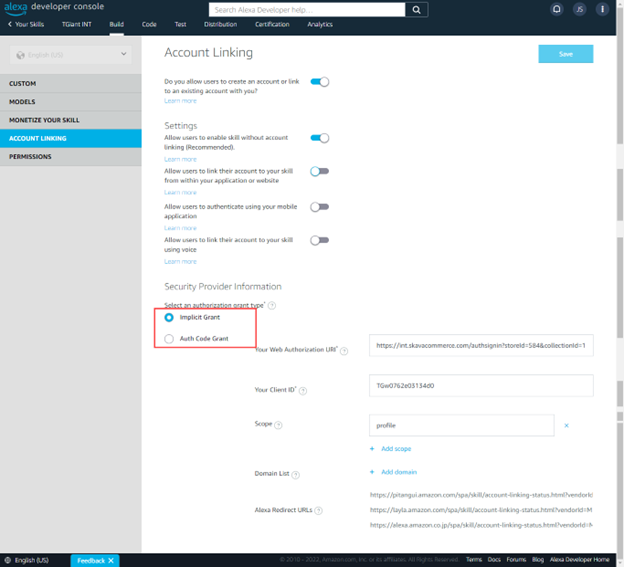
There are two types of authorization grant methods such as Implicit Grant and Auth Code Grant (This is not configured for Infosys Equinox Commerce.) to link an account.
Setting Up Account Linking using Implicit Grant Type
To set up account linking using Implicit Grant type,- In Your Web Authorization URI, provide the store sign-in page URL:
https://<StorefrontDomain>.skavacommerce.com/authsignin?storeId=<storeid>&collectionId=<collectionid>&domain=<sfo_domain>

Note: The parameter <sfo_domain> is optional. It is needed only if <sfo_domain> is the same as that of the page domain.
- Create your client ID as shown in the section Creating a Client ID.
- Go back to ACCOUNT LINKING.
- Provide the fields Your Client ID and Scope as profile.

- Save the details. Now, the account linking is activated for the skill.
Creating a Client ID (For Business Admin)
To link the storefront to Alexa, you MUST create your client on the Infosys Equinox Authorization microservice. To create a client ID as a business admin,- Get the admin auth token using the Admin Swagger. For example, check the below Swagger:
| API | https://<EnvironmentName>.skavacommerce.com/admin/services/auth/login |
| Input post body | { “identity”: `<Username>`, “password”: `<password>` } |
| Sample Response | { “sessionId”: “<SessionID>“, “authToken”: “<AuthToken>“, “businessId”: <BusinessID>, “userid”: “<UserID>“, “refreshToken”: “<RefreshToken>“ } |
- Create the new client using the below Swagger:
| API | https:// <EnvironmentName>.skavacommerce.com/authservices/swagger-ui.html#/OAuth_Clients/createOpenIdClient |
| Input Headers | { “x-collection-id”:`<CollectionID>`, “x-auth-token”:`<Admin_AuthToken>` } |
| Input oAuthClient body | { “applicationType”: “Web”, “clientName”: `<ClientName>`, “contactEmail”:`<ClientEmail>`, “redirectUris”: “<RedirectURIs>“ } Note: You can get the <RedirectURIs> from the ACCOUNT LINKING section of the Alexa developer console. |
| Sample Response | { “clientId”: “TGiaaa423ec4ce5”, “clientName”: “TGiant”, “logoUri”: null, “clientSecretExpiresAt”: “2025-10-12T10:55:29.630+0000”, “contactEmail”: “alexa.tgiant@gmail.com”, “redirectUris”: “https://pitangui.amazon.com/spa/skill/account-linking- status.html?vendorId=M2E9L5PZZ10UG7,https://layla.amazon.com/spa/skill/account-linking-status.html?vendorId=M2E9L5PZZ10UG7,https://alexa.amazon.co.jp/spa/skill/account-linking-status.html?vendorId=M2E9L5PZZ10UG7”, “idTokenSignedResponseAlg”: “RS512”, “jwksUri”: “https://cloudapi.skavacommerce.com/authservices/openidclients/jwks/TGiaaa423ec4ce5”, “applicationType”: “Web”, “collectionId”: 248 } |
A new a client is created.
- Once you want to link your account to Alexa, in the Alexa app, go to the Skill Settings.

- Click Account Linking.
This redirects to “Auth Sign In” page (refer to the section Authorizing the User for the Client Application) of the storefront as you have provided the auth sign-in URL in the ACCOUNT LINKING section of the developer console.

- Authorize the user for the client application.
Note: Each time when you link the account to Alexa, you need to make an authorize API. With this, you will authorize the user for a registered client application and create a session. Once the authorize API is successful, the page redirects back to Alexa with a success message.
Authorizing the User for the Client Application (For Technical Team)
Each time a user logs in to link the account to Alexa skill, you need to authorize the user for the registered client application and generate an auth token for the session. For this, you need to,- Include an Auth SignIn page on the storefront React side.
- Refer to the React Lite repository.
- Copy the AuthSignIn.jsx file.
- Paste it inside the views > pages folder.
- Update the storeid and domain properties inside the class constructor.
Testing the Alexa Skill (For Business Admin)
To test the skill in the Test tab of the Alexa developer console as a business admin,- In the Alexa simulator, provide the invocation name.
For example, provide open equinox store to launch the T-Giant skill.

- Refer to the properties.js file from the Node.js code for use cases where you can edit the speakouts.
Note: These intents displayed provide what actions the users can take.
Publishing the Alexa Skill (For Business Admin)
Once the skill is tested, you need to publish the skill. For publishing the Alexa skill, you need to add any locales you want. To publish the skill as a business admin,- Click Language Settings in the locale dropdown:

- Add a list of languages you want.

- Save and build the skill. Note: You can then publish the skill through the Distribution tab.
- Go to Distribution tab.

- Click the Skill Preview tab.
- Provide the store details like public name and description.
- Provide the launch phrases for the skill. For example,
-
- Alexa, open equinox store
- Alexa, open equinox store and search fridge products
- Alexa, open equinox store and get me daily needs
-
- Add the skill icons and other details and save the store preview.

- Fill the details as required in the Privacy and Compliance page.

- Click Availability for testing the skill in the Alexa mobile app or for sharing the skill to other Alexa users.

- Add the users’ email IDs which are linked with the Alexa mobile app in the Beta Test
Once the mail ID is added for the Beta Tester, the tester will get a mail from the Amazon developer console.

- Click the link provided in the e-mail. Now, you get the access to test the T Giant skill.
- Open your Alexa mobile app.
- Go to Skills. You can see the T Giant skill under Dev Skills.
- Click Enable for testing the skill.

- Once the skill is enabled, launch the skill using the provided sample phrases.
![]()
Revision History
2023-02-01 | AN – Page created and content uploaded for 8.13 release.