This document explains how to integrate Amazon Personalize in the Infosys Equinox Commerce platform and the storefront (React-based).
Overview of Amazon Personalize
Amazon Personalize is a low-code machine learning (ML) service that can generate custom recommendations through an application program interface (API) call for any application running on Amazon Web Services (AWS) infrastructure. The goal of Amazon Personalize is to deliver customized recommendations that will improve customer engagement.Amazon Personalize Set-Up Process
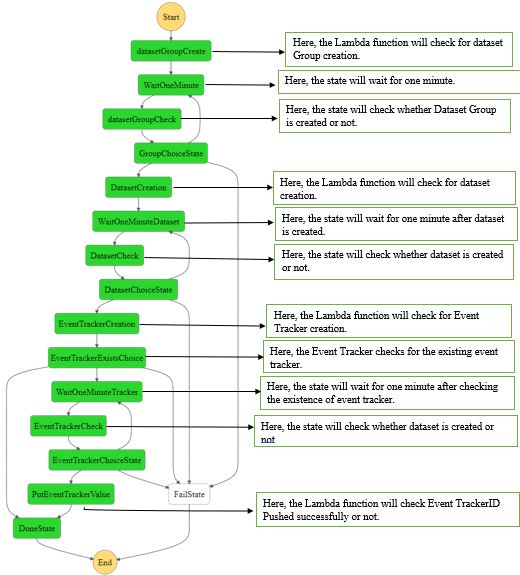
The following diagram shows the steps to be followed for setting up Amazon Personalize: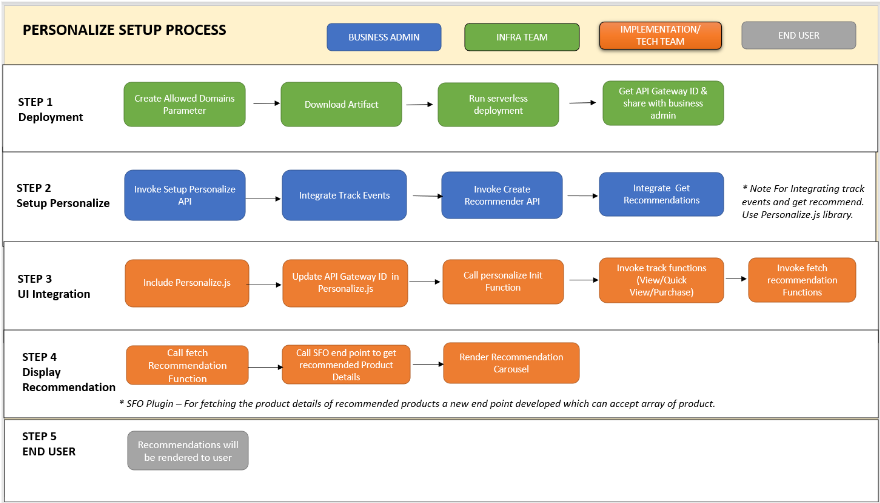 For more information, see the Setting Up Amazon Personalize and Storefront Integration sections.
Setting Up Amazon Personalize
You can set up Personalize in one of the following ways:- Manually through the Amazon Personalize Web console.
- Automatically via calling HTTP APIs that internally perform all operations.
Setting Up Amazon Personalize Manually
Basically, you can use this to set up Amazon Personalize via the Amazon console. We recommend that you skip this manual section and refer to the next section ‘Setting Up Amazon Personalize Automatically’.Create a Dataset Group
The first step is to create a dataset group consisting of the following steps:- Open the Amazon Personalize console at https://console.aws.amazon.com/personalize/home and sign in to your account.
- Choose Create Dataset Group.
- In the Dataset group details section:
- In the Name field, specify a name for your dataset group. You must use the following syntax: stage name-storeId-Dataset-group.
- In the Domain field, choose E-Commerce, click Create dataset and continue.

After creating a dataset group, you need to create interaction dataset as explained in the next section.
Create Interaction Dataset
After creating a dataset group, the Create interactions dataset page appears. To create the interactions dataset,- Specify a name for your dataset in the Dataset Name field. You must use the following syntax: stage name-storeId-interactions-datasets.
- For Dataset schema, select Create a new schema by modifying the existing default schema and importing your data.
- In the Schema name field, specify a name for your schema. You must use the following syntax: stage name-storeId- personalize-interaction-schema.

- Use the following schema as the Schema definition:
{ "type": "record", "name": "Interactions", "namespace": "com.amazonaws.personalize.schema", "fields": [ { "name": "USER_ID", "type": "string" }, { "name": "ITEM_ID", "type": "string" }, { "name": "EVENT_TYPE", "type": "string" }, { "name": "PAGE_NAME", "type": "string" }, { "name": "TIMESTAMP", "type": "long" } ], "version": "1.0" } - After specifying the schema definition, click Create dataset and continue.
Import Interaction Data
You can skip this step if you are setting this up for the first time. The existing data can only be imported if you had created an event tracker earlier and recorded some events in a dataset. After creating the interaction dataset, the Import interactions data page appears. To import the interactions data,- On the Import interactions data page, for Data import source, select Import data from S3.
- For Dataset import job name, specify a name for your import job.

- In the Additional S3 bucket policy required dialog box, if you have not granted Amazon Personalize permissions, follow the instructions to add the required Amazon S3 bucket policy.
- For Data location, specify where your data file is stored in Amazon Simple Storage Service (S3). Use the following syntax: s3://<name of your S3 bucket >/ < folder path > / < CSV filename >
For example,

- In the IAM Role section, for IAM service role, keep the default selection of Enter a custom IAM role ARN.
- For Custom IAM role ARN, specify the role that you created in Creating an IAM role for Amazon Personalize.

- After providing IAM ARN, click the Create dataset import job button.

- The data import job starts, and the Overview page is displayed. Initially, the status is shown as Create pending, and then followed by Create in progress.

The time it takes for the data to be imported depends on the size of the dataset. When the data import job has finished, the status changes to Active and the Create event tracker button is enabled which was previously disabled.

Create Event Tracker
After importing the interaction data, the event tracker page appears. The event tracker is created by following the steps given below:- Specify a name for your event tracker in the Tracker name field. Use the following syntax: stage name-storeId- event-tracker.

- Click the Finish button. This starts the creation of an event tracker.

- Initially, on the event trackers page, the status is shown as Create in progress. The status is then changed to Active.

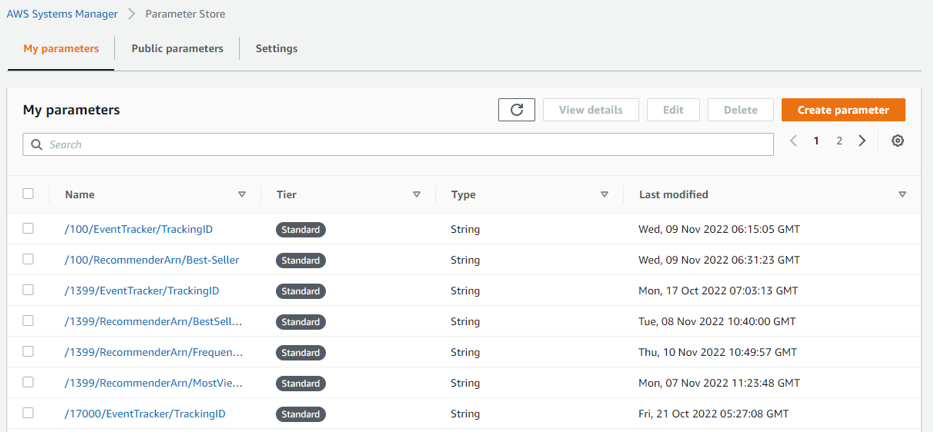
Note: For every Event Tracker, you have TrackingId, which is stored in the parameter store.
Create Event Tracker Parameter in Parameter Store
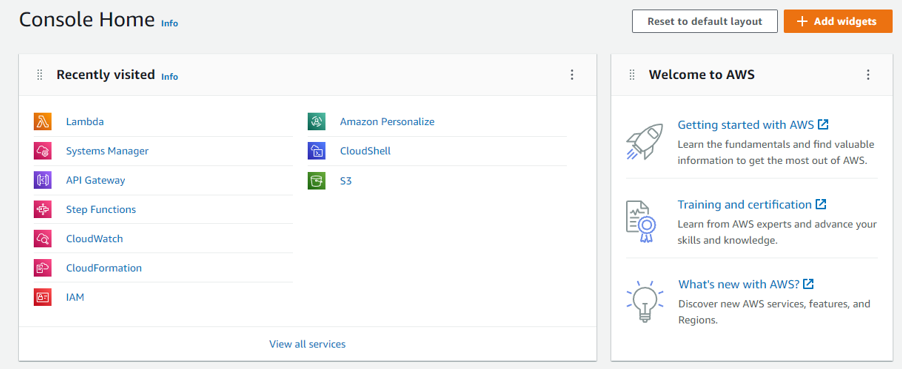
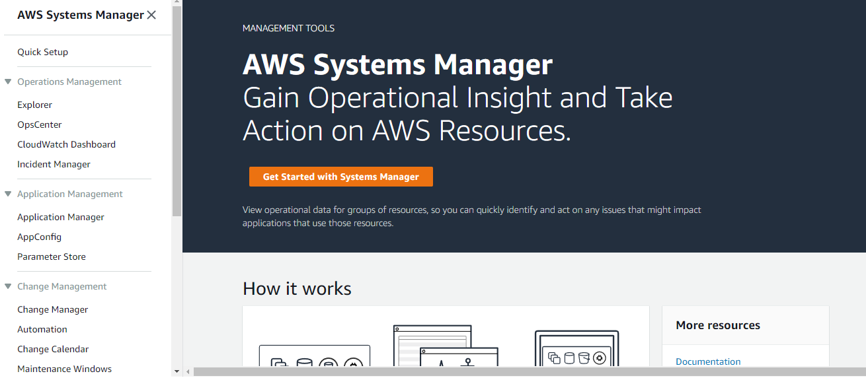
To create a dataset group,- Open the System Manager console and choose Parameter store: AWS Systems Manager – Parameter Store (amazon.com).
- Click Create parameter.
- Specify a name for your parameter in the Name field. Use the following status: /stage name/storeId/EventTracker/TrackingID.
- Specify the Tracking ID value in the Value field that you get while creating an event tracker.

For example,
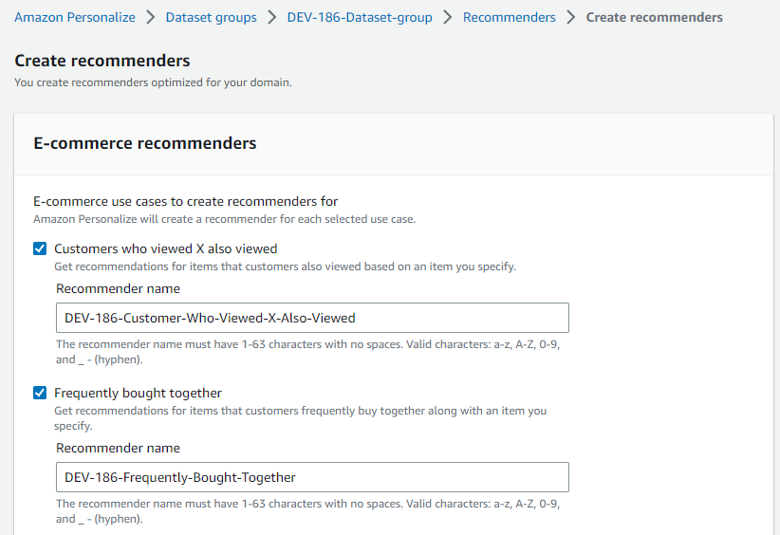
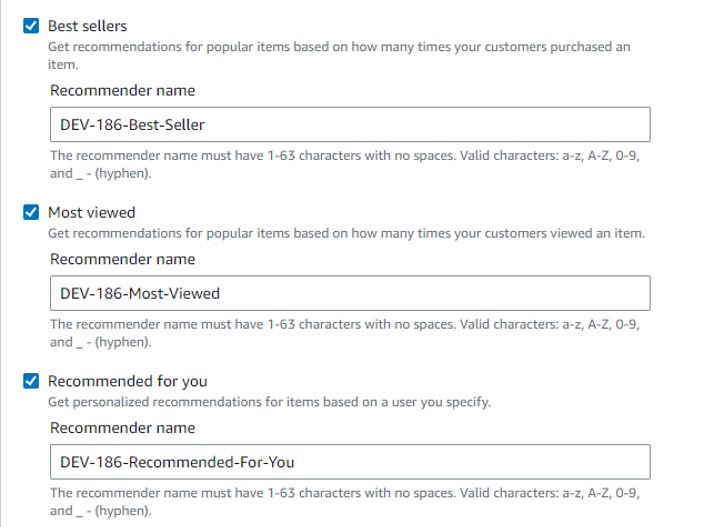
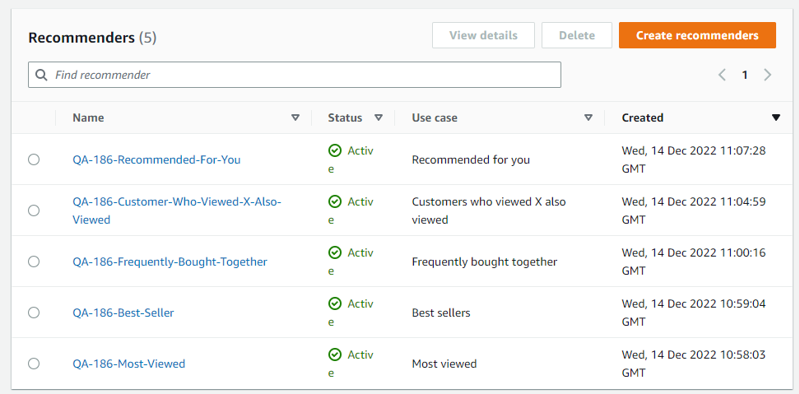
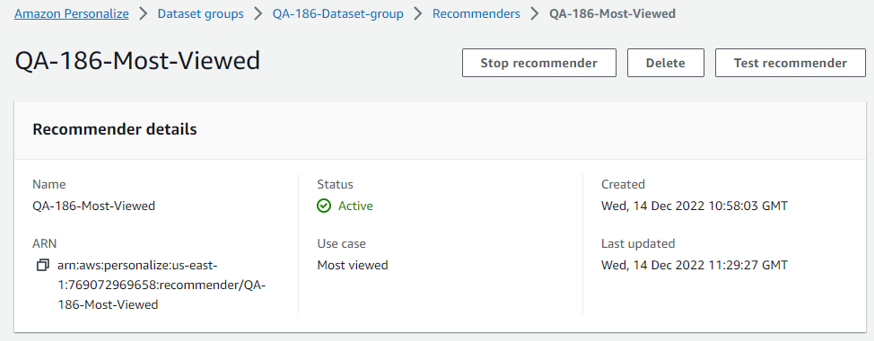
Create Recommenders
To get real-time recommendations,- Select Use e-commerce recommenders to generate real-time recommendations.
- Click Create recommenders.

- In the E-commerce recommenders page, select all or the required recommender.
Note: Once a particular recommender is deselected, the Recommender name field is disabled.

- Specify a name for the selected recommender in the Recommender name field. You must follow the syntax given in the table below:
| Recommender Name | Syntax |
|---|---|
| Customer Who Viewed X Also Viewed recommender | Stage name-storeId-Customer-Who-Viewed-X-Also-Viewed |
| Frequently Bought Together recommender | Stage name-storeId- Frequently-Bought-Together |
| Best Seller recommender | Stage name-storeId-Best-Seller |
| Most Viewed recommender | Stage name-storeId- Most-Viewed |
| Recommended For You recommender | Stage name-storeId- Recommended-For-You |
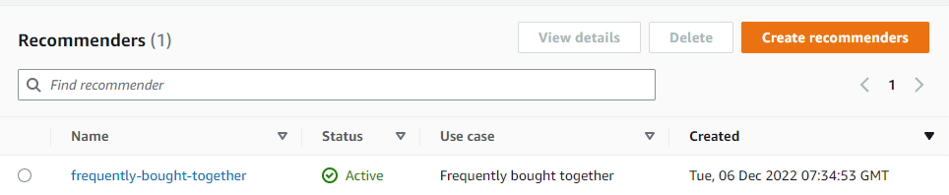
In the Recommenders page, initially, the status is shown as Create in progress and the status is then changed to Active once the recommenders are created successfully.
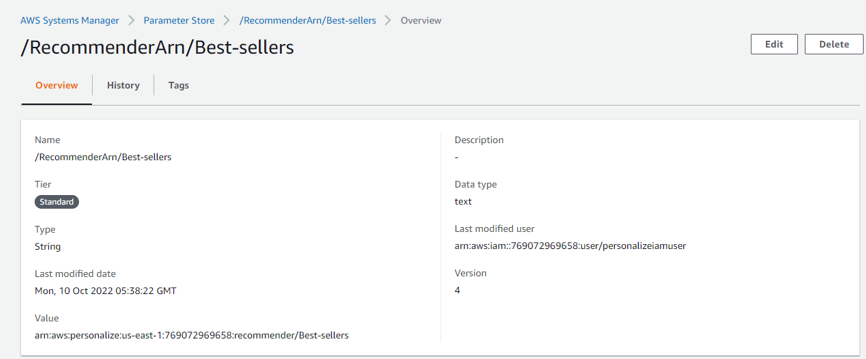
 Once the recommender is active, then you need to store the RecommenderArn value in the parameter store. The RecommenderArn is generated for each recommender. Each parameter store has a unique Resource ARN per account and region, so you can define a role and policy based on the hierarchy of the parameter store.
Create Recommender Parameter in Parameter Store
To create a dataset group consisting of the following steps,- Open the System Manager console and select Parameter Store: AWS Systems Manager – Parameter Store (amazon.com).
- Click Create parameter.
- Specify a name for your parameter in the Name field. Use the following syntax /Stage name/storeId/RecommenderArn/Frequently-Bought-Together.
- In the Value field while creating a recommender, specify the RecommenderArn value.

Testing Recommenders from AWS Console
This is an optional step that can be skipped. It can be used to verify the functionality of the recommender and the quality of recommendations from the console itself before or without integrating it into the storefront. To test the recommender from the AWS console,- To get recommendations, in the frequently-bought-together page, click Test recommender.

- In the Test recommender page, in the Item ID field, specify an item value present in the interactions dataset.

- Click Get recommendations. The Recommendations panel displays the list of recommended item IDs.

Setting Up Amazon Personalize Automatically for a store in Infosys Equinox Commerce Platform
You can set up Amazon Personalize using the step functions. The step functions were created to automate the parts of the set-up process. This method is recommended to set up Amazon Personalize. For setting up Automation Personalize, AWS Step Function with Serverless Framework and Postman are being used:- AWS Step Functions is a new, fully managed service that makes it easy to coordinate the components of distributed applications and microservices using visual workflows.
- The Serverless Framework helps you develop and deploy AWS Lambda functions, along with the AWS infrastructure resources they require. A serverless framework lets you run code without provisioning or managing servers. It is an event-driven computing platform and that means it runs your code when it is triggered.
- Postman is one of the most popular software testing tools which is used for API testing. With the help of this tool, developers can easily test, create, share, and document APIs. It is a simple Graphic User Interface for sending and viewing HTTP requests and responses.
Serverless Framework
- Serverless will create the Lambda function on its own and it will deploy when you give the command “serverless deploy” in the terminal.
- You just need to add the function details in the serverless.yml file.
- Once the Lambda function is created and deployed by serverless, that gives Lambda function endpoint in the Amazon Personalize developer console with the HTTP GET or HTTP POST method.
Create Personalize Resources
Here, you can Create a Dataset Group, Interactions Dataset, and Event Tracker in the Postman application without opening the Amazon Personalize console.In Postman
In the Postman application, you need to configure it as mentioned below:- Paste the endpoint in the Postman application and specify the POST call.
- In Postman’s Body tab, you need to pass storeId in the JSON format given below:
{ “storeId”: “186” } - Then, click the Send button.
- After clicking the Send button, the request is raised to create a dataset group in Amazon Personalize with the ‘Create Personalize Resources’ step function.
- When a request is raised for dataset group creation, you get a response in the Postman application that “Personalize Resource Creation Triggered Successfully For Store Id 186”.

In Step Function
You can view our application’s workflow as a series of event-driven steps through AWS Step Functions’ graphical console. In the step function console, you can see the Lambda function status in the Visual Workflow pane whether In progress, Failed, Caught error, Canceled, or Succeeded through these symbols: = Creating a Lambda function is in progress.
 = The Lambda function has been created successfully.
 = The Lambda function creation has been failed.

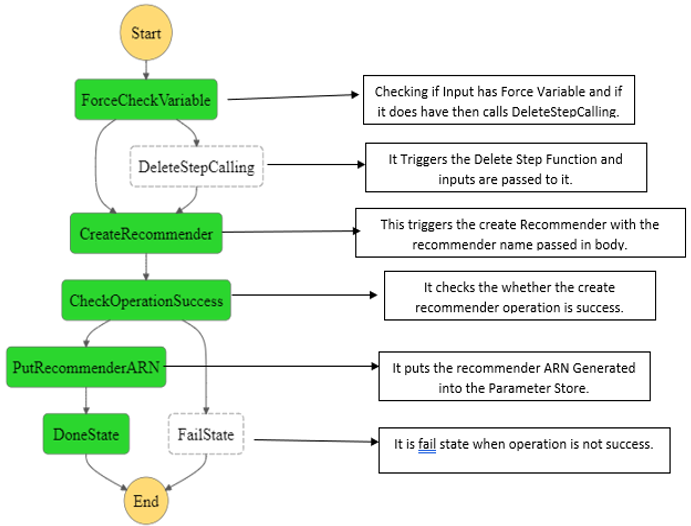
Create Recommender
Here, you can create Recommenders in the Postman application without opening the Amazon Personalize console.In Postman
In the Postman application, you need to configure it as mentioned below:- Paste the endpoint in the Postman application and specify the POST call.
- In Postman’s Body tab, you need to pass storeId and recommenderName in the JSON format.
Important: The recommender name must be the same as declared below:
{ “storeId”: “186”, “recommenderName”: “Most-Viewed” } { “storeId”: “186”, “recommenderName”: “Best-Seller” } { “storeId”: “186”, “recommenderName”: “Frequently-Bought-Together” } { “storeId”: “186”, “recommenderName”: “Customer-Who-Viewed-X-Also-Viewed” } { “storeId”: “186”, “recommenderName”: “Recommended-For-You” } - Then, click the Send button.
- After clicking the Send button, a request is raised to create a recommender in Amazon Personalize with the step function.
- When a request is raised for recommender creation, you get a response in the Postman application:
- For Most Viewed = “Create Most-Viewed Recommender Operation Successfully triggered For Store Id: 186”.

- For Best Seller = “Create Best-Seller Recommender Operation Successfully triggered For Store Id: 186”.

- For Frequently Bought Together = “Create Frequently-Bought-Together Recommender Operation Successfully triggered For Store Id: 186”.

- For Customer Who Viewed X also viewed = “Create Customer-Who-Viewed-X-Also-Viewed Recommender Operation Successfully triggered For Store Id: 186”.

- For Recommended For you = “Create Recommended-For-you Recommender Operation Successfully triggered For Store Id: 186”.

In Step Function
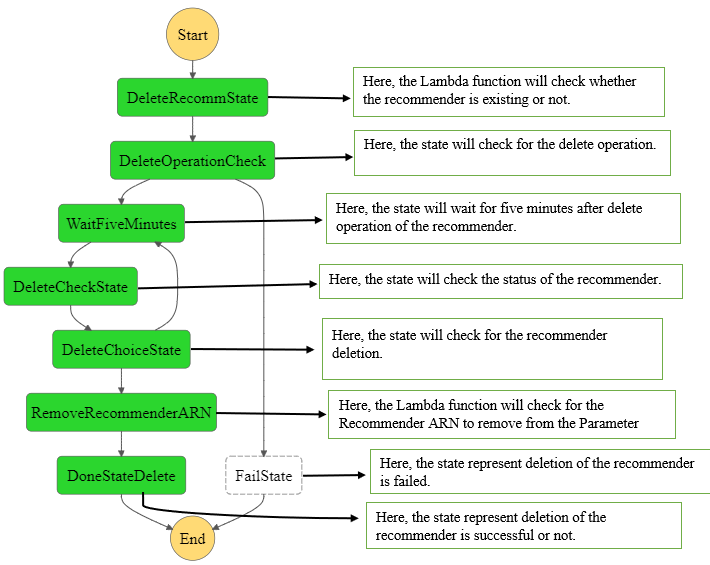
Delete Recommender
Here, you can delete Recommenders in the Postman application without opening the Amazon Personalize console.In Postman
In the Postman application, you need to configure it as mentioned below:- Paste the endpoint in the Postman application and specify the POST call.
- In Postman’s Body tab, you need to pass storeId and recommenderName in the JSON format.
Important: The recommender name must be the same as declared below:
{ “storeId” : “186”, “recommenderName”: “Most-Viewed” } { “storeId” : “186”, “recommenderName”: “Best-Seller” } { “storeId” : “186”, “recommenderName”: “Frequently-Bought-Together” } { “storeId” : “186”, “recommenderName”: “Customer-Who-Viewed-X-Also-Viewed” } { “storeId” : “186”, “recommenderName”: “Recommended-For-You” } - Then, click the Send button.
- After clicking the Send button, the request is raised to create a recommender in Amazon Personalize with the step function.
- When a request is raised for recommender creation, you get a response in the Postman application that “Recommender deletion started successfully”:

In Step Function
Check Recommender
You can check the current status of the Recommender, whether it is created in the Active state or if the status is in Create in progress.In Postman
In the Postman application, you need to configure as mentioned below:- Paste the endpoint in the Postman application and specify the POST call.
- In Postman’s Body tab, you need to pass storeId and recommenderName in the JSON format.
Important: The recommender name must be the same as declared below:
{
     "storeId" : "186",
     "recommenderName": "Most-Viewed"
}
{
    "storeId" : "186",
    "recommenderName": "Best-Seller"
}
{
    "storeId" : "186",
    "recommenderName": "Frequently-Bought-Together"
}
{
    "storeId" : "186",
    "recommenderName": "Customer-Who-Viewed-X-Also-Viewed"
}
{
    "storeId" : "186",
    "recommenderName": "Recommended-For-You"
}
- Then, click the Send button.
- After clicking the Send button, the request is raised to check the recommender in Amazon Personalize with the step function.
- When a request is raised for recommender delete, you get a response in the Postman application that “Recommender status is CREATE IN PROGRESS”:

Stopping and Starting Recommender
After the recommender is active, it can be stopped and started later. When a recommender is stopped, it cannot be used for getting recommendations. Stopping a recommender halts billing and automatic retraining for the recommender. The stop recommender function does not delete the recommender, it just pauses the recommender temporarily. The recommender can again be restarted by the start recommender function.Stopping a Recommender
The StopRecommenderCommand from the @aws-sdk/client-personalize is used to stop an ACTIVE recommender. The configuration of the recommender to be stopped is passed as a JSON body alongside the stop recommender API post-call. The input JSON schema is as follows: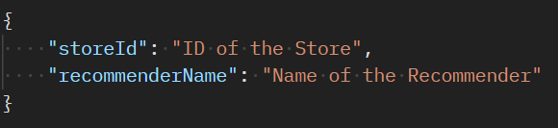
Using the storeId and recommenderName configurations that are passed via the JSON body, the Recommender Arn is fetched from the parameter store using the GetParameterCommand from the @aws-sdk/client-ssm. The Recommender Arn obtained is used as input for the StopRecommenderCommand, which stops a recommender. When a recommender is stopped, the recommender state changes from ACTIVE to INACTIVE in the following sequence:
|
ACTIVE > STOP PENDING > STOP IN PROGRESS > INACTIVE |
Starting a Recommender
The StartRecommenderCommand from the @aws-sdk/client-personalize is used to start an INACTIVE recommender. When the recommender status is active, you can resume getting recommendations from it, and the recommender billing and automatic retraining also resumes. Important: Stopping a recommender will pause the billing for an active recommender. You will still incur costs for other resources such as datasets, parameter stores, etc. To stop the billing, you will need to delete all the resources. You can estimate your Amazon Personalize cost here. The configuration of the recommender to be stopped is passed as a JSON body alongside the start recommender API post-call. The input JSON schema is as follows:Using the storeId and recommenderName configurations that are passed via the JSON body, the Recommender Arn is fetched from the parameter store using GetParameterCommand from @aws-sdk/client-ssm. The obtained Recommender Arn is used as input for the StartRecommenderCommand, which restarts a recommender. When a recommender is started, the recommender state is changed from INACTIVE to ACTIVE in the following sequence:
|
INACTIVE > START PENDING > START IN PROGRESS > ACTIVE |
Getting Recommendations
AWS (Amazon Web Services) Personalize is a machine-learning service that empowers non-machine-learning engineers to easily generate personalized recommendations for their users. SDK (Software Development Kit) is a set of software tools and programs used by developers to create applications for specific platforms. For getting recommendations and calling parameter store, these two SDKs are being used:- For Getting recommendations: AWS SDK for JavaScript PersonalizeRuntimeClient
- For Calling Parameter Store: AWS SDK for JavaScript SSM Client.
 The AWS SDK is modelized by clients and commands. To send a request, you only need to import the PersonalizeRuntimeClient, SSMClient, GetRecommendationsCommand, and GetParameterCommand.
To create a new service client, SDK uses the new function. With that client, you can make API requests to the service.
To get recommendations,
The AWS SDK is modelized by clients and commands. To send a request, you only need to import the PersonalizeRuntimeClient, SSMClient, GetRecommendationsCommand, and GetParameterCommand.
To create a new service client, SDK uses the new function. With that client, you can make API requests to the service.
To get recommendations,
- First, you need to install these packages for using AWS SDK,
- npm install @aws-sdk/client-personalize-runtime
- npm install @aws-sdk/client-ssm
- Then, you need to send a request to API (Application Programming Interfaces). The API creates a Lambda function in AWS.
- The Lambda API Reference provides information about each of the API methods, including details about the parameters in each API request and response.
- Then, you need to call Parameter Store in AWS SSM through SSMClient and GetParameterCommand.
- Once you get the values from the parameter store, then you need to check and call the Recommender Arn.
- You can call the AWS Personalize API to the ARN with a UserID or ItemID or both, as required by the specific recommender
- The Lambda function creates PersonalizeRuntimeClient and GetRecommendationsCommand. Once these Lambda functions are created, you will be able to call recommendations from the Personalize Engine.
- Refer to the official documentation for PersonalizeRuntimeClient and GetRecommendationsCommand for more information
AWS System Tools
 AWS System Manager is a set of tools that helps to manage the infrastructure and applications hosted on the AWS Cloud. The Parameter Store, Step Functions, and Lamba are utilized in our application.
Preview of AWS System Manager
Parameter Store
Parameter Store is an AWS service that stores strings. AWS SSM Parameter Store keeps your sensitive information, so restrict permissions are required to improve the security of the application.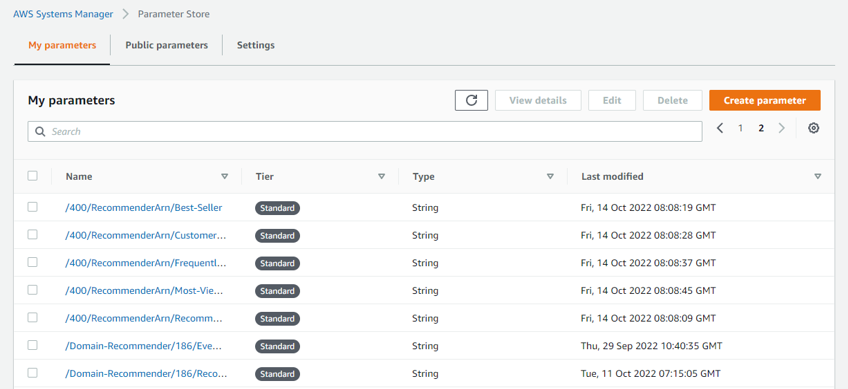
- Each Parameter Store has a unique Resource ARN per account and region, so you can easily define roles and policies based on the hierarchy of the parameter store.
- The Amazon Resource Name (ARN) of the functions for which to return recommendations.
- To get information about more than one parameter at a time, you need to use the GetParameters operation.
- To access and decrypt AWS SSM parameter, store values require ssm:GetParameters permissions.
- The ssm:GetParameters permission is the policy that is used to enforce access control and protect one service’s secrets from another. The segment gives all services an IAM role that grants access to secrets.
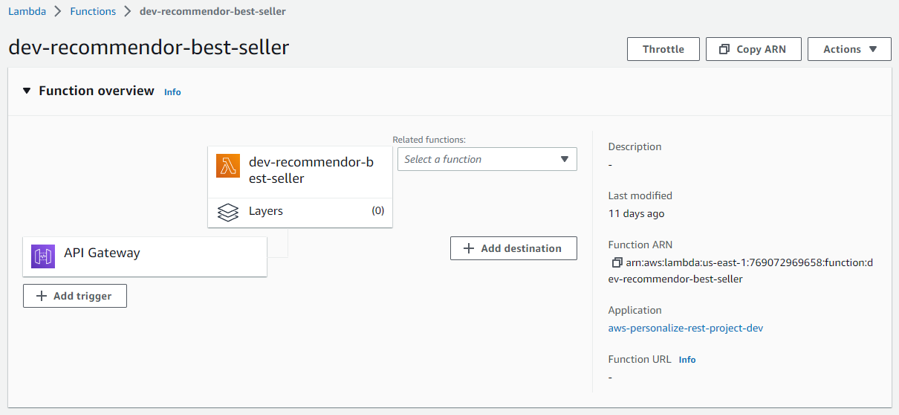
AWS Lambda
AWS Lambda is a serverless computing service provided by AWS which allows users to run application code without managing servers.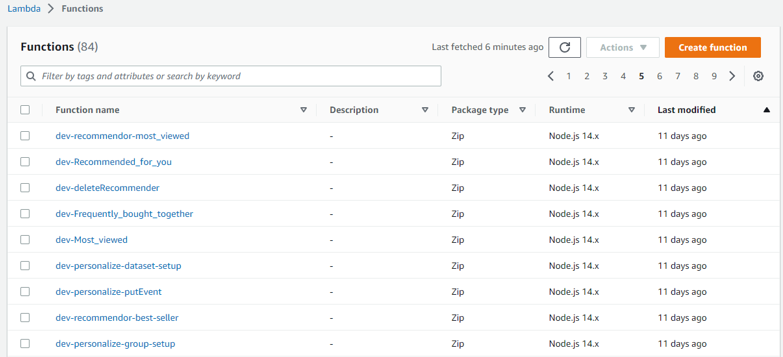
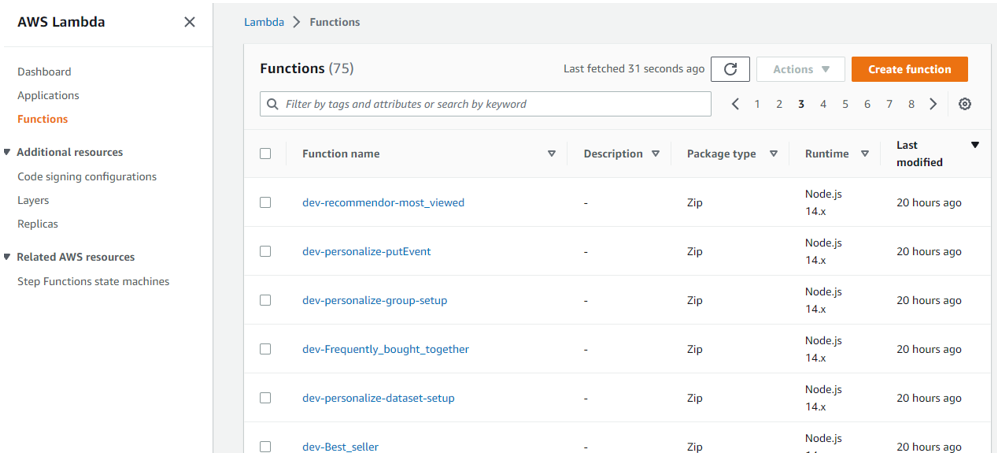
- All Lambda functions are created automatically once you give “serverless deploy” command in the terminal.
- For example, these sample Lambda functions (refer to the above screenshot) are created with the name given below: dev-recommender-best-seller
- To get recommendations, you need to have Dataset groups in Amazon Personalize.
- Within the Dataset groups, you can create Recommenders.
- Most viewed
- Best sellers
- Frequently bought together
- Customers who viewed X also viewed
- Recommended for you
- Most viewed:
- Best sellers:

- Frequently bought together:

- Customers who viewed X also viewed:

- Recommended for you:

Using serverless.yml to Personalize Resources
This is a configuration file used by the Serverless framework to create all the Lambda functions- Here, you can create a Lambda function for getting recommendations.
- AWS Lambda functions need permission to interact with other AWS services and resources in your account.
- 24 Lambda functions and 3 Step functions will be created. For example, one of those Lambda functions will be created with the name: “dev-Best_seller”.
- These permissions are set via an AWS IAM Role, which the Serverless Framework automatically creates for each service, and is shared by all functions in the service.
- For this IAM Role, you need to add the plugin “serverless-iam-roles-per-function”.
- A plugin is a piece of software that acts as an add-on to a web browser and gives the browser additional functionality.
- This Lambda functions is accessible via HTTP Get APIs with the Path mentioned in the events section. For example, for Best-Seller, the path would be “/Best_seller”.

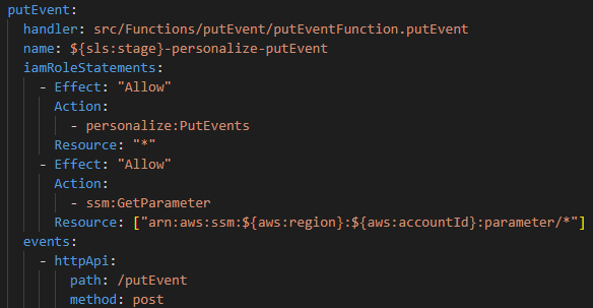
Put event
Put event is used to record user-item interaction data and store it in dataset group. For more information, refer to the official Amazon Personalize documentation for Interaction Data here. For Put Events and to call parameter store, you need to use these two SDKs:- For Calling Put Events: Personalize Events Client – AWS SDK for JavaScript v3
- For Calling Parameter Store: AWS SDK for JavaScript SSM Client
 The AWS SDK is modalized by clients and commands. To send a request, you only need to import PersonalizeEventsClient, SSMClient, and PutEventsCommand, GetParameterCommand.
The package personalizeevents provides the client and types for making API requests to Amazon Personalize Events.
A sample event body for putEvent POST call:
The AWS SDK is modalized by clients and commands. To send a request, you only need to import PersonalizeEventsClient, SSMClient, and PutEventsCommand, GetParameterCommand.
The package personalizeevents provides the client and types for making API requests to Amazon Personalize Events.
A sample event body for putEvent POST call:
| { “productId”: [List of productIds], “sessionId”: ”Current session”, “userId”: ”Current UserId”, “eventType”: ”Purchase or View event type”, “pageName”: ”Page name for event type” } |
Configuring Put Events
- First, you need to install the package for using AWS SDK:
- npm install @aws-sdk/client-personalize-events
- npm install @aws-sdk/client-ssm
- The Put Event API calls are made from the React storefront side. Note: The PutEvents calls require an Event tracking ID generated during the setup process. These calls read the event tracking ID present in the parameter store.
- Then, you need to create the Event Tracking ID. Resource ID including event tracking ID and recommender Arn are stored in the parameter store.
- After getting the StoreId, you can make a call to the parameter store.
- Based on the store ID and input format, you can retrieve resource ID data from the parameter store.
- After getting all the values, you need to parse the view event and purchase event using the Event Tracking ID.
- AWS SSM Parameter Store normally keeps your sensitive information, so restrict permissions are required to improve the security of the application.
- An event tracker specifies a destination dataset group for new event data.
- When you create an event tracker, the response includes a tracking ID, which you pass as a parameter when you use the PutEvents operation.
- Amazon Personalize then appends the new event data to the Interactions dataset of the dataset group you specify in your event tracker.
- TrackingId: The ID of the event tracker. Include this ID in the requests of the PutEvents API.
- The event tracker must be in the ACTIVE state before using the tracking ID.
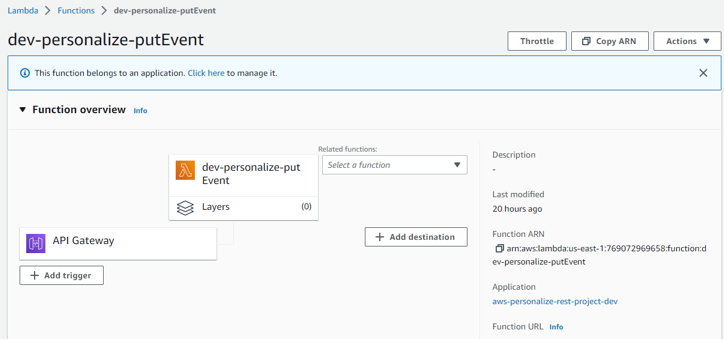
- The “putEvent” Lambda functions are created automatically once you give the “serverless deploy” command in the terminal.
- That Lambda functions are created with the name: “dev-personalize-putEvent”.
- To get information about more than one parameter at a time, use the GetParameters operation.
- The Lambda function can read the value of the parameter by making a getParameter call to the SSM service.
Creating putEvents via serverless.yml
- Here, you are creating a Lambda function for PutEvents.
- AWS Lambda functions need permission to interact with other AWS services and resources in your account.
- This one Lambda function is created with the name, “dev-personalize-putEvent”.
- These permissions are set via an AWS IAM Role, which the Serverless Framework automatically creates for each service, and is shared by all functions in the service.
- For this IAM role, we need to add the plugin: “serverless-iam-roles-per-function”.
- A Plugin is a piece of software that acts as an add-on to a web browser and gives the browser additional functionality.
- Through events, HTTP APIs are created by giving a path for the Lambda function with the proper POST method.
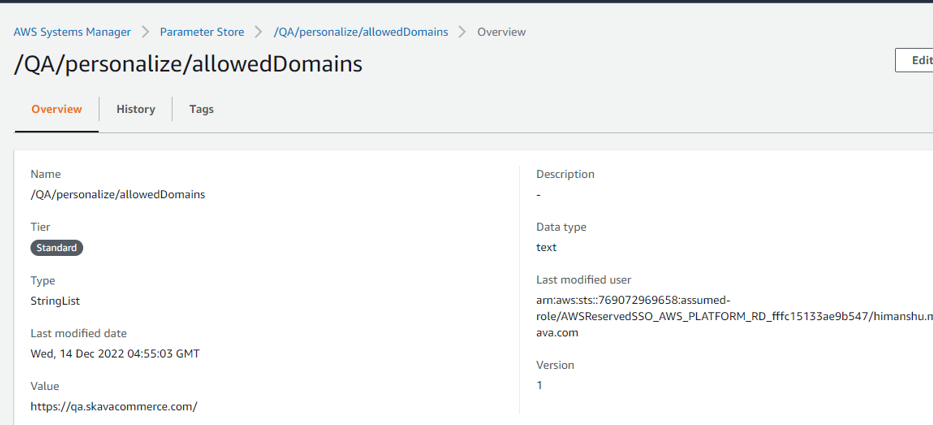
CORS Setup
Before running the serverless deployment, the Infosys Equinox Infra Team needs to create a parameter for allowed domains from which requests will be made in the parameter store. The parameter should be created with the required configurations mentioned in the table:| Type | StringList |
| Tier | Standard |
| Data type | text |
| KeyName | {STAGE}/personalize/allowedDomains |
| Value | Exact domains separated by a comma; for example, https://pedev.skavacommerce.com/,https://expdemo.skavacommerce.com/ |
Storefront Integration
This section explains the following steps that are needed to integrate Amazon Personalize in the Infosys Equinox Commerce platform and the storefront (React-based).- Prerequisite
- Track Put Events
- Get Recommendations (Internal Function)
- SFO Function (Internal Function)
- Recommendations
- Personalize.js Framework Independency
- Amazon Personalize Terms: https://docs.aws.amazon.com/personalize/latest/dg/terms.html
- General AWS Glossary: https://docs.aws.amazon.com/general/latest/gr/glos-chap.html
- Amazon Personalize API Reference: https://docs.aws.amazon.com/personalize/latest/dg/API_Reference.html
Prerequisite
Before calling the events, you need to configure the personalize.js file. To configure and call the functions of the personalize.js file,- Include the personalize.js file.
- In the personalize.js file, configure API Gateway ID or pass the complete URL as API_URL as shown below:

- Call Personalize Init function internally before calling any fetch or track function which sets the store ID, Customer ID, and API URL:

- To call any functions of the personalize.js file, import personalize.js in your file as shown below:

Track Put Events
handlePutEvent() is an internal function to track all types of events (such as Quick view, view, purchase, etc.) in the personalize.js file: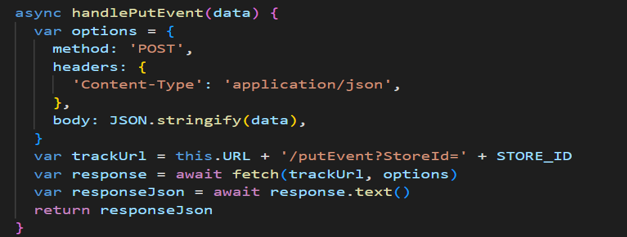
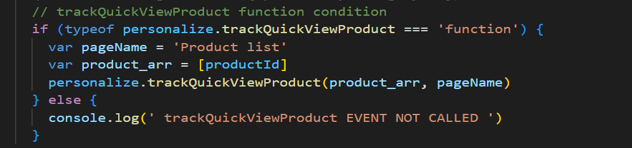
Quick View Product Event Tracker
Call the trackQuickViewProduct() function to record quick view product items from the product listing page when a customer clicks on the Quick View button: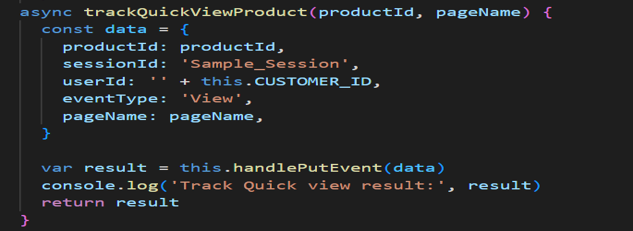
The trackQuickViewProduct function accepts product_arr (array of product ID) and pageName (string) as parameters. You need to invoke this function as shown below:
View Product Event Tracker
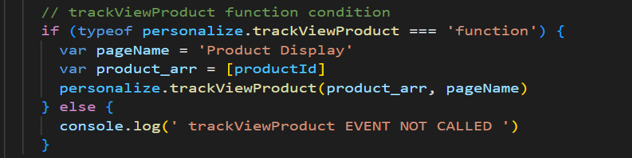
Call the trackViewProduct() function to record product items when customers visit the product display page.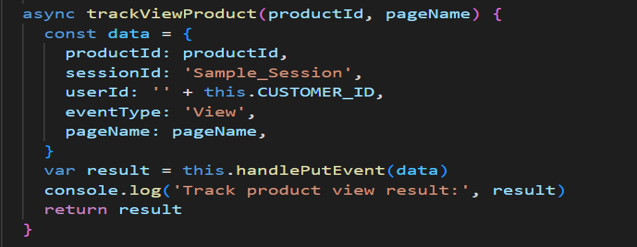
The trackViewProduct function accepts product_arr (array of product ID) and pageName (string) as parameters. You need to invoke this function as shown below:
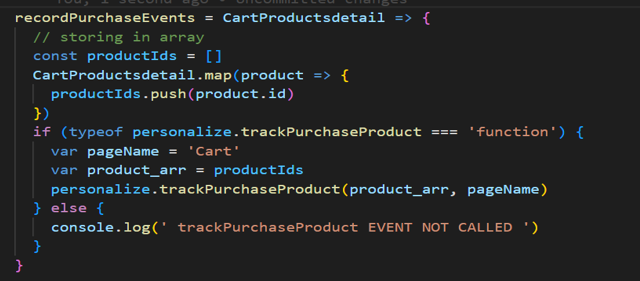
Purchase Product Event Tracker
Call the trackPurchaseProduct() function to record product items purchased by the customers on the order confirmation page.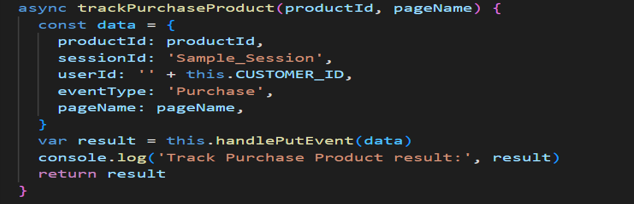
The trackPurchaseProduct function accepts product_arr (array of all the product IDs purchased by the customer) and pageName (string) as parameters. You need to invoke this function as shown below:
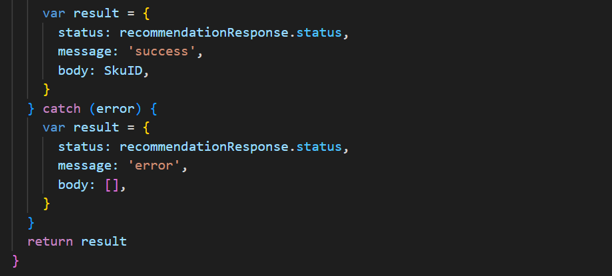
Get Recommendations (Internal Function)
The getRecommendations() function is an internal function to get all types of recommendations (recommended for you, bestsellers, most viewed, etc.) in the personalize.js file. This function returns a list of product IDs as output: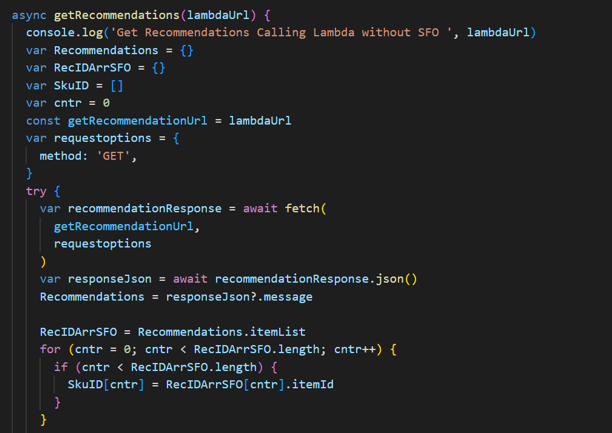
SFO Function (Internal Function)
The getProductDetails() function is also an internal function, which accepts the list of product IDs from getRecommendations() as parameters and returns the complete details of respective product IDs.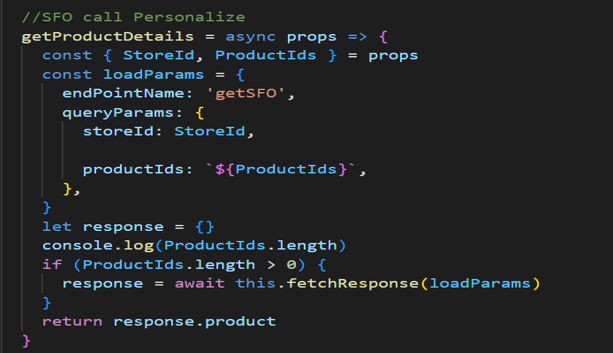
Recommendations
The following recommendations are available and configured in the storefront:| Sl. # | Recommenders | Recommender Names |
|---|---|---|
| 1. | Recommended for you | Recommended-For-You |
| 2. | Best Seller | Best-Seller |
| 3. | Most viewed | Most-Viewed |
| 4. | Frequently bought together | Frequently-Bought-Together |
| 5. | Customers who viewed X also viewed | Customer-Who-Viewed-X-Also-Viewed |
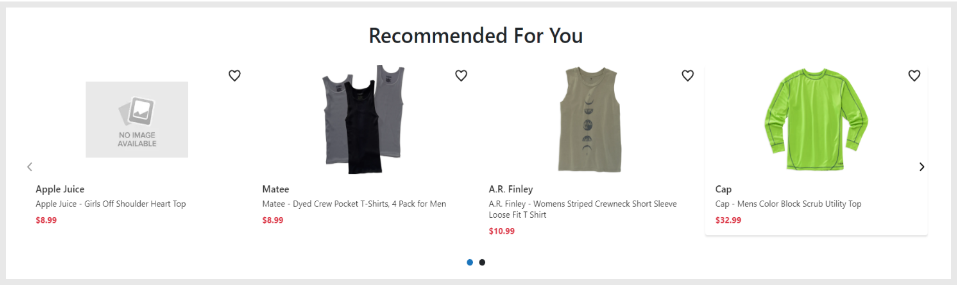
Recommended for You
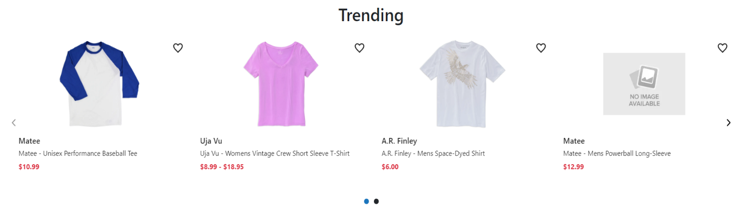
Call the fetchRecommendedForYou() function to display recommendations on the Home page of the storefront. These recommendations are filtered out based on the customers’ viewed and purchased history.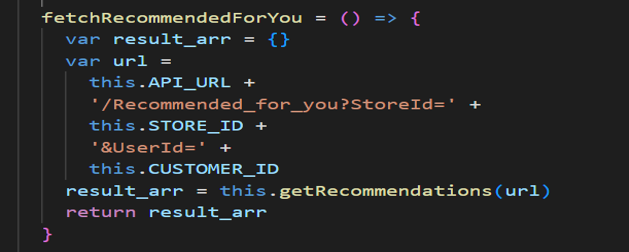
The fetchRecommendedForYou function will return an array of product IDs and can be invoked on the home page as shown below:

Note: The Recommended-for-you recommendations are applicable ONLY for the registered users. Call the getProductDetails function to get complete product details by passing an array of product IDs as parameters as shown below:
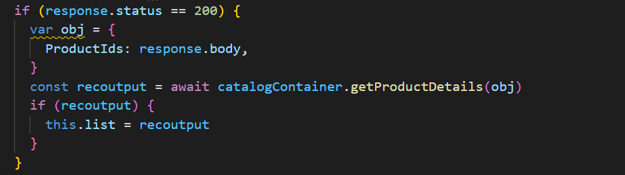
Pass the list of product details response from getProductDetails in the carousel to finally display the result on the storefront.
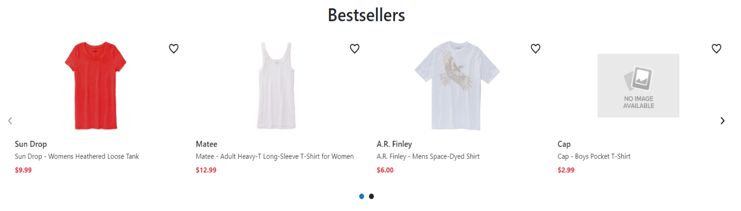
Bestseller Recommendations Function
Call the fetchBestSeller() function to display recommendations on the Home page of the storefront. These recommendations are filtered out based on the customers’ purchased history.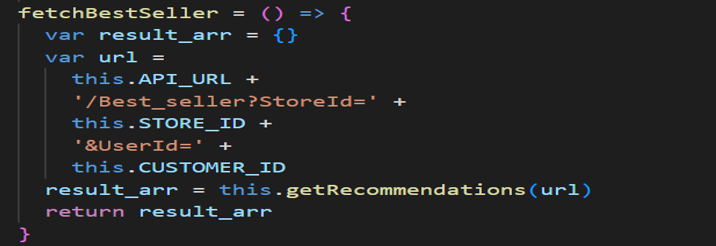
The fetchBestSeller function returns an array of product IDs and can be invoked on the home page of the storefront as shown below:

The call getProductDetails function to get complete product details by passing an array of product IDs as parameters as shown below:
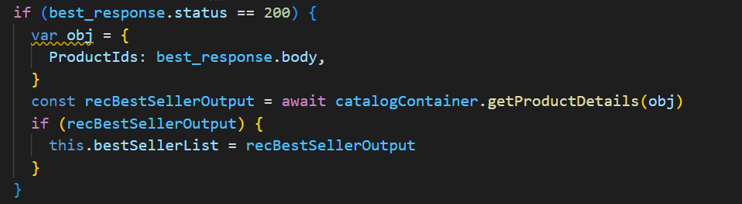
Pass the list of product details response from getProductDetails in the carousel to finally display the result on the storefront.
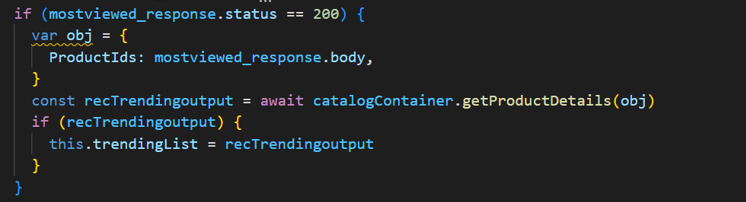
Most Viewed Recommendations Function
Call the fetchMostViewed() function to display recommendations on the home page of the storefront. These recommendations are filtered out based on the customers’ viewed history.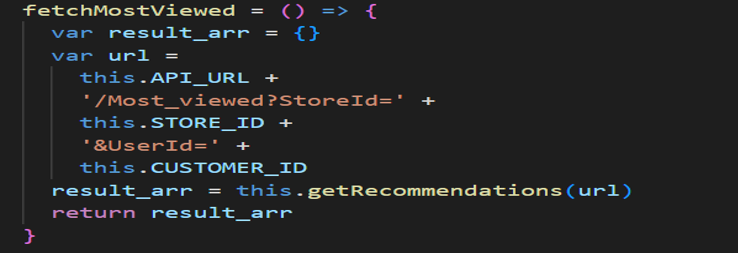 The fetchMostViewed function returns an array of product IDs and can be invoked on the home page of the storefront as shown below:
 Call the getProductDetails function to get complete product details by passing an array of product IDs as parameters as shown below:
 Pass the list of product details response from getProductDetails in the carousel to finally display the result on the storefront.
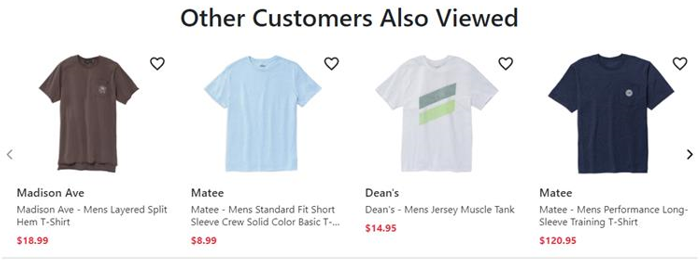
Customer Also Viewed Recommendations Function
Call the fetchCustomerAlsoViewed() function to display recommendations on the Product Details page. These recommendations are filtered out based on other customers viewing history who viewed the same or related products.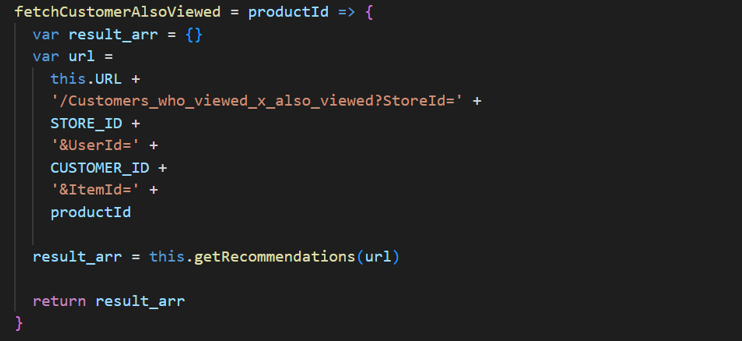
The fetchCustomerAlsoViewed function accepts productId as a parameter and returns an array of related product IDs which can be invoked in the product display page as shown below:
 Note: The Customer-Who-Viewed-X-Also-Viewed recommendations are applicable ONLY for registered users.
Call the getProductDetails function to get complete product details by passing an array of product IDs as parameters as shown below:
Note: The Customer-Who-Viewed-X-Also-Viewed recommendations are applicable ONLY for registered users.
Call the getProductDetails function to get complete product details by passing an array of product IDs as parameters as shown below:
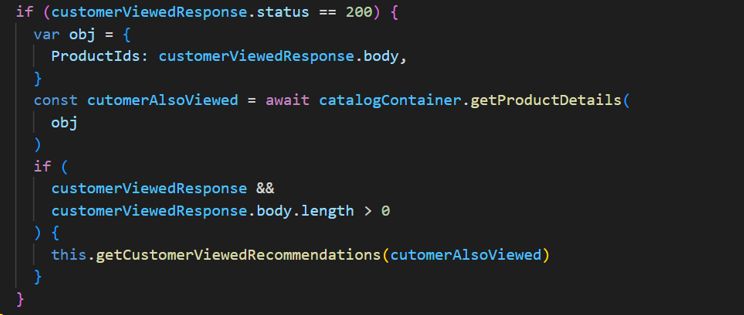
Pass the list of product details response from getProductDetails in the carousel to finally display the result on the storefront.
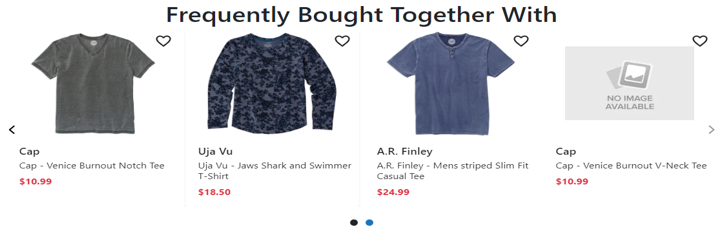
Frequently Bought Together Recommendation Function
Call the fetchFrequentlyBoughtTogether() function to display recommendations on the Cart page. These recommendations are filtered out based on other customers’ purchase history related to the last product added to their carts.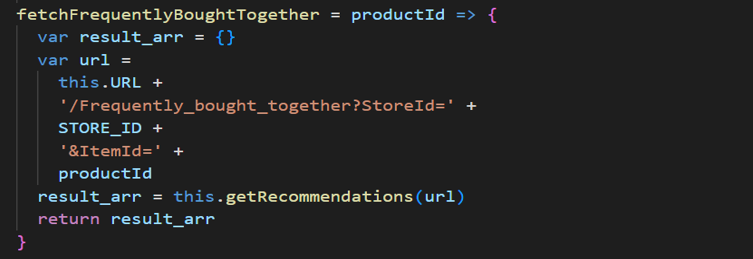 The fetchFrequentlyBoughtTogether function accepts the product ID of the last item added in the cart as latestItemId and returns an array of related product IDs which can be invoked on the cart page as shown below:
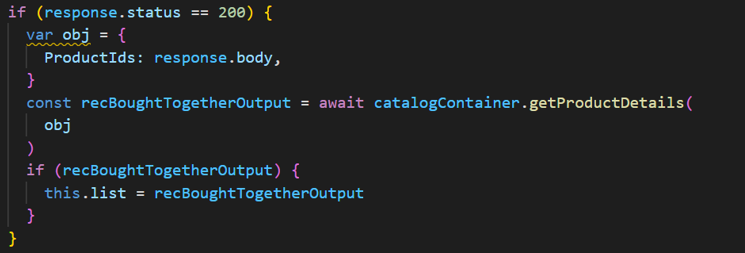
 Call the getProductDetails function to get complete product details by passing an array of product IDs as parameters as shown below:
 Pass the list of product details response from getProductDetails in the carousel to finally display the result on the storefront.
Personalize.js Framework Independency
An HTML file named personalizeIndependentFramework.html is developed to test the framework independency of the personalize.js file. The personalize.js (minified version) is included in the script tag as shown below which is hosted on the S3.| src=”https://s3.amazonaws.com/b2cdemo.static/personalize/frameworkIndependentJS/personalizev1.min.js”></script> |
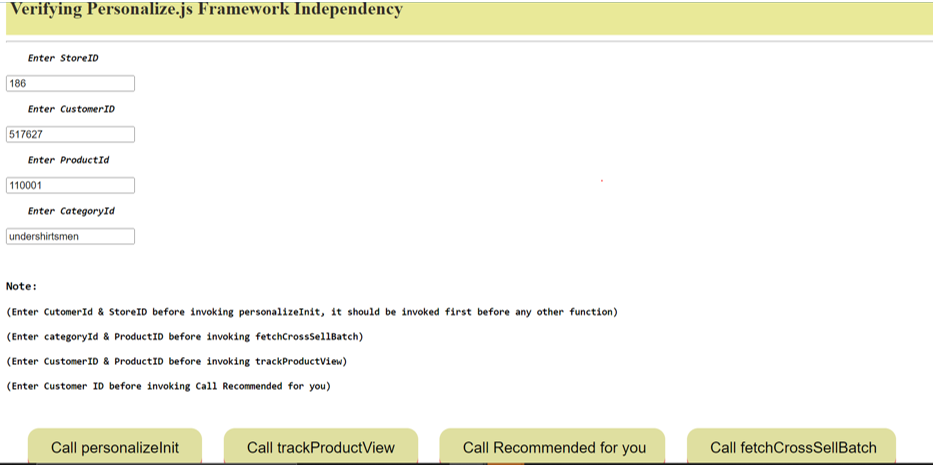 After calling the fetchCrossSellBatch function, you can see the output in the form of a table where you can see the list of product IDs and the associated prices:
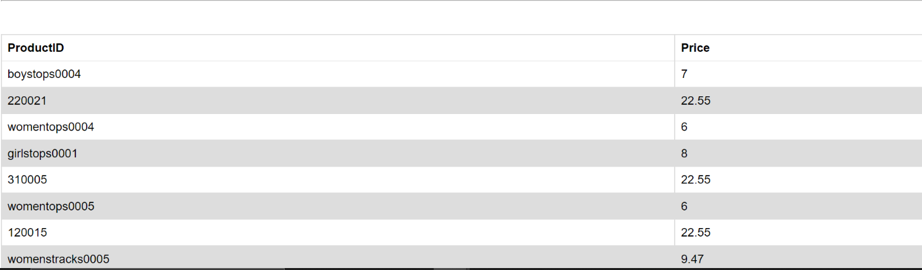 A similar kind of output is also generated when you call the Recommended-For-You function.
Hence, it can be verified that personalize.js is framework independent, that is, it could work successfully with the client environment irrespective of frameworks like ReactJS, Angular or Vue, etc. It is ONLY JavaScript based.
A similar kind of output is also generated when you call the Recommended-For-You function.
Hence, it can be verified that personalize.js is framework independent, that is, it could work successfully with the client environment irrespective of frameworks like ReactJS, Angular or Vue, etc. It is ONLY JavaScript based.
![]()
2023-06-20 | JP – Page created and content uploaded for 8.14 release.