This page equips customer service representatives and administrators with a user guide for managing B2B customer invoices in the Infosys Equinox Ultra Admin (CSR) console and the storefront account area. Invoice management provides tools to enable invoicing, generate invoices, create linked shipments, take payment on single or multiple invoices, and reconcile overdue balances across the order and account lifecycle, with matching self-service screens for buyers.
Invoice Management Overview
An invoice represents an amount a customer owes for the items on an order and connects the order with its shipments and payments. A single order can carry more than one invoice — for example, when items are invoiced and shipped in separate batches. Currently, invoices are supported only for orders placed through the quotation flow with 0% advance payment.
Invoice management is available in three areas, each suited to a different task:
| Area | Description |
|---|---|
| Account Invoices | A roll-up of every invoice for a customer account in the CSR console, with totals for revenue, paid, due, and overdue amounts, plus reminder and export actions. |
| Order Invoices | The invoices for a single order in the CSR console, where you generate invoices, review line items, take payment, and produce the invoice document. |
| Storefront Invoices | The buyer-facing All Invoices area where customers review, filter, pay, and export their own invoices. |
Note: For more information, see the video Invoice Management.
Service Glossary
- Invoice — a billing record for the items on an order, identified by an invoice number such as
INV-2026-a7eefd3. - Account Invoices — the account-level view that aggregates all invoices and balances for a single customer account.
- Order Invoices — the order-level view that lists and manages the invoices belonging to one order.
- Paid — the status of an invoice that has been paid in full.
- Due — the status of an invoice that is outstanding and not yet past its due date.
- Overdue — the status of an outstanding invoice whose due date has passed.
- Awaiting Shipment — the status of an invoice raised for items that have not yet shipped.
- Pending — the status of an invoice that exists and is awaiting payment or further action.
- Invoiced — an order line item that already has an invoice generated against it.
- Pending Invoice — a grouping of order items that are awaiting invoicing.
- Linked Shipment — a shipment associated with an invoice or invoice line item.
- Invoice Preview — the read-only view of a single invoice from which you can send, print, or download it.
- Order Summary — the panel that shows order totals (subtotal, shipping, tax, discounts, and order total) for reference.
- Payment Term — the credit period agreed in the buyer contract (for example, Net 30, Net 60, or Net 90) that determines the invoice due date.
- Grace Period — the configurable interval (default 7 days) after an invoice becomes overdue during which the buyer account can still transact before it is blocked.
How Invoicing Works
At a high level, invoicing in the CSR Admin Console follows this sequence:
- A buyer submits a quote request (RFQ) that is negotiated and approved through the quotation flow.
- The approved quote is converted into an order with 0% advance payment and the payment terms defined in the buyer contract (for example, Net 30).
- When the seller creates a shipment for the order, an invoice is generated automatically for the shipped items. Alternatively, the seller can generate an invoice first and create the shipment later.
- The invoice due date is calculated from the invoice generation date and the payment terms in the contract.
- Payments are recorded against invoices from the order detail page or from the consolidated Orders & Invoices page.
- If the buyer does not pay by the due date, the invoice moves to Overdue. After the configured grace period elapses, the account is blocked from further transactions until the overdue invoices are cleared.
  1  Quote request (RFQ)                Buyer submits; negotiated and approved
   │
   ▼
  2  Order created                      0% advance payment; contract term (e.g. Net 30)
   │
   ▼
  3  Invoice generated                  Automatically on shipment, or generated first
   │
   ▼
  4  Due date calculated                Invoice date + contract payment term
   │
   ▼
  5  Payment recorded                   From order page or Orders & Invoices page
   │
   ▼
  6  Overdue & account blocked          If unpaid past due date + grace period
Prerequisites
Before using invoice management, ensure the following conditions are met:
- Invoice feature enabled in the B2B store — Invoicing must be enabled at the store level. See Enabling invoicing in a B2B store.
- Valid credentials — You must have valid sign-in credentials with an assigned CSR or administrator role.
- Role assignment — Your role must permit viewing orders, generating invoices, taking payment, and creating shipments.
- Business and store provisioned — At least one business and one store must be configured and accessible in your Foundation service.
- Buyer contract with payment terms — The buyer account must have an active contract with a supported payment term (for example, Net 30, Net 60, or Net 90). The invoice due date is calculated from this term.
- Quote-based order — The order must be created through the quotation flow with 0% advance payment. In the current release, invoices are generated only for quote-based orders that have no advance payment.
- Platform access URL — You must have the Infosys Equinox Ultra Admin URL for your environment (provided by Infosys Equinox).
Enabling Invoicing in a B2B Store
Before invoices can be generated, the invoice feature must be enabled at the store level. Once enabled, the Invoices tab appears on the order detail page and invoice generation becomes available for orders in that store.
To enable invoicing in a B2B store:
- Go to Stores in the admin console and select the store you want to configure.
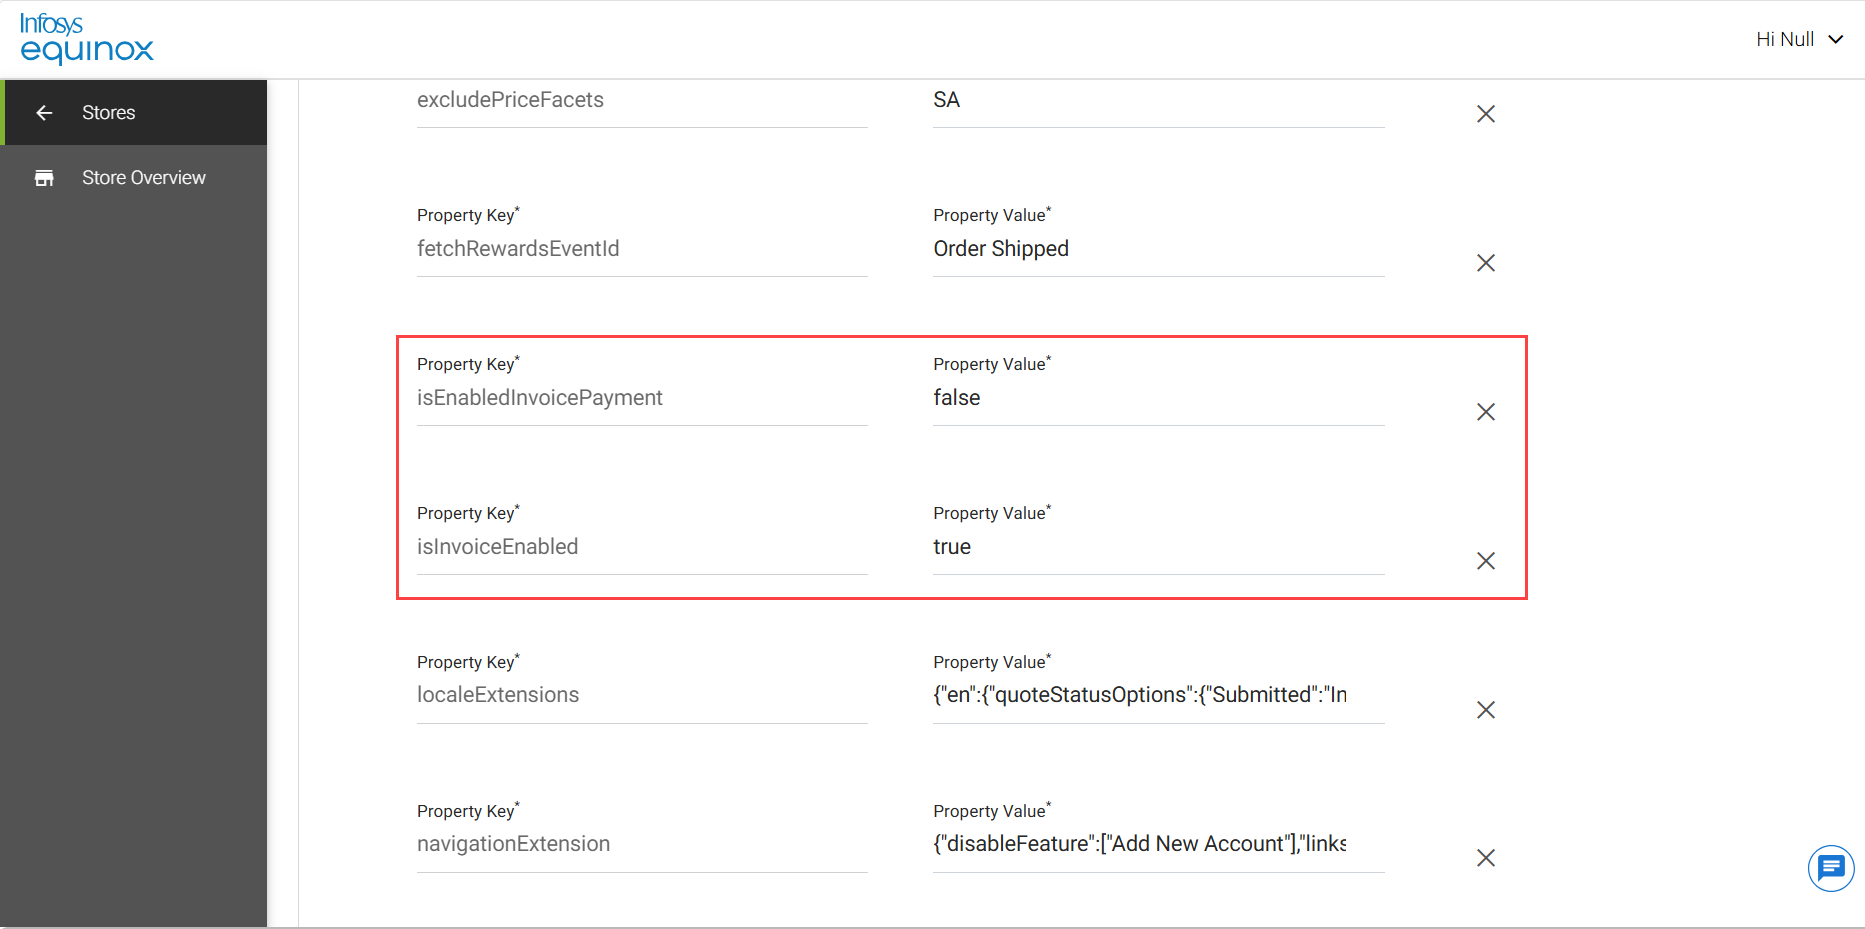
- In the store properties list, locate the following property keys:
Property Key Description isInvoiceEnabledIndicates whether the invoicing feature is enabled in the store. A value of truemeans invoice creation, management, and invoice-related capabilities are available.isEnabledInvoicePaymentIndicates whether invoice payment functionality is enabled. A value of falsemeans invoice payment is disabled and users cannot use invoice-based payment methods.enableBuyerUserInvoicePaymentControls whether B2B buyer users can pay invoices from the storefront. Set to trueto enable invoice payments andfalseto disable them.sfStoreDetailsAdd the property isInvoiceEnabledto enable invoices on the storefront. - Set the property values as required.
- Select Save.
Note: The Invoices tab is hidden on the order detail page untilisInvoiceEnabledis set totruefor the store.
Configuring Payment Terms in the Buyer Contract
The invoice due date is calculated by adding the number of days defined in the buyer contract payment term to the invoice generation date. For example, if the contract uses Net 30 and the invoice is generated on 19 June, the due date is 19 July.
Before you create quote-based orders that will be invoiced, confirm that the buyer contract uses one of the supported payment terms:
- Net 30
- Net 60
- Net 90
Note: If your business requires a longer credit period (for example, Net 180), add the payment term to the contract configuration first and then select it on the buyer account contract. The invoice due date is calculated from whichever term is selected on the contract.
Invoice Statuses
Each invoice moves through a defined set of statuses that reflect its shipment and payment state.
| Status | Description |
|---|---|
| Awaiting Shipment | The invoice is generated, but no shipment is linked to it yet. |
| Pending | The invoice exists and is awaiting payment or further action. |
| Due | Payment has not been received against the invoice, and the due date is approaching or has been reached. |
| Overdue | Payment has not been received against the invoice even after the configured number of due days has elapsed. |
| Paid | Payment has been received in full against the invoice. |
Accessing Invoice Management
To access invoice management in the Infosys Equinox Ultra Admin (CSR) console:
- Sign in to the Foundation service for your business (URL provided by Infosys Equinox).
- Go to the required Business, and then select the appropriate Store.
- Open the customer account from CSR > Accounts or from Quick Search.
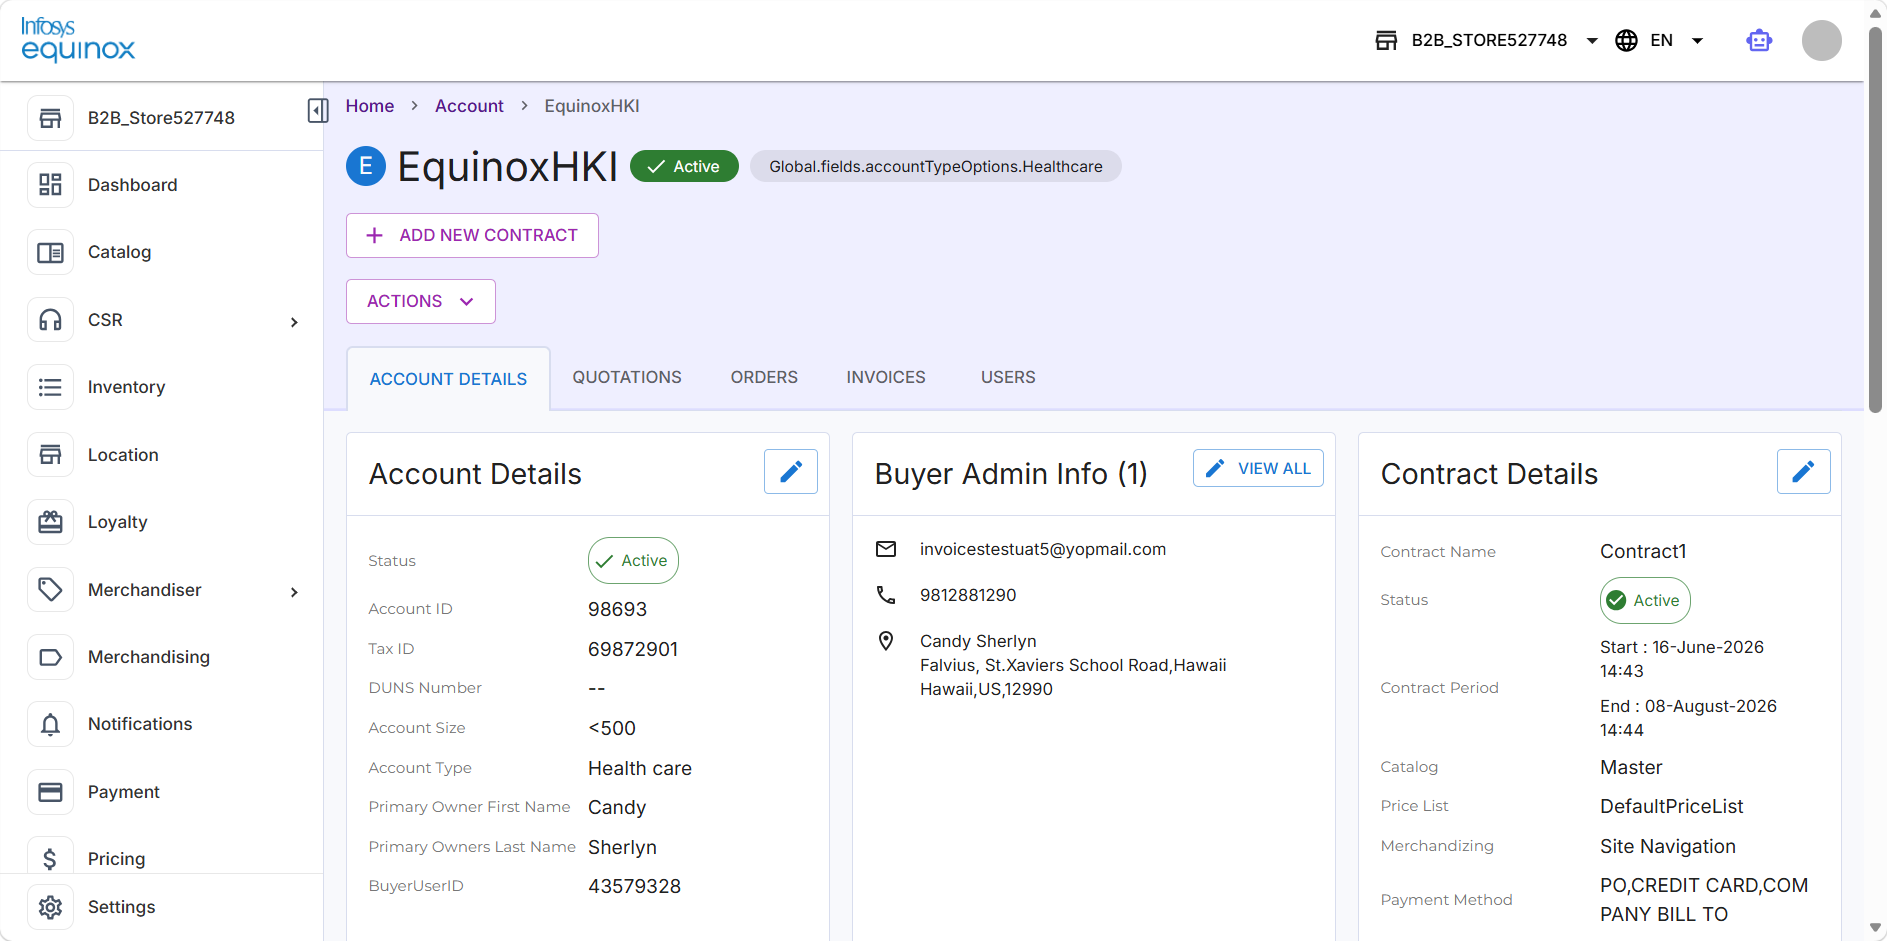
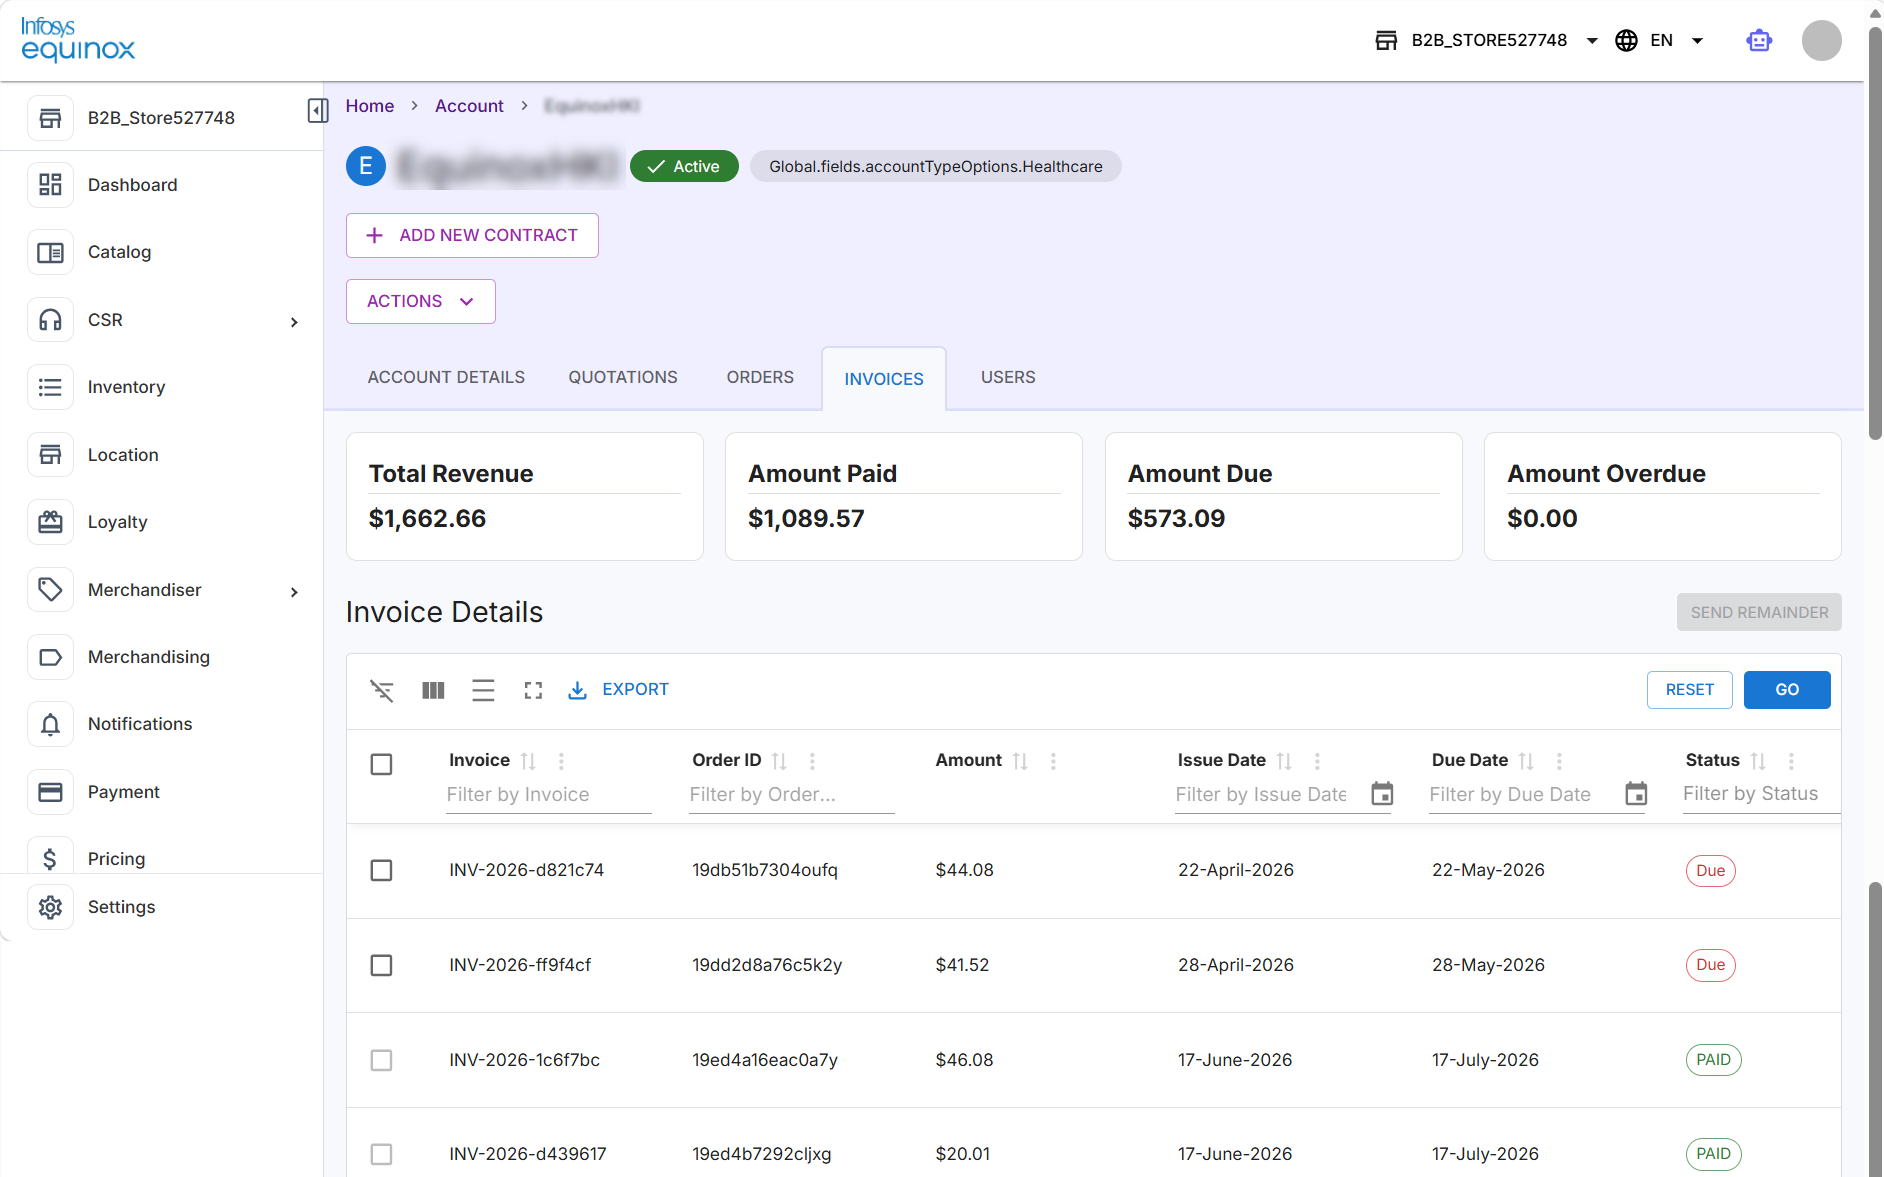
- To work with account-level invoices, select the Invoices tab on the account.
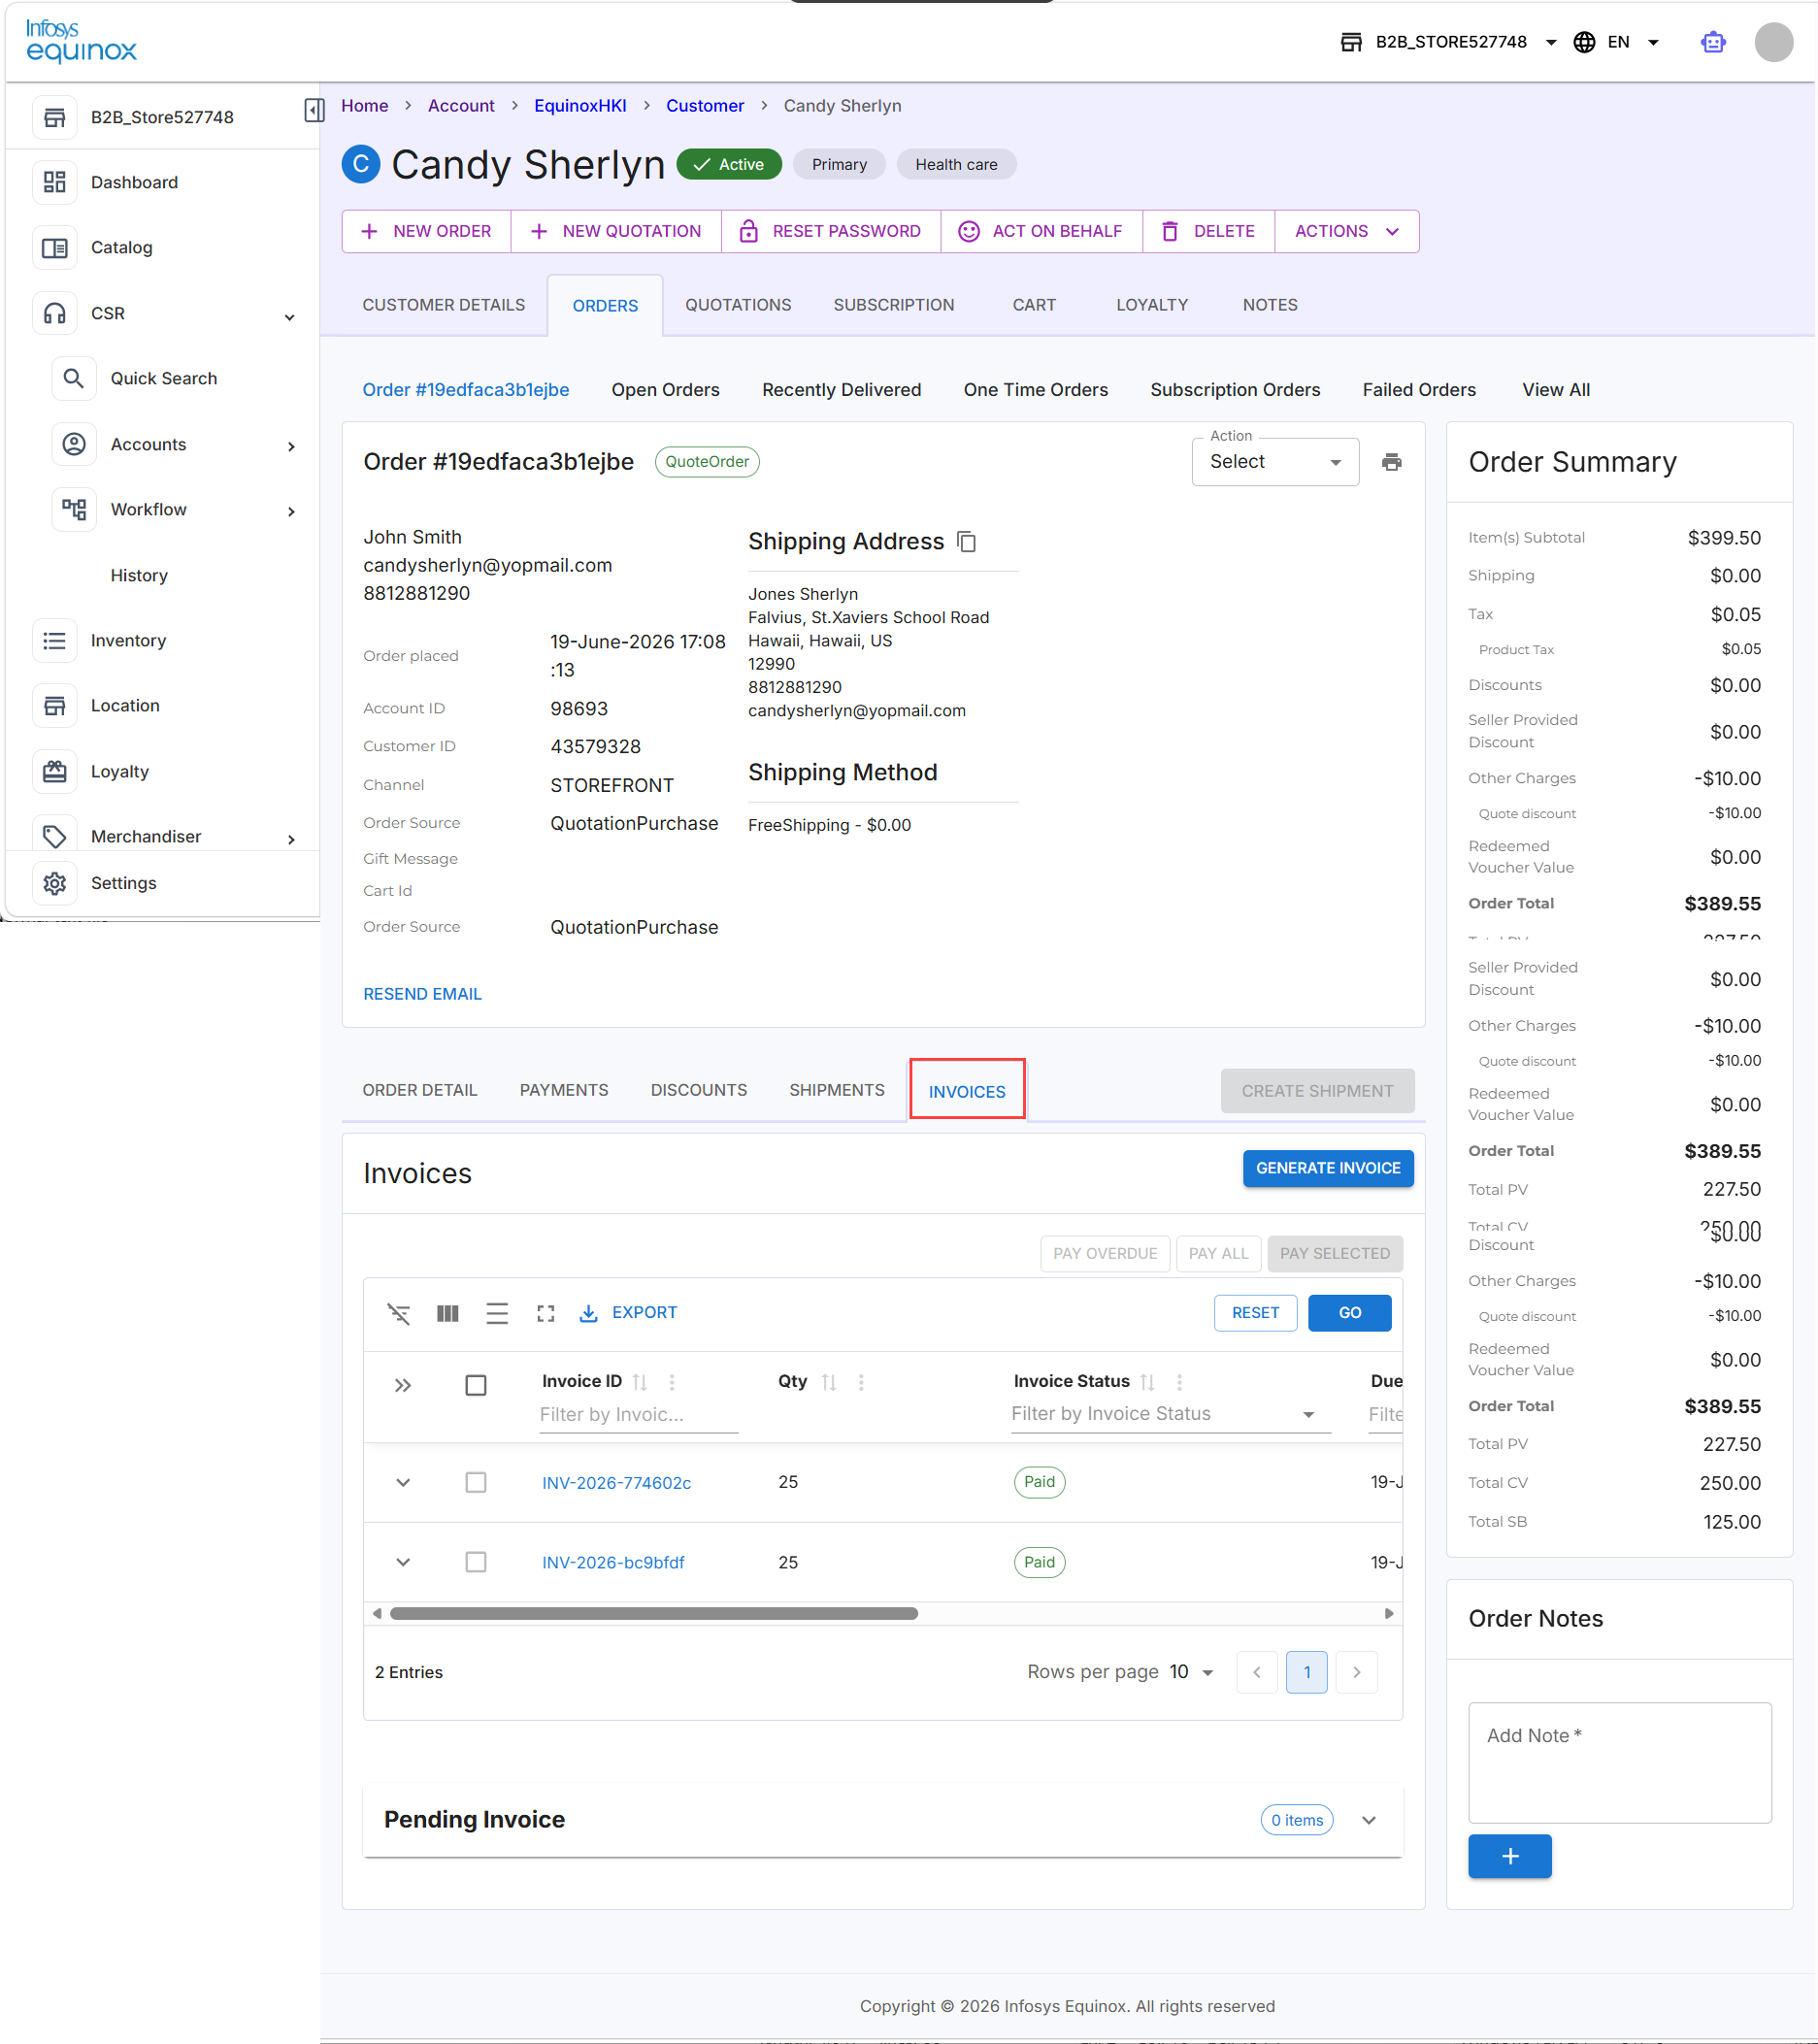
- To work with the invoices for a specific order, select the Orders tab, open an order, and then select its Invoices tab.
Note: Buyers reach their own invoices on the storefront from the account area under Orders > All Invoices. See Storefront invoices — buyer and buyer admin.
Account Invoices — CSR Admin
Overview
The account Invoices tab provides a centralized view of every invoice for a customer account and tracks the account balance through four summary cards: Total Revenue, Amount Paid, Amount Due, and Amount Overdue. An Invoice Details table lists each invoice for the account.
Prerequisites
- You must have an active CSR Admin session with an assigned CSR or administrator role.
- The customer account must have at least one order with an invoice.
Viewing Account Invoices
To view account invoices:
- In the CSR console, open the customer account.
- Select the Invoices tab. The list of invoices is shown.
Sending Payment Reminders for Overdue Invoices
To send a payment reminder for overdue invoices:
- In the CSR console, open the customer account.
- Select the Invoices tab. The list of invoices is shown.
- Select the overdue invoices you want to send a reminder for.
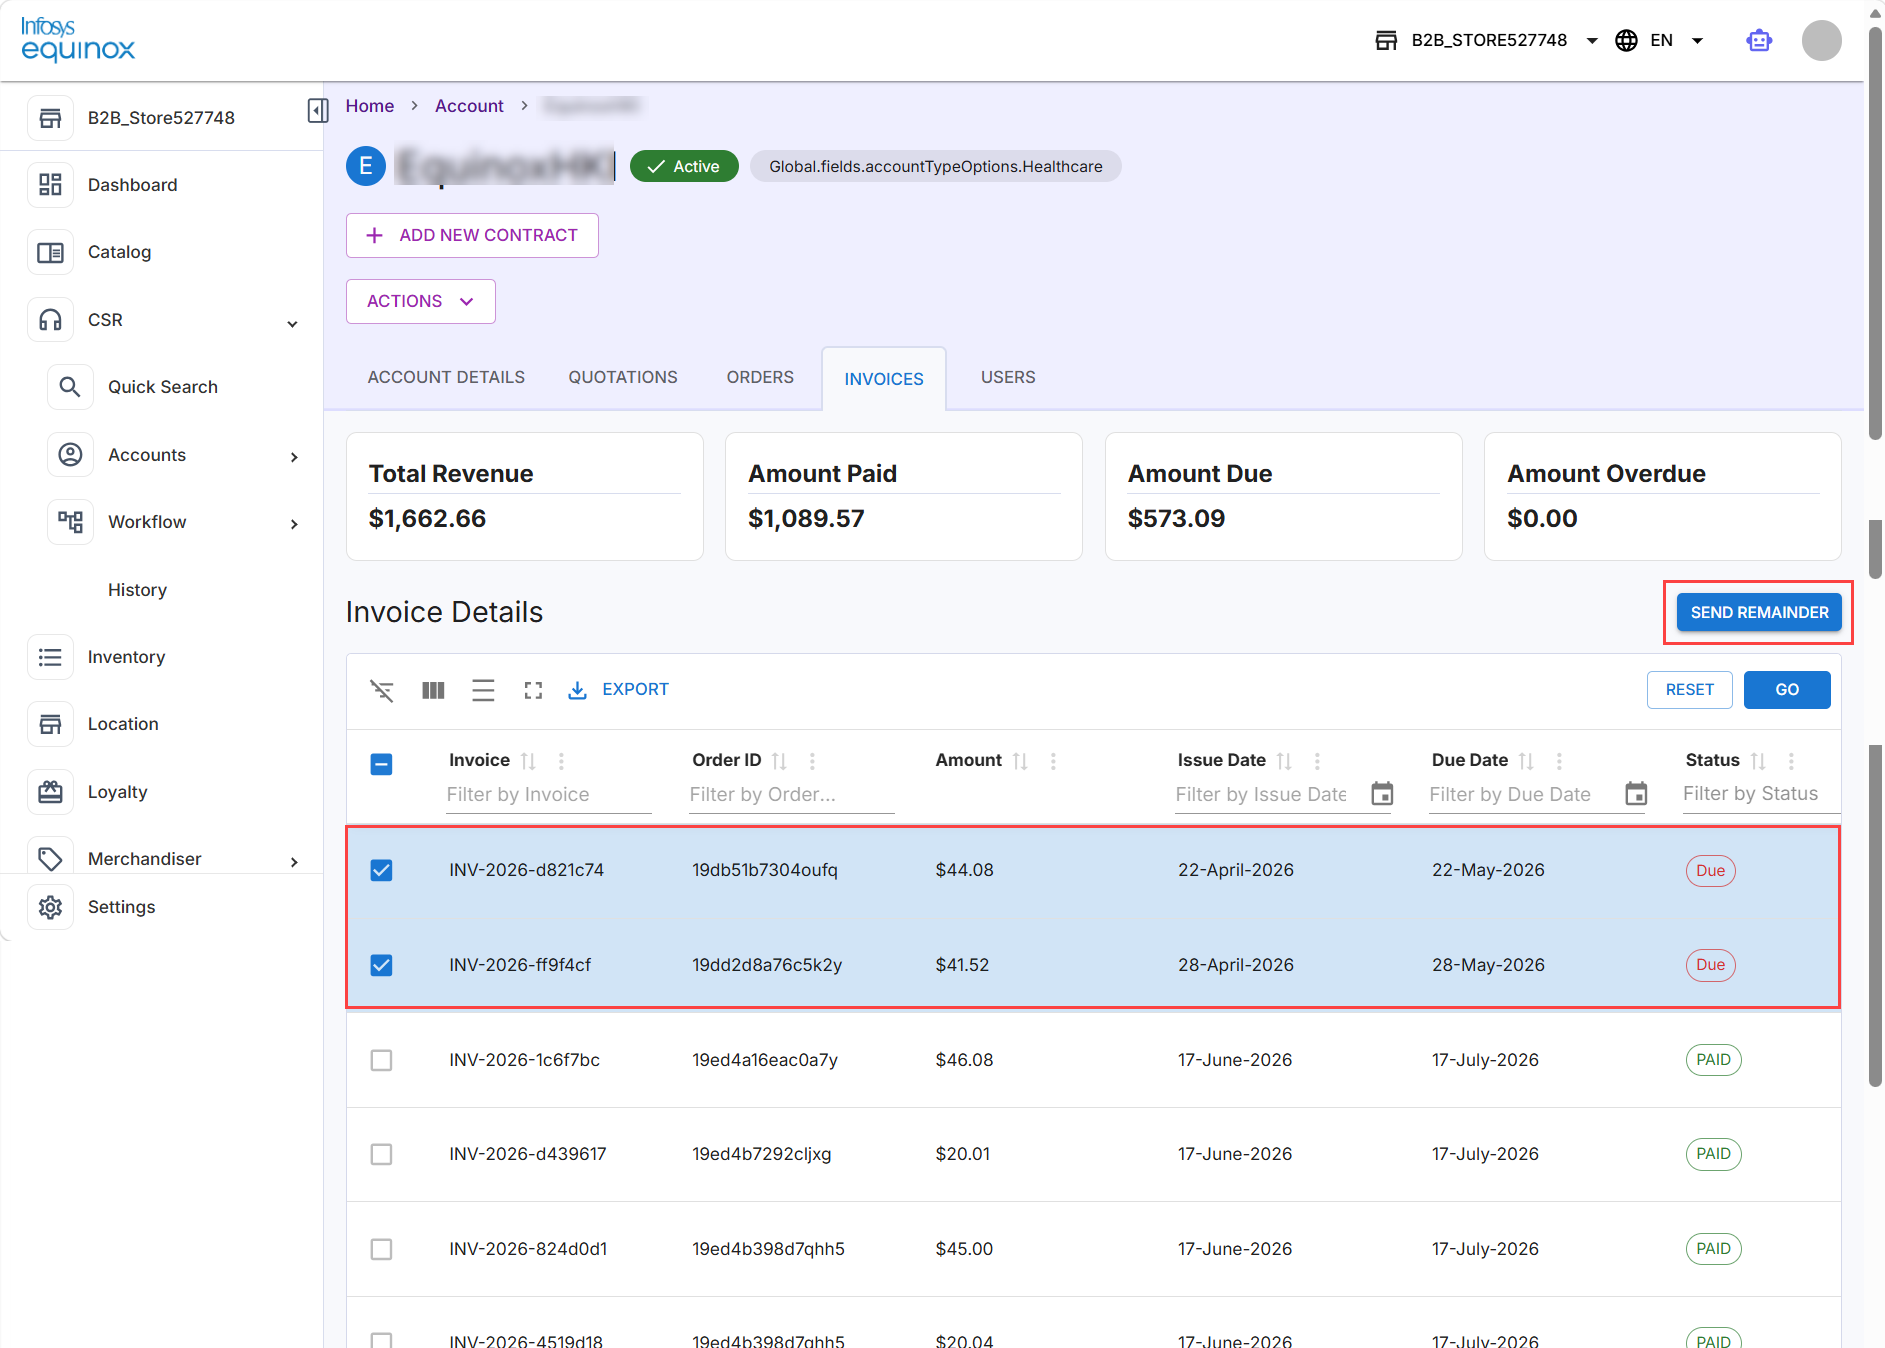
- Select SEND REMAINDER. A reminder is sent to the user.
Order Invoices — CSR admin
Overview
The order-level Invoices tab lists every invoice that is linked to a single order, along with the invoice ID, item quantity, status, due date, amount, and linked shipment ID. From this tab, you can generate invoices, create shipments, record payments, and open the invoice preview.
Prerequisites
- Invoicing is enabled for the store (
isInvoiceEnabled = true). - The order was created through the quotation flow with 0% advance payment.
- The buyer contract has a supported payment term configured.
Generating an Invoice
After an order is placed, you can generate invoices and create shipments from the order detail page. You can use one of the following flows:
- Flow 1 — Generate the invoice first, then create the shipment.
- Flow 2 — Create the shipment directly. The invoice is generated automatically.
                    Order placed
                          │
      ┌───────────────────┴───────────────────┐
      ▼                                       ▼
      Flow 1: Invoice first                   Flow 2: Shipment first
      │                                       │
      ▼                                       ▼
      Generate invoice (Awaiting Shipment)    Create shipment
      │                                       │
      ▼                                       ▼
      Create linked shipment                  Invoice generated automatically
      │                                       │
      └───────────────────┬───────────────────┘
                          ▼
             Shipment linked to invoice
             Shipped · Invoice ID shown
Flow 1: Generate the invoice, then create the shipment
Use this flow when you want to invoice items before you dispatch them.
Step 1: Generate the invoice
- Open the order in the CSR Admin Console.
- Select the INVOICES tab.
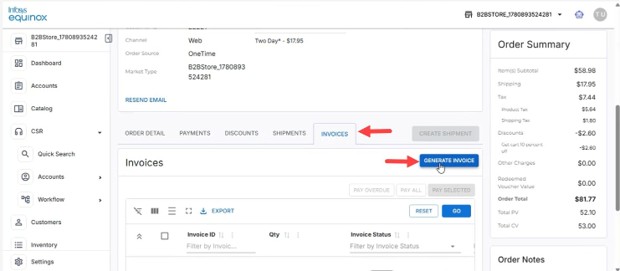
- Select GENERATE INVOICE.
- In the GENERATE INVOICE dialog, select the items to include in the invoice and adjust the quantities if required.
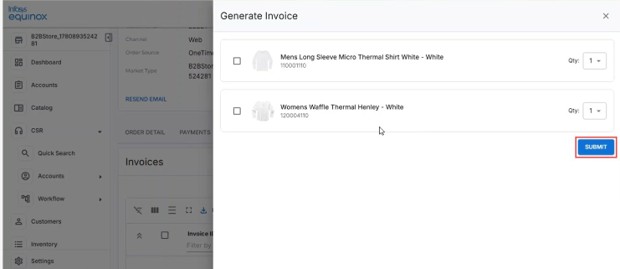
- Select SUBMIT.
The invoice is created and appears on the Invoices tab with the status Awaiting Shipment.
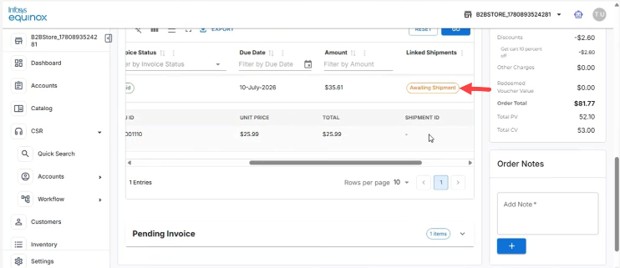
Items that are included in the invoice are tagged Invoiced in subsequent shipment dialogs.
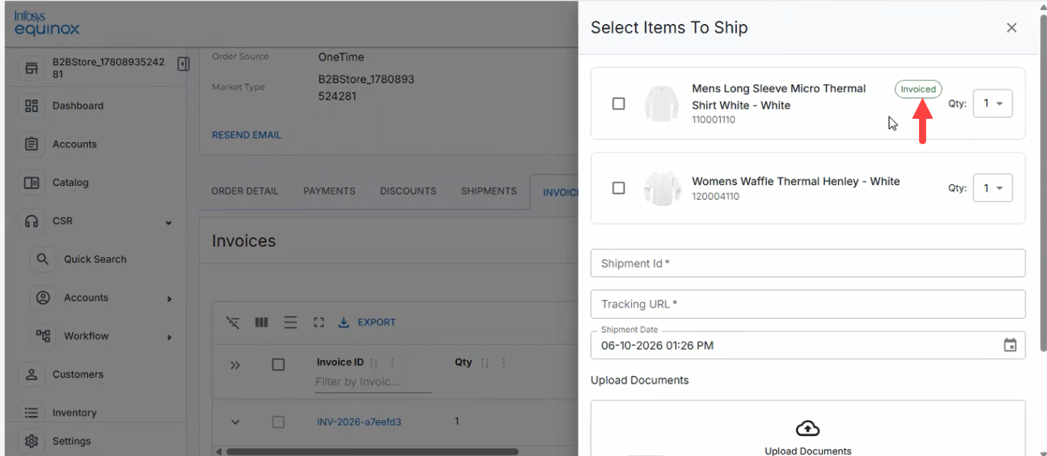
Step 2: Create the shipment
After the invoice is generated, create a shipment and link it to the invoice.
- On the order detail page, select CREATE SHIPMENT.
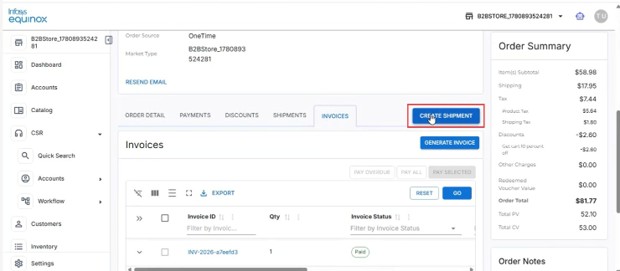
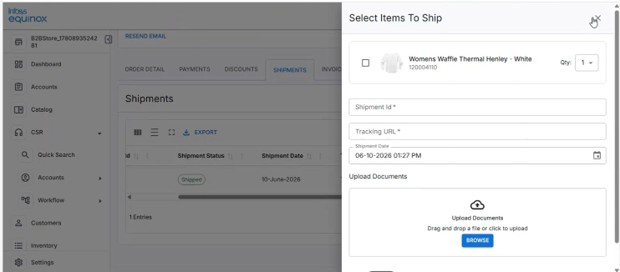
- In the Select Items To Ship dialog, select the items to ship.
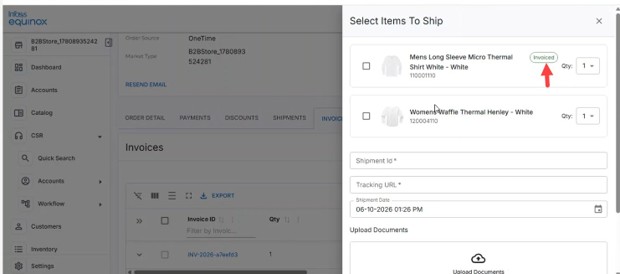
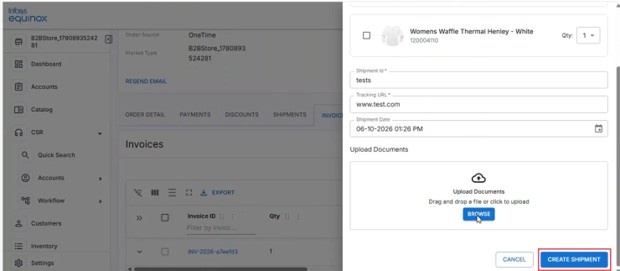
- Enter the shipment details described in the following table:
Field Description Shipment ID Unique identifier for the shipment. Tracking URL Carrier tracking link for the shipment (for example, www.fedex.com).Shipment Date Automatically populated with the current date and time. Edit the value if required. Upload Documents Optional. Drag and drop files, or select Browse to attach one or more shipment documents such as the delivery challan or transport details. Uploaded documents are also visible to the buyer. - Select CREATE SHIPMENT.
Note: Items that are already invoiced display an Invoiced badge. You can also select items that are not yet invoiced; an invoice is generated automatically for those items as part of shipment creation.
The shipment is created and linked to the invoice. On the Shipments tab, the new shipment appears with the status Shipped and the linked Invoice ID.
Flow 2: Create the shipment (invoice generated automatically)
Use this flow when you want to dispatch items and generate the invoice in a single action.
- Open the order in the CSR Admin Console.
- Select the Shipments tab.
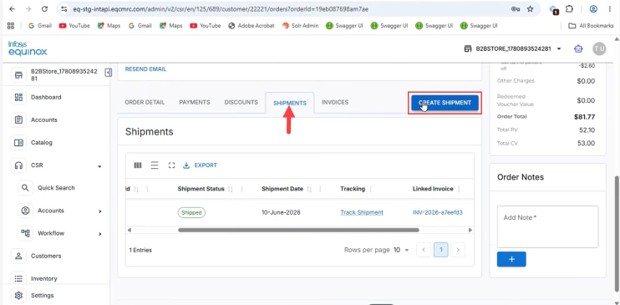
- Select CREATE SHIPMENT.
- In the Select Items To Ship dialog, select the items and enter the shipment details (Shipment ID, Tracking URL, and Shipment Date).
- Select CREATE SHIPMENT.
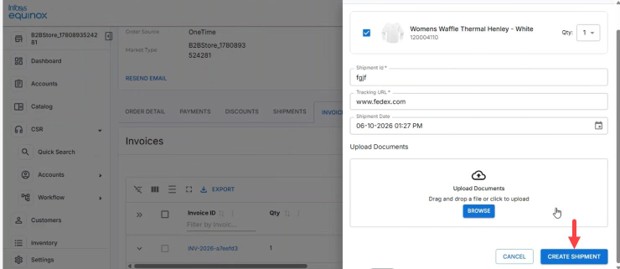
The shipment and the corresponding invoice are created at the same time. The Invoices tab is updated to show the new invoice, and the Shipments tab shows the shipment with the status Shipped and the linked invoice ID.
Note: If the order is split into multiple shipments, a separate invoice is generated for each shipment batch. This creates multiple invoices for a single order.
Viewing and Managing Invoices
After shipments are created, the Invoices tab on the order detail page lists every invoice for the order. A single order can have multiple invoices, typically one for each shipment batch.
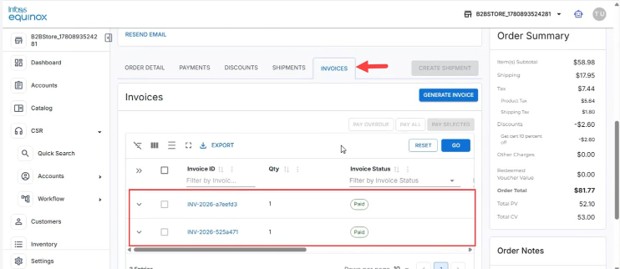
For each invoice, the tab displays the invoice ID, item quantity, status, due date, amount, and linked shipment ID.
Actions Available for a Single Invoice
The following actions are available for an individual invoice:
| Action | Description |
|---|---|
| View | Open the invoice details in the console. The preview includes bill-to and ship-to details, itemized quantities, and charge breakup. |
| Download PDF | Download the invoice as a PDF file for offline use or forwarding to the buyer. |
| Send Reminder | Send a payment reminder to the buyer contact for the invoice. |
| Pay | Record payment for the invoice on behalf of the buyer. |
Bulk Payment Actions
Use the following actions on the Invoices tab or in the consolidated Invoices and Shipments section to record payments against one or more invoices:
| Action | Description |
|---|---|
| Pay Overdue | Settle all invoices that are currently in the Overdue status. |
| Pay All | Record payment for every outstanding invoice on the order or account. The total amount can be higher than the amount for the currently selected order because it includes all outstanding invoices for the account. |
| Pay Selected | Record payment only for the invoices that you select in the list. |
| Export | Download the list of invoices for the order as a file. |
Note: After a payment action is applied, the Payment completed successfully message is displayed, the invoice status changes to Paid, and the change is reflected on both the Invoices tab and the order summary.
Note: Partial payment against a single invoice is not supported in the current release and is planned for a subsequent release. To record a partial settlement, split the payment across separate invoices.
Overdue Invoices and Account Blocking
If the buyer does not pay by the invoice due date, the invoice status automatically changes from Due to Overdue on the day after the due date.
After the invoice becomes overdue, a grace period (default 7 days) is applied. If any invoice on the account remains unpaid after the grace period elapses, the buyer account is blocked from placing new orders or completing further transactions until every overdue invoice on the account is cleared.
Note: The system does not apply a monetary penalty on overdue invoices. Blocking further transactions is the enforcement mechanism.
Storefront Invoices — Buyer and Buyer Admin
Overview
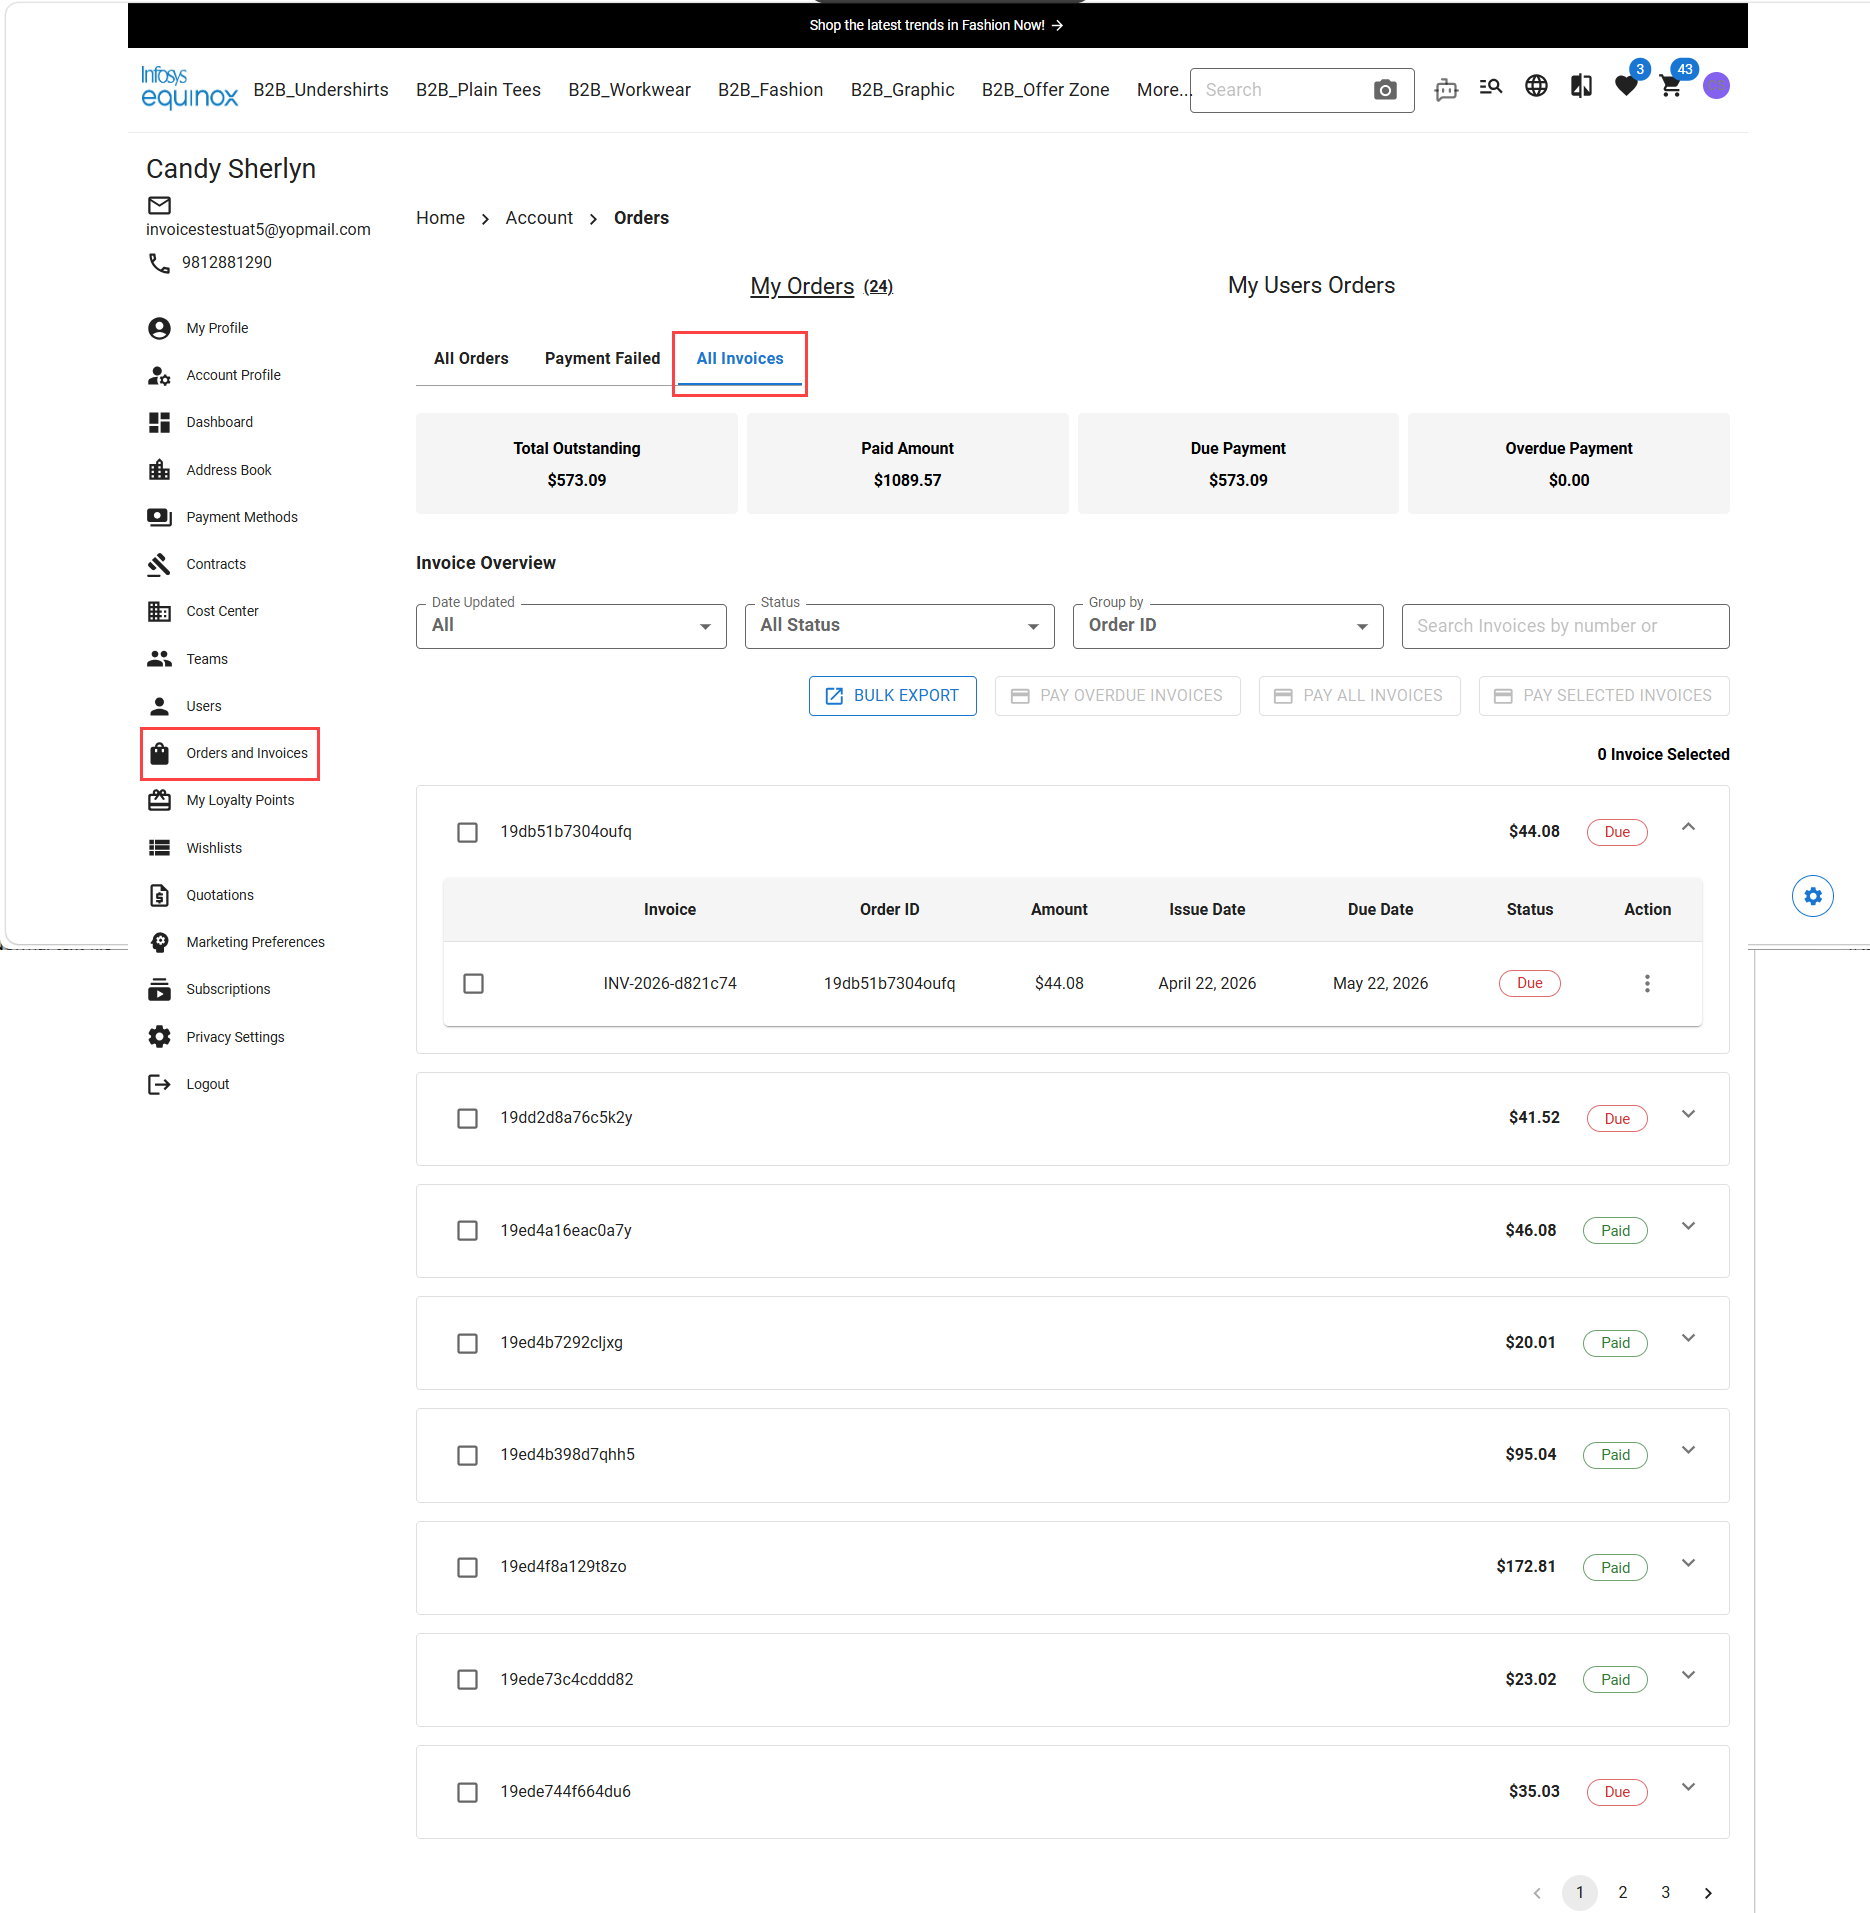
Buyers and buyer admins can review, filter, download, and pay their own invoices from the storefront account area. The buyer-facing All Invoices page mirrors the CSR consolidated view, so buyers see the same invoice IDs, statuses, due dates, and outstanding amounts that a CSR sees for the account.
Accessing Invoices on the Storefront
- Sign in to the storefront as a B2B buyer user or buyer admin with invoice payment permission.
- Open the account area.
- Go to Orders and Invoices > All Invoices.
Storefront Actions
The following actions are available on the storefront All Invoices page:
- View — Open the invoice preview with bill-to, ship-to, item, and charge details.
- Download PDF — Download the invoice as a PDF file.
- Pay — Pay a single invoice using a saved payment method.
- Pay Selected — Pay a subset of invoices in a single transaction.
- Pay All — Settle every outstanding invoice on the account.
- Export — Download the invoice list as a file.
Note: Buyer-side invoice payment requiresenableBuyerUserInvoicePayment = trueandisEnabledInvoicePayment = trueat the store level. If either property is disabled, buyers can view invoices but cannot pay them from the storefront.
Revision History
2026-07-06 | AN – Created the page and updated contents for 8.21.