This page provides Business administrators a user guide for the Catalog microservice for the Infosys Equinox platform.
Getting Started
Catalog Overview
- Structured Product Content: The Catalog handles products, stock-keeping units (SKUs), and product attributes. It allows merchants to enhance product content from various sources, including Enterprise Resource Planning (ERP) systems.
- Enrichment Components:
– Marketing Content: Includes product names, descriptions, benefits, and comparisons with other products.
– Digital Assets: Images and videos associated with products.
– Product Relationships: Grouping products into collections, bundles, or other associations.
– Attributes: Managing sales tax codes, pre-order/back-order metadata, and other relevant information.
– SEO Data: Optimizing product content for search engines. - Contributors and Workflow:
– Merchants: Provide category and placement information.
– Marketers: Contribute descriptions and digital assets.
– Finance Managers: Offer tax-related details.
– Content Managers: Approve content through a project-based workflow. - Integration with Store Service: The Catalog is linked to a store managed via the Store service.
- Roles: The Catalog supports multiple roles including Catalog Admin and Catalog Editor.
– Catalog Editor: Supports content management tasks.
– Catalog Admin: Highest level of access
In the Catalog Admin console, a Catalog Admin can,
- Manage Catalogs
- Manage Attributes
- Manage Data Model
- Manage Feeds
- Manage Products
- Manage SKUs
- Manage Tags
- Manage Master Catalog
- Manage Sales Catalog (type Default or Filter)
- Configure Settings
- Manage data via the approval workflow
For more comprehensive information on the Catalog microservice, refer to the Catalog Microservice Overview.
Service Glossary
The following are the terms with its definitions used across the Catalog Admin guide:
- Attributes – properties that define a product and its stock-keeping units (SKUs). For example, Name, Description, Material Type, Color, Size, etc.
- Bundle – allows Merchandisers to group related products so that they can be presented and sold together. Bundles require that the consumer or buyer purchase the entire bundle. See also collections.
- Business – the parent of a store or set of stores. The basic use of a business is to manage common sets of users, catalogs, and other services for the stores associated with the business.
- Business Admin – a role that manages business settings, creates, manages stores, and enables microservice(s) for a business.
- Catalog – a container for the set of information about individual products and stock-keeping units (SKUs) for a store.
- Catalog Editor – defines and manages products and stock-keeping units (SKUs) throughout the Commerce site and submits them to the Catalog Manager for approval.
- Catalog Manager – creates, manages, and approves changes to catalogs.
- Collection – a group of related products (similar to bundles). However, in a collection, an end-user can choose to purchase only a subset of products in the collection and is not required to purchase the entire set of products as is the case in bundles. See also bundles.
- Data Model – an entity that is used for holding a group of attributes that always goes together. A data model can be of type:
- Reference: It is used as a set of individual values referred by a single ID. For example, an automobile parts e-commerce store can use a specific car as a Reference type data model to store the specific cars metadata (Model ID=HAC2020; Brand=Honda; Model=Accord; Year=2020; Type=…; etc.). This Reference data model can now be easily added to multiple parts like Oil Filter, Air Filter, etc by referencing the Model ID = HAC2020.
- Template: It is used as a template as the name suggests. When a Template data model is added to a product, all of the attributes of the data model are now available on the product. The admin now fills the product’s specific values for each of these attributes. For example, a mobile phone e-commerce store may create a Template model type called Specifications consisting of attributes such as Screen Size, Memory, Operating System, etc. Each and every phone can then have the model Specifications included and any of the catalog editors enriching the product will then be providing a standardized set of values which makes it easy to have data consistency across the entire store.
- Fixed Bundle – a bundle for which the price remains static, irrespective of SKU variants.
- Group – a set of related products can be grouped together so that they can be returned together on the product detail page. See also bundles and collections.
- Master Catalog – the product catalog for a store from which any Sales Catalogs would inherit products and stock-keeping units (SKUs). Products and SKUs are entered in the Master Catalog first but may subsequently have different/overriding values in a Sales Catalog, while inheriting the Master Catalog properties.
- Omni-channel – a multichannel approach to sales that seeks to provide consumers with a seamless shopping experience, whether shopping online (on a desktop, mobile or tablet device), by telephone or in person at a physical store (https://searchcio.techtarget.com/definition/omnichannel).
- Product – a good, service, or idea that has a combination of tangible and intangible attributes and can have multiple variants which are referred to as stock-keeping units (SKUs). In Infosys Equinox Commerce, the consumer or buyer evaluates a product (for example, a men’s dress shoe available in black and brown and in sizes from 10 to 15), but actually purchases a SKU associated with the product (for example, a black-colored version of the dress shoe in size 12) rather than the product itself.
- Product Data Enrichment – the process of providing contextual and useful product data and imagery to help consumers make quick and informed decisions about purchasing products, to increase the likelihood of a sale.
- Project – a container or wrapper entity to hold changes made to a Catalog. New and updated catalog content must pass through the Project approval workflow process before it is reflected in the store’s catalogs.
- Project Workflows – make business processes more efficient by managing and tracking the human tasks involved with a process and then providing a record of that process when it completes.
- Project Notes – comments entered by project editor or approver to add context to project actions.
- Reference Model – specifies the reference model type, which allows defining the attribute values and mapping the reference model attribute to product(s) or SKU(s).
- Template Model – specifies the template model type, which allows defining the attribute values for the template model while mapping the model with the product(s) or SKU(s).
- Sales Catalog – a subset of the Master Catalog, meant to provide a flexible display structure that allows a Catalog Manager to create or copy a catalog that suits a store’s particular requirements. A Sales Catalog can be of the type:
- Default: This Sales Catalog is one where the content inside the Sales Catalog is copied from the Master Catalog and saved in the Sales Catalog. This content may be further modified within the Sales Catalog if needed. All the contents modified in the Sales Catalog stays within the Sales Catalog without any impact to the Master Catalog. For example, a product name is Sandals in the Master Catalog. However, the product name is modified from Sandals to Flip-Flops for localization purposes.
- Filter: This Sales Catalog type is one where the Sales Catalog acts as a filter on the Master Catalog. This type of Sales Catalog has NO content of its own; all the contents are exactly how it is in the Master Catalog. The application of this type of filter enables a Catalog Admin to define a subset of the product assortment that may be sellable to a certain set of companies (B2B) or a certain set of the market segments within the customers (B2C).
- Search Engine Optimization (SEO) – is a range of techniques that aid in promoting site content and products within search results for a Search Engine (e.g. Google, Bing, etc.).
- SKU Kits – a bundle that is specific to a SKU rather than a product, which is available for purchase by a consumer or buyer.
- Stock Keeping Unit (SKU) – a particular variant of a product, which is available for purchase by a consumer or buyer.
- Store – represents a specific physical location or online store of a business.
- Store Manager – associates a price list for each currency supported by a store.
- Storefront – a consumer-facing website that presents products, contents, and promotions across multiple channels such as desktop, tablet, and mobile.
- Subscription Flag – SKUs can be flagged as subscriptions for clients using a subscription service.
- Pre-order Flag – specifies if a particular SKU can be preordered, that is, allows the SKU to be purchased that is not in stock at the moment, but will be in stock at a specified date.
- Up-Sell – specifies the products similar to the product being viewed, but are of a higher range.
- Cross-Sell – specifies the products that are related to the product being viewed, such as product accessories.
- Variant – a version of a product that differs in some respect from other versions of the same product. For example, a shoe called “Oxford Classic” is a product available in different colors and sizes (variants).
Accessing the Catalog Console
Catalog Overview | Managing Attributes
- Log in to the Foundation service.

- Click Catalog on the StoreOps page.
 The Catalogs landing page appears.
  The Catalogs landing page is organized into four primary tabs, each serving a distinct purpose:
- Catalog Tab: This is the main tab where you can manage and organize your product data. It’s where you’ll find all your products and SKUs, and where you can create and manage your master and sales catalogs. See Managing Catalogs.
- Attribute Tab: This tab is dedicated to managing the attributes of your products. Here, you can define and modify the characteristics of your products, such as color, size, or any other specific features that your products may have. See Managing Attributes.
- Data Model Tab: This tab allows you to manage the structure of your product data. It’s where you can define and modify the relationships between different types of data in your catalog. See Managing Data Model.
- Settings: This tab is where you can configure the settings for your catalog. It provides options for setting up import and export functions, managing user permissions, and other administrative tasks related to catalog management. See Configuring Settings.
Managing Catalogs
Accessing Catalog | Creating Catalog
Catalog management in Infosys Equinox Commerce is a strategic process that ensures the quality of product data across all sales channels. It involves organizing, standardizing, and publishing product data for each sales channel. The Catalogs store product and SKU specifications and interact with the Pricing, Inventory, Promotion, and Merchandising microservices on the Storefront.
A master catalog is always present in the Catalog microservice, serving as the dataset for all products and SKUs. A Catalog Manager has the option to create any number of additional catalogs, typically referred to as sales catalogs, which are subsets of the master catalog.
The process begins with the entry or import of all products and SKUs into the master catalog. Sales Catalogs facilitate the utilization of enriched product data in multiple applications. For instance, if you operate an e-commerce store for all consumers and a separate e-commerce store for special events, you might want to use a separate Sales Catalog of the Default type for those special events. Similarly, for a B2B store where the product assortment is a subset of the master catalog, dependent upon the contract with the particular business, a Sales Catalog of the Filter type can be used.
For the Default type of Sales Catalog, upon running a feed from the master catalog to a sales catalog, the sales catalog will inherit the products, SKUs, and properties from the master catalog. Thereafter, the values for products and SKUs within the sales catalog (for example, description, colors, sizes, etc.) can be changed to override the values inherited from the master catalog.
As another example of the application of Sales Catalogs, consider a business that is into two different domains like Apparels and Accessories. In this scenario, the master catalog holds the product data for both Apparel & Accessories. The business can create two sales catalogs for Apparel and Accessories separately and map the required products from the master catalog.
In the Catalogs tab, you can,Configuring and Searching for Catalogs
Searching for Catalogs
To search for the Catalogs,- In the All Catalogs page, click the searchable fields in the header to open the search field. The searchable fields are Catalog Name, Catalog ID, Catalog Status, Type, and Row Select.
Note:- For displaying and/or modifying the searchable fields, see Modifying Searchable Fields.
- For displaying a predefined number of catalogs per screen, see Selecting Predefined Rows.
- By default, all the approved catalogs are listed on the All Catalogs page.
- Enter the desired search criteria in the search field, and then click the Go button. The list of catalogs matching the search criteria is displayed.
Modifying Searchable Fields
To modify the searchable fields,- Click
 (vertical ellipse) available at the beginning of the search field.
 - Select or deselect the items to add and/or remove the searchable fields from the header.
 The selected searchable fields appear in the header.
Selecting Predefined Rows
To select predefined rows, By default, 10 catalogs per screen will appear, but the number of catalogs per screen can be modified as follows:- Click (vertical ellipse) available at the beginning of the search field and select Row Select. The Row Select appears as part of the search criteria.
- Select 10 Rows, 25 Rows, or 50 Rows from the drop-down list.

Creating a Catalog
- On the All Catalogs page, click the Create Catalog button.

- In the Catalog Create page, enter/select the required information.
 The following table provides the field description for the Catalog Create screen:
The asterisk (*) symbol indicates mandatory fields.Field Description Catalog Name* Enter a name for the catalog. This field is mandatory. Catalog ID* Enter a unique catalog identifier. This field is mandatory. Description Enter a brief description of the catalog. Status* Select a status: - Active: This status allows the sales catalog to appear on the storefront.
- Inactive: This status prevents the sales catalog from being used.
Type* Select the Type of Sales Catalog. Functionality Sales Catalog Type Reference Default Filter Fetching Products and/or SKUs By default, no products and/or SKUs are imported from master catalog. All or based on the rule(s). Since the filter acts exactly as the name suggests, all master catalog product data is available at all times to this Sales Catalog and the filter limits the products/SKUs that are to be members of this Sales Catalog. Based on the rule(s). Configuring Sales Catalog Rules Running Feed Manual – You need to run the feed via Sales Catalog Rules: - To fetch new products and/or SKUs
- Whenever there are updates to be fetched from the Master catalog to the sales catalog.
Automatic – Any updates (newly added items and/or updates on the existing items) to the products and/or SKUs in the Master catalog is automatically available to the sales catalog on matching the rule(s) configured in the Sales Catalog Rules. Importing Into a Sales Catalog Managing Products and SKUs You can view and manage products and SKUs in the sales catalog. You can ONLY view the details of products and SKUs within catalog when you click on a specific product/SKU from the listing page. Within any product, you can view only the associated SKUs that belong to the specific catalog filter. You cannot edit, delete and/or sort any entities within the catalog filter. Updating Products Updating SKUs Importing into a Sales Catalog Importing Products and/or SKUs You can import new products and/or SKUs via the Import tab. You cannot import new products and/or SKUs. Importing Products, SKUs, and Attributes into the Master Catalog Managing via Project Approval Workflow You can manage Sales Catalog via Project Approval Workflow. Project-based Approval Workflow is irrelevant since there is NO possibility of making any changes to the product/SKU data from within this type of Sales Catalog. Managing Project Approval Workflow Exporting Model Values You can export model values. You cannot export model values. Exporting Model Values Start Date* Select a start date of the catalog. If required, you can also specify the timestamp. End Date* Select an end date of the catalog, which defines the expiry of the catalog. If required, you can also specify the timestamp.
Note: After the expiry date, the catalog turns inactive.Choose Logo Image Select a logo image of the catalog from your local computer. - To add property, in the Additional Properties section, click the Add Property button and enter the property key and property value. This is optional.
Note:- To delete the property key and value pair, click the Delete icon.
- To add more properties, repeat the above step 3.
- Click the Save button.
 Note: To discard the changes, click the Cancel button.
The catalog is created and listed on the All Catalogs page. Now, you can configure various products in the catalog.
Updating a Catalog
Catalog Managers can modify the metadata of existing Sales Catalogs (excluding the Master catalog) from the Catalogs tab. These changes bypass the project approval workflow process. For more details, see Project Approval Workflow. To update a catalog,- In the All Catalogs page, click on a particular catalog. The Catalog Overview tab is displayed with the catalog details.
 Note: On the Catalog Overview screen, you can check the catalog’s Status and Type. For a product or SKU to access its listing page, click the numeric link. For guidance on importing Products/SKUs into catalogs, see Importing into Master Catalog and Importing into Sales Catalog.
 - Click the Edit icon and update the required fields.
 Note: You cannot modify the Catalog ID and Type drop-down values.
 - Click the Save button. The Catalog is updated.
Note: To discard the changes, click the Cancel button.
Copying a Sales Catalog
With the Catalog Admin console, you can create a new Sales Catalog by copying an existing one. This process duplicates all data, including name, description, status, type, dates, and properties. It saves time and effort compared to creating a new sales catalog from scratch. To copy the required sales catalog,- In the All Catalogs page, navigate to the required sales catalog.
- In the Catalog Overview page, click the Copy button.

- In the Catalog Create page, make the required changes.
 Note: The Type field is not editable.
- When you copy a Filter type sales catalog, all configured updates matching the existing sales catalog rule(s) are automatically copied to the new Sales Catalog.
- When you copy a Default type sales catalog, you need to run the Sales Catalog Rules to fetch the updates from the Master Catalog.
- For detailed information on the fields, refer to field types in the Creating Catalog.
- Click the Save button.
 The Sales Catalog is copied and displays the copied Catalog Overview page.
Managing Attributes
An attribute, a property defining a product and its SKUs, needs to be set up before establishing Products or SKUs. These attributes can be associated with a product or SKU. Catalog Managers and Editors manage these attributes via the Attributes tab, which contains a master list of all system-default and client-defined product and SKU attributes for all catalogs. For example, include type, supplier name, brand, material type, color, size, etc. In the Attributes tab, the attributes are managed under the following tabs:
| Tab Name | Description |
| LIST | In the LIST tab, you can Search, Create, Update, and/or Export an attribute. For more information, refer to |
| GROUP | In the Group tab, you can Search, Create, and/or Update an attribute group. For more information, refer to |
| VARIANT GROUP | In the Variant Group tab, you can Search, Create, and/or Update a variant attribute group. For more information, refer to |
| IMPORT | In the Import tab, you can import the attributes using a prescribed template that is available to download and populate with required data, refer to Importing Attributes. |
Note: There is no approval workflow for managing attributes, attribute groups, variant attribute groups, and import attributes, refer to the Project approval workflow process.
List Tab
In the List tab, you can,
Configuring and Searching for Attributes
Searching for Attributes
To search for the Attributes,
- In the Attributes tab, under the LIST tab, click the searchable fields in the header to open the search field. The searchable fields are Attribute Name, Attribute ID, Attribute Level, Type, Field Type, Comparable, Displayable, Filterable, Searchable, Sortable, Required, Status, and Row Select.
Note:- For displaying and/or modifying the searchable fields, see Modifying Searchable Fields.
- For displaying a predefined number of attributes per screen, see Selecting Predefined Rows.
- By default, all the approved attributes are listed in the attributes page.
- Enter the desired search criteria in the search field, and then click the Go button.
 The list of Attributes matching the search criteria is displayed.
Modifying Searchable Fields
To modify the searchable fields,
- Click (vertical ellipse) available at the beginning of the search field.
- Select or deselect the items to add and/or remove the searchable fields from the header.
 The selected searchable fields appear in the header.
Selecting Predefined Rows
To select Predefined Rows, By default, 10 attributes per screen will appear, but the number of attributes per screen can be modified as follows:
- Click (vertical ellipse) available at the beginning of the search field and select Row Select. The Row Select appears as part of the search criteria.

- Select 10 Rows, 25 Rows, or 50 Rows from the drop-down list.

Creating an Attribute
In the LIST tab, Catalog Managers and Catalog Editors can create new attributes from the list of custom and user-defined attributes, update the existing attribute, search for attribute(s) by name, ID, or field type, and export all the attributes to your local computer. For creating a new attribute, see the video below or the step-by-step instructions:
- In the Attributes tab, under the LIST tab, click the Create Attribute button.

- In the Attribute Create page, enter/select the required information.
 The following table provides the field description for the Attribute Create screen:
Note: The asterisk (*) symbol indicates mandatory fields.Field Description Attribute Name* Enter the name of the attribute. A maximum of 200 characters are allowed for the attribute name. Attribute ID* Enter the unique identifier of the attribute. A maximum of 200 characters are allowed for the attribute ID. Attribute Level Create an attribute for the Product and SKU. Select the appropriate attribute level from the drop-down list: - Product/SKU: To associate the attribute to a product and/or SKU.
- Product: To associate the attribute to a product.
- SKU: To associate the attribute to a SKU.
Status* Select the status. The possible statuses are: - Active – indicates the active status of the attribute. The active attribute can be mapped to the product(s) or SKU(s) via a model. By default, the Active status is selected.
- Inactive – indicates the inactive status of the attribute. The inactive attribute cannot be mapped to the product(s) or SKU(s).
Type* Select the appropriate type from the drop-down list. The possible types are: - Static – Indicates the static type of attributes. Selecting Static type allows viewing and selecting the static field types. By default, this is selected.
- Dynamic – Indicates the dynamic type of attributes. Selecting Dynamic type allows viewing and selecting the dynamic field types.
Field Type* Select the appropriate field type from the drop-down list. The field types vary based on the selected Type field. If the Type is selected as Static, the following static field types appear for selection: - Boolean: To provide one of two possible values for the attribute.
- Date: To define the date for the attribute.
- Decimal – To include exact numeric values for the attribute. It represents the number of digits after the decimal point. It allows the user to specify the minimum to maximum decimal value and/or define maximum decimal length value.
- Email – To include email values for the attribute. It represents a valid email address value.
- Group List – To provide a grouped list of values for the attributes. It represents a group of lists.
- Add Group Value: Click the Add Group Value button to add a group and multiple group values within the group.
- Add Group: Click the Add Group button to add more than one group.
- HTML Content – To include HTML content to the attributes. It stores a valid HTML text, which includes valid HTML tags.
- List – To provide a list of values to select from. It allows the user to define predefined values and select any one value when mapped with Product or SKU. In the List Item field,
- Enter the list item to be added with product or SKU.
- Click the Add Items button to add more than one list item.
- Model – To define a model for the attribute. For detailed, information on the model, refer to Model.
- Multiple List – To include multiple list values. It allows the user to define predefined values and allows to select multiple values when mapped with Product or SKU.
- Optional Multiple List – To include optional multiple list values.
- Number – To include number values. It is a 64-bit two complement integer. Specify the minimum and maximum number for validation.
- Regular Expression – It represents a valid regular expression pattern.
- String – To include string values. It represents a word or sequence of characters. In the Validation Type, specify the minimum to maximum string characters for Products/SKUs.

- Text Area – It represents the paragraph of texts. In the Validation Type, specify the minimum to maximum text characters and number of rows for the text for Products/SKUs.
- URL – It represents a valid URL value.

- Built-in models: Assign field type (model) for the attribute, based on which you can associate items (set of products and/or SKUs) to the Product(s) and SKU(s).
- Products: Selecting the Products model type allows adding only the Product items to the attribute values while mapping it with the product(s) and/or SKU(s). You can also directly map only the attributes to the product(s) and/or SKU(s). For detailed information about associating this attribute and adding items to it, refer to Associating items to product.
- SKUs: Selecting the SKUs model type allows adding only the SKU items to the attribute values while mapping it with the product(s) and/or SKU(s). You can also directly map only the attributes to the product(s) and/or SKU(s). For detailed information about associating this attribute and adding items to it, refer to Associating items to SKU.
- Template: Selecting the template model type allows defining the attribute values for the template model while mapping the model with the product(s) or SKU(s).
- For detailed information about the template model, refer to Model Type.
- This Template Model can be added to the attribute(s) by selecting the field type as Template. For detailed information, refer to Creating Attributes to create an attribute.
- Reference: Selecting the reference model type allows defining the attribute values in the catalog details page and mapping the reference model attribute to product(s) or SKU(s).
- For detailed information, refer to Reference Model Dynamic Tabs.
- For detailed information about the reference model, refer to Model Type.
- This Reference Model can be added to the attribute(s) by selecting the field type as Reference. For detailed information, refer to Creating Attributes to create an attribute.
- Image – In the Validation Type, enter the asset path template to include only images for Products/SKUs.
- Image with Caption – In the Validation Type, enter the asset path template to include images with a caption for Products/SKUs.

Comparable* Indicates whether this attribute is comparable or not. Selecting Yes makes this attribute as comparable on the storefront. By default, the No option is selected. 
Displayable* Indicates whether this attribute is displayable or not. Selecting Yes makes this attribute as displayable on the storefront. By default, the No option is selected. 
Filterable* Indicates whether this attribute is filterable or not. Selecting Yes makes this attribute filterable on the storefront. By default, the No option is selected.  Note: This field will not be displayed for the Field Type Model.
Searchable* Indicates whether this attribute is searchable or not. Selecting Yes makes this attribute searchable on the storefront. By default, the No option is selected. 
Sortable* Indicates whether this attribute is sortable or not. Selecting Yes makes this attribute sortable on the storefront. By default, the No option is selected. 
Required* Indicates whether this attribute is mandatory or optional. Selecting Yes makes this attribute mandatory based on the above defined attribute level. By default, the No option is selected. Auto Generation* Indicates whether the description of this attribute is generated automatically or not. Selecting Yes makes the description is generated automaticlly when you save the product. By default, the No option is selected.
Note:This attribute is only applicable for product description. - Click the Save button. The attribute is created.

Note:- Repeat the above procedure to add more attributes to the model.
- To discard the changes, click the Cancel button.
Updating an Attribute
To update an attribute,
- In the Attributes tab, under the LIST tab, click on a particular attribute. The Attribute Create page appears.

- In the Attribute Create page, update the required fields.
Note:- You cannot modify the Attribute ID. For information on each field, see attribute fields in Creating an Attribute section.
- The Attribute Level field is not editable if it is “Product/SKU”.
- The Attribute Level field is editable if it is “Product” or “SKU”.
- Click the Save button. The attribute is updated.
Note: To discard the changes, click the Cancel button.
Exporting All Attributes
Using the Catalog Admin console, in the List tab, you can export all the attributes to your local computer. By default, the LIST tab is displayed.
- In the Attributes tab, under the LIST tab, click the Export button.
 All the attributes are exported in an excel sheet format file to your local computer.
Group Tab
The Attribute Group is a logical grouping of attributes of the same type, which can be associated with a specific product type. In the Group tab, you can,
Configuring and Searching for Attribute Groups
Searching for Attribute Groups
To search for the Attribute Group,
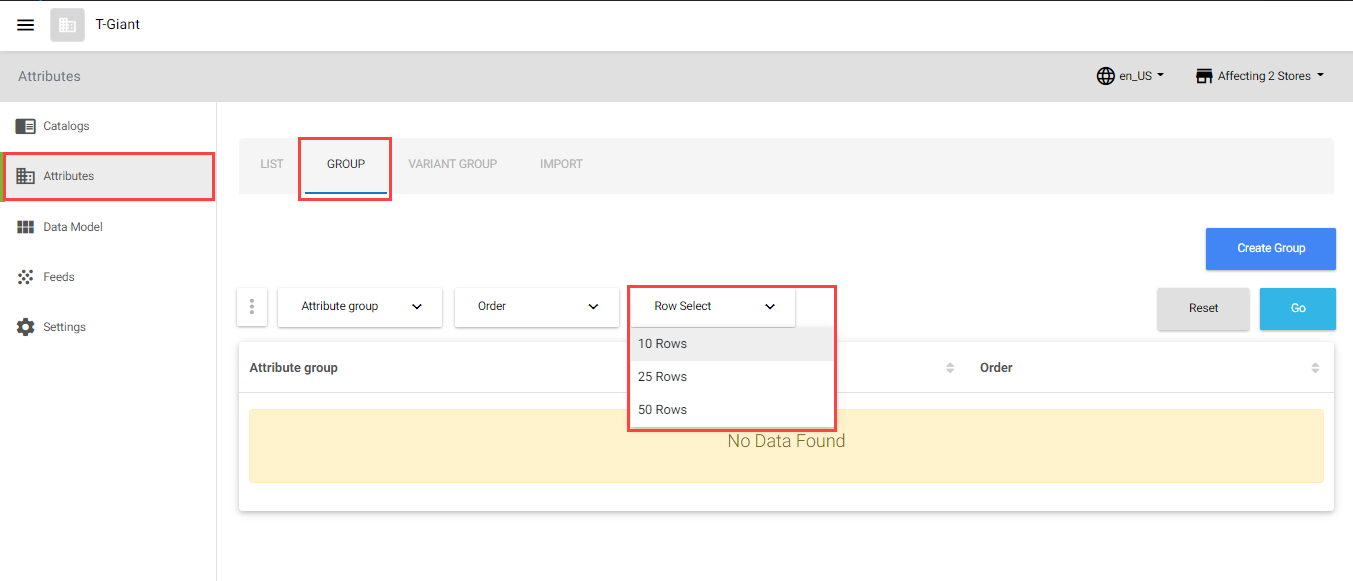
- In the Attributes tab, under the GROUP tab, click the searchable fields in the header to open the search field. The searchable fields are Attribute Group, Order, and Row Select.
Note:- For displaying and/or modifying the searchable fields, see Modifying Searchable Fields.
- For displaying a predefined number of attribute groups per screen, see Selecting Predefined Rows.
- By default, all the approved attribute groups are listed in the attributes page under GROUP tab.
- Enter the desired search criteria in the search field, and then click the Go button.
 The list of attribute groups matching the search criteria is displayed.
Modifying Searchable Fields
To modify the searchable fields,
- Click (vertical ellipse) available at the beginning of the search field.
- Select or deselect the items to add and/or remove the searchable fields from the header.
 The selected searchable fields appear in the header.
Selecting Predefined Rows
By default, 10 attribute groups per screen will appear, but the number of attribute groups per screen can be modified. To set a fixed number of rows per page,
- Click (vertical ellipse) available at the beginning of the search field and select Row Select. The Row Select drop-down list appears as part of the search criteria.

- Select 10 Rows, 25 Rows, or 50 Rows from the drop-down list.
Creating an Attribute Group
Catalog Managers can create attribute groups to ensure ease and consistency during product and SKU data entry by Catalog Editors. For example, the Catalog Manager for a store that sells T-Shirts and Accessories might create an attribute group for each product type:
- T-Shirt Attribute Group
- Name
- Brand
- Details
- Accessories Attribute Group
- Name
- Details
For creating a new attribute group, see the video below or the step-by-step instructions:
- In the Attributes tab, click the GROUP tab, and then click the Create Group button.

- In the Attribute Group Create page, enter/select the required information.
 The following table provides the field description for the Attribute Group Create screen:
Note: The asterisk (*) symbol indicates mandatory fields.Field Description Attribute Group Name* Enter the name of the attribute group. This field is mandatory. Order* Enter an order number. Indicates the sequence of the attribute group, while mapping the attributes to the product. This field is mandatory. Add Attributes - Click the Add Attributes field.
- Select the checkbox next to the existing attributes to be added to the group. Select the required attributes from the drop-down list.

- Click the Save button. The attribute group is created. Note: To discard the changes, click the Cancel button.
Updating an Attribute Group
To update a group of attributes,
- In the Attributes tab, click the GROUP tab, and then click on the particular attribute group.

- In the Attribute Group Update page, update the required fields.
Note: You cannot modify the attribute group name. - Click the Save button. The attribute group is updated.
Note: To discard the changes click the Cancel button.
Variant Group Tab
A variant is a distinct version of a product. The Variant Attribute Group, a logical assembly of similar attributes, can be linked to a specific SKU type. For instance, for a T-Shirt product, SKUs are determined by color and size attributes. Here, color and size attributes are called variants. Attributes of identical variant types can be consolidated into one Variant Attribute Group for association with specific product types. Variant attributes should be exclusively defined at the SKU level. In the Variant Group tab, you can,
- Configure and Search for Variant Attribute Groups
- Create a Variant Group
- Update a Variant Attribute Group
Configuring and Searching for Variant Attribute Groups
Searching for Variant Attribute Groups
To search for the Variant Attribute Group,
- In the Attributes tab, under the Variant Group tab, click the searchable fields in the header to open the search field. The searchable fields are Attribute Group, Order, and Row Select.
Note:- For displaying and/or modifying the searchable fields, see Modifying Searchable Fields.
- For displaying a predefined number of variant attribute groups per screen, see Selecting Predefined Rows.
- By default, all the approved variant attribute groups are listed in the attributes page under the VARIANT GROUP tab.
- Enter the desired search criteria in the search field, and then click the Go button.
 The list of variant attribute groups matching the search criteria is displayed.
Modifying Searchable Fields
To modify the searchable fields,
- Click
 (vertical ellipse) available at the beginning of the search field.
 - Select or deselect the items to add and/or remove the searchable fields from the header.
 The selected searchable fields appear in the header.
Selecting Predefined Rows
By default, 10 attribute variant groups per screen will appear, but the number of attribute groups per screen can be modified: To set a fixed number of rows per page,
- Click (vertical ellipse) available at the beginning of the search field and select Row Select. The Row Select appears as part of the search criteria.

- Select 10 Rows, 25 Rows, or 50 Rows from the drop-down list.

Creating a Variant Attribute Group
Variant Attribute Groups enhance product consistency by grouping variants to define SKUs. For instance, a group named ‘ShirtVariants’ might include attributes like ‘Shirt Size’ and ‘Brand’. In the ‘VARIANT GROUP’ tab, you can create or edit an attribute group, or search by group name or order number. For example, a Catalog Manager for a store selling T-Shirts and Accessories might create a variant attribute group for each SKU type:
- Men’s Fashion Casual Front Long/Short Sleeve Henley T-Shirts
- Shirt Size
- Brand
- Jackets and Watches
- Design
- Size
- Color
To create a Variant Attribute Group,
- In the Attributes tab, click the VARIANT GROUP tab, and then click the Create Variant Group button.

- In the Attribute Group Create page, enter/select the required information.
 The following table provides the field description for the Attribute Group Create screen:
Note: The asterisk (*) symbol indicates mandatory fields.Field Description Attribute Group Name* Enter a name of the variant attribute group. Order* Enter an order number. Add Attributes - Click the Add Attributes field.
- Select the checkbox next to the existing attributes to be added to the group. Select the required attributes from the drop-down list.

- Click the Save button. The variant attribute group is created.
Updating a Variant Attribute Group
To update a Variant Attribute group,
- In the Attributes tab, click the GROUP tab, and then click on the particular variant attribute group.

- In the Attribute Group Update page, update the required fields.
Note: You cannot modify the attribute group name. - Click the Save button. The variant attribute group is updated.
Note: To discard the changes, click the Cancel button.
Import Tab
In the Attributes’ IMPORT tab, you can bulk upload the attribute data:
- Download a template – First, download and use this sample sheet (.xlsx) to update all the necessary product and SKU details.
- Import the File – Then, upload the updated sample sheet (.xlsx) on to the IMPORT Tab.
- Also, view the previous import details in the Import History section. All attributes can be imported into the Catalog console.
For bulk upload the attribute details, see the video below or refer to the instructions on download the sample sheet to update the necessary attribute details and import the data:
Downloading a Template
Before you import attribute data, you need to download the sample template, fill in all the required details, and import the Excel sheet. The downloaded Excel sheet contains an attribute sheet with a list of all attributes and their details specific to the collection. The same template varies based on the collection to which the catalog is associated. The sample template can be used across collections ONLY if the customer attributes are the same in both collections. For example, let us consider two collections and two new stores,
- Collection 1 has 20 predefined attributes.
- Collection 2 has 25 predefined attributes.
- Store US associated with the collection 1
- Store CA associated with the collection 2
In this case, you cannot use the same sample for the two stores (Store US and Store CA), since the pre-defined attributes are varying. To download a template with attributes and its details,
- In the Attributes tab, click the IMPORT tab, and then click the Download Template button.
 The SampleImport.xlsx file is downloaded to your local computer.
 - You can enter the required attribute information in the sample excel sheet file and import it. For detailed information, refer to Importing a document.
Importing a document
To import a document,
- Drag and drop the updated excel sheet file (.xlsx) from your local computer on to the Import Document section. (OR) Click the Add File button to upload the file from your local computer.

- After a successful upload, click the Start Import button to import the model details.
 Note: To delete the uploaded file, click the Delete icon.
 - In the Import Document section, you can view the summary of the imported data.
 Summary – displays the number of products, SKUs and/or attributes that are newly created, updated, and failed along with the total products, SKUs, and/or attributes count that are available in the sheet.
 - In the Import History section, you can,

- Click on the imported file “link” to download and view the imported file.
- Click on the
 icon to view the summary details.
 - Click on the
 icon to download and view the failed items with the reason for import failure.
The following table provides the differences between the different statuses:
| Status | Functionality | Description |
| Success |
|
|
| Partial |
|
|
| Error |
|
|
The successfully imported attributes are listed on the attributes listing page. 
Managing Data Model
Managing Attributes | Managing Product and SKU Details
Data models, entities holding a group of related attributes, can be associated with various products or SKUs as a single attribute. The Data Model tab allows you to define a set of attributes as a model entity and apply it to one or more products.
An Attribute Group is a logical cluster of product-associated attributes, each requiring individual mapping. In contrast, a Data Model groups multiple attributes under a single entity. To associate a data model with a product, define a new “Model” type attribute, reference it with the data model, and map this attribute to the product. This pulls up all attributes within the data model. Models, classified into Reference and Template categories, are beneficial when adding identical attributes to multiple products or SKUs.
An Attribute Group is a logical grouping of attributes associated with the product. However, each of those attributes should be mapped individually. In contrast, a Data Model groups multiple attributes under a single entity. The data model cannot be associated with a product directly. A new attribute of type “Model” must be defined and reference it with the data model. Finally, map this model-type attribute against the product. This pulls up all attributes that are associated within that data model. The models are classified into two categories:
The model is useful when the same attributes are required to be added to multiple products or SKUs. The sequence of mapping a model with the product(s) or SKU(s) is as follows:
- Create a model.
- Add attributes to the model.
- Create an attribute with the Field Type Model.
- Associate the attribute with the Field Type Model to product(s) and/or SKU(s).
For creating a new attribute, see the video below or the step-by-step instructions:
- Create a model – define a data model called “T-Shirt Specifications” with the model type as “Reference”.
- Add attributes to a model – Within the “T-Shirt Specifications” model, define the following attributes
- Size
- Neckline
- Sleeve Type
- Fit
- Material
- Brand
- Sellers
Note: For multiple T-Shirt products defined like Men’s Slim Fit T-Shirt, Men’s Regular Fit T-Shirt, Ladies Slim Fit T-Shirt, Ladies Regular Fit T-Shirt, Kids Boys Slim Fit T-Shirt, Kids Boys Regular Fit T-Shirt, Kids Girls Slim Fit T-Shirt, Kids Girls Regular Fit T-Shirt etc. For all these, the “T-Shirt Specifications” data model can be mapped since each of the product need the same attributes .
- Create an attribute with the Field Type Model – Create an attribute (in the attributes section) say “T-Shirtspec” of type “model” and reference it against the “T-Shirt Specifications” model.
- Associate the attribute – Associate the attribute “T-Shirtspec” to all the above-mentioned products, which maps all the attributes within that model to the products.
In the Data Model tab, the models are managed under the following tabs:
- MODEL Tab
- IMPORT Tab
Configuring and Searching for Models
Searching for Models
To search for the models,
- In the Data Model tab, under the MODELS tab, click the searchable fields in the header to open the search field. The searchable fields are Model ID, Model Name, Description, Model Type, Status, and Row Select.
Note:- For displaying and/or modifying the searchable fields, see Modifying Searchable Fields.
- For displaying a predefined number of models per screen, see Selecting Predefined Rows.
- By default, all the approved models are listed in the models page.
- Enter the desired search criteria in the search field, and then click the Go button.
 The list of models matching the search criteria is displayed.
Modifying Searchable Fields
To modify the searchable fields,
- Click (vertical ellipse) available at the beginning of the search field.
- Select or deselect the items to add and/or remove the searchable fields from the header.
 The selected searchable fields appear in the header.
Selecting Predefined Rows
By default, 10 attributes per screen will appear, but the number of attributes per screen can be modified: To set a fixed number of rows per page,
- Click (vertical ellipse) available at the beginning of the search field and select Row Select. The Row Select appears as part of the search criteria.

- Select 10 Rows, 25 Rows, or 50 Rows from the drop-down list.

Creating a Model
To create a model,
- In the Data Model tab, under the MODELS tab, click the Create Model button.

- In the Model Create page, enter/select the required information.
 The following table provides the field description for the Model Create screen:
- Click the Save button. The model is created.
Note: To discard the changes, click the Cancel button.

Associating an Attribute to the Model
Once the model is created, the Add Attribute option is enabled. You can associate multiple attributes as a model entity and then map that model entity against any of the product(s) and/or SKU(s). To associate an attribute(s) to the model,
- Click the Add Attribute button.
 The Add Attribute screen appears.
- In the Add Attribute page, make the desired changes. The following table describes the fields in the Add Attribute screen:
Note:Fields Description Attribute Name* Enter the name of the attribute. A maximum of 200 characters are allowed for the attribute name. Attribute ID* Enter the unique identifier of the attribute. A maximum of 200 characters are allowed for the attribute ID. Type* Select the appropriate type from the drop-down list. The possible types are: - Static – Indicates the static type of attributes. Selecting the Static type allows viewing and selecting the static field types.
- Dynamic – Indicates the dynamic type of attributes. Selecting the Dynamic type allows viewing and selecting the dynamic field types.
Status* Select the status. The possible statuses are: - Active – indicates the active status of the attribute. The active attribute can be mapped to the product(s) or SKU(s) via a model. By default, the Active status is selected.
- Inactive – indicates the inactive status of the attribute. The inactive attribute cannot be mapped to the product(s) or SKU(s).
Field Type* Select the appropriate field type from the drop-down list. The field types vary based on the selected Type field. If the Type is selected as Static, the static field type of attributes is displayed: - Boolean: To provide one of two possible values for the attribute.
- Date: To define the date for the attribute.
- Decimal: To include exact numeric values for the attribute.
- Email: To include email values for the attribute.
- Group List: To provide a grouped list of values for the attributes.
- HTML Content: To include HTML content to the attributes.
- List: To provide a list of values to select from.
- Multiple List: To include multiple list values.
- Optional Multiple List: To include optional multiple list values.
- Number: To include number values.
- Regular Expressions: To include regular expression values.
- String: To include string values. It represents a word or sequence of characters.
- Text Area: It represents the paragraph of texts.
- URL: It represents a valid URL value.

- Image: To include only images for Products/SKUs.
- Image with Caption: To include images with a caption for Products/SKUs.
- Built-in models: Assign model field type for the attribute, based on which you can associate items (set of products and/or SKUs) to the Product and SKU.
- Products: Selecting the Products model type allows defining the attribute values as “valid product IDs” while mapping the attribute with the product(s) and/or SKU(s).
- SKUs: Selecting the SKUs model type allows defining the attribute values as “valid product IDs” while mapping the attribute with the product(s) and/or SKU(s).
- Template: Selecting the template model type allows defining the attribute values for the template model while mapping the model with the product(s) or SKU(s).
- For detailed information about the template model, refer to Model Type.
- This Template Model can be added to the attribute(s) by selecting the field type as Template. For detailed information, refer to Creating Attributes to create an attribute.
- Reference: Selecting the reference model type allows defining the attribute values in the catalog details page and mapping the reference model attribute to product(s) or SKU(s).
- For detailed information, refer to Reference Model Dynamic Tabs.
- This Reference Model can be added to the attribute(s) by selecting the field type as Reference. For detailed information, refer to Creating Attributes to create an attribute.
Comparable* Indicates whether this attribute is comparable or not. Selecting Yes makes this attribute as comparable. By default, the No option is selected. Displayable* Indicates whether this attribute is displayable or not. Selecting Yes makes this attribute as displayable. By default, the No option is selected. Filterable* Indicates whether this attribute is filterable or not. Selecting Yes makes this attribute as filterable. By default, the No option is selected.
Note: This field will not be displayed for the Field Type Model.Searchable* Indicates whether this attribute is searchable or not. Selecting Yes makes this attribute as searchable. By default, the No option is selected.
Note: This field will not be displayed for the Field Type Model.Sortable* Indicates whether this attribute is sortable or not. Selecting Yes makes this attribute as sortable. By default, the No option is selected.
Note: This field will not be displayed for the Field Type Model.Required* Indicates whether this attribute is mandatory or optional. Selecting Yes makes this attribute as mandatory. By default, the No option is selected. - The asterisk (*) symbol indicates mandatory fields.
- Repeat the above procedure to add more attributes to the model.
- Click the Save button. The attributes are added to the model.
Note: The Reference model or Template model can be added as an attribute to map them to the product(s) and/or SKU(s). This functionality helps in defining multiple attributes as a model entity and consuming that model against one or many products and SKUs.- To add Reference Model or Template Model as an attribute, refer to Creating Attributes.
- To add individual, grouped, or model attributes (model entity) under Property name, refer to Product Attributes and SKU Attributes.
- To define attribute values to the Reference Model in the catalog details page, refer to Reference Model Dynamic Tabs.
- To directly associate relations to the model attributes (attributes within the model) and associate them to Product(s) or SKU(s), refer to Product Relations and SKU Relations sections.
Editing a Model
To edit a model,
- In the Data Model tab, under the MODELS tab, click the desired model.

- Update the necessary model details, add attributes, or delete the model.

- Click the Save button. The model is updated.
Note: To discard the changes, click the Cancel button.
Deleting a Model
A model can be deleted if it lacks attributes or isn’t associated with any product(s) or SKU(s). To delete a model,
- In the Data Model tab, under the MODELS tab, click the desired model.
- Click the Delete button.
 The model is deleted.
Exporting Models
The Catalog Admin console allows you to export all data models to your local computer. To export models,
- In the Data Model tab, under the MODELS tab, click the Export button.
 The models are exported to your local computer.
Importing Models
All data models can be imported into the Catalog console. In the IMPORT tab, you can,
- Download a sample template – download and use this sample sheet (.xlsx) to update all the necessary attribute and model details.
- Import the File – upload the updated sample sheet (.xlsx) on to the IMPORT Tab.
- View the previous import details in the Import History section.
Download a Template
Before you import a document, you need to download the sample template, fill in all the required details, and then import the document. The downloaded Excel sheet contains the guidelines and model sheet with a list of all attributes, models, and their details. To download a template with models and their details,
- In the Data Model tab, click the IMPORT tab.

- Click the Download Template button. The SampleImport.xlsx file is downloaded to your local computer.
 You can enter the required attribute information in the sample excel sheet file and import it. For importing model details, see Import Model Details.
Import Model Details
To import model details,
- Drag and drop the updated excel sheet file (.xlsx) from your local computer on to the Import Document section. (OR) Click the Add File button to upload the file from your local computer.

- After a successful upload, click the Start Import button to import the model details.
 Note: To delete the uploaded file, click the Delete icon. After an import, you can view,
-
- Summary – displays the number of products, SKUs, attributes and/or models that are newly created, updated, and failed along with the total products, SKUs, attributes, and/or models count that are available in the sheet.
- Import History – displays the previous import details with a link to download and view the excel sheet, status of the import, import summary details, download and view the failed items.
Note:- If there is an error in the import feed, then you can click the New Import button to import a newly updated sheet.
- If an import is failed, you can download and view the failed items with the reason for import failure, click the Download Failed Items button.
Managing Reference Model (Dynamics Tab)
All reference models appear as tabs on the catalog details page, alongside the Catalog Overview, Products, SKUs, and Import tabs. The name of each data model tab corresponds to the name of its respective reference model. You can only add model values if the model contains attributes. For more information, see:
- export the attributes and their values from a reference model
- create a model value for the reference model
Note: You can create more than one model value for the reference model. To add this reference model to an attribute, select Model as the field type. For more information, see Creating an Attribute. For example, in the following scenario, Model Value 1 and Model Value 2 are created for the reference model features via a project.
| Reference Model | Model Value 1 | Model Value 2 | Model Value 3 |
| Features | Color – Red | Color – Blue | Color – Black |
| Features | Size – Small | Size – Medium | Size – Large |
Exporting Model Values
The exporting model value is NOT applicable if the catalog type is “Filter“, refer to the Type field of Creating Catalog. To export attributes with values,
- Click the appropriate Reference Model tab in the left navigation panel.
 Note: For example, in the above screen, Features, Screen Features, Screen Definition, and Screen Information are the reference models.
 - Click the Export button.
 The attributes and their values are exported to your local system in Excel (.xlsx) format.
Creating Model Values to Reference Model
Ensure that the Reference Model is created in the Data Model, before you start creating model value to the reference model. For creating a model value to the reference model, see the video below or the step-by-step instructions:
For detailed information on creating a reference model, see Creating a Model. To create a model value to the reference model,
- In the All Catalogs page, click the master catalog row.
 The Catalog Overview screen appears.
  All Reference Models are displayed as tabs in the left navigation panel.
 - Click on the required Reference Model tab. In the below screen, the Data Model Values tab is the sample reference model. Note: For example, in the above screen, Tags Overview, Tagging, Data Model Values, Tags, and Tag Groups are the reference models.
- Click the Create button to add model values.
 Note: If there are no attributes within the selected reference model, then the page appears as below:
 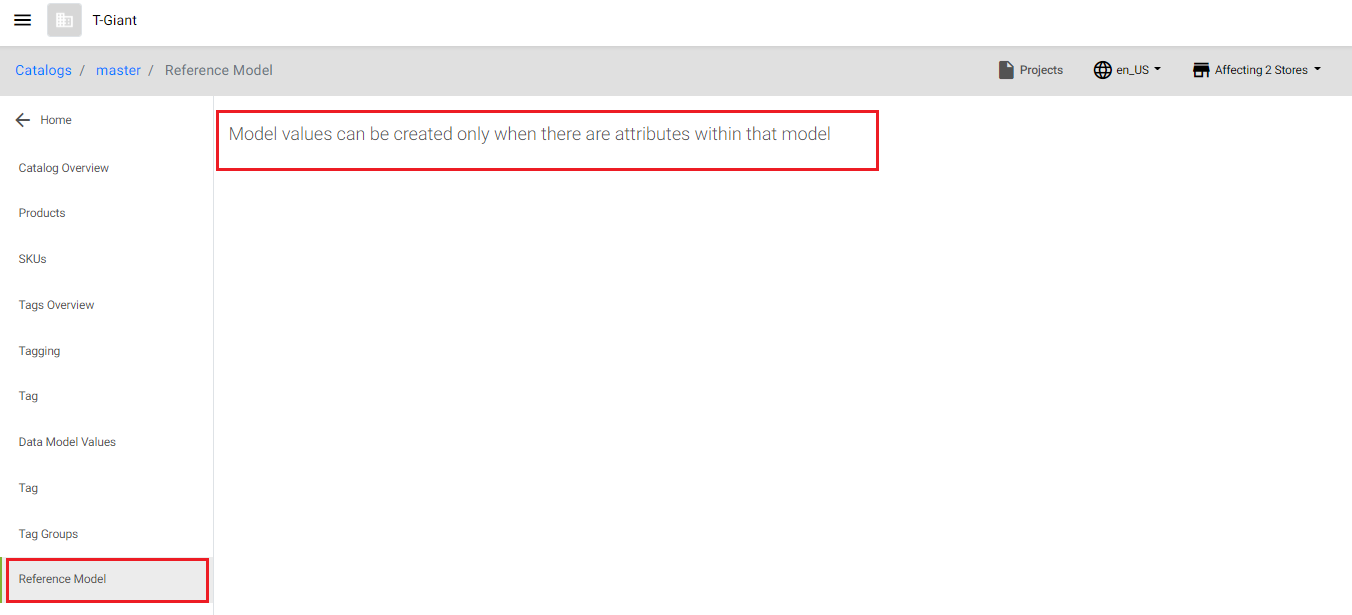 For information on adding attributes to the model, see Creating a Model section.
 - The Select Project pop-up opens to associate the product to a project. This is required to create a project and get it approved with the Catalog Manager.
Note: This page appears only if the project is not selected already.
- In the Select Project screen, select the required project.
Note: If the project is not available, then create a new project. You can also select the required project or create a new project before creating the product group. For more information, see “Creating a Project”. For more information on project approval workflow, see Managing Project Approval Workflow.
- In the Select Project screen, select the required project.
- In the Create page add the model values.

- Click the Save button. The model values are added to the reference model.
 Note:
Note:
- To discard the changes, click the Cancel button.
- You can add more values to the Reference Model. When multiple values are added to the Reference Model, you can select the values while associating attributes to product(s) or SKU(s).
- To add this model to attribute(s), create a model with the Field Type as Model and map this attribute with the Field Type Model, see Create an Attribute
- If required, repeat the Creating a Model Value procedure to add more model values to the Reference Model.
- To make this model value(s) approved, the project of the model value(s) is to be submitted and approved. To submit and approve the project, see Managing Project Approval Workflow.
The Features model is added to the attribute “Specifications”. While adding this “Specifications” attribute to a product, you will find the option to choose Model Value 1 and/or Model value from the drop-down list. The same attribute can be added to multiple products or SKUs. 
Managing Feeds
The Catalog Admin console allows you to manage the feeds of the Catalog microservice via the batch jobs dashboard. For more details, refer to the page Feeds – Catalog. Each feed may include multiple jobs, each with various schedules.
Note: From the collections management page, you can view the feeds of a Catalog collection. For more details, see Managing Collections of a Microservice. For managing catalog feeds, see the video below or the step-by-step instructions:
With the Catalog Batch Jobs dashboard, you can:
- View the Job Schedules of a Feed
- View running Details of a Feed Job
- Edit a Fee Job
- Create a Job Schedule
- Edit or Retrigger a Job Schedule
View the Job Schedules of a Feed
To view the job schedules of a feed,
- In the Catalogs homepage, click Batch Jobs in the left navigation panel.
 The Batch Jobs page is displayed.
- Click on the required Batch ID to view the Catalog feeds. For example, catalogexport.
 The following table provides the field description in the Batch Jobs page:
Field Description Job ID Displays the unique identifier for the Catalog Job. Collection ID Displays the identifier for the catalog job collection. Service Type Displays the catalog service type. Name Displays the job service name as catalog. Created Time Displays the date and time when the batch job is created for the first time. Updated Time Displays the date and time as and when the batch job is updated. History If you want to view the Batch History, click History. - Click on a Job ID to view the Job Details and Schedules.
 The Job Details and Job Schedules are displayed.
Note:- The Created Time displays the date and time when the Feed Job is created for the first time.
- The Updated Time displays the date and time as and when the Feed Job is updated.
View the Running Details of a Feed Job
To view the running details of a feed job,
- Navigate to the Job Details and Job Schedules page.
- Click History in the left navigation.
- Click on the History ID.

- The History Details page appears.
 The following table explains the History Details page:
Note: If the schedule is for importing items and the schedule is completed partially, you can find job history as error file to download and view the failed items.Button/Section Purpose 
To view the summary of the completed schedule in the JSON format, click View Summary. You can view the summary details of the feed job. Note: - The summary details display the URL link to download the output files for the catalogexport and modelvalueexport feed jobs.
 Note: You can navigate to URL in the view summary to download the output file.


To view the log details, click Summary Log: 
- The summary details display the URL link to download the output files for the catalogexport and modelvalueexport feed jobs.
Edit a Feed Job
You can edit a Feed Job using the edit icon in the Job Details page. To edit a feed job,
- Click on a Job ID to navigate to the Job Details and Job Schedules page.

- Click the edit icon.
 The Job Details page appears.
- Edit the job details. The following table provides the field description to edit a job:
Field Description Name Update the name of the job. Description Update the description of the job. Status Select a status: - Active: active batch jobs will be triggered.
- Inactive: inactive batch jobs will not be triggered.
Execution Type Select an execution type: - ETL – ETL refers to Extracting, Transforming, and Loading data. The job is executed via the Pentaho server. By default, the ETL batch job is executed.
- LWJ -LWJ refers to Lightweight Job. The batch job is executed as a lightweight job via the Spring Batch server. This takes less time for completion compared with the ETL jobs.
Max Run Time Update the maximum running time (in seconds) of the job. The job will be terminated if it exceeds the maximum running time limit. + Add Job Params Click the + Add Job Params button to add one or more job params with a Property Key and Property Value. Note: This property key-value pair impacts the configuration of the active job execution. 
- Click the Save button. The batch job details are updated.
Creating a Job Schedule
You can create a job schedule using the Create Schedule button on the Job Schedules page. To create a Job Schedule,
- Navigate to the Job Details page.
- Click the Create Schedule button:
 The Create Schedule Details page is displayed.
- Enter the field details. The following table provides the field description for creating a schedule:
Note: Fields marked with * are mandatory.Field Description Name* Update the name of the job schedule. Description* Update the description of the job schedule. Status* Change the status to any one of the following: - ON DEMAND – the job schedule is triggered immediately.
- INACTIVE – the job schedule is not triggered.
- SCHEDULED – the job schedule is triggered repeatedly in a given interval of time. The time interval is specified in the field Repeat Interval.
Batch Interval Specify the batch refresh interval (in seconds). The value should be less than or equal to Repeat Interval. For example, Repeat Interval is 1800 seconds and Batch Interval is 180 seconds. At each refresh interval, the system checks the completion of the Repeat Interval duration. Repeat Interval Update the frequency interval (in seconds), which triggers the job schedule repeatedly. The job Start Time is updated based on Repeat Interval. Last Run Time Update the last run time (in seconds) of the job schedule. Max Run Time Update the maximum running time (in seconds) of the job schedule. An alert email will be sent if it exceeds the maximum running time limit. Start Time Update the start time of the job schedule. End Time Update the end time of the job schedule. Add Job Params Click the Add Job Params button to add another job parameter with a Property Key and Property Value. This property key-value pair impacts the configuration of the active job execution. - Click Save to create the schedule.
Edit or Retrigger a Job Schedule
To edit or retrigger a job schedule,
- Navigate to the Job details of a job.
- Click on the desired job schedule.
 The schedule details are displayed:
  Note: To retrigger the Schedule, click Retrigger.
 - Click the edit icon.

- Edit the details. The following table provides the field description for editing a Job Schedule:
Field Description Name Update the name of the job schedule. Description Update the description of the job schedule. Status Select a status: - ONDEMAND –the batch job is triggered immediately if it is scheduled to run the feed.
- INACTIVE: the batch will not be triggered.
- SCHEDULED – the batch job will be triggered repeatedly in a given interval of time. The time interval is specified in the field Repeat Interval.
Feed Interval Specify the period between batch job schedules (in seconds). The batch Start Time is updated based on Feed Interval. Repeat Interval Update the frequency interval in seconds. The batch will be triggered repeatedly by this interval. Last Run Time Update the last running time of the job. Max Run Time Update the maximum running time (in seconds) of the job. The job will be terminated if it exceeds the maximum running time limit. Start Time Update the start time of the job. End Time Update the end time of the job. + Add Job Params Click the + Add Job Params button to add one or more job params with a Property Key and Property Value. Note: This property key-value pair impacts the configuration of the active job execution. 
- Click the Save button. The job schedule details are updated.
Managing Product & SKU Details
Managing Data Model | Managing Tags
A product, a combination of tangible and intangible attributes, can have multiple SKUs (Stock Keeping Units), each representing a variant. For instance, a T-shirt is a product, and its variants like different sizes (medium-sized shirt, large-sized shirt, and so on) or colors (white color shirt, red color shirt, and so on) are individual SKUs.
Products and SKUs must be created or imported into the Master catalog and then they can be brought into a Sales catalog. All attributes, attribute groups, and variant groups should be created before creating your products and its SKUs. Products and their SKUs are defined using attributes within catalogs. Attributes are created at the collection level and apply to all catalogs in that collection.
Attribute values can be applied in the Master Catalog and overwritten at the Sales Catalog level. Each attribute has a locale-specific value, allowing a product to have different names in different locales (e.g., “Sandals” in English, United States (en_US) and “Slippers” in English, India (en_IN)).
Note: If a multi-locale app is installed in your store, product descriptions for a locale are automatically translated to other locales upon saving.
Accessing product or SKU tabs
To access product or SKU tabs,
- In the Catalogs tab, click the master catalog row.
 The Catalog Overview tab displays the master catalog landing page with the master catalog details. In the Master Catalog landing page, click on the following tabs in the left panel:
- Catalog Overview – To view the overview of the master catalog.
- Products – To create a new product or update the existing product along with the required product details, such as product ID, name of the product, assets of the product, SEO details of the product, attributes of the product, SKUs that are associated with the product, up-sell and/or cross-sell product relations.
- SKUs – To create a new SKU or update the existing SKU along with the required SKU details, such as SKU ID, name of the SKU, assets of the SKU, attributes of the SKU, and products that are associated with the SKU.
- Import – To bulk import the products, SKUs, and/or attributes into the catalog. For more information, refer to the Section Importing Products, SKUs, and Attributes into the Master Catalog and Importing Products, SKUs, and Attributes into the Sales Catalog.
Creating and Managing Product Data
Understanding Product Types
Infosys Equinox Commerce Catalogs can contain the following Product Types:
- Product – an item evaluated by a consumer or buyer (for example, a men’s casual shirt whose stock includes multiple colors and sizes).
- Stock Keeping Unit (SKU) – a sellable version of the product (for example, a men’s casual shirt in blue, size small).
- Bundle – a group of products grouped together by a Merchandiser that must be sold together (for example, a men’s casual shirt, combo jeans pant, full sleeves shirts, half sleeves shirts, and multi slim fit t-shirts that can only be added to the cart as a group).
- Fixed Bundle – a bundle for which the price remains static.
- SKU Kits – a bundle with specific SKUs rather than products.
- Collection – a group of items grouped by a Merchandiser that are presented collectively but are sold individually (for example, men’s accessories collection that includes Jackets, watches, overcoat, and hand gloves that are presented as a collection but can be purchased as a set or as individual products).
Product Relationships
- Group: When the products are part of the same group they can be listed separately both in the Product List Page (PLP) and the Product Detail Page (PDP) but they are linked together so each PDP can show the other products in the group as available choices.
- Collection: When the products are part of a collection, they appear together as a collection on the PLP. The PDP is a special page that shows the collection and the individual products with the ability to add each product to the cart separately.
- Bundle: When the products are part of a bundle, the related products appear together on the PLP, and the entire bundle can be added to the cart from the PDP.
- Relations: Allows attribute association with any products.
- Up-Sell: Prompts consumers to buy a more expensive version of the selected product (e.g., upgrading from 12 to 24 roses).
- Cross-Sell: Suggests a complementary product to the selected item (e.g., a matching belt for black dress shoes).
For managing products and SKUs, see the video below or the step-by-step instructions:
Configuring and Searching for Products
Searching for products
To search for the products,
- In the Products tab, click the searchable fields in the header to open the search field. The searchable fields are Projects, Product Name, Product ID, Status, Row Select, and the products that are listed in the drop-down list.
Note:- For displaying and/or modifying the searchable fields, see Modifying Searchable Fields.
- For displaying a predefined number of products per screen, see Selecting Predefined Rows.
- By default, all the approved products are listed in the Products page. If the project is selected, you can view the products that are created or updated via a project by selecting the particular project in the Projects drop-down list.
- Enter the desired search criteria in the search field, and then click the Go button.
 The list of products matching the search criteria is displayed.
Modifying Searchable Fields
To modify the searchable fields,
- Click (vertical ellipse) available at the beginning of the search field.
- Select or deselect the products to add and/or remove the searchable fields from the header.
 The selected searchable fields appears in the header.
Selecting Predefined Rows
To select Predefined Rows, By default, 10 products per screen will appear, but the number of products per screen can be modified as follows:
- Click (vertical ellipse) available at the beginning of the search field and select Row Select.
 The Row Select appears as part of the search criteria.
 - Select 10 Rows, 25 Rows, or 50 Rows from the drop-down list.

Creating Products
To create a new product,
-
- In the All Catalogs page, click the master catalog row. The Catalog Overview tab displays the master catalog landing page with the master catalog details:
 The Master Catalog Landing page for the catalog contains the following tabs and a Projects drop-down list at the top right side of the page.
- Catalog Overview – To view the master catalog details, such as master catalog status, last updated details, and number of products and SKUs associated with the mater catalog.
- Products – To create a new product or update the existing product along with the required product details, such as product ID, name of the product, status of the product, type of the product, assets of the product, SEO details of the product, attributes of the product, SKUs that are associated with the product, up-sell and/or cross-sell product relations.
- SKUs – To create a new SKU or update the existing SKU along with the required SKU details, such as SKU ID, name of the SKU, assets of the SKU, attributes of the SKU, and products that are associated with the SKU.
- Reference Model – See Reference Model (Dynamic Tabs).
- Import – To bulk import the products, SKUs, and/or attributes into the catalog when the catalog type is “Default”. For more information, refer to the section Importing Products, SKUs, and Attributes into the Master Catalog and Importing Products, SKUs, and Attributes into the Sales Catalog.
Note: The Import tab is NOT available only if the catalog type is “Filter”, refer the Type field of Creating Catalog.
- Click the Products tab and click the Create Item button.

- The Select Project pop-up opens to associate the Product to a project. This is required to create a project and get it approved with the Catalog Manager.
Note: This page appears only if the project is not selected already.
- In the Select Project screen, select the required project.
Note: If the project is not available, then create a new project. You can also select the required project or create a new project before creating the product group. For more information, see “Creating a Project”.
- In the Select Project screen, select the required project.
- In the Add an Item page, enter/select the required information.
 The following table provides the field description for the
- In the All Catalogs page, click the master catalog row.
Add an Item
-
- screen:
| Field | Description |
| Type* | Select an item type:
|
| ID* | Enter a unique item identifier. Note: This field accepts alphanumeric and special characters (such as !@$&()-_:{}/.*=space). |
| Name* | Enter the name for the item. |
| Video URL | Select a relevant video of the product which is used to generate product description, additional attributes, and attribute values. Note: This field is shown only when the Product Description app is installed. |
| Iamge URL | Select a relevant image of the product which is used to generate product description, additional attributes, and attribute values. Note: This field is shown only when the Product Description app is installed. |
| Audio URL | Select a relevant audio of the product which is used to generate product description, additional attributes, and attribute values. Note: This field is shown only when the Product Description app is installed. |
| Pdf URL | Select a relevant PDF of the product which is used to generate product description, additional attributes, and attribute values. Note: This field is shown only when the Product Description app is installed. |
- Click any one of the following buttons:
- Add – adds the product. You can view the added product in the Products tab. Later, you can click on the product to add the product-related details.
- Add Details – to add the product. The Basic Information page appears and then you can add the product-related details.

Update the Existing Product
Products can be updated, edited, deleted, and/or sorted from the Master Catalog view and the Sales Catalog view. Note: Products in the Default type sales catalog can be updated, edited, deleted, and/or sorted. Whereas the products in the Filter type sales catalog cannot be updated, edited, deleted, or sorted. For detailed information, refer to the Type field of Creating Catalog. If it is “Filter” type sales catalog, you can only view the list of products that are reflected based on the catalog rule, refer to Importing into Sales Catalog. To update the existing product details,
- In the All Catalogs page, click the master catalog row. The Catalog Overview tab displays the Master catalog details.
- Click the Products tab and click on the required product.
 The product’s Overview page appears.
- In the product page that appears, the Catalog Manager can view the below tabs in the left panel:
Product Overview Tab
In the Product Overview tab, a Catalog Editor or Manager can view the complete information of the product, such as product name, product title, the image of the product, all attribute information, variant information, product detailed description, and attribute details, SKUs, etc. In the respective sections, click the View button to navigate to the respective pages and view the complete details.
This Product’s Overview tab is the landing page when you click on a particular product.
Note: You can click on the View link to navigate to the respective tabs.
Basic Information Tab
In the Basic Information tab, a Catalog Editor or Manager can view or update the basic information of the product, such as name, identifier, status, timestamp, and the visible status of the product. To update the product’s basic details (via the project approval workflow),
- In the All Catalogs page, click the master catalog row. The Catalog Overview screen appears with the master catalog details.
- Click the Products tab and click on the required product.
 The product’s Overview page appears.
 - Click the Basic Information tab.

- In the Basic Information screen, click the Edit icon.
- The Select Project pop-up opens to associate the product to a project. This is required to create a product and get it approved with the Catalog Manager.
Note: This page appears only if the project is not selected already.
- In the Select Project screen, select the required project.
Note: If the project is not available, then create a new project. You can also select the required project or create a new project before creating the product group. For more information, see “Creating a Project”. For more information on project approval workflow, see Managing Project Approval Workflow.
- In the Select Project screen, select the required project.
- Update the product information.
 The following table provides the screen description for the Basic Information screen:
Note: The Product ID and Type fields cannot be edited once the product is added.Field Description Product Name* Enter the product name. Status* Select the status as Active or Inactive. By default, Active is selected. Start Date* Select a start date of the product. If required, you can also specify the timestamp. End Date* Select an end date of the product, which defines the expiry of the catalog. If required, you can also specify the timestamp. Note: After the expiry date, the catalog turns inactive. Is Visible* This option allows you to temporarily disable the product so that it does not appear on the storefront. Select: - Yes to make the product visible in the storefront.
- No to make the product invisible in the storefront.
Group ID Add a Group ID to group products. Default Category ID Add the default category ID. For more information on Category, refer to Managing Categories section of Merchandising service. - Click the Save button. The changes are updated to the product’s Basic Information tab.
Note: To discard the changes, click the Cancel button.
Assets Tab
Assets for products and their stock keeping units (SKUs) are stored on the Digital Asset Management (DAM) system and called by the Catalog service via dynamic attributes based on the image file names. In the Assets tab, a Catalog Editor or Manager can manage the assets of the product by:
- viewing the image, text, and link of the primary, alternate, and/or swatch images
- approving or rejecting the AI-generated images
Image Name Nomenclature Infosys Equinox has configured your Catalog settings to include the folder path where your product and SKU images are stored on your DAM (“Cloud folder”). Your image file names should be constructed as follows:
- The file name for product images should be constructed with plus “_main.png” or “_alt.png” (for example, 110001_main.png and 110001_alt.png for Product ID 110001)
- Product and SKU property values can be included as part of URL generation (e.g. <imagefolder>+<itemId>+<attribute1>+_Main.jpg).
The Catalog service will use dynamic attributes to generate the appropriate image URL for your products and SKUs. Asset Generation Process
- Client names the primary and alternate images for products and SKUs according to the Image Name Nomenclature above.
- Client defines primary and alternate images for products and SKUs in the collection properties (for example, https://<cloud_domain>.cloudfront.net). For detailed information on collection properties, refer to Collection Properties document available in the Developer Portal.
- Client creates a dynamic attribute for the Store Catalog called primaryimage and configures the conditional format for the attribute as <imagefolder>+<productId>+.png.
- Client creates a dynamic attribute for the Store Catalog called altimage and configures the conditional format as <imagefolder>+<productId>+.png.
- Product
- Set the value of the primaryimage attribute for the product to its Product ID (for example, 110001).
- Set the value of the altimage attribute for the product to its Product ID (for example, 110001)
- When the products and SKUs load, the Catalog microservice will execute the dynamic attribute formula and generate an image URL that includes the Cloud folder path, product or SKU ID, and the string “_main.png” or “_alt.png”:
- Product Image URL example – https://d167y3o4ydtmfg.cloudfront.net/2/110001_main.png
- SKU Image URL example – https://d167y3o4ydtmfg.cloudfront.net/2/110001110_alt.png
Viewing the Images of a Product
To view the primary, alternate, and/or swatch images (via the project approval workflow) of a product,
- In the All Catalogs page, click the master catalog row. The Catalog Overview screen appears.
- Click the Products tab and click on the required product. The product’s Overview page appears.
- Click the Assets tab. The Asset details are displayed under Primary images, Alt images, and Swatch images. Note: By default, the primary, alternate, and/or swatch images (attributes) that are defined by the Business Administrator in the collection properties appear for a Product in this Assets tab. Refer to the Collection Properties document available in the Developer Portal.

SEO Tab
In the SEO tab, a Catalog Editor or Manager can view or add semantic IDs, keywords, and description of the product.
- In the All Catalogs page, click the master catalog row. The Catalog Overview screen appears with the master catalog details.
- Click the Products tab and click on the required product. The product’s Overview page appears.
- Click the SEO tab and click on the Edit icon.
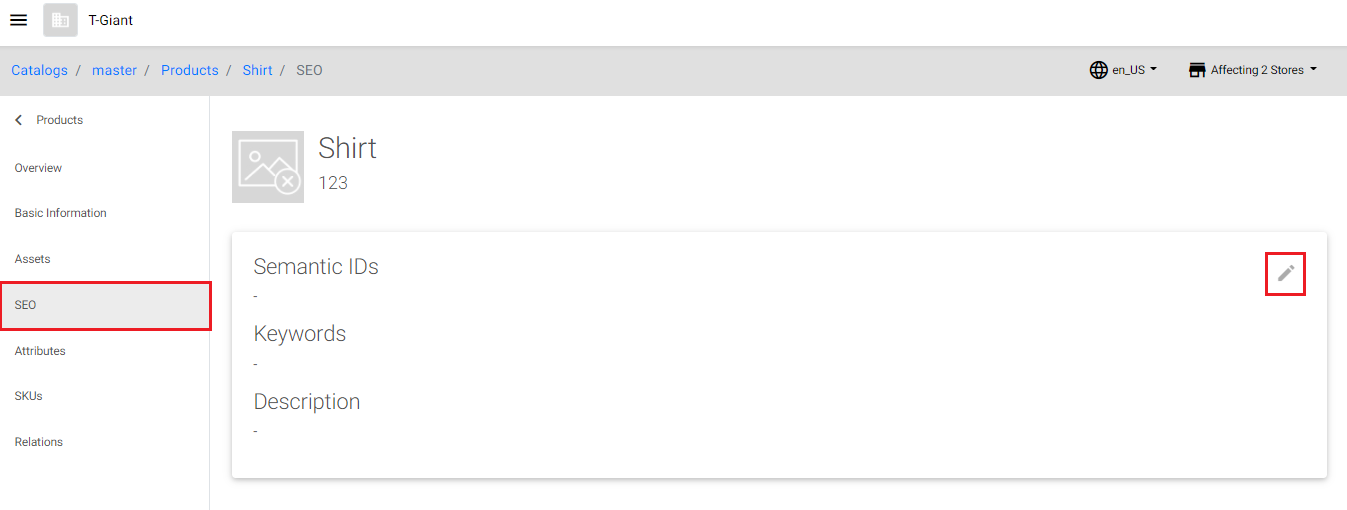
- The Select Project pop-up opens to associate the product to a project. This is required to create a product and get it approved with the Catalog Manager.
Note: This page appears only if the project is not selected already.
- In the Select Project screen, select the required project.
Note: If the project is not available, then create a new project. You can also select the required project or create a new project before creating the product group. For more information, see “Creating a Project”. For more information on project approval workflow, see Managing Project Approval Workflow.
- In the Select Project screen, select the required project.
- Click the Add Semantic ID, Add Keyword, and/or Description fields and enter the SEO details.
Note: To remove the added Semantic IDs and keywords, click icon.
icon. 
- Click the Save button. The changes are updated to the product.
Note: To ignore the changes, click the Cancel button.
Attributes Tab
Product attributes contain information about the different characteristics which describes the product (for example, size, color, style, collection, season etc.). In the Attributes tab, you can,
- Adding Attributes to a product
- Deleting Attributes from a product
- Adding the deleted attributes back to a product
Adding Attributes to a product
You can add individual, grouped, or multiple attributes as an attribute to Products. To add attributes to a products,
- In the All Catalogs page, click the master catalog row. The Catalog Overview screen appears.
- Click the Products tab and click on the required product. The product’s Overview page appears.
- Click the Attributes tab and click on the Add New Attributes field or the Edit icon.

- The Select Project pop-up opens to associate the product to a project. This is required to create a product and get it approved with the Catalog Manager.
Note: This page appears only if the project is not selected already.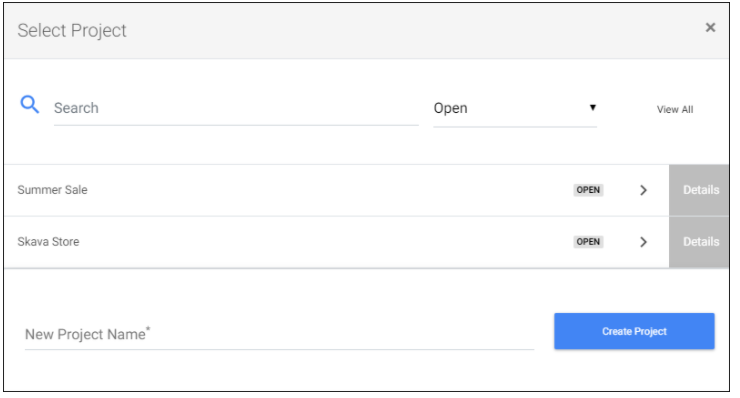
- In the Select Project screen, select the required project.
Note: This page appears only if the project is not selected already. If the project is not available, then create a new project. You can also select the required project or create a new project before creating the product group. For more information, see “Creating a Project”. For more information on project approval workflow, see Managing Project Approval Workflow.
- In the Select Project screen, select the required project.
- In the Add Attributes drop-down list, select the checkbox next to the required attributes to associate attribute(s) to the product.
 Note: This Add Attributes drop-down lists all attribute(s) that are created in the Create Attribute page of Attributes section and Add Attribute page of Data Model section. For detailed information see “Creating an Attribute” and “Creating a Model“. You can also enter the required attributes in the Search Attributes field and directly search the required attribute.
 - Define the attribute values and click Save.
Note: The selected attributes appear in three different scenarios, they are Individual/Ungrouped attributes, Grouped Attributes, and Model Attributes.- Scenario 1 – Individual/Ungrouped Attributes: Individual attributes are listed under the Ungrouped Attributes category.

- Scenario 2 – Grouped Attributes:
- Single Attribute Group: Attributes that are grouped to a single attribute group are listed with the respective “Attribute Group Name“. For detailed information on creating grouped attributes, refer to Creating an Attribute Group.

- Multiple Attribute Group: Attributes that are grouped to more than one attribute group are listed under the “Attributes into Multiple Group“ category.
 Note: For information on creating grouped attributes, refer to Creating Attribute and Variant Groups.
- Single Attribute Group: Attributes that are grouped to a single attribute group are listed with the respective “Attribute Group Name“. For detailed information on creating grouped attributes, refer to Creating an Attribute Group.
- Scenario 3 – Model Attributes: Reference model or Template model
- When the Reference model has been selected as attributes, the attribute values are derived from the model attribute.

- More than one model can be nested via the attributes. The multiple nested models are shown in the following screen:

- When Template model has been selected as attributes, the attribute values are added while associating with the SKU.
 Note: You can add the same template attributes again to the product by clicking the Add Template button.
- When the Reference model has been selected as attributes, the attribute values are derived from the model attribute.
- Scenario 1 – Individual/Ungrouped Attributes: Individual attributes are listed under the Ungrouped Attributes category.
- Click the Save button. The changes are updated to the product.
Deleting Attributes from a Product
This section describes delete an attribute from the product and add the deleted attribute back to the product. To delete the individual and/or grouped attributes,
- Click the Edit icon on the required attribute group.
- Select the Delete option against the required attribute and click the Save button.

The deleted attribute is displayed as follows,

Adding the deleted attributes back to a product
To add the deleted attributes back to the product,
- In the individual and/or grouped attributes section, click the Edit icon.

- Deselect the Delete option against the required attribute and click the Save button.

The attribute is added back to the product.
SKUs Tab
In the SKUs tab, a Catalog Editor or Manager can associate previously approved Products and/or SKUs to the Product. Associating products and/or SKUs to a Product To associate the Product and/or SKUs in the SKUs tab,
- In the All Catalogs page, click the master catalog row. The Catalog Overview screen appears.
- Click the Products tab and click on the required product. The product’s Overview page appears.
- Click the SKUs tab and select the required SKU.

- In the SKUs page, click the Add icon to associate previously approved SKUs to the new Product.

Note: If SKUs are still in the workflow approval process, they will only be available for product association after they are approved. The addition of SKUs to a product can be done later. - The following options allow you to find appropriate SKU(s):
- Search the SKU(s) by providing the Item ID and Name of the SKU in the search field.
- Enable the toggle key to see the SKU(s), which exist in the current project.
 The following table provides the fields description of the selecting items screen to associate with the product:
Field Description Search by Item ID or Item Name To search the required item(s), enter an item ID and/or item name and click the search icon. In the search result, you can select the required item(s). Note: You can search multiple Product and/or SKU IDs separated by comma. Ensure that you provide only valid item IDs as values. 
Search using filter To filter and search based on the attribute name and/or attribute value, - Click
 icon. The following attribute model is expanded:
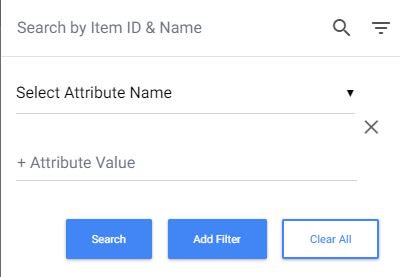
- Select the attribute name from the drop-down list.
- Enter the attribute value, if required.
- Click the Search button. The matching attribute(s) will be displayed.
- To clear the filter, click the Clear All button.
- To remove the additional filters, click
 icon.
icon. - To add more filters and search, click the Add Filter button:

Search by Project Toggle towards: - All Approved – to list all the approved products. By default, this is selected.

- Current Project – to list all the products that are yet to be submitted and approved:

Select All Click the Select All option to select all the items listed in the search result section.  Click the Deselect all option to deselect all the selected items.
  Note: To select few more products and/or SKUs from the list, scroll down and then click on Select All option.
 - Click
- The item is added to the respective attribute(s).
Note: To dissociate a particular item from the attribute(s), click the Delete icon against a particular item. - Click the Save button. The changes are updated to the product.
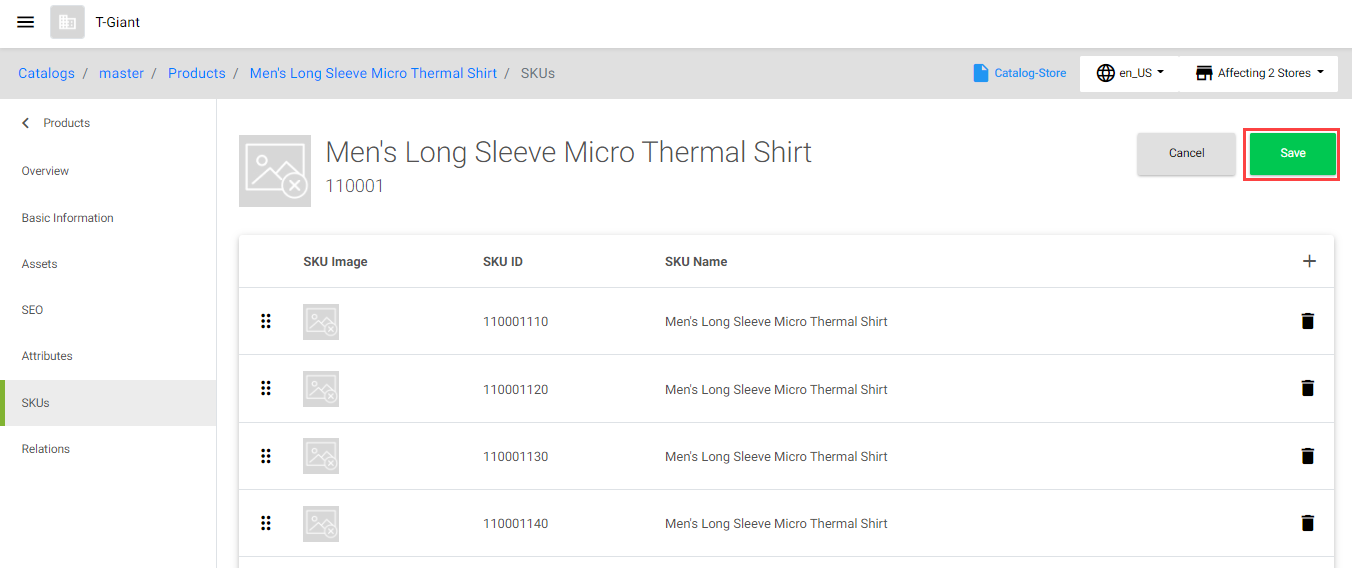
Relations Tab
In the Relations tab, a Catalog Editor or Manager can add relations/attributes (which means add attributes to the product) and associate previously approved products to Up-Sell, Cross-Sell, and/or relations (attributes).
In the Add Relations section, a Catalog Editor or Manager can add (relations) only the attributes with attribute level as “Product” and/or “Product/SKU”. For detailed information about the attribute level, refer to Creating Attributes. Within the added relations (attribute) section, you can,
-
- Associate a set of products and/or SKUs to the product within the relations (attributes). This association is based on the field type (model) of the attribute which is defined during attribute creation, refer to Creating Attributes.
- If the model type is “Product”, select the required product items from the default project or current project.
- If the model type is “SKU”, select the required SKU items from the default project or current project.
- Rearrange the sequence of added products or SKUs within the relations (attributes).
- Delete the associated products/SKUs from the relations.
- Delete the relations (attributes) via project approval workflow.
- Associate a set of products and/or SKUs to the product within the relations (attributes). This association is based on the field type (model) of the attribute which is defined during attribute creation, refer to Creating Attributes.
In the Up-Sell and Cross-Sell sections, a Catalog Editor or Manager can associate previously approved Products for Up-Sell and/or Cross-Sell.
-
- The Up-Sell tab allows you to define the related up-selling products for a product.
- The Cross-Sell tab allows you to define the additional cross-selling products for a product.
Adding Relations (Attributes) to a Product
To add relations (attributes) to a product,
- In the All Catalogs page, click the master catalog row. The Catalog Overview screen appears.
- Click the Products tab and click on the required product. The product’s Overview page appears.
- Click the Relations tab and click the Add Relations drop-down list to associate attribute(s) to the product.
 Note: This drop-down lists all attribute(s) categorized with attribute level “Product/SKU” and “Product” that are created in the Create Attribute page of Attributes section and Add Attribute page of Data Model section. For example, “Associated Products” and “SKUID_Associations” shown in the screen are the defined attributes. For detailed information see “Creating Attributes” and “Create Model“.
The associated relations (attribute(s)) appears after the Cross-Sell section as shown below:
Note: Once an attribute is added from the Add Relations drop-down list, the attribute does not appear in the list until that attribute section is deleted and saved.
- Click the Save button. The attributes are associated to the product.
Associating Up-Sell, Cross-Sell, and/or Relations (attributes)
Up-Sell products are the products similar to the product being viewed, but are of a higher range. Cross-Sell products are products that are related to the product being viewed, such as product accessories. Example 1: let us consider the user is viewing a mobile phone of 100$ and RAM capacity as 4 GB.
- In the Up-Sell list, products with cost and/or configuration higher than the phone that is being viewed will be listed. That is products similar to the phone but costlier than 100$ and a better RAM capacity will be displayed.
- In the Cross-Sell list, products that are related to the phone, such as mobile accessories will be displayed. That is accessories such as headset, mobile pouch, screen protector, etc., will be displayed.
Example 2: let us consider the user is viewing a T-shirts of 100$ and color as Red.
- In the Up-Sell list, products with cost and/or brand higher than the T-shirt that is being viewed will be listed. That is products similar to the T-shirt but costlier than 500$, and color “Red” will be displayed.
- In the Cross-Sell list, products that are related to the T-shirt, such as colors will be displayed. That is colors such as Red, Black, Blue, etc., will be displayed.
To associate Up-Sell, Cross-Sell, and/or Relations (attributes),
- In the Relations page, click the Add icon against the Up-Sell, Cross-Sell sections, and/or Relations (attributes).
 The list of approved products appear on the right side of the screen as shown below:
- Select the items to associate them with the relations (attributes), up-sell, and/or cross-sell. The following table provides the field description of the selecting items screen:
The item is added to the respective attribute(s), Up-Sell, or Cross-Sell section.Field Description Search by Item ID or Item Name To search the required item(s), enter an item ID and/or item name and click the search icon. In the search result, you can select the required item(s). Ensure that you provide only valid item IDs as values. Ensure that you provide only valid item IDs as values.
Note: You can search multiple Product and/or SKU IDs separated by comma.Search using filter To filter and search based on the attribute name and/or attribute value, - Click icon. The following attribute model is expanded:
- Select the attribute name from the drop-down list.
- Enter the attribute value, if required.
- Click the Search button. The matching attribute(s) will be displayed.
Note:- To clear the filter, click the Clear All button.
- To remove the additional filters, click icon.
- To add more filters and search, click the Add Filter button:
Search by Project Toggle towards: - All Approved – to list all the approved products. By default, this is selected.
- Current Project – to list all the products that are yet to be submitted and approved:
Select All Click the Select All option to select all the items listed in the search result section.
Click the Deselect all option to deselect all the selected items.
Note: To select few more products and/or SKUs from the list, scroll down and then click on Select All option.
Note: To dissociate a particular item from the attribute(s), Up-Sell, or Cross-Sell section, in the Relations page, click the Delete icon against a particular item. - Click
- In the Relations page, click the Save button. The items are added to the relations.

Note: Once the product is created, the Catalog manager can review and Submit the Project for approval. See Projects and Approvals above for details about working with Projects.
Rearranging sequence of items in the Relations (Attributes)
To rearrange sequence of items in the relations (attributes) section,
- In the Relations page, under the Up-Sell, Cross-Sell, and/or relations (Attributes) sections, hover the mouse on the
 icon.
icon. 
- Drag and drop the item in the required place. The item is re-arranged as required
- Click the Save button. The rearrangement of items are updated.
Deleting an item from Relations (Attributes) section of Product
This section describes deleting a particular item from the attribute section and deleting the attribute section itself. To delete an item from the relations (attributes) section,
- In the Relations (Attribute(s)) section, click on the Delete icon against a particular item.

- Click the Save button. The item is deleted from the attribute. To delete an attribute from the product, refer to Deleting Attributes from the Product.
Deleting the Relations (Attributes) section from a Product
To delete an attribute section,
- In the Relations (Attributes) section, select the delete option.
Note: You cannot perform any operations if the section is marked for deletion.
- Click the Save button. The attribute section is deleted. Note:
- The attribute section that is marked for deletion is removed only after the approval. The deleted attribute is available for selection in the Add Relations drop-down list in the Relations page. However, the attribute section is deleted immediately without approval when there are no items available in it.
- Other Products and SKUs will not be able to see the newly created Products until they have been approved.
- Once the product is created, the Catalog manager can review and Submit the Project for approval, refer to Projects and Approvals. Other Products and SKUs will not be able to see the newly created Products until they have been approved.
Export Product(s)
You can export ONLY the data related to the product(s) that are filtered in the catalog admin screen. When a product is exported, all related entities, such as products and SKUs that are belonging to this product are also exported. To export product(s),
- In the All Catalogs page, click the master catalog row. The Catalog Overview tab displays the Master catalog details.
- Click the Products tab and click on the Export button.
 The product(s) details are downloaded to your local computer in the .xlsx file format.
Creating and Managing SKUs
In the SKUs tab, you can view all the SKUs, create a new SKU, update the existing SKUs, and/or export all the SKUs to your local computer. For example, a casual shirt with a model number of 45790 and a size of 32″, may have a SKU of 45790-32.
Configuring and Searching for SKUs
Searching for SKUs
To search for the SKUs,
- In the SKUs tab, click the searchable fields in the header to open the search field. The searchable fields are Projects, SKU Name, SKU ID, Status, Row Select, and the SKUs that are listed in the drop-down list.
Note:- For displaying and/or modifying the searchable fields, see Modifying Searchable Fields.
- For displaying a predefined number of SKU(s) per screen, see Selecting Predefined Rows.
- By default, all the approved SKUs are listed in the SKUs page. If the project is selected, you can view the SKUs that are created or updated via a project by selecting the particular project in the Projects drop-down list.
- Enter the desired search criteria in the search field, and then click the Go button.
 The list of SKUs matching the search criteria is displayed.
Modifying Searchable Fields
To modify the searchable fields,
- Click (vertical ellipse) available at the beginning of the search field.
- Select or deselect the products to add and/or remove the searchable fields from the header.
 The selected searchable fields appear in the header.
Selecting Predefined Rows
To select Predefined Rows, By default, 10 SKUs per screen will appear, but the number of SKUs per screen can be modified as follows:
- Click (vertical ellipse) available at the beginning of the search field and select Row Select. The Row Select appears as part of the search criteria.
- Select 10 Rows, 25 Rows, or 50 Rows from the drop-down list.

Creating a New SKU
To create a new SKU,
- In the All Catalogs page, click the master catalog row. The Catalog Overview page appears. The Master Catalog Landing page for the catalog contains the following tabs and a Projects drop-down option at the top right side of the page.
-
- Catalog Overview – To view the master catalog details.
- Products – To create a new product or update the existing product along with the required product details, such as product ID, name of the product, assets of the product, SEO details of the product, attributes of the product, SKUs that are associated with the product, up-sell and/or cross-sell product relations.
- SKUs – To create a new SKU or update the existing SKU along with the required SKU details, such as SKU ID, name of the SKU, assets of the SKU, attributes of the SKU, and products that are associated with the SKU.
- Reference Model – See Reference Model (Dynamic Tabs).
- Import – To bulk import the products, SKUs, and/or attributes into the catalog when the catalog type is “Default”. For more information, refer to the section Importing Products, SKUs, and Attributes.
Note: The Import tab is NOT available only if the catalog type is “Filter”, refer the Type field of Creating Catalog.
- Click the SKUs tab.

- The Select Project pop-up opens to associate the SKU to a project. This is required to create a SKU and get it approved with the Catalog Manager.
Note: This page appears only if the project is not selected already.
- In the Select Project screen, select the required project.
Note: If the project is not available, then create a new project. You can also select the required project or create a new project before creating the product group. For more information, see “Creating a Project”.
- In the Select Project screen, select the required project.
- In the SKUs tab, click the Create Item button.

- In the Add Item page, enter/select the required information.
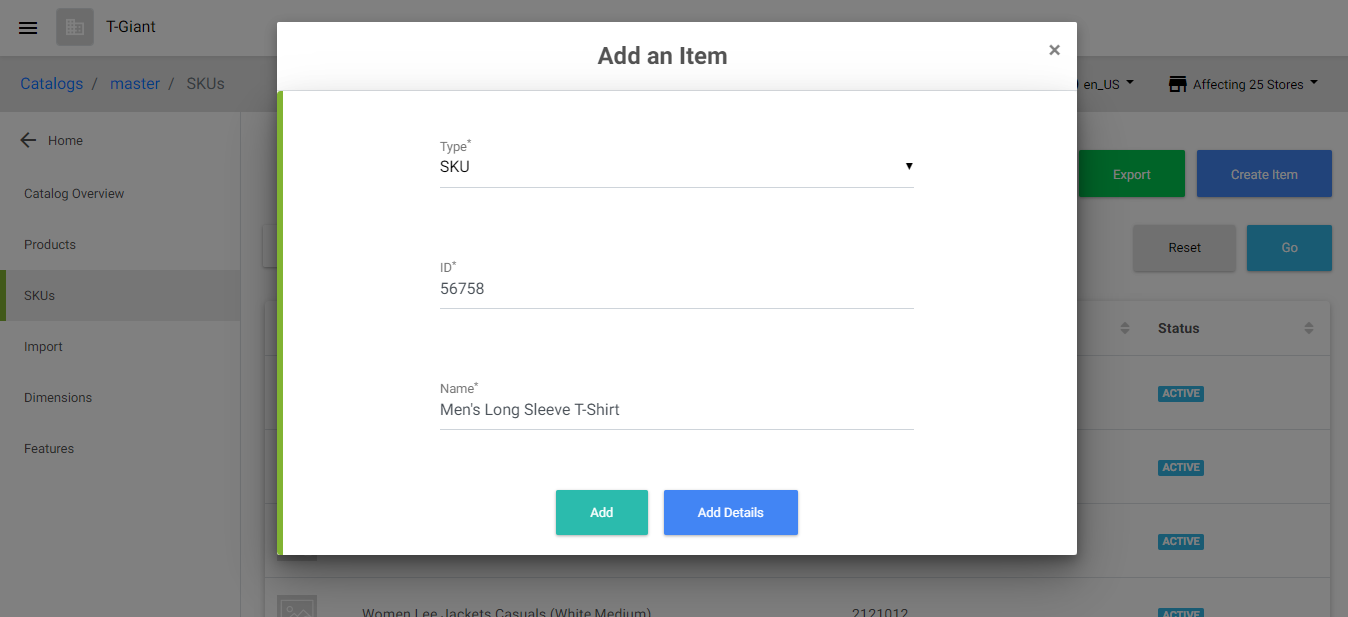 The following table describes the fields in the Add an Item pop-up screen:
Click any one of the following buttons:Field Description Type* Select any one of the following item types: - SKU (default)
- Product
- Bundle
- Fixed Bundle
- SKU Kit
- Collection
ID* Enter a unique SKU identifier. Note: This field accepts alphanumeric and special characters (such as !@$&()-_:{}/.*=space). Name* Enter a name for the SKU. - Add – adds the SKU. You can view the added SKU in the SKUs tab. Later, you can click on the SKU to add the SKU-related details.
- Add Details – to add the SKU, and then to add the SKU-related details.
- Click the Save button. The SKU is created.
Update the Existing SKU
SKUs can be updated, edited, deleted, and/or sorted from the Master Catalog view and the Sales Catalog view. Note: SKUs in the Default type sales catalog can be updated, edited, deleted, and/or sorted. Whereas the SKUs in the Filter type sales catalog cannot be updated, edited, deleted, or sorted. For detailed information, refer to the Type field of Creating Catalog. If it is “Filter” type sales catalog, you can only view the list of SKUs that are reflected based on the catalog rule, refer to Importing into a Sales Catalog. To update the existing SKU details,
- In the SKUs tab, click on the required SKU.
 Note: You can search for the required SKU directly in the search category. Alternatively, you can click on the project and select the specific project to which the required SKU is associated.
 - Click on these tabs available in the left panel:
SKUs Overview Tab
In the Overview tab, a Catalog Editor or Manager can view the complete overview of the SKU, such as SKU ID, associated assets, attribute information, variant details, a detailed product description, and attribute specifics. To navigate, view, and edit the necessary details, click the View button in the corresponding sections. This Overview tab is the landing page when you click on a particular SKU:  Note: To navigate to the respective tabs, click the View link.
Basic Information Tab
In the Basic Information tab, a Catalog Editor or Manager has the ability to view or modify the SKU’s basic information, such as name, identifier, status, timestamp, and visibility status of the SKU. To update the product’s basic details (via the project approval workflow),
- In the All Catalogs page, click the master catalog row. The Catalog Overview screen appears.
- Click the SKUs tab and click on the required SKU. The SKUs Overview page appears.
- Click the Basic Information tab, and click the Edit icon.

- The Select Project pop-up opens to associate the product to a project. This is required to create a product and get it approved with the Catalog Manager.
Note: This page appears only if the project is not selected already.
- In the Select Project screen, select the required project.
Note: If the project is not available, then create a new project. You can also select the required project or create a new project before creating the product group. For more information, see “Creating a Project”. For more information on project approval workflow, see Managing Project Approval Workflow.
- In the Select Project screen, select the required project.
- Update the SKU information.
 The following table describes the fields in the SKUs Basic Information screen:
Note: The SKU ID and Type fields cannot be edited once the SKU is added.Field Description SKU Name* Update the SKU name. Status* Select the status as Active (default) or Inactive. Start Date* Select a start date of the SKU. If required, you can also specify the timestamp. End Date* Select an end date of the SKU, which defines the expiry of the SKU. If required, you can also specify the timestamp. Is Visible This option allows you to temporarily disable the SKU so that it does not appear on the storefront. Select: - Yes to make the SKU visible in the storefront.
- No to make the SKU invisible in the storefront.
UPC ID Add a Universal Product Code (UPC) ID. Subscription Enable this option if this SKU is viable for the users to order it one time and deliver it frequently or at regular intervals of time. Toggle subscription to: - Off, which disables subscription for the SKU.
- On, which enables subscription for the SKU.
- Interval Type: Select the interval type from the drop-down list. The possible interval types are Days, Weeks, Months, or Years.
- Interval to Process Forth Coming Order: Specify the interval to process based on the interval type selected.
- Interval To Process First Order: Specify the interval to process the first order.
- Interval To Notify User: Specify the interval to notify the user.
- Monthly Frequency Minimum Value: Specify the minimum value for monthly frequency of subscription.
- Monthly Frequency Maximum Value: Specify the maximum value for monthly frequency of subscription.
Pre-order Enable this option if this SKU is viable for the users to place an order before it is available for purchase. Toggle Pre-order to: - Off, which disables pre-order for the SKU.
- On, which enables pre-order for the SKU.
- Click the Save button. The changes are updated to the SKU’s Basic Information tab. Note: To ignore the changes, click the Cancel button.
Assets Tab
Assets for products and their Stock Keeping Units (SKUs) are stored in your Digital Asset Management (DAM) system. The Catalog service retrieves these assets using dynamic attributes based on your image file names. In the Assets tab, a Catalog Editor or Manager can view the image, text, and link of the primary, alternate and/or swatch images of the SKU. Image Name Nomenclature Infosys Equinox has configured your Catalog settings to include the folder path where your product and SKU images are stored on your DAM (referred to as “Cloud folder”). Your image file names should be constructed as follows:
- The file name for SKU images should be constructed with “_main.png” or “_alt.png” (for example, 110001110_main.png and 110001110_alt.png for SKU ID 110001110)
- Product and SKU property values can be included as part of URL generation (e.g. <imagefolder>+<itemId>+<attribute1>+_Main.jpg).
The Catalog service will use dynamic attributes to generate the appropriate image URL for your products and SKUs. Asset Generation Process
- The client names the primary and alternate images for products and SKUs according to the Image Name Nomenclature above.
- The client defines primary and alternate images for products and SKUs in the collection properties (for example, https://<cloud_domain>.cloudfront.net). For detailed information on collection properties, refer to the Collection Properties document available in the Developer Portal.
- The client creates a dynamic attribute for the Store Catalog called primaryimage and configures the conditional format for the attribute as <imagefolder>+<productId>+.png.
- The client creates a dynamic attribute for the Store Catalog called altimage and configures the conditional format as <imagefolder>+<productId>+.png.
- SKU
- Set the value of the primaryimage attribute for the SKU to its SKU ID (for example, 110001110)
- Set the value of the altimage attribute for the SKU to its SKU ID (for example, 110001110)
- When the products and SKUs load, the Catalog microservice will execute the dynamic attribute formula and generate an image URL that includes the Cloud folder path, product or SKU ID, and the string “_main.png” or “_alt.png”:
- Product Image URL example – https://d167y3o4ydtmfg.cloudfront.net/2/110001_main.png
- SKU Image URL example – https://d167y3o4ydtmfg.cloudfront.net/2/110001110_alt.png
To update the primary, alternate, and/or swatch images (via the project approval workflow) of the SKU,
- In the All Catalogs page, click the master catalog row. The Catalog Overview screen appears.
- Click the SKUs tab and click on the required SKU. The SKUs Overview page appears.

- Click the Assets tab. The Asset details are displayed under Primary images, Alt images, and Swatch images.
Note: By default, the primary, alternate, and/or swatch image attributes that are defined by the Business Administrator in the collection properties appear for a SKU in this Assets tab. Refer to the Collection Properties document available in the Developer Portal.
- The Select Project pop-up opens to associate the product with a project. This is required to create a product and get it approved by the Catalog Manager.
Note: This page appears only if the project is not selected already.
- In the Select Project screen, select the required project.
Note: If the project is not available, then create a new project. You can also select the required project or create a new project before creating the product group. For more information, see “Creating a Project”. For more information on project approval workflow, see Managing Project Approval Workflow.
- In the Select Project screen, select the required project.
- In the Assets tab, click the Edit icon and update the primary, alternate, and/or swatch images.
- In the Assets page, update the primary, alternate, and/or swatch images.
- Click the Save button. The changes are updated to the SKUs. Note: To ignore the changes, click the Cancel button.
Attributes Tab
SKU attributes contain information about the different characteristics that describes the SKU. For example, Name, Description, Material Type, Color, Size, etc. In the Attributes tab, you can,
- Adding Attributes to a SKU
- Deleting Attributes from a SKU
- Adding the deleted attributes back to the SKU
Adding Attributes to a SKU
You can add individual/ungrouped, grouped, or multiple attributes as an attribute to SKU. The add attributes to a SKU,
- In the All Catalogs page, click the master catalog row.
- The Catalog Overview screen appears.
- Click the SKUs tab and click on the required SKU. The SKUs Overview page appears.
- Click the Attributes tab and click on the Add New Attributes field or the Edit icon.

- Click the Add Attributes field and select the checkbox next to the required attributes.
 Note: This Add Attributes drop-down lists all attribute(s) that are created in the Create Attribute page of the Attributes section and the Add Attribute page of the Data Model section. For detailed information, see “Creating an Attribute” and “Creating a Model“. You can also enter the required attributes in the Search Attributes field and directly search for the required attribute.
 - Define the attribute values and click Save. Note: The selected attributes are categorized in their different scenarios, they are Individual/Un grouped attributes, Grouped Attributes, and Model Attributes.
- Scenario 1 – Individual/Ungrouped Attributes: Individual attributes are listed under the Ungrouped Attributes category.

- Scenario 2 – Grouped Attributes:
- Single Attribute Group: Attributes that are grouped into a single attribute group are listed with respective the “Attribute Group Name“. For detailed information on creating grouped attributes, refer to Creating an Attribute Group.

- Multiple Attribute Group: Attributes that are grouped into more than one attribute group are listed under the “Attributes into Multiple Group” category.
Note: For information on creating grouped attributes, refer to Creating Attribute and Variant Groups.
- Single Attribute Group: Attributes that are grouped into a single attribute group are listed with respective the “Attribute Group Name“. For detailed information on creating grouped attributes, refer to Creating an Attribute Group.
- Scenario 3 – Model Attributes: Reference model or Template model
- When the Reference model has been selected as attributes, the attribute values are derived from the model attribute.
- More than one model can be nested via the attributes. The multiple nested models are shown in the following screen:
- When the Template model has been selected as attributes, the attribute values are added while associating with the SKU.
Note: You can add the same template attributes again to the product by clicking the Add Template button.
- When the Reference model has been selected as attributes, the attribute values are derived from the model attribute.
- Scenario 1 – Individual/Ungrouped Attributes: Individual attributes are listed under the Ungrouped Attributes category.
- Click the Save button. The relations are added to the SKU.
Deleting Attributes from a SKU
This section describes deleting an attribute from the SKU and adding the deleted attribute back to the SKU. To delete the individual/ungrouped and/or grouped attributes from a SKU,
- Click the Edit icon on the required attribute group.
- Click the Delete option against the required attribute.
- Click the Save button. The deleted attribute is displayed as follows,
Adding the deleted attributes back to the SKU
To add the deleted attributes back to the SKU,
- In the individual and/or grouped attributes section, click the Edit link.


- Deselect the Delete option against the required attribute.
- Click the Save button. The attribute is added back to the SKU.
Products Tab
In the Products tab, a Catalog Editor or Manager can associate previously approved Products and/or SKUs to the SKU. Associating Products and/or SKUs to SKU To associate the Product and/or SKUs in the Products tab,
- In the All Catalogs page, click the master catalog row.
- The Catalog Overview screen appears.
- Click the SKUs tab and click on the required SKU. The SKUs Overview page appears.
- Click the Products tab in the left panel. The product details associated with the SKU are displayed.

Relations Tab
In the Relations section, a Catalog Editor or Manager can add relations (attributes) to the SKU. You can add only the attributes with attribute level as “SKU” and/or “Product/SKU”. For detailed information about the attribute level, refer to Creating Attributes. Within the added relation (attribute) section, you can,
- Associate a set of products and/or SKUs to the SKU within the relations (attributes). This association is based on the model field type of the attribute which is defined during attribute creation, refer to Creating Attributes.
- If the model type is “Product”, select the required product items from the default project or current project.
- If the model type is “SKU”, select the required SKU items from the default project or current project.
- Rearrange the sequence of added products or SKUs within the relations (attributes).
- Delete the associated products/SKUs from the relations.
- Delete the relations (attributes) via project approval workflow.
Adding Relations (Attributes) to SKU
To add Relations (Attributes) to SKU,
- Go to the SKUs’ Relations page and click the Add Relations drop-down list.
Note: You can view only the attributes that are associated as Product/SKU or SKU in the Add Relations drop-down list. This drop-down lists all attribute(s) categorized with attribute level “Product/SKU” and “SKU” that are created in the Create Attribute page of the Attributes section and Add Attribute page of the Data Model section. For detailed information see “Creating Attributes” and “Create Model. The associated attribute(s) appear as shown below.
Note: Once an attribute is added from the Add Relations drop-down list, the attribute does not appear in the list until that attribute section is deleted and saved.
- Click the Save button. The attributes are associated with the SKU.
Associating the Relations (Attributes)
To associate the relations (attributes),
- Click the Add icon.

- The list of approved items appears on the right side of the screen as shown below. The following table provides the field description of the selecting item screen to associate items to the SKU.
Field Description Search by Item ID or Item Name To search the required item(s), enter an item ID and/or item name, and click the search icon. In the search result, you can select the required item(s). Ensure that you provide only valid item IDs as values. <
strong>Note: You can search multiple Product and/or SKU IDs separated by a comma.Search using filter To filter and search based on the attribute name and/or attribute value, - Click icon. The following attribute model is expanded:
- Select the attribute name from the dropdown list.
- Enter the attribute value, if required.
- Click the Search button. The matching attribute(s) will be displayed.
Note:- To clear the filter, click the Clear All button.
- To remove the additional filters, click .
- To add more filters and search, click the Add Filter button:
Search by Project Toggle towards: - All Approved – to list all the approved products. By default, this is selected.
- Current Project – to list all the products that are yet to be submitted and approved:
Select All Click the Select All option to select all the items listed in the search result section. Click the Deselect all option to deselect all the selected items.
Note: To select a few more products and/or SKUs from the list, scroll down and then click the Select All option. - Click
- Click the Save button. The items are added to the relations.
Note: Once the product is created, the Catalog manager can review and Submit the Project for approval. See Projects and Approvals above for details about working with Projects.
Rearrange the sequence of items in the Relations (Attributes)
To rearrange the sequence of items in the relations (attributes) section,
- In the Relations (Attributes) page, hover the mouse on the icon.

- Drag and drop the item in the required place. The item is re-arranged as required.
- Click the Save button to save the changes.
Delete Relations (Attributes) from a SKU This section describes deleting a particular item from the attribute section and deleting the attribute section itself. Deleting items from the attributes section To delete items from the relations (attributes) section,
- In the Relations (Attributes) page, click on the delete icon against a particular item. The item is deleted.

- Click the Save button. The item is deleted from the attribute.
Deleting a particular attribute section To delete a particular attribute section,
- In the Relations (Attributes) section, select the delete option.
Note: You cannot perform any operations if the section is marked for deletion.
- Click the Save button. The attribute section is deleted.
Note:- The attribute section that is marked for deletion is removed only after the approval.
- The deleted attribute is available for selection in the Add Relations drop-down list on the Relations page. However, the attribute section is deleted immediately without approval when there are no items available in it.
- Other Products and SKUs will not be able to see the newly created Products until they have been approved.
- Once the SKU is created, the Catalog manager can review and Submit the Project for approval, for detailed information, refer to the Projects and Approvals workflow. Other Products and SKUs will not be able to see the newly created Products until they have been approved.
Creating Additional Item Types
Similar to Products and SKUs items, Catalog Editors can create and edit additional item types in the Catalog Admin console, they are,
- Bundles – grouped related products that are presented and sold together.
- Fixed Bundles – bundles for which product price remains static, irrespective of SKU variants.
- SKU Kits – bundles comprised of specific SKUs rather than products.
- Collections – a group of related products that are presented together but are not required to be sold together (a subset or individual products can be purchased).
To Create Additional Item Types
- On the Catalog landing page, under the Catalogs tab, click the master catalog row.
- Click the Products tab in the left panel and click the Create Item button.
- The Select Project pop-up opens to associate the Product to a project. This is required to create a product and get it approved by the Catalog Manager.
Note: This page appears only if the project is not selected already. - In the Select Project screen, select the required project.
Note: If the project is not available, then create a new project. You can also select the required project or create a new project before creating the product group. For more information, see “Creating a Project”. - In the Add Item page, in the Type field select the required type of item.

The following table describes the above screen.Field Description Type Select any one of the following item types: - Product
- SKU
- Bundle
- Fixed Bundle
- SKU Kit
- Collection
ID Enter a unique product identifier. Name Enter a name for the product. - Enter the ID and Name for the item type and click the Add Details button.
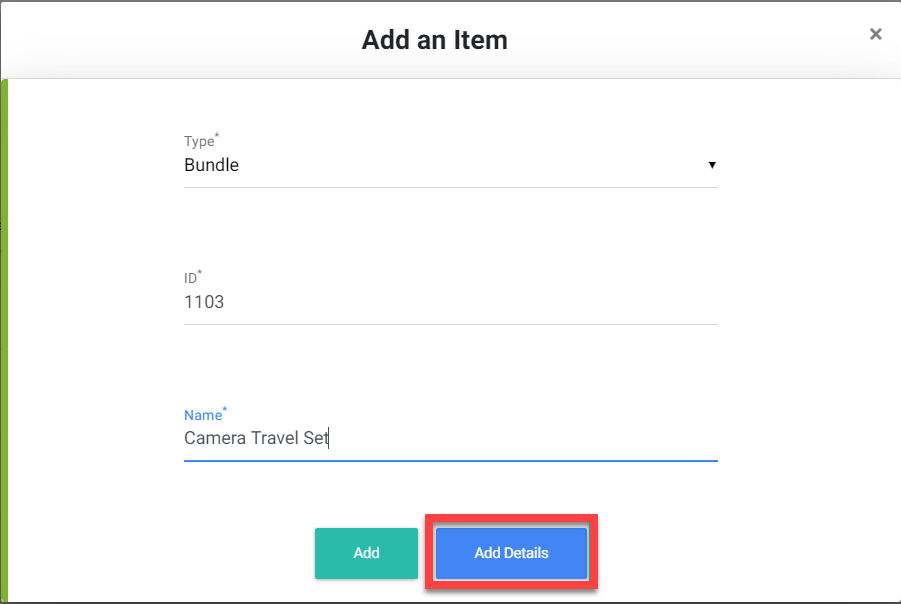
- Based on the selected item type (Bundle, Fixed Bundle, SKU kit, or Collection) the relevant item type appears on the left side as a tab within which you can associate products and SKUs. The item type appears as,
- If a Bundle is selected from the Type drop-down list, the Bundles tab appears in the left navigation panel.

- If Collections is selected from the Type drop-down list, the Collections tab appears in the left navigation panel.

- If SKU Kits is selected from the Type drop-down list, the SKUs Kits tab appears in the left navigation panel.

- If Fixed Bundle is selected from the Type drop-down list, the Fixed Bundle tab appears in the left navigation panel.
- If a Bundle is selected from the Type drop-down list, the Bundles tab appears in the left navigation panel.
- Click the respective tab (Bundle, Collection, Fixed Bundle, or SKU Kits) and then click the Add icon to associate products to the item type.
Note: By default, the products or SKUs, which exist in the master catalog will appear in the Products modal (for bundles or collections) or SKU(s) modal (for SKU kits). The following options allow you to find and associate the desired products (for Bundle, Collection, Fixed Bundle) or SKU(s) (for SKU and SKU Kit items). - In the Item screen, perform these functions and select one or more items to associate them with the product:

- In the Item list in the right panel, perform these functions and select one or more items to associate them with the SKU:
 The following table provides the fields description for selecting items to associate with the SKU:
Field Description Search by Item ID or Item Name To search the required item(s), enter an item ID and/or item name and click the search icon. In the search result, you can select the required item(s). Ensure that you provide only valid item IDs as values.
Note: You can search multiple Product and/or SKU IDs separated by comma.Search using filter To filter and search based on the attribute name and/or attribute value, - Click icon. The following attribute model is expanded:
- Select the attribute name from the drop-down list.
- Enter the attribute value, if required.
- Click the Search button. The matching items for the selected attributes will be displayed.
Note:- To clear the filter, click the Clear All button.
- To remove the additional filters, click icon.
- To add more filters and search, click the Add Filter button:
Search by Project Toggle towards: - All Approved – to list all the approved products. By default, this option is selected.
- Current Project – to list all the products that are yet to be submitted and approved:
Select All Click the Select All option to select all the items listed in the search result section. Click the Deselect all option to deselect all the selected items. 
Note: To select a few more products and/or SKUs from the list, scroll down and then click on the Select All option. - Click
- Click the Save button. The additional types are added.
Note: Click the Delete icon to remove the added product.
Edit Additional Item Types
The process for editing additional Item Types data is similar to the process for editing the product and SKU Item Types, including working with projects. For more information, refer to Updating the existing Product and Updating the existing SKU.
Export SKU(s)
You can export ONLY the data related to the SKU(s) that are filtered in the catalog admin screen. When a SKU is exported, all related entities, such as the SKU and all products to which this SKU belongs are also exported. To export SKU(s),
- In the All Catalogs page, click the master catalog row. The Catalog Overview tab displays the Master catalog details.
- Click the SKUs tab and click on the Export button.
 The SKU(s) details are downloaded to your local computer in the .xlsx file format.
Managing Tag(s)
Managing Product & SKU Details | Working with Master Catalog
The Tag(s) offers you the flexibility to create tags and tag groups. Before you start, ensure that you create a Tag and/or Tag group as a reference model with the model value. For detailed information on creating a reference model, refer to Creating a Model. The tag(s) is managed via the following tabs:
Viewing Tags Overview
- In the All Catalogs page, click the master catalog row. The Catalog Overview screen appears.
- Click the Tags Overview tab. The Tags Overview screen appears.
 The following table describes the field in the Tags Overview page:
Field Description Tags Active Indicates the active tag(s). - Click the Show Count button to view the number of the active tag(s).
- Click the Download icon to view the active tag(s).
Inactive Indicates the Inactive tag(s). - Click the Show Count button to view the number of the Inactive tag(s).
- Click the Download icon to view the Inactive tag(s).
Unused Tags Indicates the tag(s) that are not tagged with any product(s). - Click the Show Count button to view the number of unused tag(s).
- Click the Download icon to view the unused tag(s).
Tagless Products Indicates the product(s) that are not tagged with any tag(s). - Click the Show Count button to view the number of the product(s) that are not tagged.
- Click the Download icon to view the the number of the product(s) that are not tagged.
Tag Groups Active Indicates the active tag group(s). - Click the Show Count button to view the number of active tag groups(s).
- Click the Download icon to view the active tag groups(s).
Inactive Indicates the Inactive tag group(s). - Click the Show Count button to view the number of the Inactive tag group(s).
- Click the Download icon to view the Inactive tag group(s).
Managing Tag Group(s)
In the Tag Groups tab, you can,
- Configure and Search for Tag Group(s)
- Export Tag Group(s)
- Create a Tag Group
- Edit a Tag Group
- Import Tag Group(s)
Configuring and Searching for Tag Groups
Searching for Tag Group(s)
To search for the Tag Group(s),
- In the Tag Groups page, click the searchable fields in the header to open the search field. The searchable fields are Tag group attribute, Projects, Tag Groups ID, Status, and Row Select.

Note:- For displaying and/or modifying the searchable fields, see Modifying Searchable Fields.
- For displaying a predefined number of tag(s) per screen, see Selecting Predefined Rows.
- By default, all the approved tag Group(s) are listed on the Tag page. If the project is selected, you can view the tag that is created or updated via a project by selecting the particular project in the Projects drop-down option.
- Enter the desired search criteria in the search field, and then click the Go button. The tag group(s)(s), which match the search criteria appears.
Modifying Searchable Fields
To modify the searchable fields,
- Click (vertical ellipse) available at the beginning of the search field.
- Select or deselect the products to add and/or remove the searchable fields from the header.
 The selected searchable fields appear in the header.
Selecting Predefined Rows
To select Predefined Rows, By default, 10 Tag Groups per screen will appear, but the number of Tag Groups per screen can be modified as follows:
- Click (vertical ellipse) available at the beginning of the search field and select Row Select. The Row Select appears as part of the search criteria.

- Select 10 Rows, 25 Rows, or 50 Rows from the drop-down list.
Creating a Tag Group
- In the All Catalogs page, click the master catalog row.
Note: Before creating a tag group, ensure that you create the Reference Model by the name “Tag Group”. For detailed information on creating a reference model, see Creating a Model. All the Reference Models are displayed as tabs on the catalog details page as shown below. The Catalog Overview screen appears. - Click the Tag Group tab in the left navigation panel.
Note: If required, click on the locale option located at the upper right of the screen and select the appropriate locale from the drop-down list. - Click the Create button.

- The Select Project pop-up opens to associate the tag groups to a project. This is required to create a project and get it approved with the Catalog Manager.
Note: This page appears only if the project is not selected already.
- In the Select Project screen, select the required project.
Note: If the project is not available, then create a new project. You can also select the required project or create a new project before creating the product group. For more information, see “Creating a Project”. For more information on project approval workflow, see Managing Project Approval Workflow.
- In the Select Project screen, select the required project.
- In the Create screen, enter the required information:
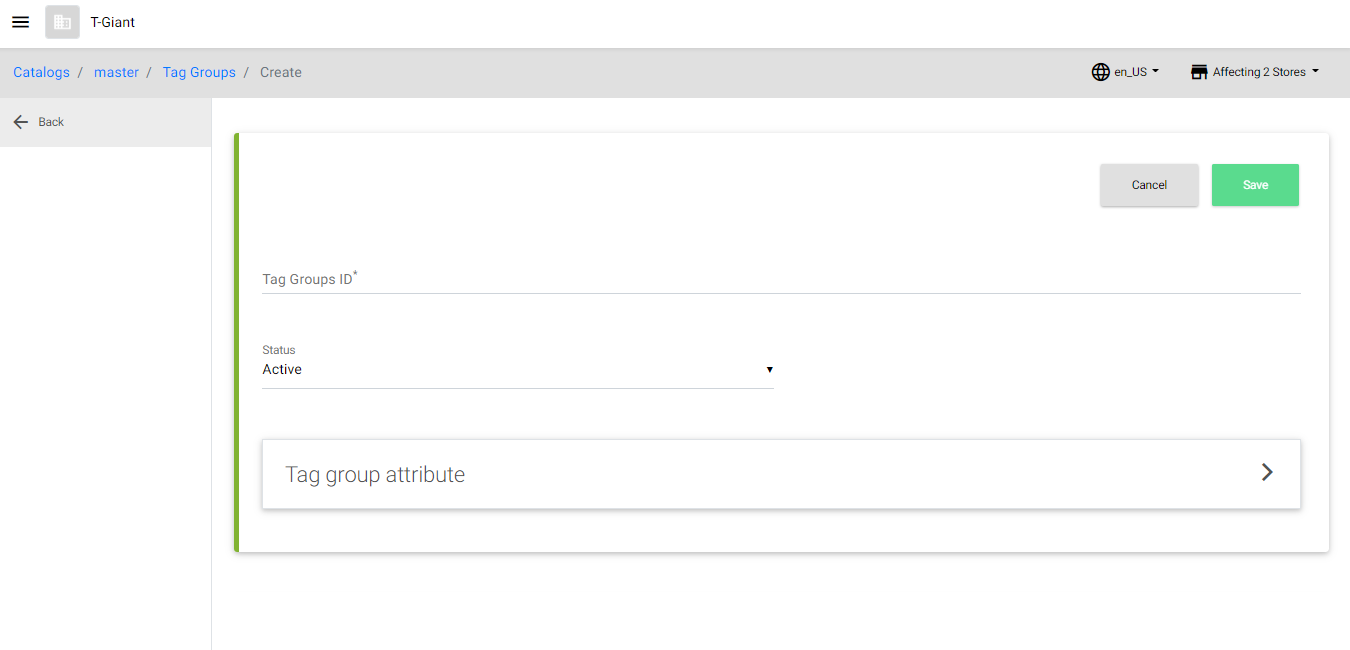 The following table describes the fields in the Create screen:
The asterisk (*) symbol indicates mandatory fields.Field Description Tag Group ID* Enter the ID of the tag group. Status Select the appropriate status from the drop-down list. The statuses are: - Active – The active tag group can be tagged to the product. By default, the Active status is selected.
- Inactive – The inactive tag group cannot be tagged to the product.
Tag Group Name Enter the name of the tag group. Description Enter the relevant description of the tag group. - Click the Save button. The Tag Group is created.
Note: To ignore the changes, click the Cancel button.
Editing a Tag Group
To edit a tag group,
- In the All Catalogs page, click the master catalog row.
 The Catalog Overview screen appears.
 - Click the Tag Groups tab and click on the required Tag Group.
- In the Tag Group page, click the Edit icon to update the tag details.

- The Select Project pop-up opens to associate the Tag Group to a project. This is required to create a project and get it approved with the Catalog Manager.
Note: This page appears only if the project is not selected already.
- In the Select Project screen, select the required project.
Note: If the project is not available, then create a new project. You can also select the required project or create a new project before creating the product group. For more information, see “Creating a Project”. For more information on project approval workflow, see Managing Project Approval Workflow.
- In the Select Project screen, select the required project.
- Update the required tag details.
- Click the Save button. Note: To ignore the changes, click the Cancel button.
Exporting Tag Groups
To export tag group(s),
- In the All Catalogs page, click the master catalog row. The Catalog Overview screen appears.
- Click the Tag Groups tab and click the Export button.
 The tag group details are downloaded to your local computer in the .xlsx file format.
Importing Tag Groups
To import tag groups,
- In the All Catalogs page, click the master catalog row. The Catalog Overview screen appears.
- Click the Tag Groups tab and click the Import tab.

- Click the Download Template button to download a sample Excel sheet to your local system for importing tag details.

- Enter the required information in the sample Excel sheet.
- Select the appropriate locale from the locale drop-down list at the upper right of the screen.
- Drag and drop the updated Excel sheet file (.xlsx) from your local computer onto the Import Document section. (OR) Click the Add File button to upload the file from your local computer.

- The Select Project pop-up opens to associate the product to a project. This is required to create a product and get it approved with the Catalog Manager.
Note: This page appears only if the project is not selected already.
- In the Select Project screen, select the required project.
Note: If the project is not available, then create a new project. You can also select the required project or create a new project before creating the product group. For more information, see “Creating a Project”. For more information on project approval workflow, see Managing Project Approval Workflow.
- In the Select Project screen, select the required project.
- After a successful import, the Import History appears.

Note:- If there is an error in the import feed
- Click the Download Failed Items button to view the failed items with the reason for import failure.
- Click the New Import button to import a new updated sheet.
- If there is an error in the import feed
Managing Tag(s)
A tag is a keyword(s) or term(s) that is assigned to a particular product(s). It allows you to find the product(s) by browsing or searching in the storefront. In the Tag tab, you can,
Configuring and Searching for Tags
Searching for Tag(s)
To search for the Tag(s),
- In the Tag page, click the searchable fields in the header to open the search field. The searchable fields are Tag attribute, Projects, Tag ID, Status, and Row Select.

Note:- For displaying and/or modifying the searchable fields, see Modifying Searchable Fields.
- For displaying a predefined number of tag(s) per screen, see Selecting Predefined Rows.
- By default, all the approved tag(s) are listed in the Tag page. If the project is selected, you can view the tag that is created or updated via a project by selecting the particular project in the Projects drop-down option.
- Enter the desired search criteria in the search field, and then click the Go button. The tag(s), that match the search criteria appear.
Modifying Searchable Fields
To modify the searchable fields,
- Click (vertical ellipse) available at the beginning of the search field.
- Select or deselect the products to add and/or remove the searchable fields from the header.
 The selected searchable fields appear in the header.
Selecting Predefined Rows
To select Predefined Rows, By default, 10 Tag Groups per screen will appear, but the number of Tag Groups per screen can be modified as follows:
- Click (vertical ellipse) available at the beginning of the search field and select Row Select. The Row Select appears as part of the search criteria.

- Select 10 Rows, 25 Rows, or 50 Rows from the drop-down list.
Creating a Tag
- In the All Catalogs page, click the master catalog row.
Note: Before creating a tag, ensure that you create the Reference Model by the name “Tag”. For detailed information on creating a reference model, see Creating a Model. All the Reference Models are displayed as tabs on the catalog details page as shown below. The Catalog Overview screen appears. - Click the Tags tab and click the Create button.
Note: If required, click on the locale option located at the upper right of the screen and select the appropriate locale from the drop-down option. The Select Project pop-up opens to associate the product with a project. This is required to create a product and get it approved by the Catalog Manager.
Note: This page appears only if the project is not selected already.
- In the Select Project screen, select the required project.
Note: If the project is not available, then create a new project. You can also select the required project or create a new project before creating the product group. For more information, see “Creating a Project”. For more information on project approval workflow, see Managing Project Approval Workflow.
- In the Select Project screen, select the required project.
- The Create page appears.
 The following table describes the fields in the Create screen:
The asterisk (*) symbol indicates mandatory fields.Field Description Tag ID* Enter the ID of the tag. Status Select the appropriate status from the drop-down option. The statuses are: - Active – The active tag can be tagged to the product. By default, the Active status is selected.
- Inactive – The inactive tag cannot be tagged to the product.
Tag Name Enter the name of the tag. Visible Select the appropriate option from the drop-down list. The options are: - True – Selecting this option allows the tag(s) to be visible in the Storefront.
- False – Selecting this option does not allow the tag(s) to be visible in the Storefront.
Tag Group If required to add this tag under a tag group, enter the tag group name in this field or click the add icon to find the appropriate tag group. Select the checkbox of the tag group(s) in the pop-up window, and then click Add.
Note: The tag group(s) can be searched by Project, Tag Group ID, Tag Group Attribute, and/or Status. - Click the Save button to create the tag.
Note: To ignore the changes, click the Cancel button.
Editing a Tag
To edit a tag,
- In the All Catalogs page, click the master catalog row. The Catalog Overview screen appears.
- Click the Tags tab and click the desired tag row to edit.

- Click the Edit icon to update the tag details.

- The Select Project pop-up opens to associate the product with a project. This is required to create a project and get it approved by the Catalog Manager.
Note: This page appears only if the project is not selected already.
- In the Select Project screen, select the required project.
Note: If the project is not available, then create a new project. You can also select the required project or create a new project before creating the product group. For more information, see “Creating a Project”. For more information on project approval workflow, see Managing Project Approval Workflow.
- In the Select Project screen, select the required project.
- Update the required tag details.
- Click the Save button.
Note: To ignore the changes, click the Cancel button.
Exporting Tags
To export tag(s),
- In the All Catalogs page, click the master catalog row. The Catalog Overview screen appears.
- Click the Tags tab and click the Export button.
 The tag details are downloaded to your local computer in the.xlsx format.
Importing Tags
To import tags,
- In the All Catalogs page, click the master catalog row. The Catalog Overview screen appears.
- Click the Tags tab and click the Import tab.

- Click the Download Template button to download a sample Excel sheet to your local system for importing tag details.

- Enter the required information in the sample Excel sheet.
Note: Select the appropriate locale from the locale drop-down list at the upper right of the screen. - Drag and drop the updated Excel sheet file (.xlsx) from your local computer onto the Import Document section (OR) click the Add File button to upload the file from your local computer.

- The Select Project pop-up opens to associate the product with a project. This is required to create a product and get it approved by the Catalog Manager.
Note: This page appears only if the project is not selected already.
- In the Select Project screen, select the required project.
Note: If the project is not available, then create a new project. You can also select the required project or create a new project before creating the product group. For more information, see “Creating a Project”. For more information on project approval workflow, see Managing Project Approval Workflow.
- In the Select Project screen, select the required project.
- After a successful import, the Import History screen appears.
Note:- If there is an error in the import feed,
- Click the Download Failed Items button to view the failed items with the reason for import failure.
- Click the New Import button to import a new updated sheet.
- If there is an error in the import feed,
Tagging
In the Tagging page, the tag(s) are added to a product(s). On the Tagging page, you can:
- Configure and Search for Tagging
- Exporting the product(s) with the mapped tags
- Updating a single product with tag(s)
- Updating multiple products with tag(s)
Configuring and Search for Tagging
Searching for Tagging (s)
To search for Tagging,
- In the All Catalogs page, click the master catalog row. The Catalog Overview screen appears.
- Click the Tagging tab in the left navigation panel.
- In the Tagging page, click the searchable fields in the header to open the search field. The searchable fields are Projects, Product Name, Product ID, Tag Name, Tagless Products, Status, Row Select, and the products that are listed in the drop-down list.

Note:- For displaying and/or modifying the searchable fields, see Modifying Searchable Fields.
- For displaying a predefined number of products per screen, see Selecting Predefined Rows.
- By default, all the approved products are listed on the Products page. If the project is selected, you can view the products that are created or updated via a project by selecting the particular project in the Projects drop-down list.
- Enter the desired search data, and then click the Go button.
Note: To reset the search field in the header, click the Reset button. The product(s), which match the search criteria appears.
Modifying Searchable Fields
To modify the searchable fields,
- Click (vertical ellipse) available at the beginning of the search field.
- Select or deselect the products to add and/or remove the searchable fields from the header.
 The selected searchable fields appear in the header.
Selecting Predefined Rows
To select Predefined Rows, By default, 10 Tag Groups per screen will appear, but the number of Tag Groups per screen can be modified as follows:
- Click (vertical ellipse) available at the beginning of the search field and select Row Select. The Row Select appears as part of the search criteria.

- Select 10 Rows, 25 Rows, or 50 Rows from the drop-down list.
Exporting Product(s)
To export product(s),
- In the All Catalogs page, click the master catalog row. The Catalog Overview screen appears.
- Click the Tagging tab and click on the Export button.
 The product(s) with its tagging details are downloaded to your local computer in the .xlsx file format.
Updating Single Product with Tag(s)
To update a single product with tag(s),
- In the All Catalogs page, click the master catalog row. The Catalog Overview screen appears.
- Click the Tagging tab in the left navigation panel.
- Search and select a desired product on the Tagging page, and then click the Update Tags button.

- Click the Edit icon.
- The Select Project pop-up opens to associate the product with a project. This is required to create a product and get it approved by the Catalog Manager.
Note: This page appears only if the project is not selected already.
- In the Select Project screen, select the required project.
Note: If the project is not available, then create a new project. You can also select the required project or create a new project before creating the product group. For more information, see “Creating a Project”. For more information on project approval workflow, see Managing Project Approval Workflow.
- In the Select Project screen, select the required project.
- Click the Tags Add icon.
- Search and select the relevant tag(s), and then click the Save button to add the tag(s) to the product.
Note: It is allowed to select the tags from any of the pages by clicking the page numbers at the bottom of the screen.
Updating Multiple Products with Tag(s)
To map the tag(s) to multiple products,
- In the All Catalogs page, click the master catalog row. The Catalog Overview screen appears.
- Click the Tagging tab in the left navigation panel.
- Search and select desired products on the Tagging page, and then click the Update Tags button.

Note: It is allowed to select the products from any of the pages by clicking the page numbers at the bottom of the screen. - Click the edit icon. The Select Project pop-up opens if the project is not selected. Select the project or create a project:
- Click the Tags Add icon.
- Search and select the relevant tag(s), and then click the Save button to add the tag(s) to the selected products.
Note: It is allowed to select the tags from any of the pages by clicking the page numbers at the bottom of the screen.
Working with Master Catalog
Managing Tag | Working with Sales Catalog
Importing Products, SKUs, Attributes into the Master Catalog
Overview
All products and SKUs can be imported into the master catalog before they can be brought into a Sales catalog. All attributes, attribute groups, and variant groups should be created before creating your products and its SKUs. Upon running a feed from the master catalog to a sales catalog, the sales catalog will inherit the products, SKUs, and properties from the master catalog. Thereafter, the values for products and SKUs within the sales catalog (for example, description, colors, sizes, etc.) can be changed to override the values inherited from the master catalog. Additions and changes made within a Catalog, including imports, must be approved by a Catalog Manager via the Project approval workflow process. For importing products and SKUs, see the video below or the step-by-step instructions:
In the IMPORT tab, you can,
- Download a sample template – download and use this sample sheet (.xlsx) to update all the necessary product and SKU details.
- Import the File – upload the updated sample sheet (.xlsx) onto the IMPORT tab.
- View the previous import details in the Import History section.
Downloading a Document
Before you import a document, you need to download the sample template, fill in all the required details, and then import the document. The downloaded Excel sheet contains these tabs:
- product
- sku
- imageswithtext
- productskumapping
To download a document with product and SKU details,
- In the All Catalogs page, click the master catalog row.
Note: To import a document to the master catalog click Master, else click the sales catalog. The Catalog Overview screen appears. - Click the Import tab in the left panel and click the Download Template button.
 The SampleImport.xlsx file is downloaded to your local computer.
Importing a document
To import a document,
- Enter the required information in the sample excel sheet file.
- Drag and drop the updated excel sheet file (.xlsx) from your local computer on to the Import Document section. (OR) Click the Add File button to upload the file from your local computer.

- The Select Project pop-up opens to associate the product to a project. This is required to create a project and get it approved with the Catalog Manager.
Note: This page appears only if the project is not selected already.
- In the Select Project screen, select the required project.
Note: If the project is not available, then create a new project. You can also select the required project or create a new project before creating the product group. For more information, see “Creating a Project”. For more information on project approval workflow, see Managing Project Approval Workflow.
- In the Select Project screen, select the required project.
- After a successful upload, click the Start Import button to import the model details.

Note: To delete the uploaded file, click the Delete icon. - After an import, you can view,

- Summary – displays the number of products and/or SKUs that are newly created, updated, and failed along with the total products count and SKUs count that are available in the sheet.
- Import History – displays the previous import details with a link to download and view the Excel sheet, status of the import, import summary details, download and view the failed items.
Note:- If there is an error in the import feed, then you can click the New Import button to import a newly updated sheet.
- If an import is failed, you can download and view the failed items with the reason for import failure, and click the Download Failed Items button.
Working with Sales Catalog
Working with Master Catalog | Configuring Settings
Importing Products, SKUs, Attributes Into a Sales Catalog
Similar to the Master Catalog, Infosys Equinox Commerce allows Catalog Editors and Managers to import additions and changes to the Sales Catalog. There are two import methods for Sales Catalogs:
- Copy the existing products and SKUs from the Master catalog into a Sales Catalog using the Sales Catalog Rules tool.
- Configure the rule by clicking the Edit icon on the sales catalog landing page.
When importing data into a Sales Catalog, the related products, such as up-sell and cross-sell products must also be included in the rule definition; otherwise, the storefront will be unable to show these related products. In case the related products are not imported into the Sales Catalog, the up-sell and cross-sell product IDs will show in the product data when viewed in the admin screens and will also show when the product data is exported. However, the up-sell and cross-sell products will not be available when the shopper browses the product in the storefront. Similar care must be exercised for complex products, such as Bundles, Collections, SKU Kits, and Grouped products.
Configuring Sales Catalog Rules
Importing Products, SKUs, and Attributes
Similar to the Master Catalog, Infosys Equinox Commerce allows Catalog Editors and Managers to import additions and changes to the Sales Catalog. You can associate sales catalog rules in one of the following ways:
- Associate all products and SKUs from the master catalog to the sales catalog (default)
- Associate selected products and/or SKUs from the master catalog to the sales catalog (using the filter)
For the step-by-step instructions, see the above links or the video given below:
Associate all products and SKUs to the Sales Catalog
To associate all products and SKUs from the Master Catalog to the Sales Catalog,
- In the All Catalogs page, click on the required Sales Catalog row.
 The Catalog Overview page appears.
 - Click the Sales Catalog Rule tab.

- The Select Project popup appears to associate products and/or SKUs to the Sales Catalog.
Note: This page appears only if the project is not selected already.
- In the Select Project screen, select the required project.
Note: If the project is not available, then create a new project. You can also select the required project or create a new project before creating the product group. For more information, see “Creating a Project”. For more information on project approval workflow, see Managing Project Approval Workflow.
- In the Select Project screen, select the required project.
- In the Sales Catalog Rule section, click Run button. All the products and SKUs are associated from the master catalog to the sales catalog.

Note: By default, Match: All is enabled, which indicates that all products and SKUs are to be associated from the master catalog to the sales catalog. - Click the Edit icon on the sales catalog page to ensure that the All check box is selected. Once the mapping in progress completes the Catalog rules are mapped successfully.
Associate selected products and/or SKUs to the Sales Catalog
To associate selected products and/or SKUs from the Master Catalog with the Sales Catalog,
- In the All Catalogs page, click on the required Sales Catalog row. The Catalog Overview page appears.
- Click the Sales Catalog Rule tab.

- The Select Project popup appears to associate Products and/or SKUs. This is required to create a project and get it approved with the Catalog Manager.
Note: This page appears only if the project is not selected already.- In the Select Project screen, select the required project or create a new project. For more information, see Create a Project and Project Approval Workflow.
- In the Select Project screen, select the required project or create a new project. For more information, see Create a Project and Project Approval Workflow.
- In the Sales Catalog Rule section, click the Edit icon.

- Deselect All to associate products and/or SKUs by rules. The Map by Rules section appears.

- Configure the condition as follows:
- To add a condition based on an ID:
- In the Condition drop-down list, select Product ID to add products or select SKU ID to add SKUs.
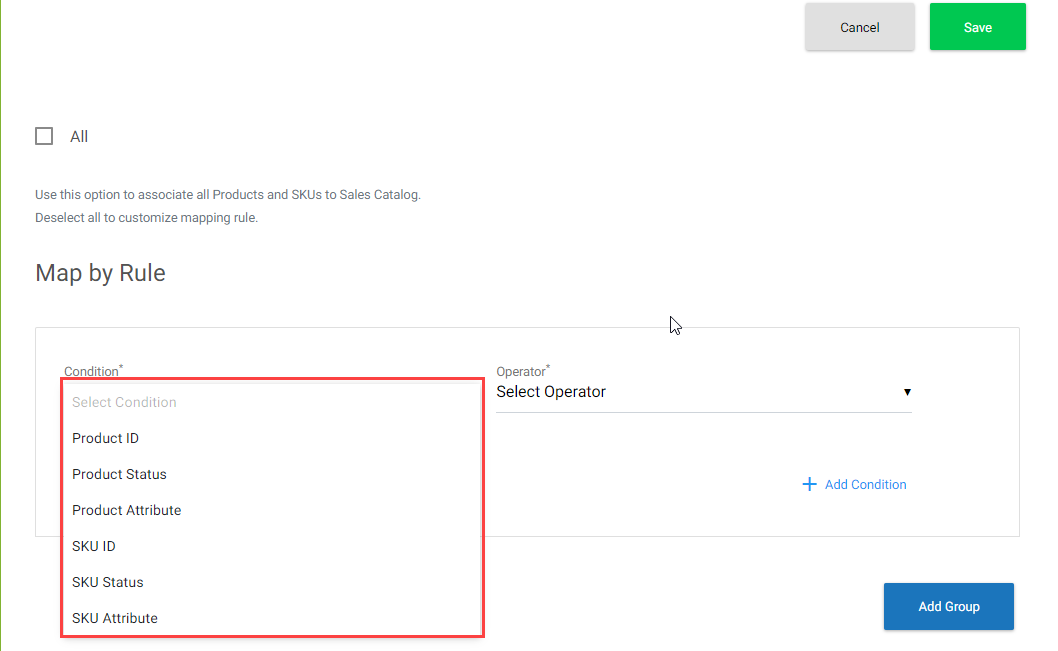
- In the Operator drop-down list, select the required operators.
- IN – checks for availability of multiple product/SKU IDs
- NOT IN – checks for non-availability of multiple product/SKU IDs
- Equals – checks for availability of single product/SKU ID
- Not Equals – checks for non-availability of single product/SKU ID

- In the Values field click the
 icon and add the required item(s). For instructions to add items, see Add Items.
- In the Condition drop-down list, select Product ID to add products or select SKU ID to add SKUs.
- To add a condition based on the status:
- In the Condition drop-down list, select Product Status to add status-based products or select SKU Status to add status-based SKUs.
Note: The status-based condition is not applicable for the Filter type catalog, since only active Products and/or SKUs are added to the Filter type catalog. Refer to the Type field of the Creating Catalog section. - Click the Operator field and select the required Operator.
- Select the required Status from the Status drop-down list.

- In the Condition drop-down list, select Product Status to add status-based products or select SKU Status to add status-based SKUs.
- To add a condition based on an attribute:
- In the Condition drop-down list, select the Product Attribute to add items that are mapped as product attributes or select SKU Attribute to add items that are mapped as SKU attributes.
- Click the Attribute field and select the required attribute.

- Click the Operator field and select the required operator.

- Equals – checks for a single string value
- Equals Ignore Case – checks for single value without case-sensitive
- Not Equals – checks for non-availability of a single string value
- Greater Than, Greater Than or Equals, Less than, Less Than or Equals – checks only for numbers (Integer, Float)
- Like – performs a partial search
- To add a condition based on an ID:
- Click Add Condition to add another condition if required.
Note:- To delete a condition, click the Delete icon.
- You can add one or more conditions by clicking the Add Condition option.
- Click the Add Group button to configure the “OR” condition. This is optional.

Note: To add one or more groups of conditions, click the Add Group button. - Click the Save button. The Sales Catalog Rule is created.

The rules are added to the Sales Catalog Rule page as follows:
- Click the Run button to associate the products and SKUs as per the rules you configured above.
- Click , and the list of approved items appears in the right panel.
- In the Search for Item screen, perform these functions and select one or more items to associate them to the attributes. The following table provides the field description for item selection:
The item is added to the respective attribute(s) section.Field Description Search by Item ID or Item Name To search the required item(s), enter an item ID and/or item name, and click the search icon. In the search result, you can select the required item(s). Ensure that you provide only valid item IDs as values.
Note: You can search for multiple Product IDs and/or SKU IDs by separating them with a comma.Search using filter To filter and search based on the attribute name and/or attribute value, - Click icon. The following attribute model is expanded:
- Select the attribute name from the drop-down list.
- Enter the attribute value, if required.
- Click the Search button. The matching attribute(s) will be displayed.
Note:- To clear the filter, click the Clear All button.
- To remove the additional filters, click .
- To add more filters and search, click the Add Filter button:
Search by Project Toggle towards: - All Approved – to list all the approved products. This option is the default.
- Current Project – to list all the products that are yet to be submitted and approved:
Select All Click the Select All option to select all the items listed in the search result section. Click the Deselect all option to deselect all the selected items.
Note: To select a few more products and/or SKUs from the list, scroll down, and then click the Select All option.
Note: To dissociate a particular item from the attribute(s) in the Feed page, click the Delete icon against a particular item. - Click
Importing via Excel Spreadsheet
The attributes of existing products and SKUs in the Sales Catalog can be updated via an Excel spreadsheet with the Import feature. As with manual additions and updates, bulk import changes require approval from a Catalog Manager via the Project approval workflow process. After clicking the Sales catalog and Import tab, see Importing Attributes for instructions on importing attributes. 
Configuring Settings
Working with Sales Catalog | Projects and Approvals
Configure Settings allows configuring the attribueid value of Name, Primary Image, Alt Image, Swatch Image, and Image Folder. The Settings tab contains the attribute of the product or SKU configuration. In the Settings tab, a Catalog manager can update the configurations that are required for a product or SKU. To configure the settings,
- Click the Settings tab in the left panel. The Catalog Attribute settings are displayed.

- Update the settings for a product or SKU. The following table provides the field description for the Setting screen:
Field Description Image Folder The folder path where the product or SKU image is stored. Attribute ID of Name Update the name of a product or SKU. Attribute ID of Primary Image Update the primary image attribute name of a product or SKU image. Attribute ID of Alt Image Update the alternate image attribute name of a product or SKU image. Attribute ID of Swatch Image Update the swatch image attribute name of a product or SKU image. - Click the Save button to update the catalog settings.
Projects and Approvals
Based on business requirements, a Business Admin can enable or disable the project workflow. This is achieved by using the defaultprojectaccess property during the configuration of a microservice collection.
Enabling or Disabling Project Access and Workflow
All additions and changes to data in the Catalog microservice are processed through the Project Approval workflow. This workflow operates based on the enabled or disabled state of the defaultprojectaccess and disable_project_workflow properties of the Catalog service. A Business Admin can enable or disable the project approval workflow in the Collection Properties of the Catalog microservice. There are three different flows in the Project Approval workflow:
Note: You can configure the collection property while Creating a Collection or Updating a Collection. Also, see Collection Properties.
| Functions | Description | Collection Properties | |
| defaultprojectaccess | disable_project_workflow | ||
| Mandatory Project Approval workflow | All additions and changes to data require approval from a microservice manager role (for example, Catalog Manager) before they can take effect. The approval process necessitates a project approval workflow, which is managed through the Projects option visible in the header. As a mandatory step, the Select Project screen appears automatically until all additions and changes are associated with a project for approval. | Disable | Disable/enable Note: The “disable_project_workflow” will work only when “defaultprojectaccess” is enabled. |
| Skip Project Approval workflow |
All additions and changes to data go directly into effect and do not require approval from a microservice manager role. The Projects option will not be visible in the header. The additions and changes are saved to the default project. The Select Project screen will not appear.
|
Enable | Enable |
| Optional Project Approval Workflow | All additions and/or changes to data directly go into effect. If a microservice manager role needs to approve the data, you can initiate the project approval workflow through the Projects option visible in the header. The system saves additions and changes to the default project. The Select Project screen appears only when you click on the Projects link from where you can associate the additions and/or changes to a project for approval. | Enable | Disable |
Creating Projects in the Catalog
- Login to the Foundation service for your company (URL provided by Infosys Equinox).
- Click the Catalog microservice. The Catalog landing page appears.
- Click on the desired catalog from the catalog list to edit.

- Click the Projects link at the top-right corner of the screen.
- The Select Project screen appears.

- Enter a Project Name and click the Create Project button.
 The newly created Project appears in the Project List.
- Click on the View All button to view a list of all Projects, including the newly created project in the list.
 The newly created project is listed with all other projects.
Note: If you have already selected an existing project, the project name is displayed in the top-right corner of the screen.

Project Details
To see the details of an existing Project,
- Click the Details button against your project in the Select Project Screen.

- The Project screen displays the details of the project. This enables the editor or a manager to update the description of the project, add a target completion date, view proposed changes, add notes, and submit the project for approval.

Submitting Projects in the Catalog Microservice
After making desired changes to a Catalog within a Project, a Catalog Editor or Manager should submit the proposed changes to a Catalog Manager for approval and go into effect.
- Review the details of the Project to be submitted by clicking the project’s row in the Projects List.

- Click the Edit icon to submit the Project with changes to a Catalog Manager for approval.

- Click the Submit button.
 The Submitted Project will display with a status of Submitted in the Projects List until a Catalog Manager takes action.

Managing Project Approval Workflows
The project workflow is the process of managing catalog details via the project. In the project workflow, you can create or select a project to add the addition/update of catalog details to the project or initiate the addition/update of catalog details, a project select pop-up opens to select or create a project to make part of the catalog details in the project. The project workflow is managed via a feed process and controlled by various statuses.
Note: The project approval workflow is skipped on the scenarios given below:
- If the collection property is configured for skipping the project approval workflow, refer to Enabling or Disabling projects.
- If the Sales Catalog is created as a “Filter” type catalog, refer to the Type field of the Creating Catalog section.
The states of the project approval workflow are as follows:
- Open: This is the default status when a project is created or if the Catalog Manager reopens the project for correction. The project is editable in this state.
- Submitted: The changes have been submitted to the Catalog Manager for approval but have not yet been approved. The project is not editable in this state.
- Approved: The changes have been approved by the Catalog Manager and are live. The project is not editable in this state.
- Approval in Progress: The changes have been submitted to the Catalog Manager for approval. The Catalog Manager has clicked the Approve button, but the triggered approval feed has neither completed nor failed. The project is not editable in this state.
- Approval Failed: The changes were submitted to the Catalog Manager for approval. The Catalog Manager clicked the Approve button, but the triggered approval feed failed. The project is not editable in this state. The Approve button will be available in the UI, and the Catalog Manager must click it again to trigger a new approval feed.
- Denied: The changes have been rejected. The project is not editable in this state.

To Approve, Deny, or Reopen a Project, the Catalog Manager should:
- Login to the Foundation server for your company (URL provided by Infosys Equinox).
- Click the Catalog option.

- In the Catalog landing page, click the recently edited project.
Note: Catalogs and Projects are not shared. Each Catalog contains its own unique set of Projects. - Click Projects at the top-right corner of the screen.
- Review the details of the submitted Project by clicking the project’s row in the Projects List.
- Click one of the following options:
- Export – This option allows you to export the Products and SKUs associated with the project to your local computer.
- Approve – Use this option to approve the proposed changes.
- Deny – If you want to reject the changes, select this option.
- Reopen – To reopen the project, choose this option.
 The updated status (in this example, Approved) appears for the Project in the Projects List.
Revision History
2024-07-17 | JP – Improved content using AI.
2024-03-10| AN – Updated for release 8.17.2.
2022-12-21| SW – Updated for release 8.13.0.
2022-04-10 | JP – Fixed link and http issues.
2021-12-30 | SW – Updated for release 8.11.0.
2021-06-16 | SW – Improvised the guide.
2020-09-01 | SW – Updated content for Release 8.11.0.
2020-07-14 | SW – Updated content for Release 8.10.0.
2020-07-01 | SW – Updated content for Release 8.9.0.
2020-05-25 | JP – Updated content for Release 8.8.0.
2020-05-04 | JP – Updated content for May 2020 release.
2020-03-18 | AM – Updated content for April 2020 release.
2019-09-16 | AM – Updated content for September 2019 release.
2019-07-26 | PLK – Minor copyedits.
2019-07-19 | AM – Updated content for July 2019 release.
2019-06-08 | PLK – Minor copyedits.
2019-05-17 | JP – Minor copyedits.
2019-05-08 | JP – Inserted images and fixed link issues.
2019-05-04 | PLK – Content updated for April 2019 release.
2019-01-24 | PLK – Content uploaded and TOC and links created.