About Ultra Admin Console
Overview
The Ultra Admin Guide introduces the new CSR Admin platform, transitioning from the Enterprise Admin to the Ultra Admin. This advanced administrative platform is designed to enhance user experience through modern technologies like React MUI, ensuring a more intuitive, efficient, and seamless experience for users accessing various functionalities.
Key Features and Enhancements
- Integration of Functional Areas: The CSR Admin consolidates key functionalities from the Enterprise Admin, such as Order Admin, Customer Admin, Account Admin, and Subscription Management, into a comprehensive solution for customer service representatives (CSRs).
- Streamlined User Experience: The platform optimizes and improves key functionalities to provide a more streamlined experience for end users.
- Enhanced Support Capabilities: CSRs can effectively assist customers with account-related issues, service requests, and updates, ensuring a better, faster, and more effective support experience.
Working with Change Log
Overview
With Change Log, you can search and view the changes between the current version and the previous version for the selected period. For the defined date range, you can use filter to find the records matching the filter criteria. Any changes in the services such as Catalog, Pricing, Subscription, Inventory, Promotion, or Loyalty data (Create, Update, and Delete operations), the log is shown with the yellow color highlights to signify where the changes are made.
Before You Begin
Before using this feature in the Ultra Admin Console, ensure the following prerequisites are met:
- Install and activate the Change Log app from the App Marketplace.
- Configure the store property
adminV2Enableby updating the value to include “changelog“.
Note: If theadminV2Enableproperty already contains other values, appendchangelogby adding a comma without a space at the end.
Viewing Change Logs
To view change logs of all or a particular service,
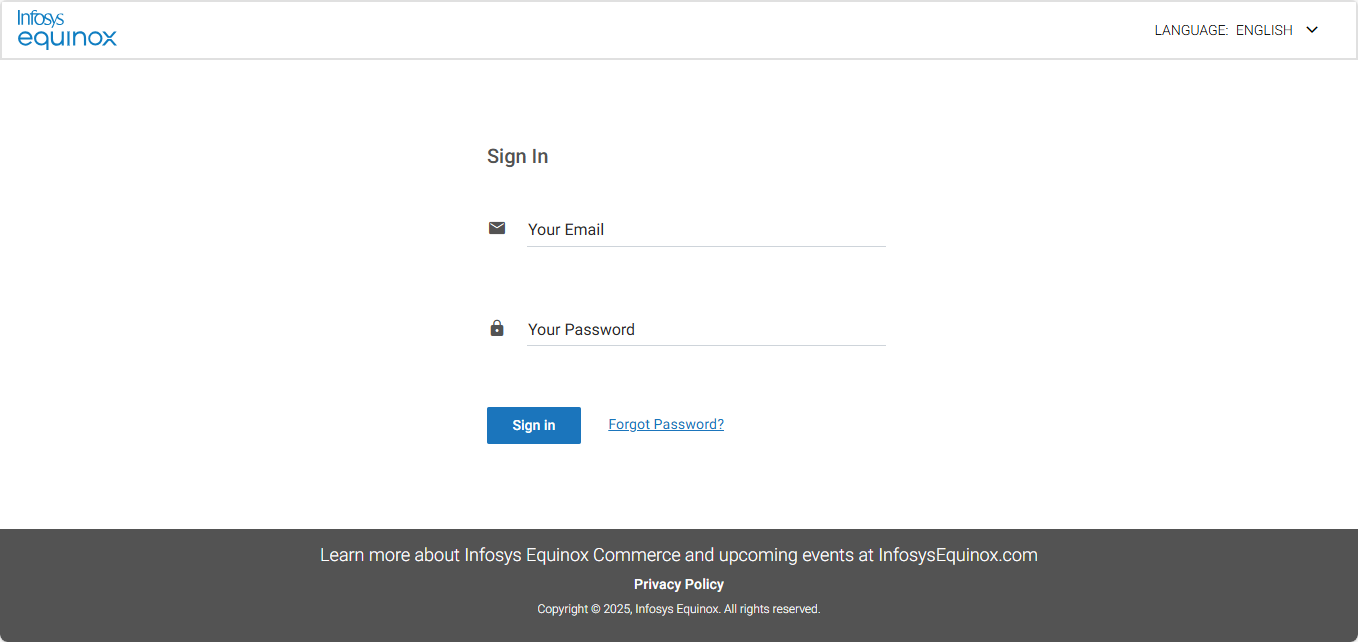
- Log in to the Foundation console for your business (URL provided by Infosys Equinox).
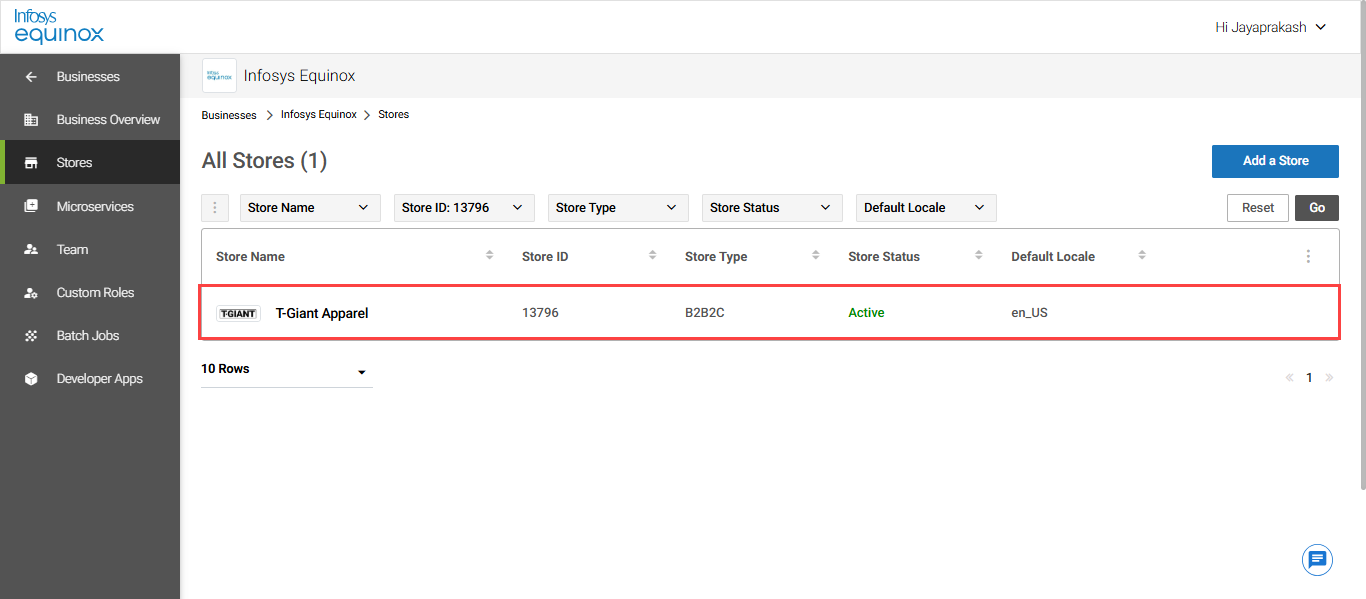
- Select the required business and the store.
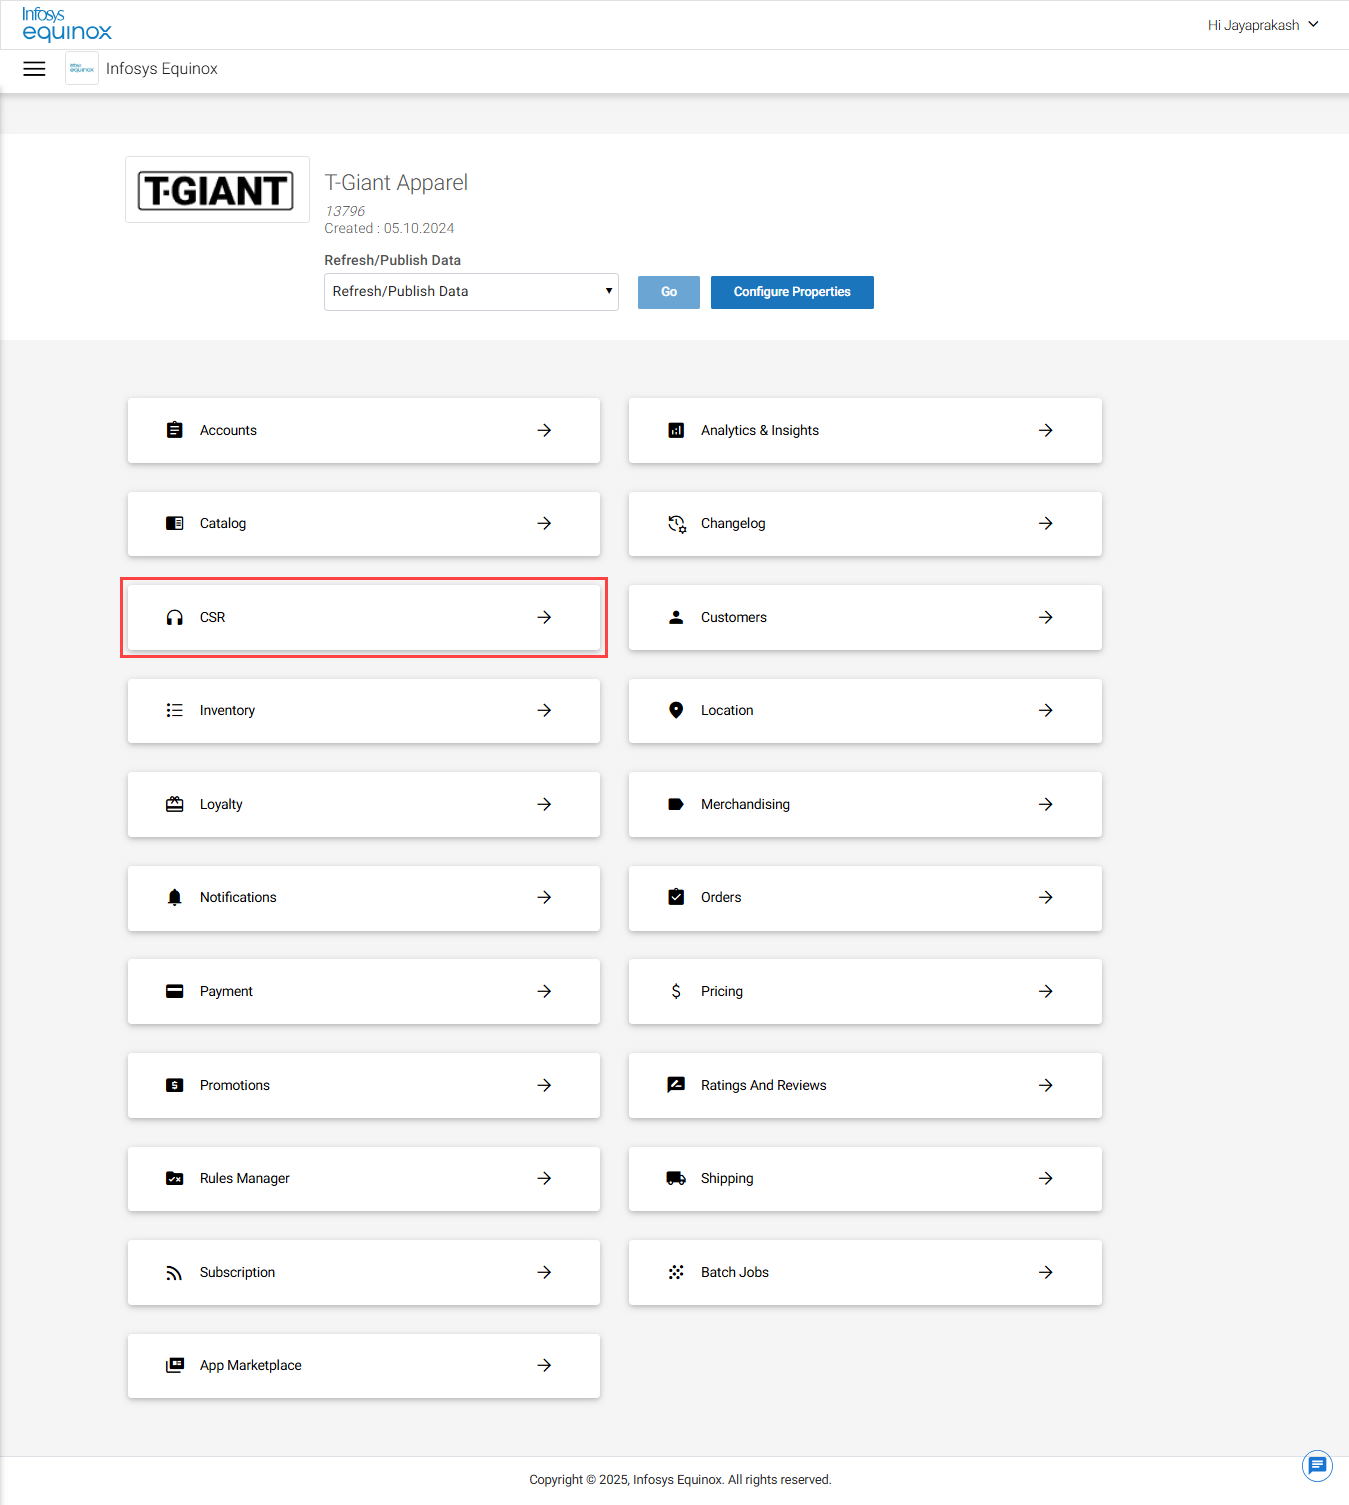
- From the StoreOps page, navigate to the Ultra Admin console.
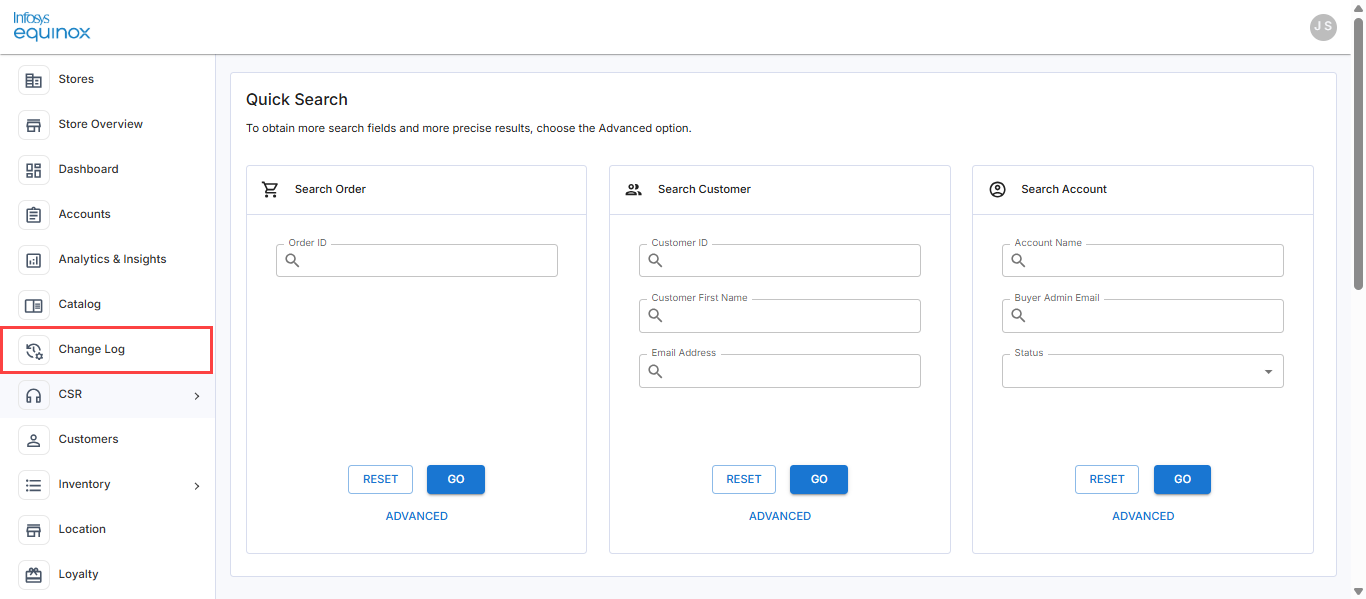
- In the left navigation panel, select Change Log.
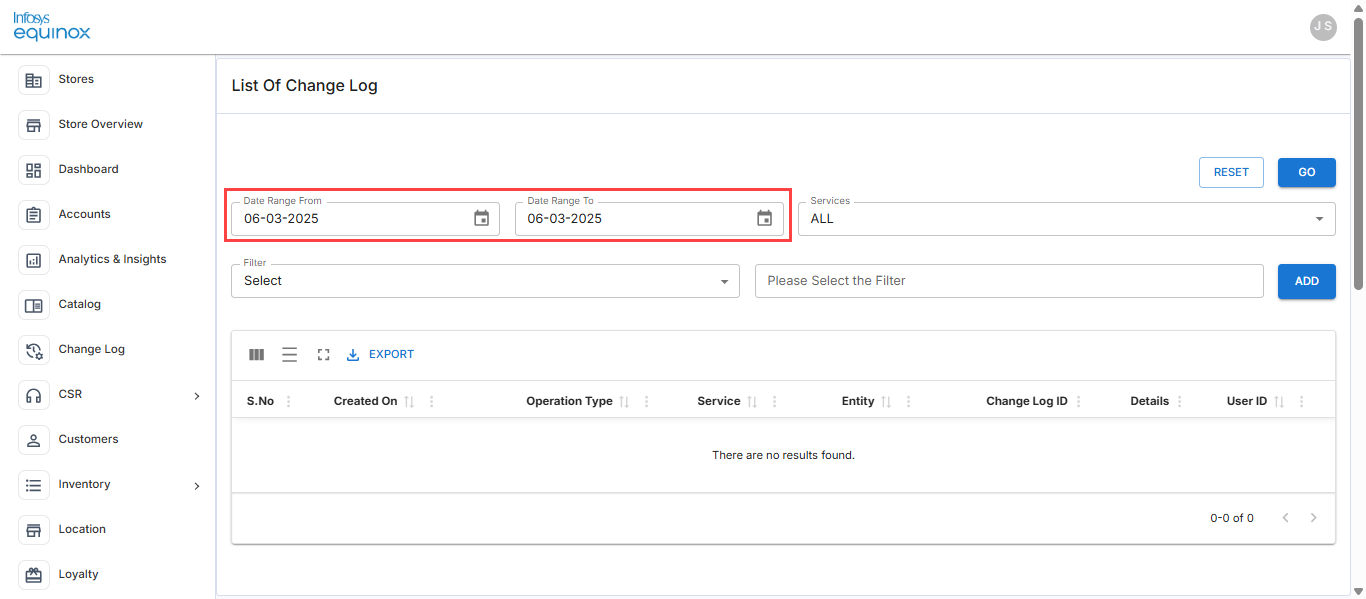
- Set the start and end dates to search for the change logs within the date range. This filter is optional.
Note: By default, the date range is selected for the current date.
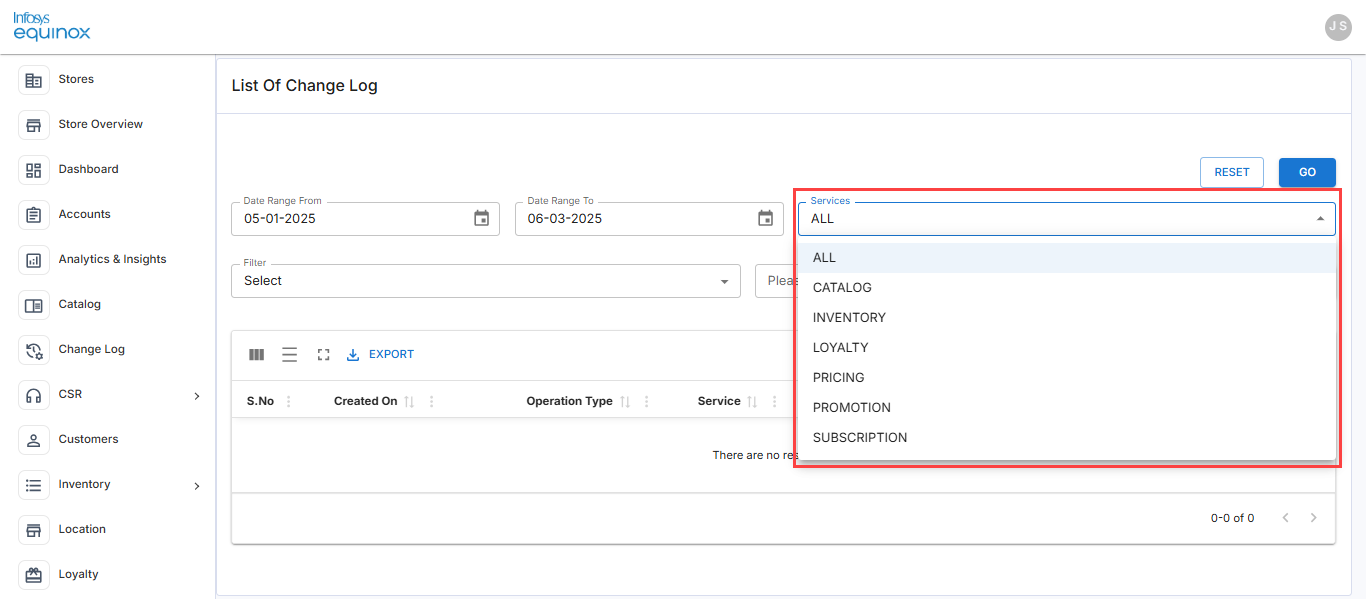
- In the Services dropdown list, select All or a required service. This filter is optional.
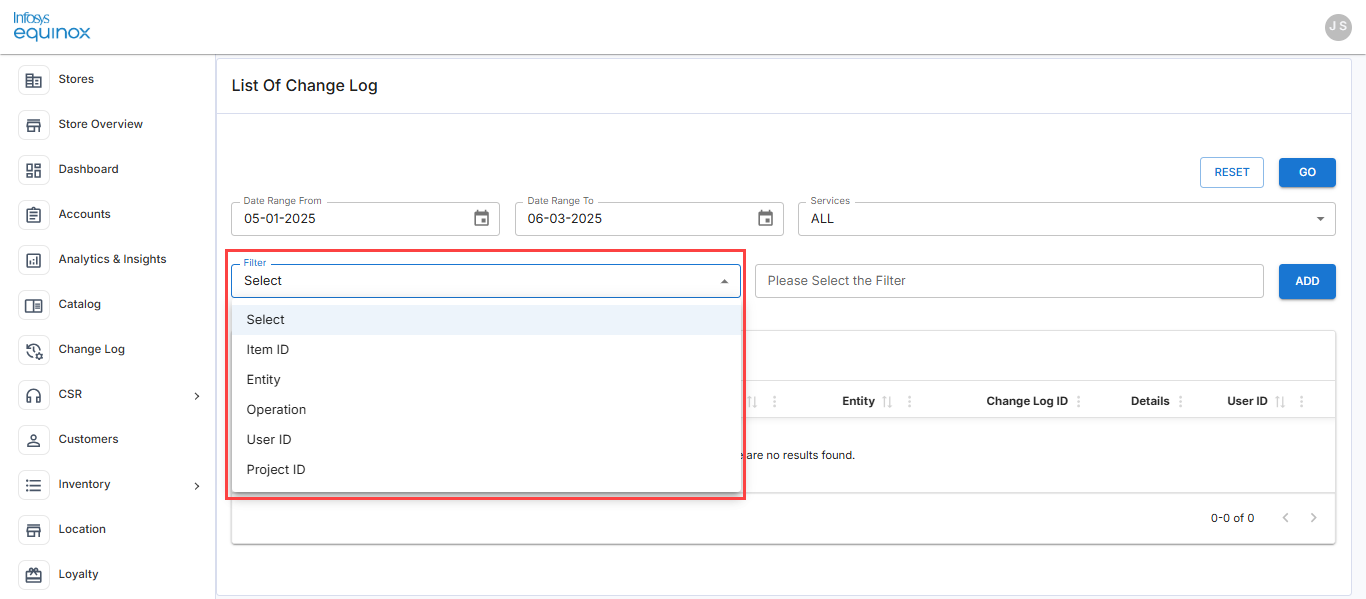
- Select a required filter from the dropdown list. This filter is optional.
The possible values are:- Item ID: To search for the change logs of a specific promotion group or promotion, enter the promotion group or promotion ID.
- Entity: to find the change logs for the selected entities, select all, PROMOTION, and/or PROMOTION GROUP.
- Operation: to find the change logs with a specific type of operation(s), select all, CREATE, UPDATE, and/or DELETE.
- User ID: to check changes made by a specific user, enter the user ID.
- Project ID: to search for the change log of a specific project ID, enter the project ID.
- After selecting a filter, in the next input field, enter the appropriate value based on the filter you have selected.
- Click Add to add another filter if required and repeat the above steps 5 & 6. This is optional. If you do not have add additional filters, proceed to the next step.
- Click the GO button.
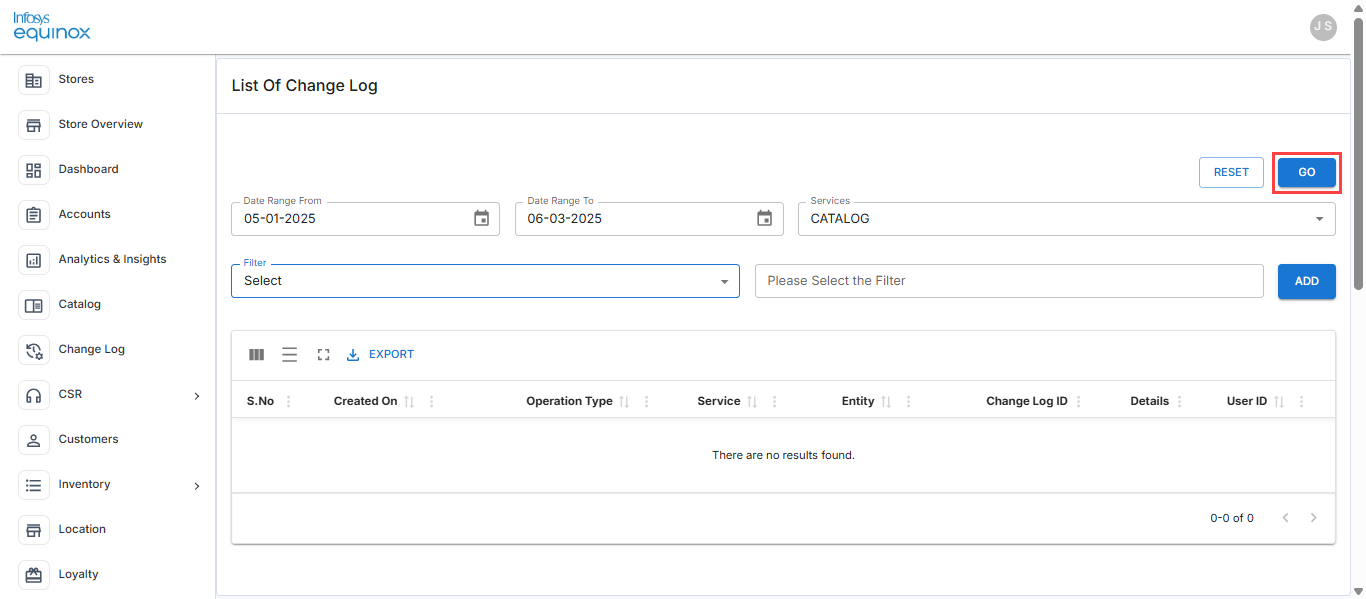
Note: To clear the filters, click the Clear Filters button.
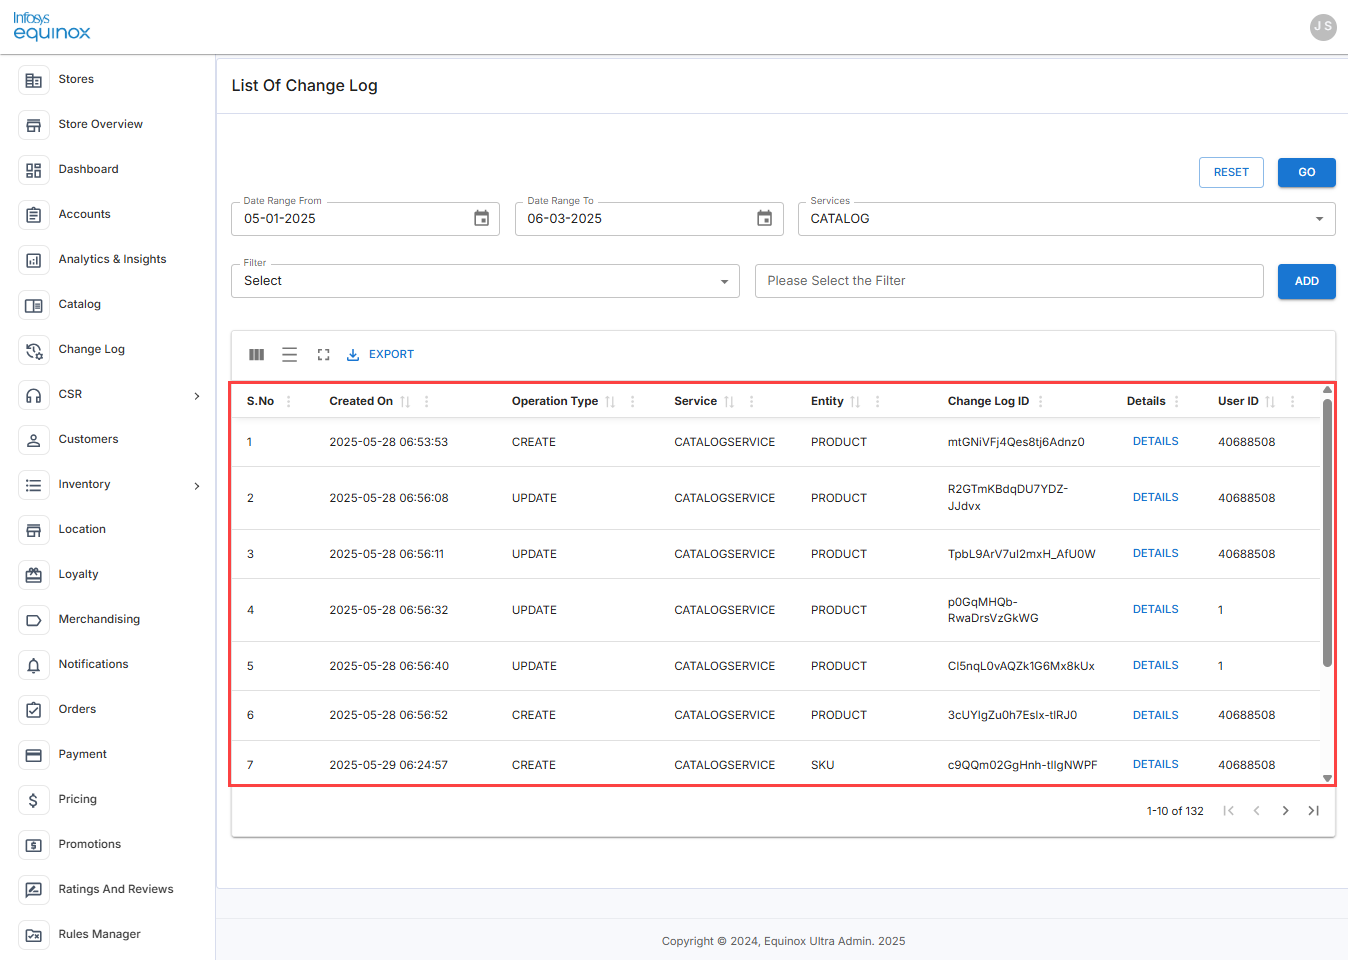
The change logs are shown based on the selected filters. For example,
Managing Orders, Customers, Accounts by a CSR
Overview
The Infosys Equinox CSR Admin console plays a crucial role in managing business and customer interactions for B2B2C (Business-to-Business-Customers), B2C (Business-to-Customers), or B2B (Business-to-Business) store-type. CSRs handle a range of customer services, including grievance redressal, placing orders via phone, managing customer profiles, and resolving various issues. The CSR Admin is an integral component of the Ultra Admin, specifically designed to help CSRs manage and address customer needs efficiently.
With the CSR Admin console, a CSR can perform the following functions:
- Create an Account: Create an account on behalf of a customer. When a customer creates an account via the storefront, the same is reflected along with their address(es) and payment details. A CSR can view and manage all the customer accounts. For more information, see Working with Accounts.
- Manage an Order: View and manage both normal and subscription orders placed by the customer. A CSR can place a new order or subscription order on behalf of a customer. For more information, see Placing a New Order for Guest Users.
- Manage Customer Information: Create and manage all customer information, including adding a new customer, orders, addresses, payment details, privacy and consent preferences, and create, manage and associate customer attributes. For more information, see Managing Customer Attributes, Actions Available for Registered Customers, and Customer Details Tab.
CSR Admin includes extension capabilities that enable businesses to easily customize their operational workflows. To meet organizational requirements, specific features for order processing, navigation, account configurations, and customer management can be enabled or disabled. For more information, see Customizing Extensions.
By centralizing customer, account, and order information and management, the CSR Admin console enhances the efficiency of customer service operations and improves the overall customer experience.
Customizing Extensions
Overview
Extensions enable businesses to quickly customize their order, navigation, account, and customer management processes by toggling specific features on or off. To implement these changes, you can modify the JSON file within the relevant store property, ensuring that only the essential features are retained to meet each client’s unique requirements.
Implementing Extensions via Store Properties
To enable specific functionalities, extensions are configured through store properties. This involves modifying the associated JSON file to activate or deactivate features as needed. By customizing the JSON structure, you can tailor the system behavior to match your business requirements efficiently.
List of Store Property Configurations
The following store property configurations enable customization and management of various extensions within the Ultra Admin console:
| Feature for | Use store property | To |
| Account | accountExtension | Customize account-related features with additional fields, advanced search options, and more. |
| Customer | customerExtension | Enhance customer management with configurable fields, editable properties, and more. |
| Navigation | navigationExtensions | Configure the main menu to show, hide, add new menu items, and more. |
| Order | ordersExtension | Customize order management screens, adds conditional display fields, and more. Note: For more information, see the videos Configuring Component Level Returns and Additional Capabilities Using Order Extensions in Ultra Admin. |
| Order Items | orderitemsExtension | Customize order item management by toggling features on or off. |
| Order Reasons | orderreasonsExtension | Enable customization of order reasons for cancel, return, and replacement. |
| Order Actions | orderactionsExtension | Display or hide refund methods and other charges in the return order flow. |
| Order Reports | orderReportsExtension | Enable customization of order reports. |
| Subscriptions | subscriptionsExtension | Configure the show/hide channel type, price edit, and upcoming order date. Also configures enable/disable other charges of the subscription order. |
| Rules Extensions for Account & Customer | rulesExtension | Provide enhanced control and customization over the management of account and customer profiles, including visibility and edit permissions. |
| Locales | localeExtensions | Display menus and fields in the user’s preferred language (such as US English, Germany, and Arabic). |
| Payment | paymentExtension | Show payment options like bank transfer, installments, store credit, and loyalty rewards based on channel type. |
| Address | addressExtension | Allow to update a customer’s legal address before placing an order. |
Note: For more information, see the videos:
- Inventory Extension Actions and Fields
- Configurable Price Actions and Fields
- Categories Extension Actions and Fields
- Currency Config Extension
- Tax Inclusive Pricing
- Accounts & Customers Extension Configuration by a CSR
Example
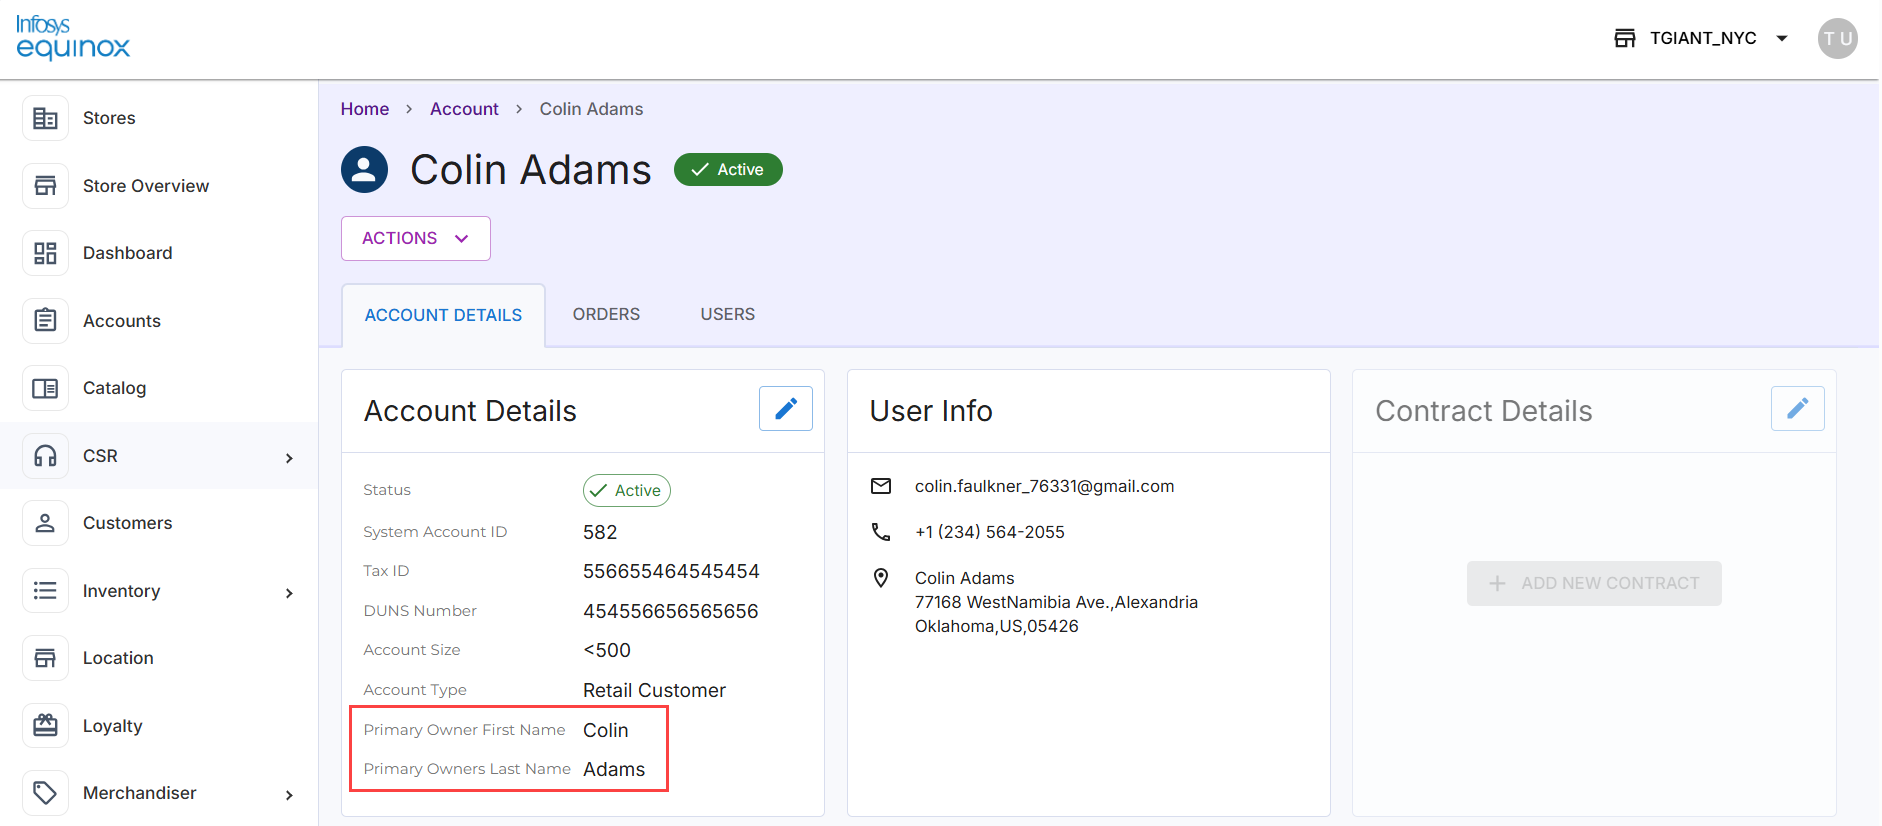
For example, to add extra fields with view-only or editable that provide more detailed information on the account profile page, in the store property accountsExtension, modify the JSON to include the following:
| “additionalDisplayFields”: [ { “label”: “Primary Owner First Name”, “type”: “string”, “path”: “bfirstName”, “enableEdit”: false }, { “label”: “Primary Owners Last Name”, “type”: “string”, “path”: “blastName”, “enableEdit”: false } ], |
where,
- “name”: This value will be the property name that is mapped through the API.
- “label”: This value will be shown on the UI as the field label.
- “type”: This property determines the field input type (e.g., text, select).
- “path”: This property value is used for object mapping.
- “enableEdit”: This property controls whether a field is editable or view-only. Set it to true to make the field editable, or false to make it view-only.
After the configuration, you can see the “Primary Owner First Name” and “Primary Owner Last Name” as viewable fields on the account profile page:
Using Quick Search & Advanced Filters
With the CSR Admin console, as a CSR, you can do a quick search for a customer or use the advanced search filter to obtain the desired result.
Use a Quick Search
Quick Search is the landing page as soon as you click CSR in the StoreOps page. Quick search is a basic search functionality that allows an admin user to quickly find specific order, customer, or account details.
To use a quick search by a CSR Admin user,
- Log in to the Foundation console for your business (URL provided by Infosys Equinox).
- Select the required store in the All Stores page.
Once a store is selected, the StoreOps page will appear. If a CSR is associated with multiple stores, they will be redirected to the store listing page upon logging in. If a CSR is associated with only one store, the store operations page will be the landing page upon logging in. - In the StoreOps page, click the CSR card.
The Quick Search page is displayed.
Note: If you are already on the CSR Admin console, in the left navigation panel, click CSR to expand, and then click Quick Search.
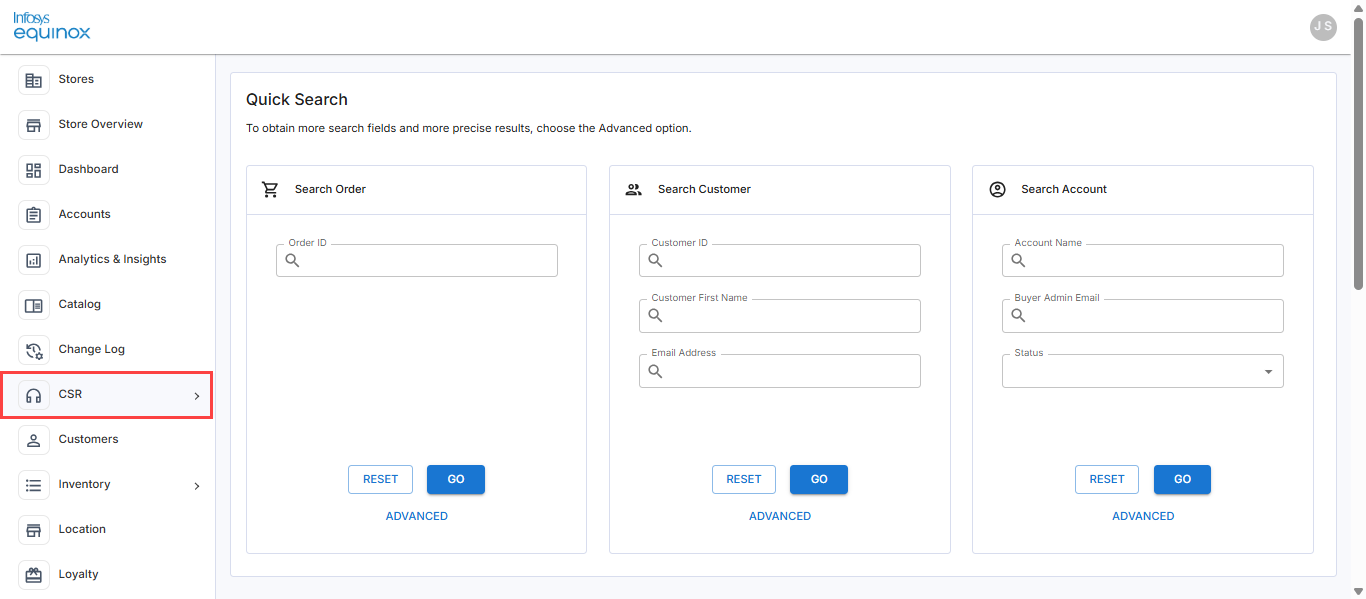
- In the Quick Search page, to search for order(s), customer(s), or accounts, use the required quick search:
Under Use a quick search to Search Order search by the order identifier Search Customer search by the customer identifier, customer’s first name, or email address Search Account search by the account identifier - Click the Go button.
Note:- To reset the filled-in search details, click the RESET button.
- To use the advanced search criteria, see Using Advanced Search.
Use an Advanced Filter
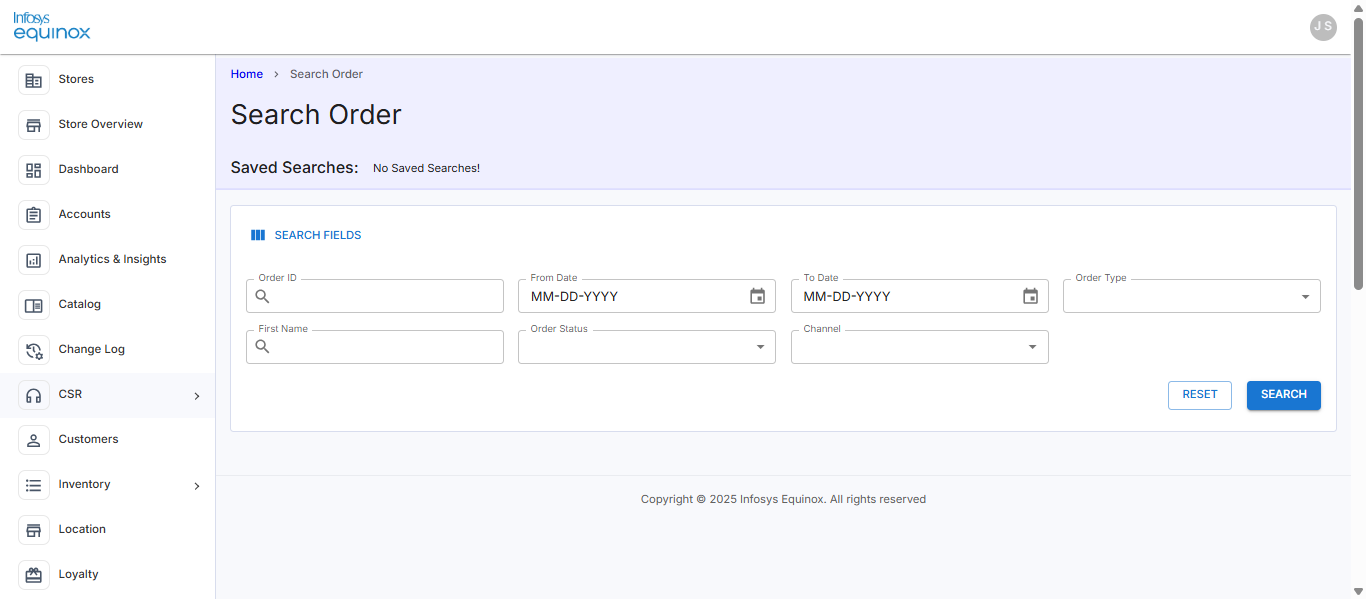
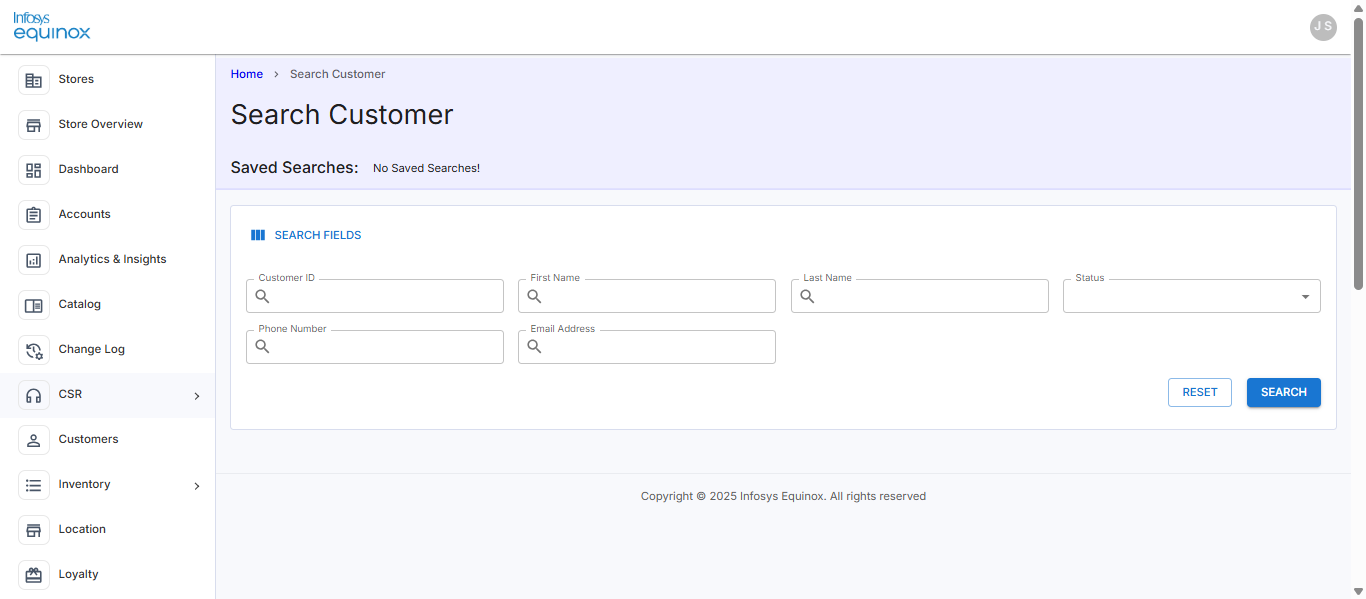
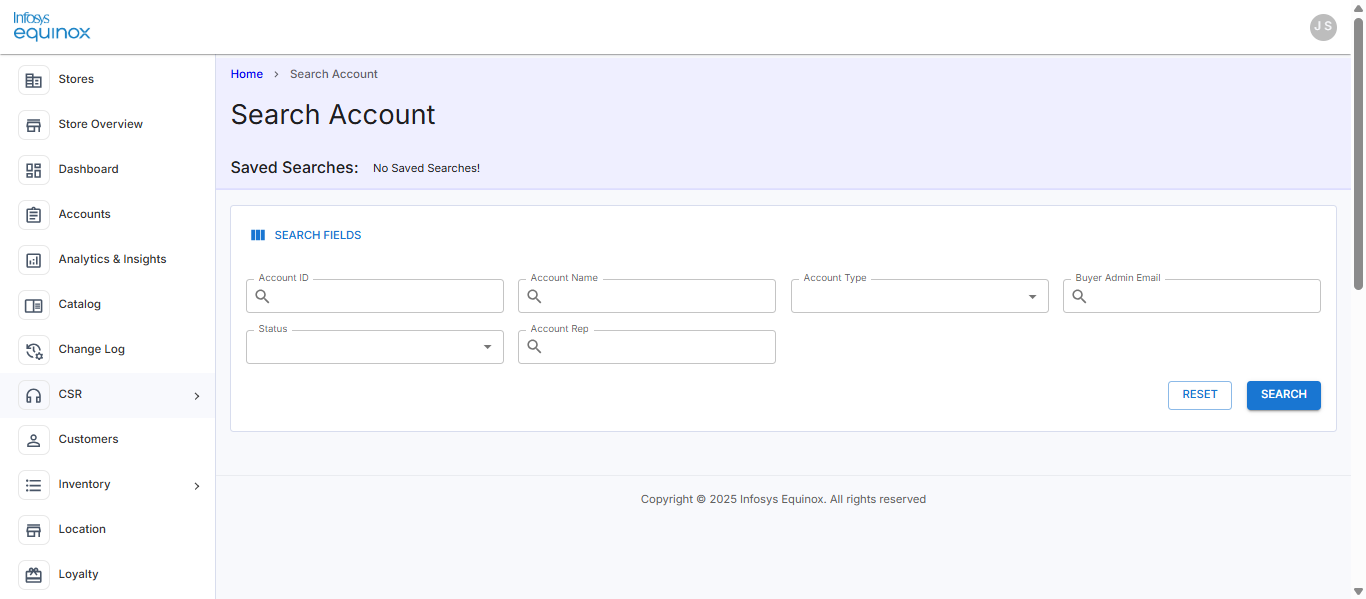
The advanced search goes beyond the quick search box functionality. In order to show results that match, it enables an admin user to further filter the search and apply other criteria. Depending on which component (such as an order, customer, or account) you are looking for, different search boxes apply. You will notice search filters that are activated by default under these components. In addition to the default search filters, there are additional search fields that you can activate as needed.
To obtain more search fields and to use more advanced search options,
- Log in to the Foundation console for your business (URL provided by Infosys Equinox).
- Select the required store in the All Stores page.
Once a store is selected, the StoreOps page will appear. If a CSR is associated with multiple stores, they will be redirected to the store listing page upon logging in. If a CSR is associated with only one store, the store operations page will be the landing page upon logging in. - In the StoreOps page, click the CSR card.
The Quick Search page is displayed.
Note: If you are already on the CSR Admin console, in the left navigation panel, click CSR to expand, and then click Quick Search.
- In the Quick Search page,
Under Click the ADVANCED option to Search Order Enter or select the appropriate value to search for the order data Search Customer Enter or select the appropriate value to search for the customer data Search Account Enter or select the appropriate value to search for the account data
Note: The following screen shows the ADVANCED option for orders, customers, and accounts:
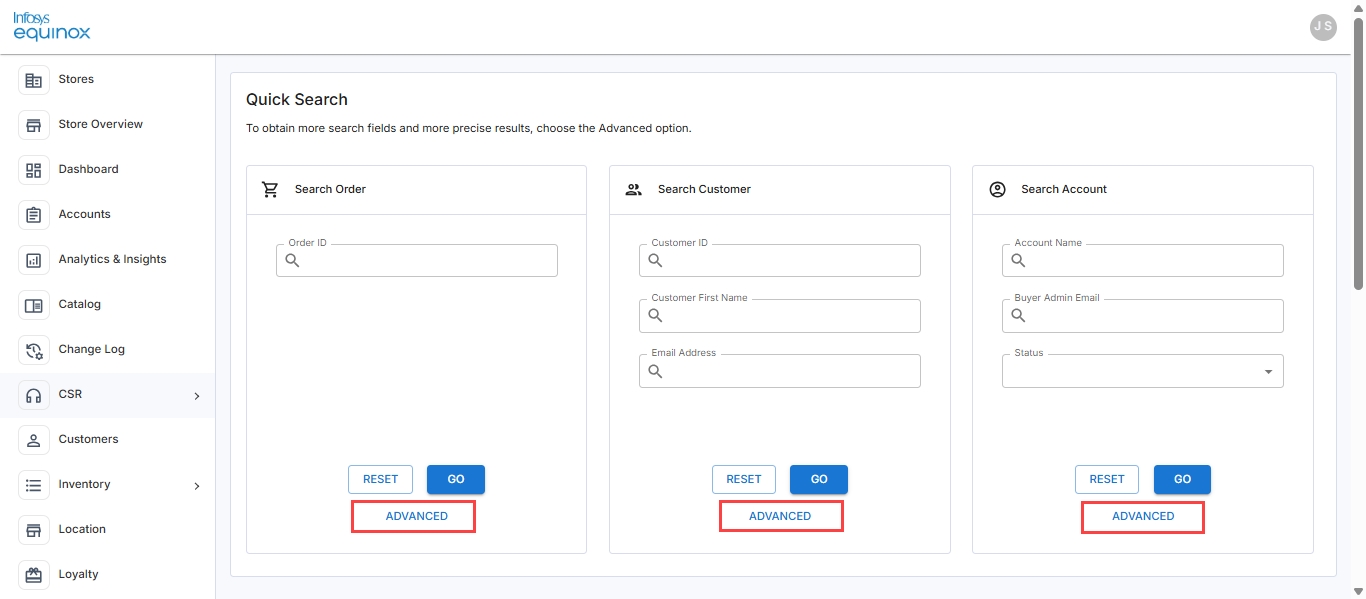
The following advanced search criterion page is displayed:
- For Order:
- For Customer:
- For Account:
- For Order:
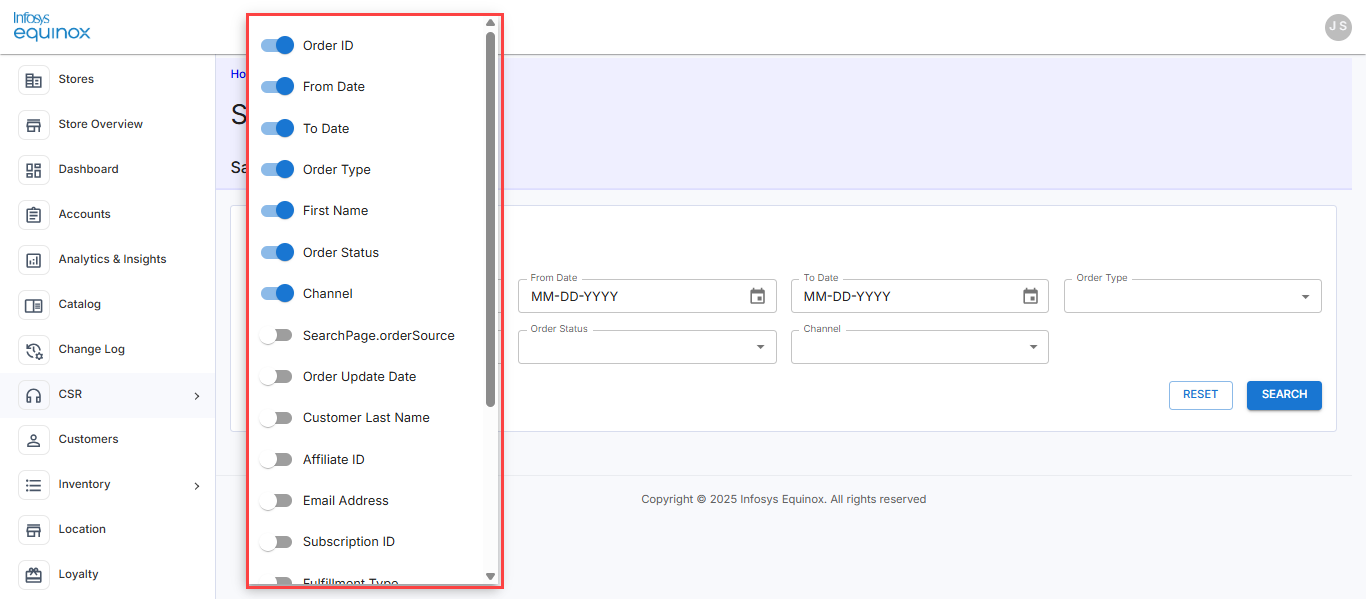
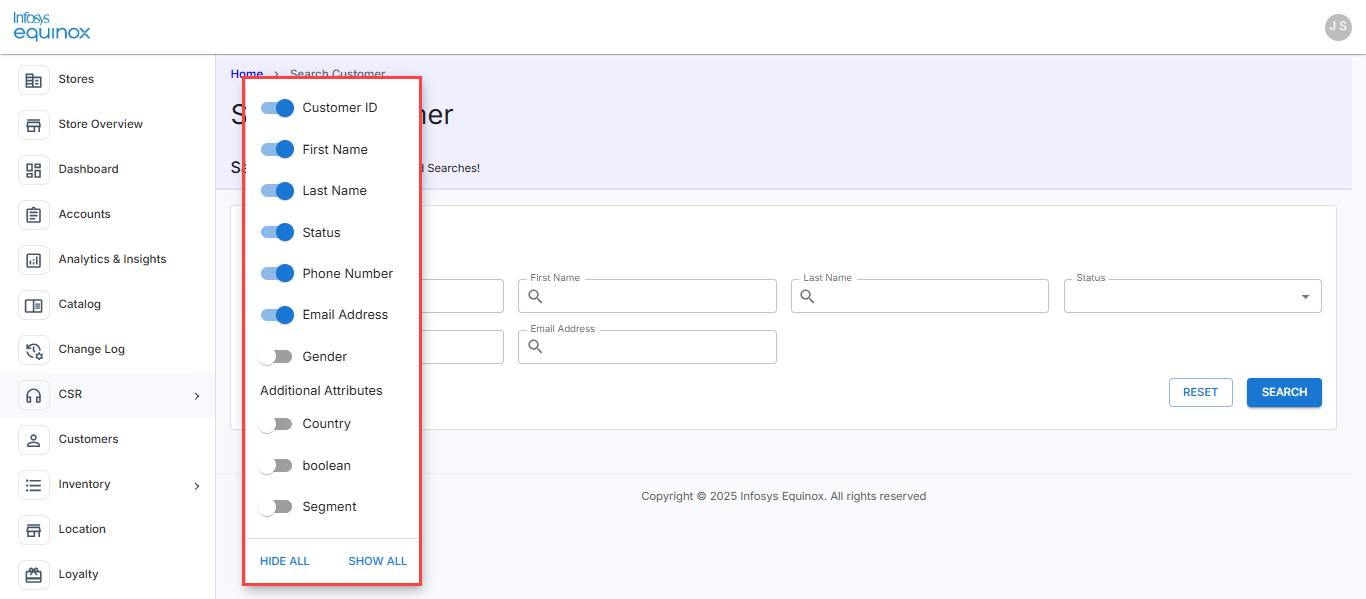
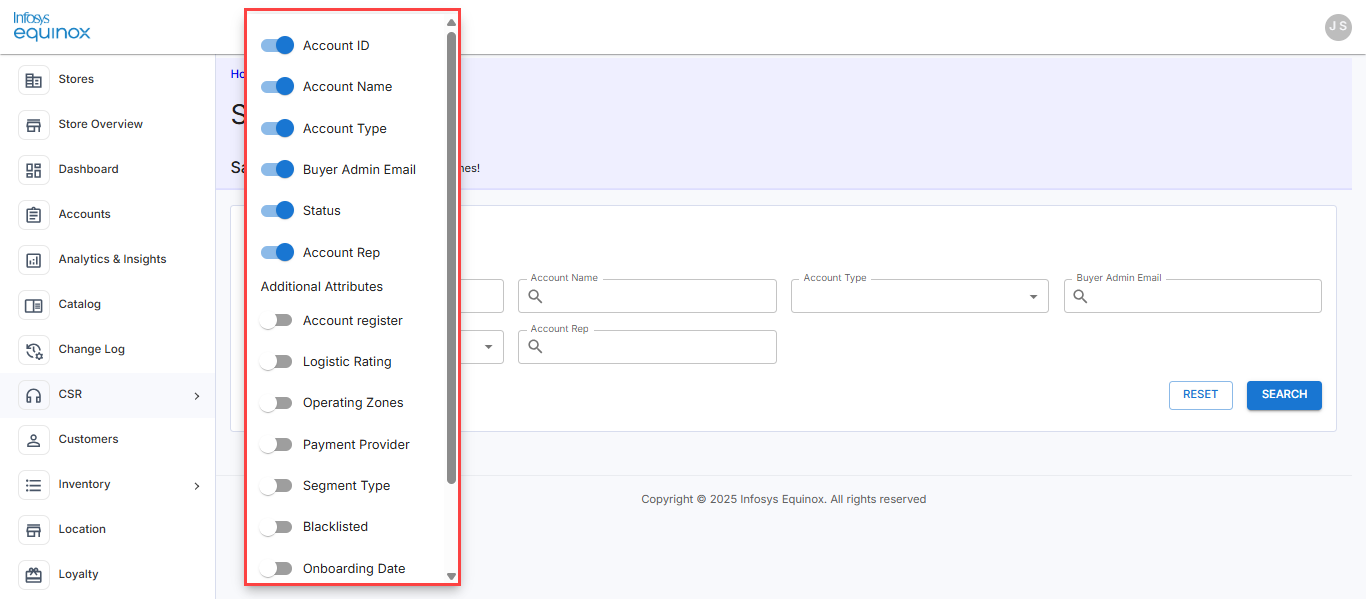
- If required, click SEARCH FIELDS to enable or disable more additional search criteria to be used. The enabled search field appears as part of the search criterion.
Note: In SEARCH FIELDS, scroll down and click SHOW ALL to show all the search fields or click HIDE ALL to hide all the search fields at once.
- For Order:
- For Customer:
- For Account:
- For Order:
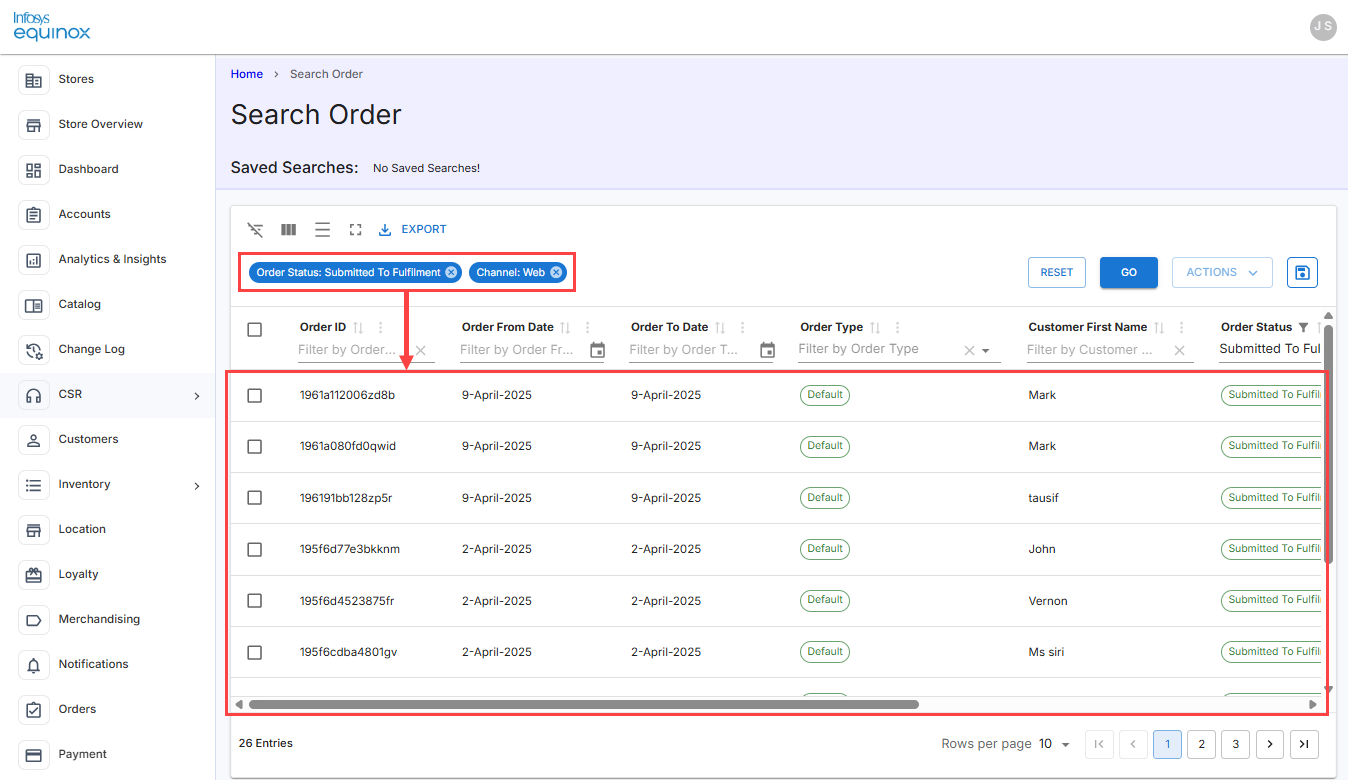
- Click SEARCH. The search result matching the criteria appears.
For example, the advanced search for orders:
Note:- To reset the filled-in search details, click the RESET button.
- To use the quick search option to search for the data, see Using Quick Search.
- To customize the table grid in the advanced search for orders, customers, and accounts, refer to the next section.
Additional Options in Search Result Page
Additionally, CSR can use the following options to export the search result data or to improve the view of the search result page. These options are shown in the search result page, attributes landing page, and similar pages in the CSR admin console.
Here are the options shown in the advanced search result page:
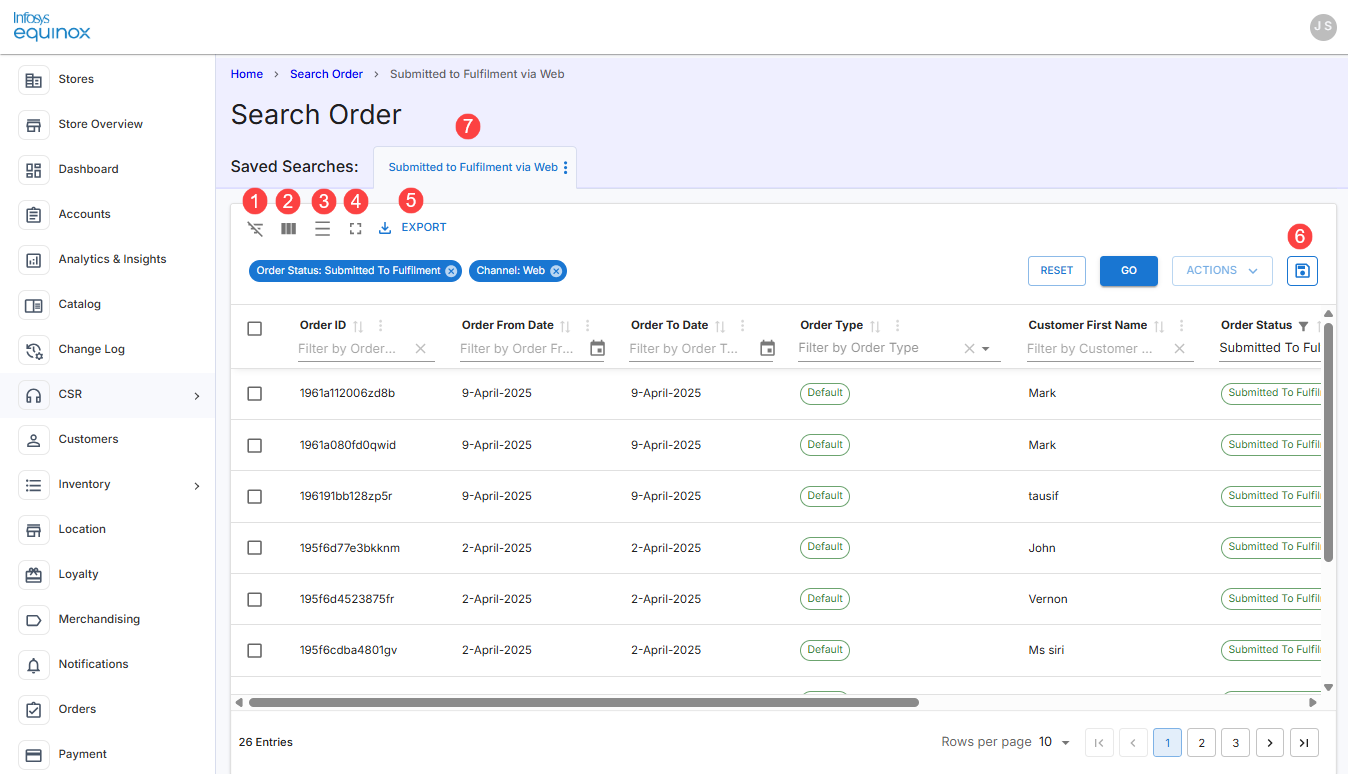
The following table describes the above callouts:
|
|
Use this option to show or hide filters on the columns of the table grid. |
|
|
Use this option to show or hide columns of the table grid. You will see a dropdown list with some columns enabled and others disabled. Only the enabled columns appear on the table grid. At the top of the dropdown list, you can hide all or show all columns with a single click. |
|
|
Use this option to increase or decrease the density of the rows. More rows can be viewed when the density is reduced. |
|
|
Use this option to maximize the view. Clicking it again will return to the standard view. |
|
|
Use this option to export the table gride data to your local computer. |
|
|
Use this option to save the search criteria. Once saved, the custom-defined search filter will appear in the Saved Searches list. |
|
|
On saving the search filter, it appears in a tab. Click the vertical ellipsis to rename, edit, or delete the saved search filter. |


To drill down to a specific result within a table, enter a search term into the table’s column headers and click GO to refine the displayed data and locate the desired information. You can also use sort option available in each columns to the filtered results. If needed, click the Reset button to clear all applied filters and return to the original list of orders. Or, click  to clear the value on a particular column.
Placing a New Order for Guest Users
A CSR persona can place an order on behalf of a guest user from the Equinox Admin console without a need to navigate to the storefront. When creating a guest order, CSR can choose the fulfillment method “Ship It” or “Pick It Up” based on the customer’s preference:
- Ship It: The CSR selects this option to have the item shipped directly to the customer’s address.
- Pick It Up: The CSR selects a store location where the item will be shipped to the store for customer pickup.
For placing an order for a registered user, see Acting on Behalf of a Registered Customer to Place Orders and Placing a New Order for a Registered User.
To place a new order by a CSR for a guest user,
- Log in to the Foundation console for your business (URL provided by Infosys Equinox).
- Select the required store in the All Stores page.
Once a store is selected, the StoreOps page will appear. If a CSR is associated with multiple stores, they will be redirected to the store listing page upon logging in. If a CSR is associated with only one store, the store operations page will be the landing page upon logging in. - In the StoreOps page, click the CSR card.
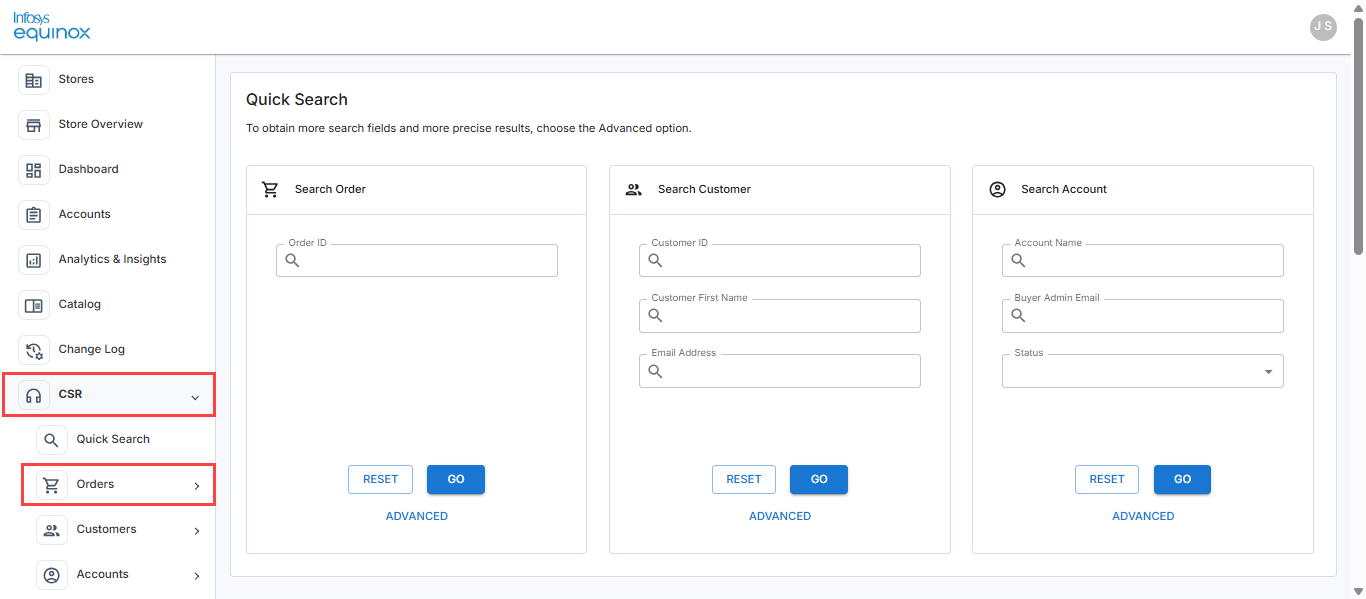
- In the left navigation panel, click CSR, and then click Orders.
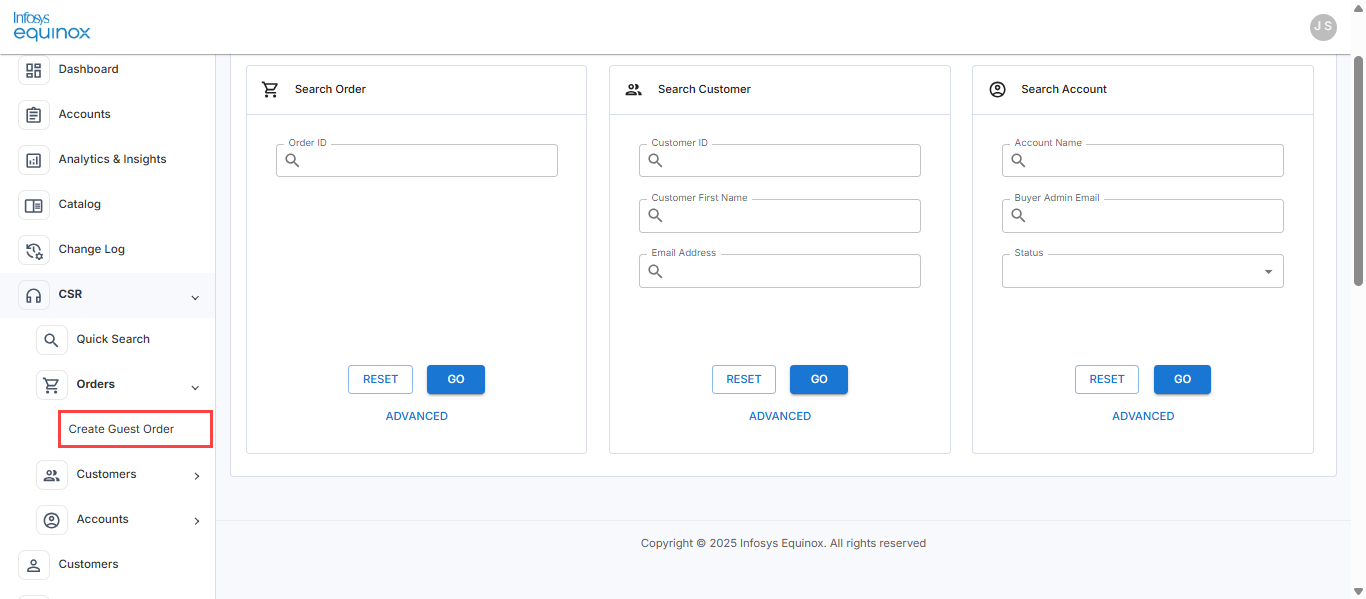
- Under Orders, click Create Guest Order.
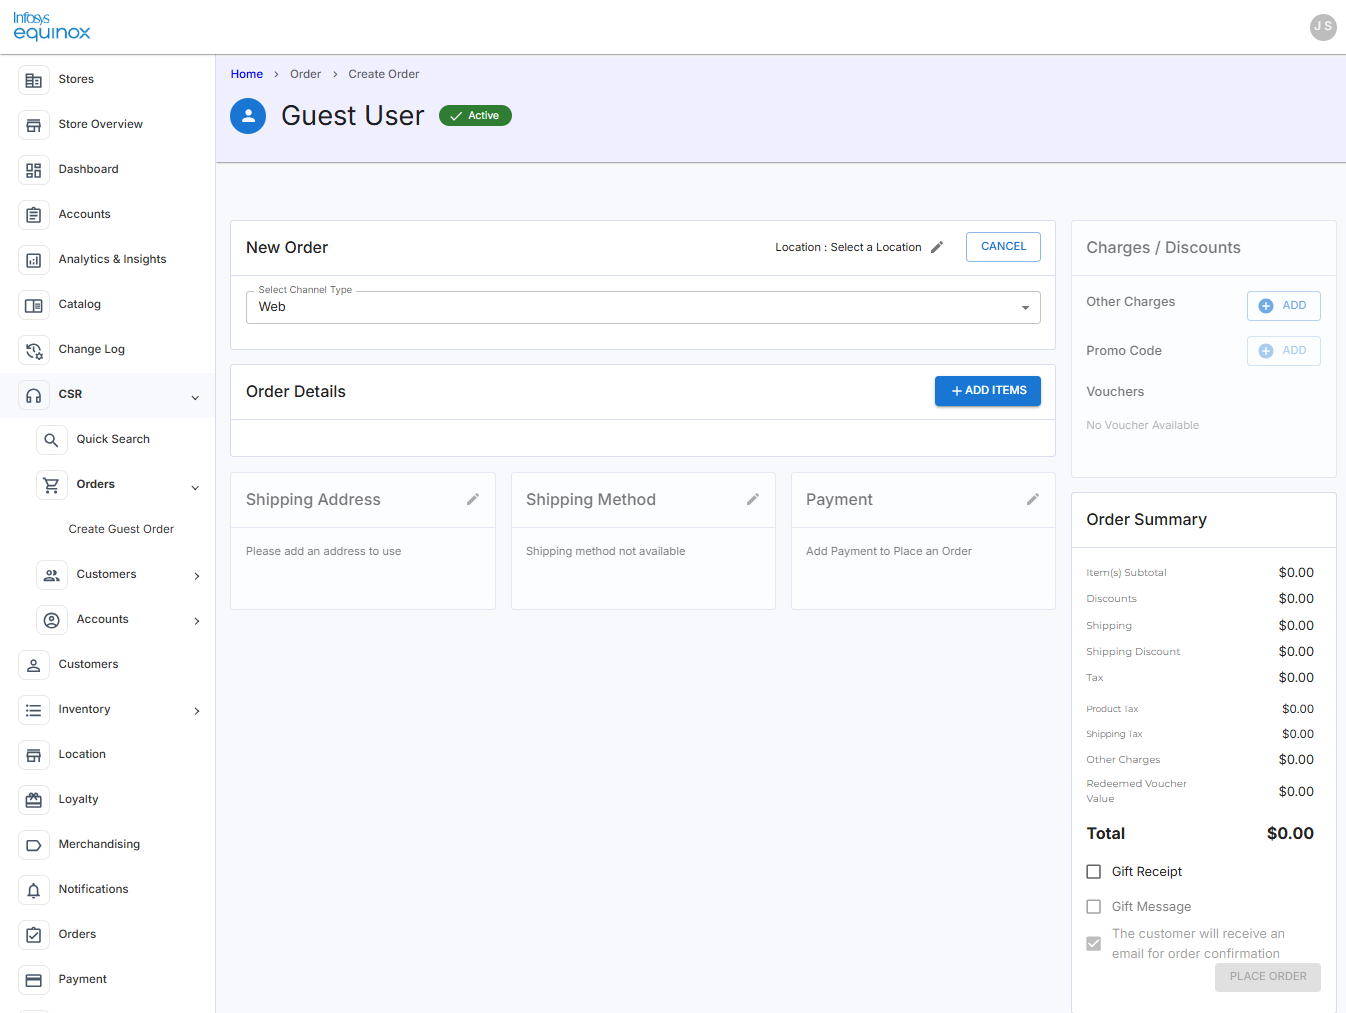
The Guest User page opens.
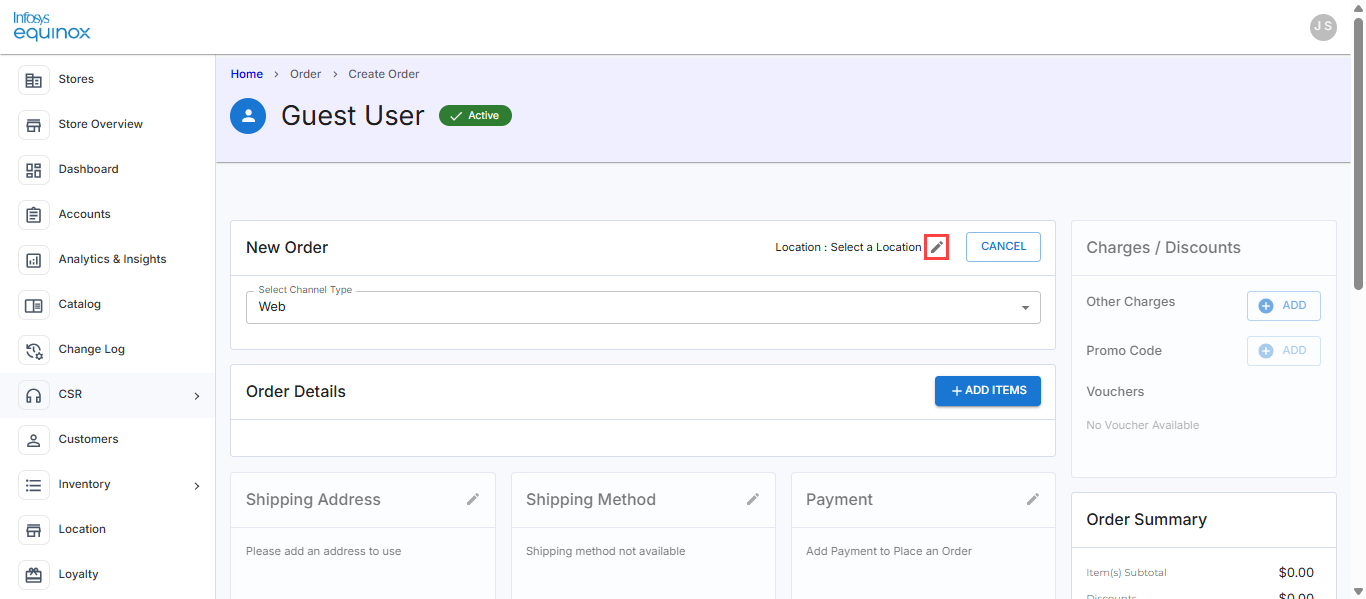
- For adding your store pick up location, in the Location selector, click the Edit icon:
The “Pick up store selection” drawer appears on the right side of the screen:
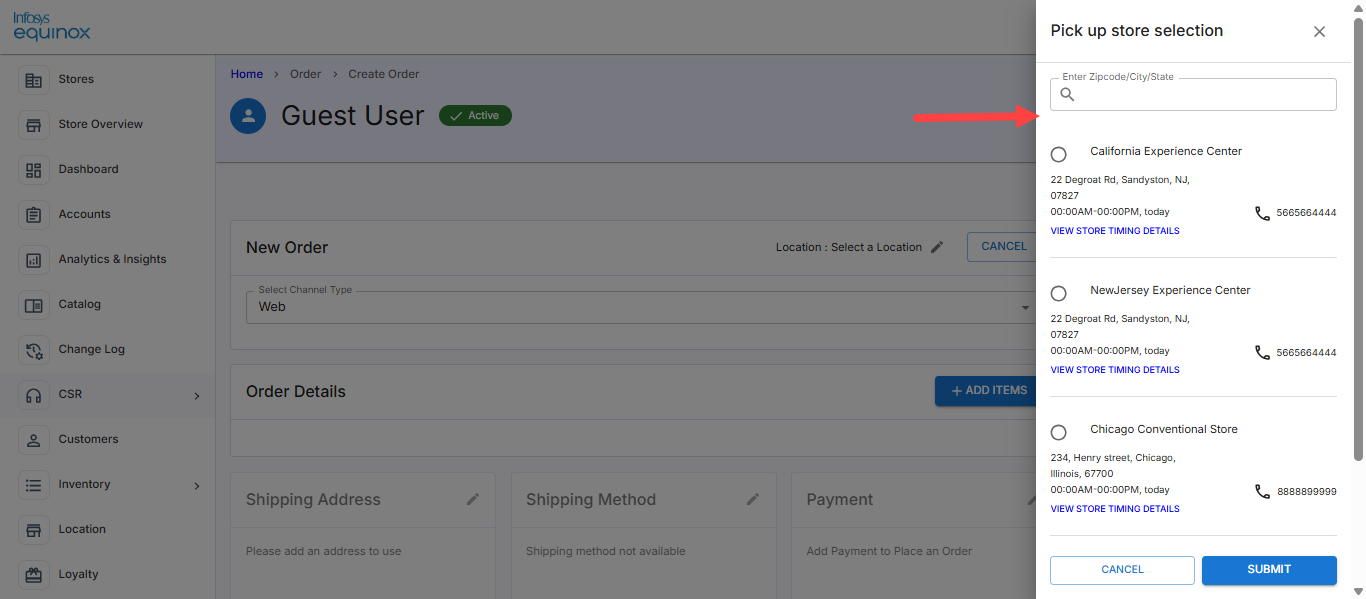
- In the Search bar, enter your location’s zip code, city, or state. The matching search result will be displayed.
- Select the required store from which the customer wants to pick up the product(s).
Note: While selecting the store pickup, you will see the name, address, phone, and timing of the store. CSR can click the VIEW STORE TIMING DETAILS option to know the store timing details of all days of the week. After checking, to hide the store timing details, click the HIDE STORE TIMING DETAILS option.
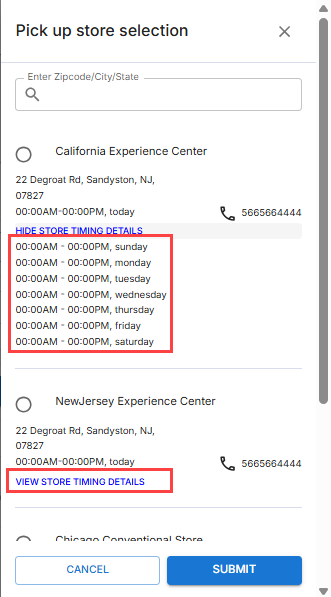
- Click the Submit button. The selected pickup store appears in the Locations field.
Note: To ignore adding the location, click the Cancel button in the Pick up store selection drawer - . After adding the pick up location, if you want to cancel it, click the Cancel button in the New Order page.
Note: For more information, see the video Placing a BOPIS Order by a CSR.
- In the New Order checkout page, select any one of the channel types:
- Web: Select this option if the order is placed via online.
- Phone: Select this option if the order is placed via a mobile phone.
- Walk in Center: Select this option if the customer places the order in a walk-in center.
- CSR: Select this option if a CSR places the order based on the customer’s request.
Note: The channel type values are configured via the store property orderChannelTypes in the Foundation Admin Console.
- Click the ADD NEW ITEMS button to add an item that is required by the customer.
- Search and select the required product.
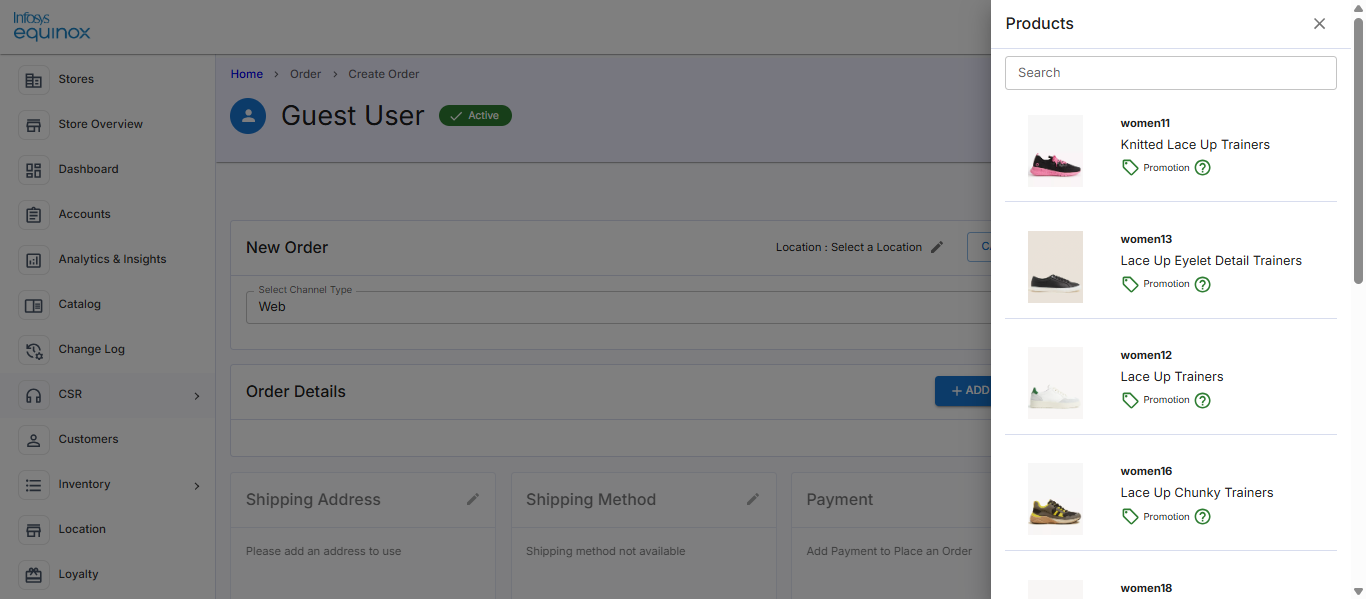
- In the Products drawer,
- Select the quantity of the item. By default, the quantity 1 is selected.
The product detail page opens.
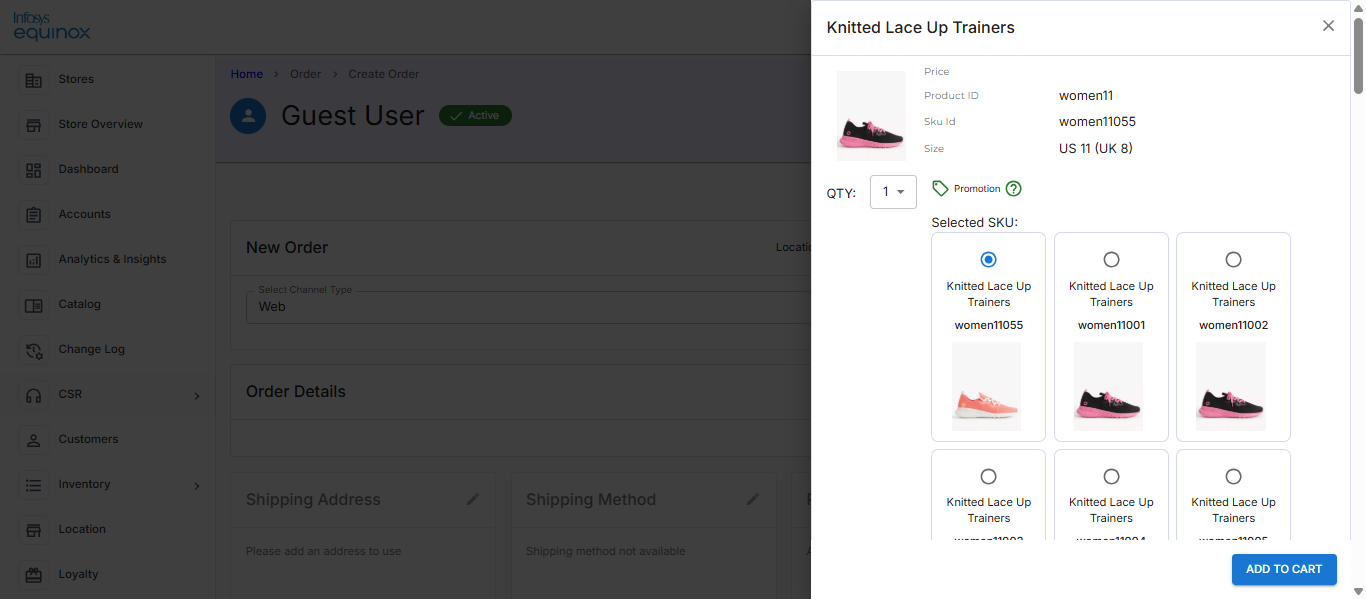
- Select the required SKU.
Note: To deselect the product, click present at the top-right of the screen. - If pick up from store location is selected in the New Order page, select the Pick up in store option shown under the “Available for Pick Up” section.
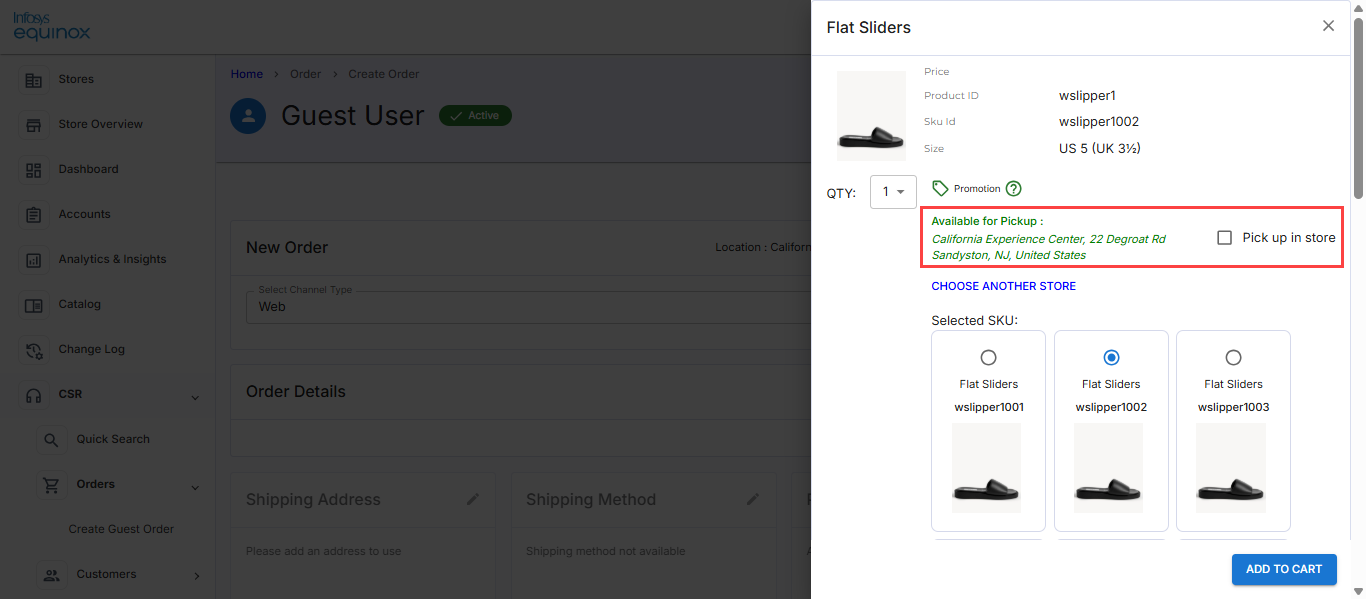
Note: To choose another store, click the CHOOSE ANOTHER STORE option, and then select the required store from the “Pick up store selection” drawer. - Click the ADD TO CART button to add the items to the cart.
The message “Item added successfully” appears on the top of the screen. - If pick up from the store location is opted, then the pick up person’s details (such as first and last name, email, and phone number) must be provided and submitted:
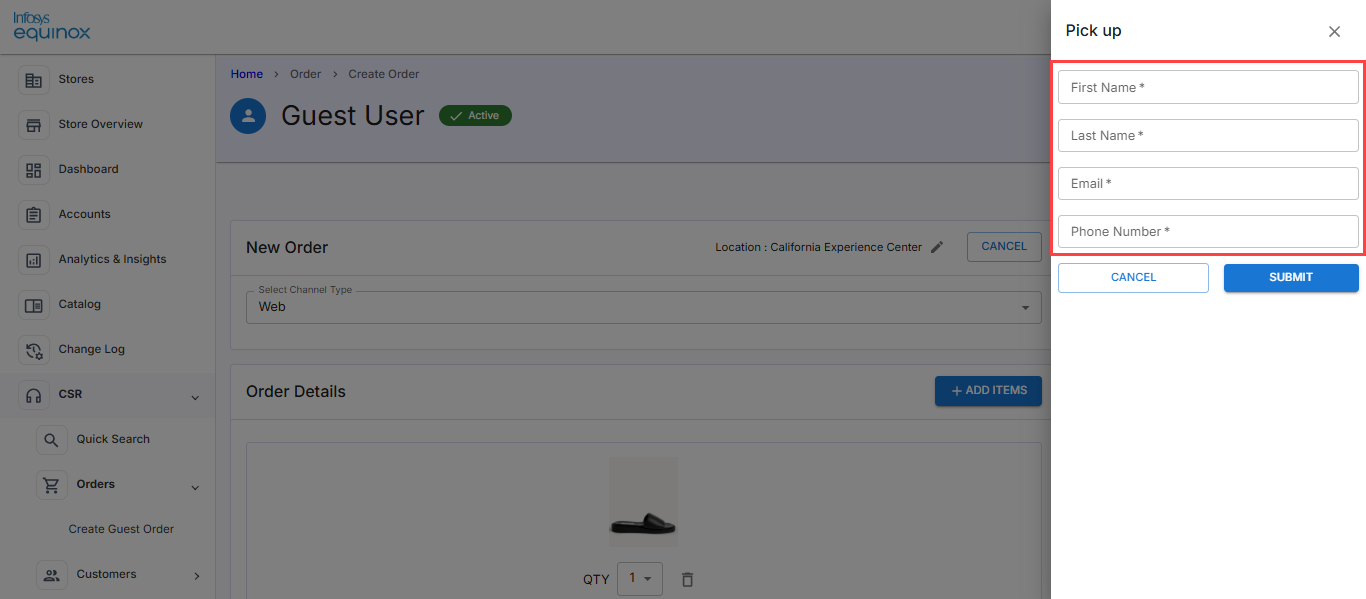
Note: For more information, see the video BOGO Gift Selection.
- Select the quantity of the item. By default, the quantity 1 is selected.
- In the Order Details section, you can review or modify as follows if required:
- Select the required quantity of the item.
- Click the Delete icon to remove the added items.
Note: Only after adding the item, the remaining sections on this page will be enabled. - Select any one of the following:
- Ship It – to ship the item(s) to the specified shipping address.
- Pick It Up – to pick the items by the customer from a nearby store location. In Select Store, enter a zip code, city name, or state name, and then click Search. In the result page, select a required location.
Note: If you do not get a location, refine your search by entering another zip code or by selecting another distance.
- Under Shipping Address, click
 , and then click ADD NEW to add the address of the guest user to whom the item needs to be delivered. Click the SAVE button to save the address.
Note:- To replace the added address, click , and fill up all the necessary address details.
- The Shipping Address section is not shown if the Store Pickup option is selected.
- To replace the added address, click
- Under Shipping Method, displays the default shipping method.
Note: To choose another shipping method, click and then again click against the selected shipping method in the Shipping Method drawer. Select a override reason and provide override price details. Click the SAVE button to save the shipping method.
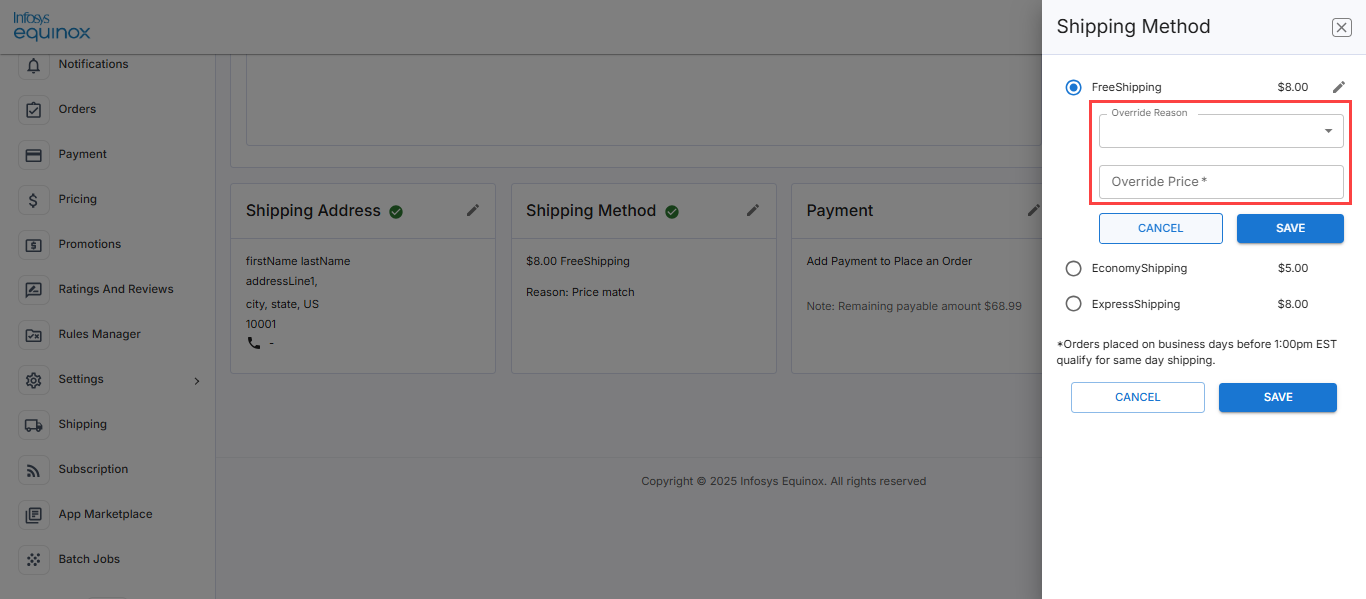
- Under Payment, click , and then click ADD NEW in the Payments drawer to add the credit card or debit card payment details of the customer.
Note: While adding the payment card details, CSR can choose the filled in payment card as the default card, and also choose to show the payment card in the customer’s profile.
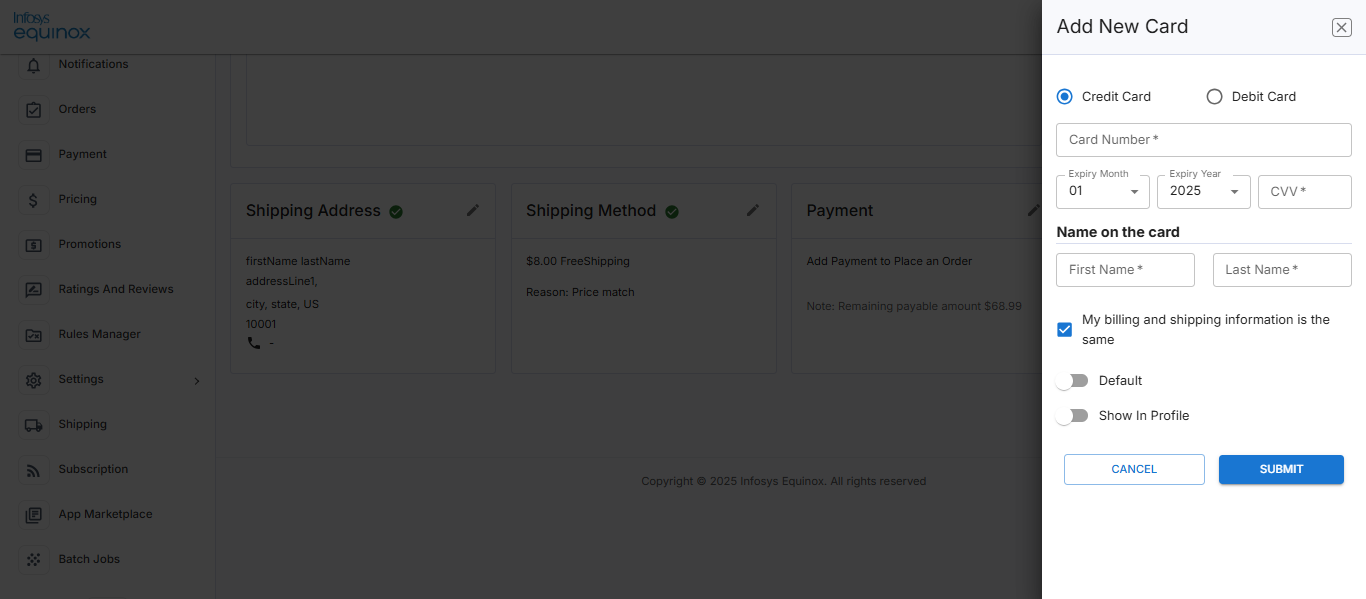
- Click the SUBMIT button to submit the payment method.
- Under the Charges / Discounts section, for Other Charges:
- Click
 to include the custom-defined other charges at the cart level if applicable.
 - Select to apply the appropriate additional charges, for example Sales.
- Specify the charge name and the charge value against the order.
- Click the APPLY button. The additional charges will be shown in this section and in the Order Summary section as part of the total charges to be paid by the customer.
- Click
- Under the Charges / Discounts section, for Add promotion and/or loyalty details, click to include necessary promotions details.
Note: For more information, see the video Promo Code and Voucher Updates. - View the order summary.
- Select Gift Receipt if required. For example, the business can configure to print the invoice without price details, and so on.
- Select Gift Message if required. Provide the required gift message.
- Click the PLACE ORDER button.
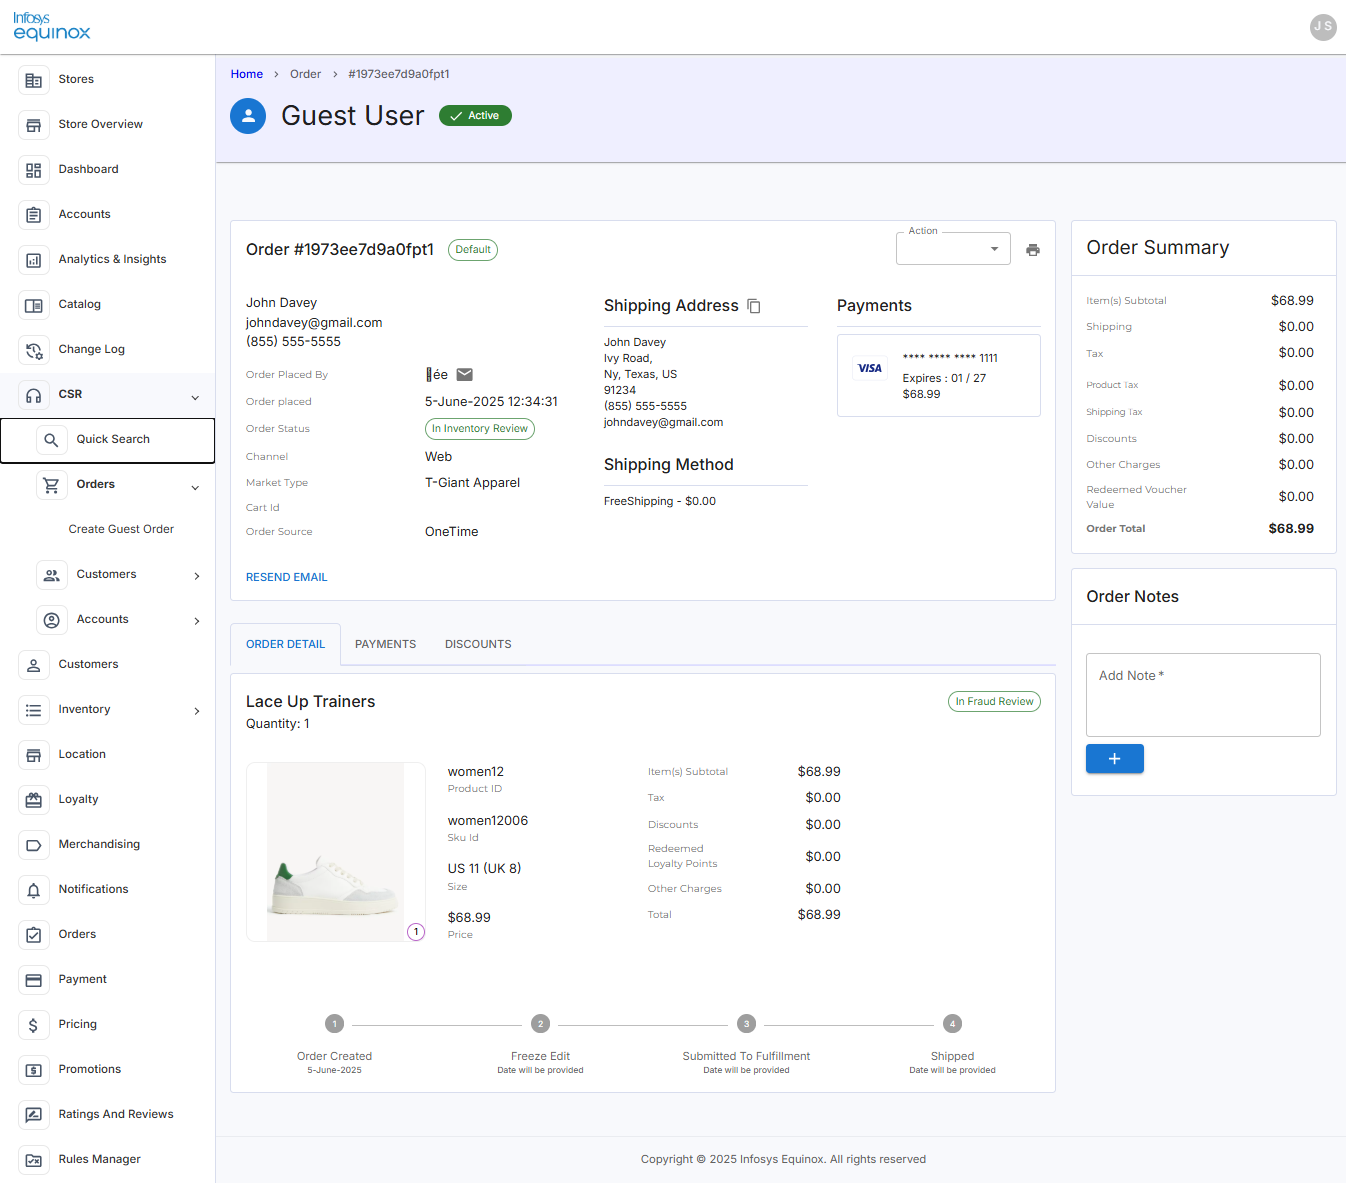
The order is created as shown below:
Managing Customer Attributes
Overview
Customer attributes are user-friendly, admin-defined fields that allow businesses to store additional information beyond the standard fields. These custom attributes help businesses:
- Tailor their data to specific needs
- Add personalization
- Assist in customer segmentation
- Enhance data analysis
CSR can define these custom attributes when adding a new customer or updating a particular customer’s profile. Attributes can be configured as mandatory or optional, depending on business requirements.
Note: For more information, see the video Custom Attributes.
As a CSR Admin, you can:
- View the list of previously created attributes
- Create new attributes
- Update existing attributes
- Manage attribute settings and configurations
Attribute Field Types
When creating a new attribute, you must specify the field type. The available field types include:
- Boolean – True/False values
- Date – Calendar date selection
- Decimal – Numeric values with decimal points
- Email – Valid email address format
- List – Single-select dropdown list
- Multiple List – Multi-select dropdown list
- Number – Whole numbers only
- String – Free text input
Examples of Custom-Defined Attributes
- Activation Date
- Rating
- Secondary Contact (Email)
- Tier
- Multiple Payment Methods
Viewing the Existing Customer Attributes
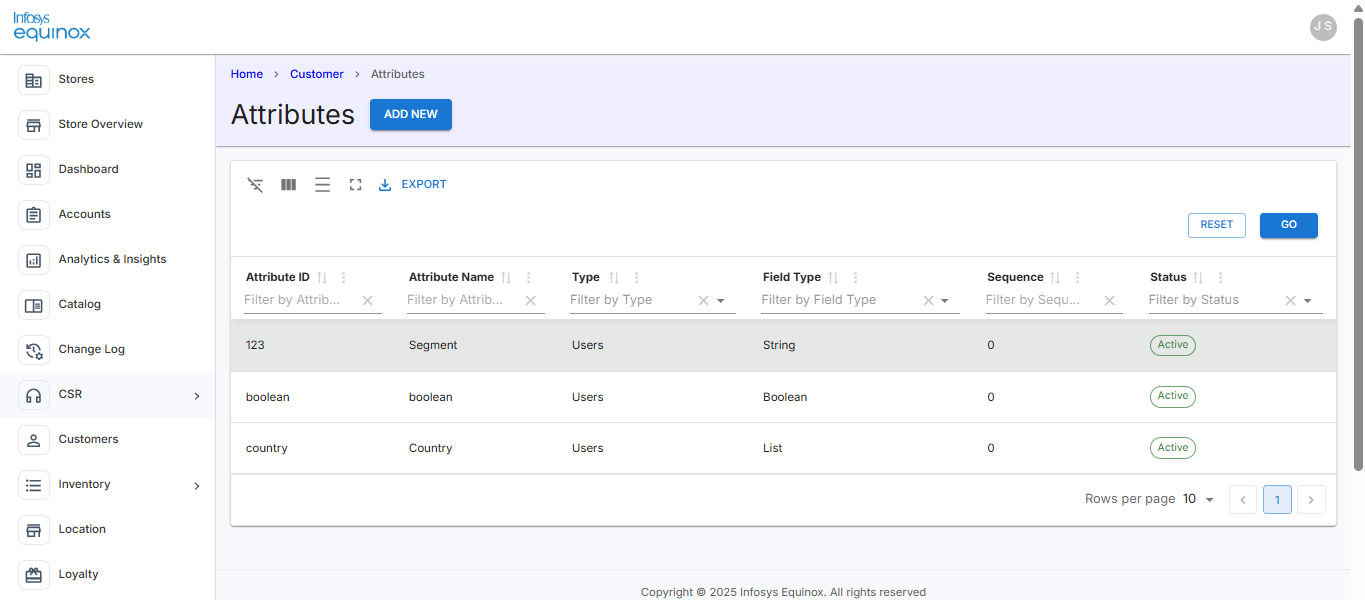
CSR can view the list of available custom attributes under Customers.
To navigate and view the existing customer attributes,
- Log in to the Foundation console for your business (URL provided by Infosys Equinox).
- Select the required store in the All Stores page.
Once a store is selected, the StoreOps page will appear. If a CSR is associated with multiple stores, they will be redirected to the store listing page upon logging in. If a CSR is associated with only one store, the store operations page will be the landing page upon logging in. - In the StoreOps page, click the CSR card.
- In the left navigation panel, click CSR, then Customers, and finally Attributes.
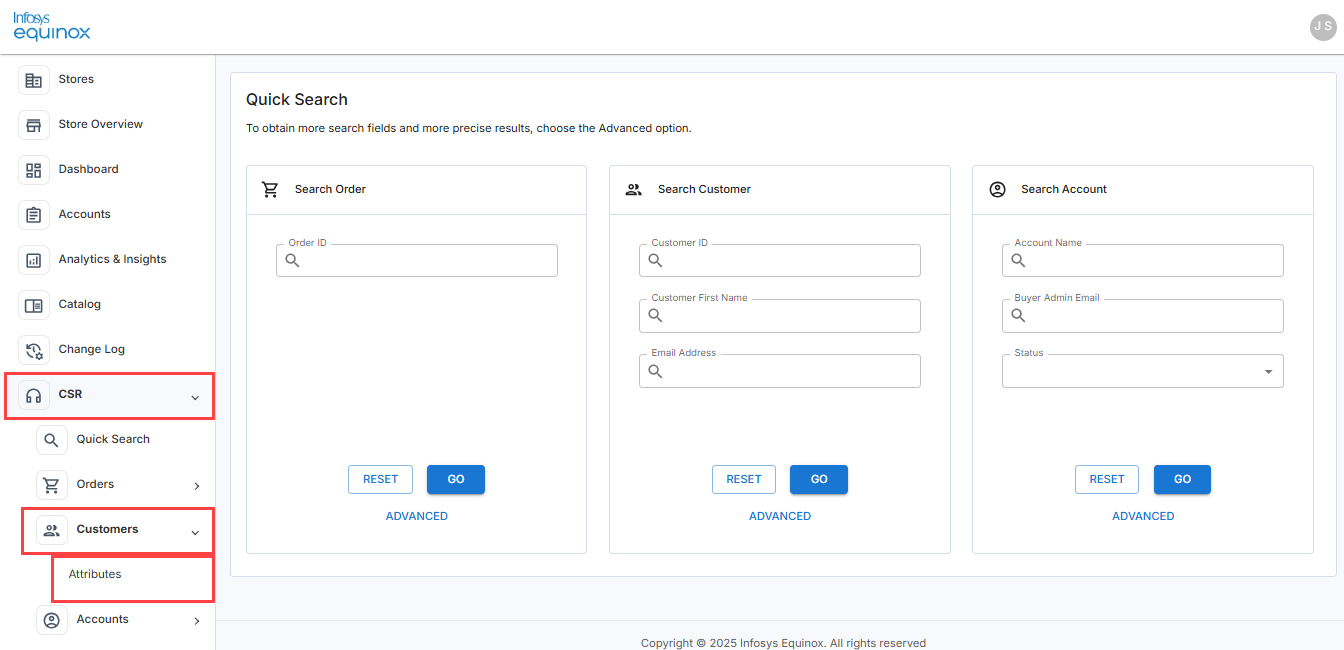
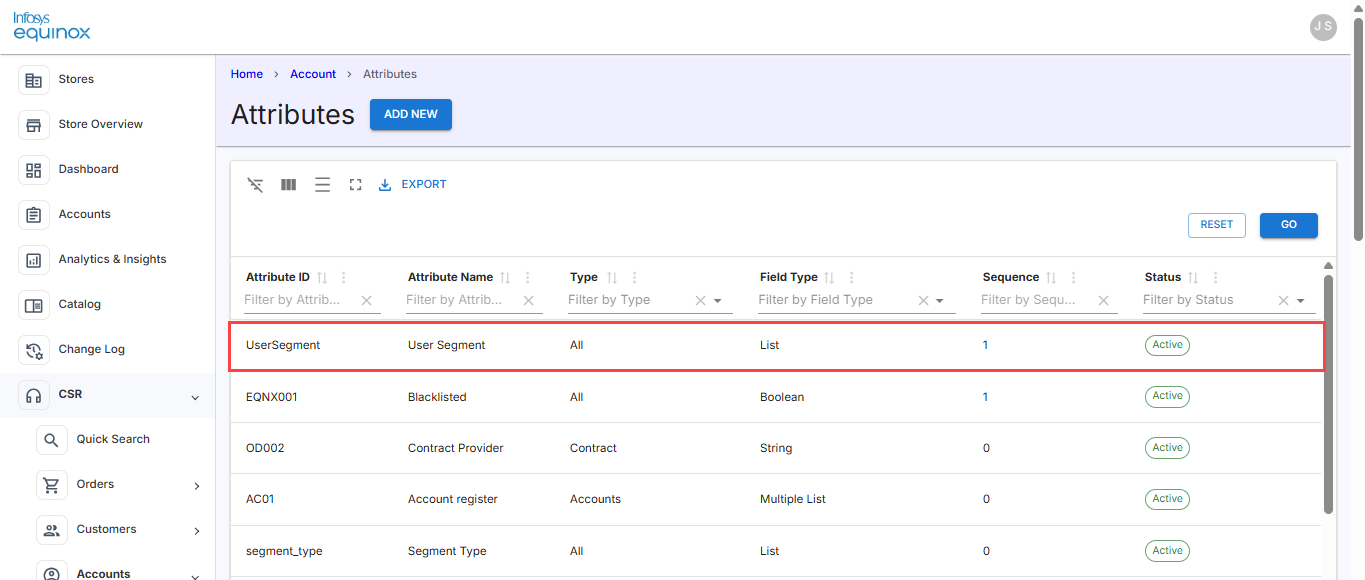
The Attributes landing page appears:
Adding a New Customer Attribute
A CSR Admin can add a new attribute based on business requirements. When creating an attribute:
- The field type must be specified.
- The attribute must be associated with users.
Once created, the attribute will:
- Appear in the list of attributes.
- Be visible on the customer’s profile page.
To add a new attribute,
- Log in to the Foundation console for your business (URL provided by Infosys Equinox).
. - Select the required store in the All Stores page.
.
Once a store is selected, the StoreOps page will appear. If a CSR is associated with multiple stores, they will be redirected to the store listing page upon logging in. If a CSR is associated with only one store, the store operations page will be the landing page upon logging in. - In the StoreOps page, click the CSR card.
. - In the left navigation panel, click CSR, then Customers, and finally Attributes.
. - Click
 .
.
The Create Attribute drawer appears on the right side of the screen.
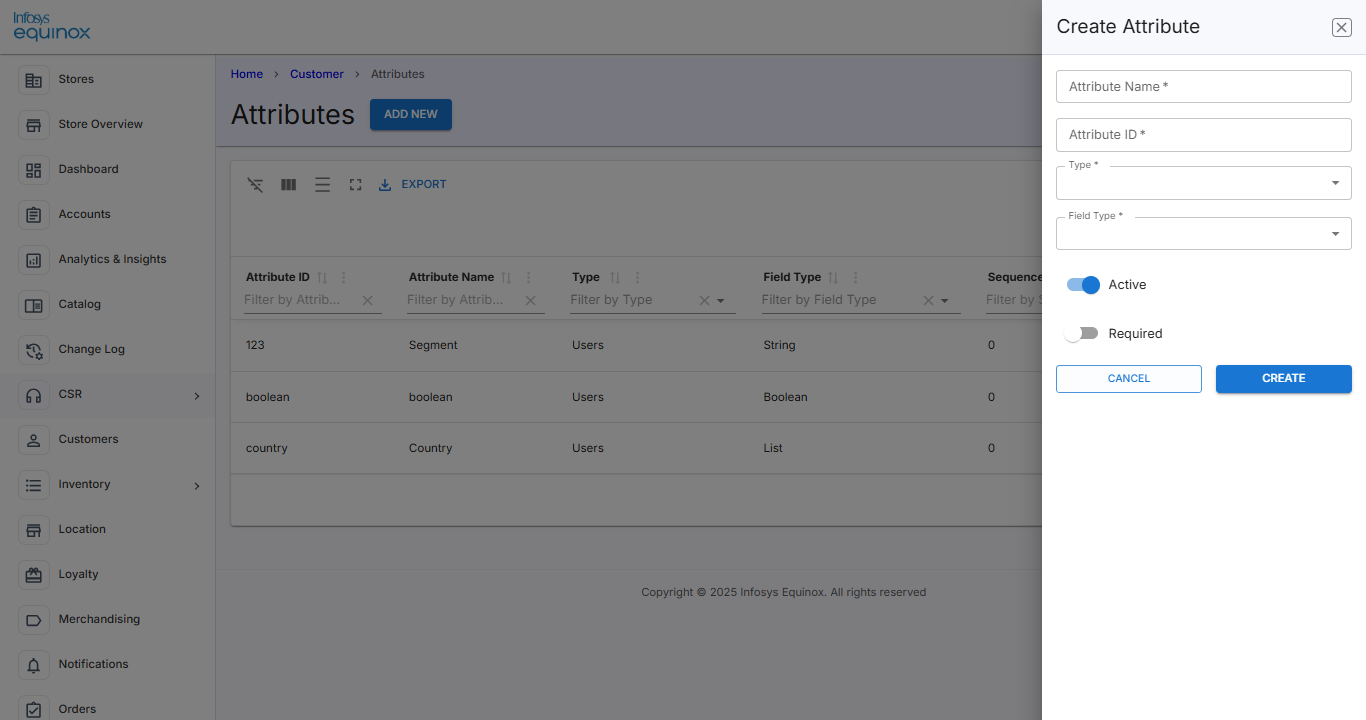
- Enter or select the field information.
The following table provides the create attribute field information:Field Description Attribute Name Enter an attribute name. A maximum of 200 characters are allowed for the attribute name. Attribute ID Enter an attribute ID. A maximum of 200 characters are allowed for the attribute ID. Type Select a type:
- Users: Select this to map the attribute only to users.
Field Type Select a required field type:
- Boolean: Select this to provide one of two possible values for the attribute.
- Date: Select this to provide date format values.
- Decimal: Select this to include exact numeric values for the attribute. Specify the number of digits after the decimal. A minimum of 1 and a maximum of 3 digits after decimal is allowed.
- Email: Select this to include email values for the attribute.
- List: Select this to provide a list of values to select from.
- Multiple List: Select this to include multiple list values. Click the Add Items button, add items to the multiple list.
Note: To delete a selected list item, click the Delete icon. - Number: Select this to include number values. Specify the minimum and maximum number.
- String: Select this to include string values. Set the minimum and maximum number of characters.
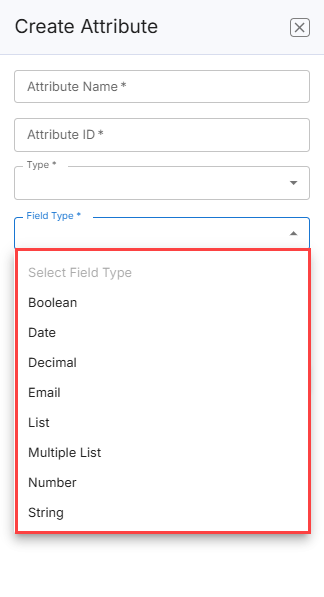
Based on the requirement or customization need, different data types can be selected. Once you select the Field Type, the Default Value and Sequence options are displayed.
Default Value Enter the default value for the attribute based on its field type. For example, if the field type is Email, enter an Email ID. This field appears after selecting a field type. It is optional and can be modified when associating the attribute with a customer account. Sequence Specify a whole number or decimal value to sequence the attribute. In case, you want to insert an attribute between two attribute sequences, then use a decimal value. For example, you can enter 1.5 to sequence an attribute between 1 and 2.
Note: If two attributes have the same sequence, then the attributes will be listed alphabetically.
Active or Inactive Enable or disable the status of the attribute from active to inactive or vice versa. By default, the Active status is enabled. Required Enable or disable to make the attribute mandatory or optional. By default, the Required status is disabled. If enabled, the attribute becomes mandatory for customer input. - Click the CREATE button. The created is added to the attribute list.
Updating an Existing Customer Attributes
To update an existing customer attribute,
- Log in to the Foundation console for your business (URL provided by Infosys Equinox).
- Select the required store in the All Stores page.
Once a store is selected, the StoreOps page will appear. If a CSR is associated with multiple stores, they will be redirected to the store listing page upon logging in. If a CSR is associated with only one store, the store operations page will be the landing page upon logging in. - In the StoreOps page, click the CSR card.
- In the left navigation panel, click CSR, then Customers, and finally Attributes.
- Click on an attribute to view its details.
The Update Attribute drawer appears on the right side of the screen:
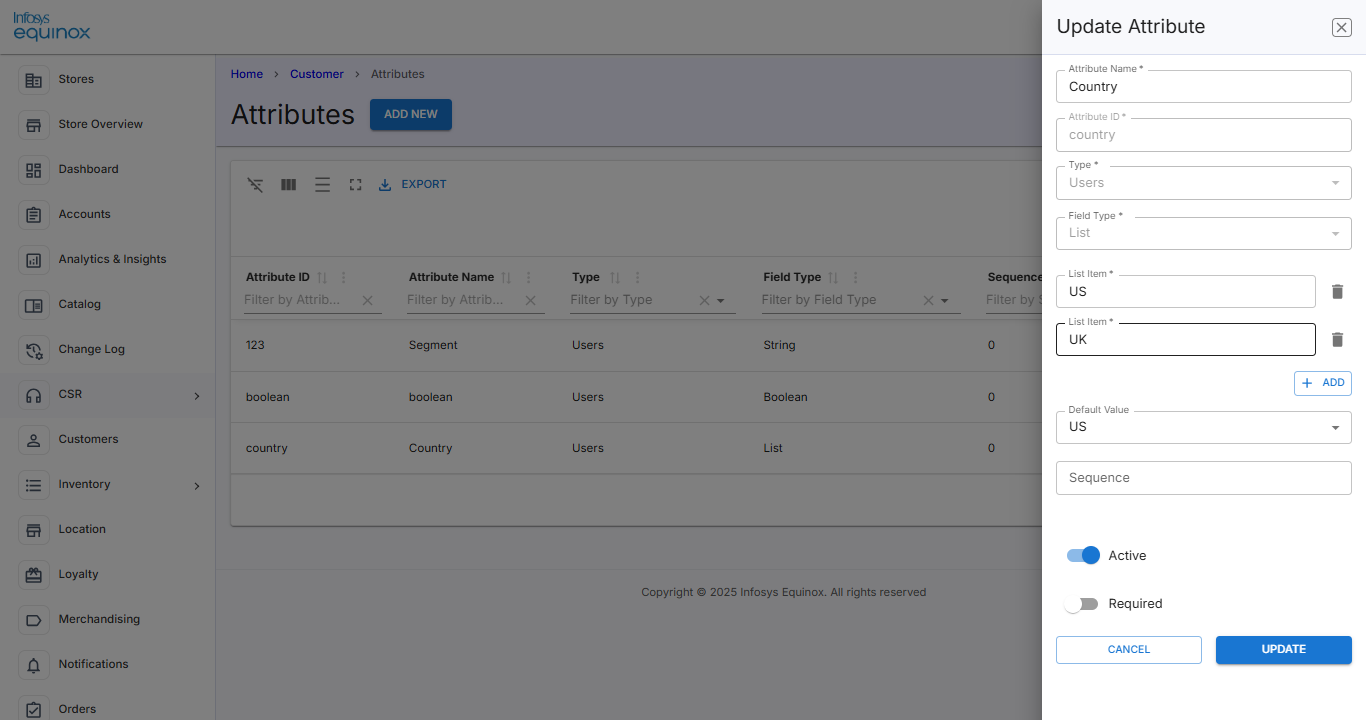
The following table explains the Update Attribute drawer:
Field Description Attribute Name* Edit the name of the attribute. Attribute ID View the attribute ID. This field cannot be edited. Type* View the type of the attribute. This field cannot be edited. Field Type* View the field type of the attribute. The field type can be any one of the following:
- Boolean
- Date
- Decimal
- List
- Multiple List
- Number
- String
This field cannot be edited.
Default Value Edit the default value of the attribute. Sequence Edit the sequence of the attribute to order the display of attributes. Active Enable or disable the status of the attribute from active to inactive or vice versa. By default, the Active status is enabled. Required Enable or disable to make the attribute mandatory or optional. By default, the Required status is disabled. - Click
 to save changes.
Note: To ignore the changes, click the Cancel button.
Working With Accounts
Once a store is created with the B2B2C or B2B store type, the Account is enabled under CSR in the left navigation panel of the Ultra Admin console.
Adding a New Account
A CSR admin can create a new account and associate or delete custom attributes as required.
Note: For more information, see the video Phone Number Country Codes.
To add a new account to the store,
- Log in to the Foundation console for your business (URL provided by Infosys Equinox).
- Select the required store in the All Stores page.
Once a store is selected, the StoreOps page will appear. If a CSR is associated with multiple stores, they will be redirected to the store listing page upon logging in. If a CSR is associated with only one store, the store operations page will be the landing page upon logging in. - In the StoreOps page, click the CSR card.
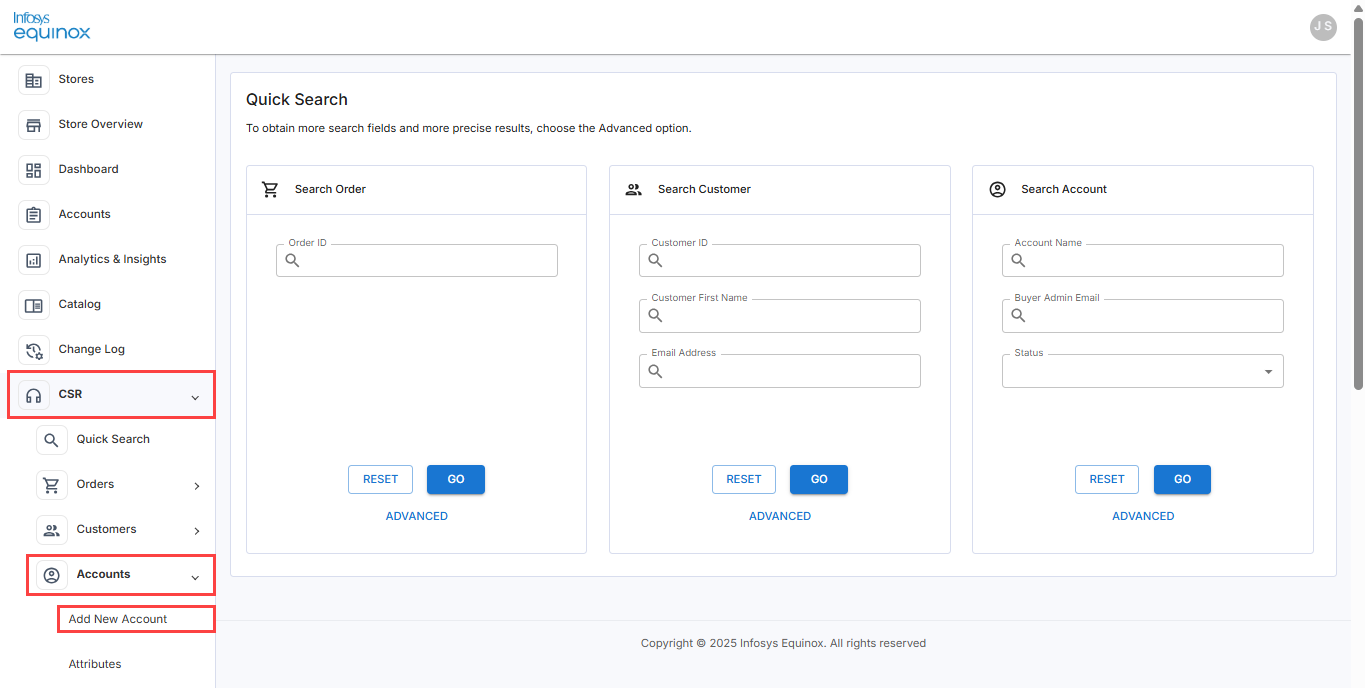
- In the left navigation panel, click CSR, then Accounts, and finally Add New Account.
- In the New Account drawer, fill all the required details:
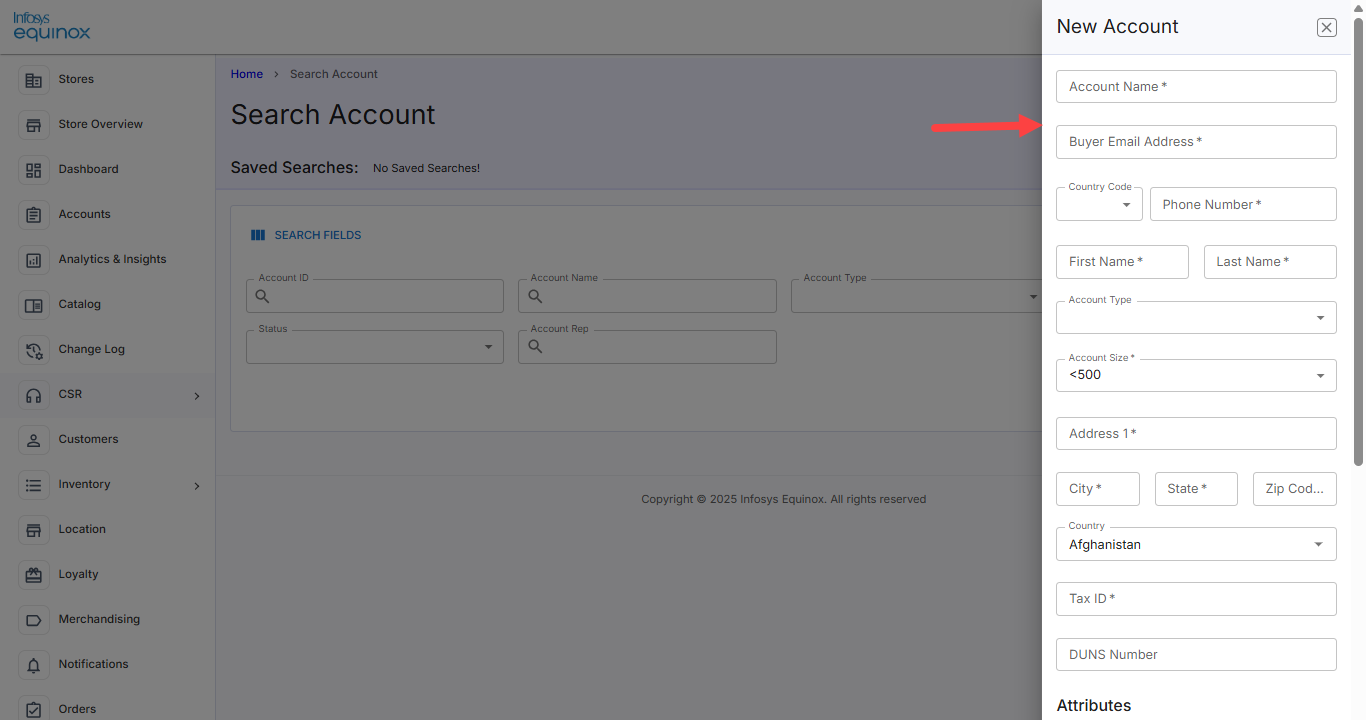
The following table describes the fields to create a new account:
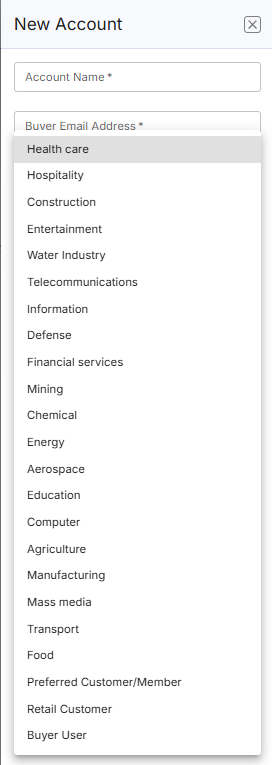
Note: The fields marked with asterisk (*) are mandatory.Field Description Account Name* Enter the buyer’s organization name. Buyer Email Address* Enter the buyer admin’s email address. Country Code* Select the buyer’s country code for the phone number. Phone Number* Enter the contact number associated with the account. First Name* Enter the buyer admin’s first name. Last Name* Enter the buyer admin’s last name. Account Type* Select the applicable account type. The account types are hard coded to allow the clients to segment their buyers (for example, Agriculture, Hospital, Computer, etc.) for promotional and other purposes.
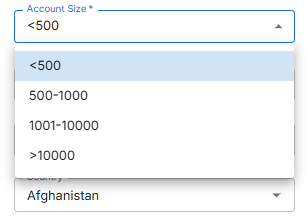
Account Size* Select the buyer’s company size (reflects the possible number of shoppers from the buyer).
Address* Enter the buyer’s street address. City* Enter the buyer’s city. State* Enter the buyer’s state. Zip Code* Enter the buyer’s zip code. Country* Select the buyer’s country from the available list of countries. Tax ID* Enter the buyer’s tax identification number. DUNS Number
Enter the Dun and Bradstreet’s unique nine-digit identifier for the buyer. -
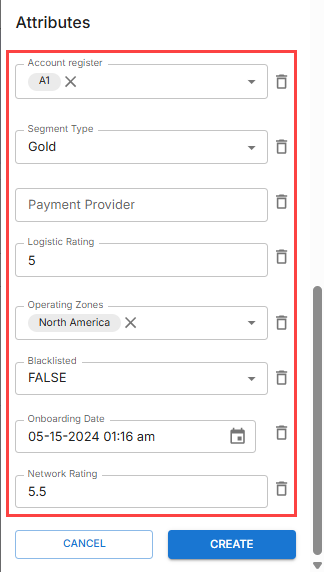
In the Attributes section, select the relevant attributes that best define the account.
Note:-
Attributes are customizable properties used to categorize and describe account details based on business needs.
-
Any attributes that have been created or updated will be available for selection when setting up a new account. For more information on creating or modifying the account attributes, see Managing Attributes.
- CSR Admin can delete a particular attribute using
 in the New Account drawer.
-
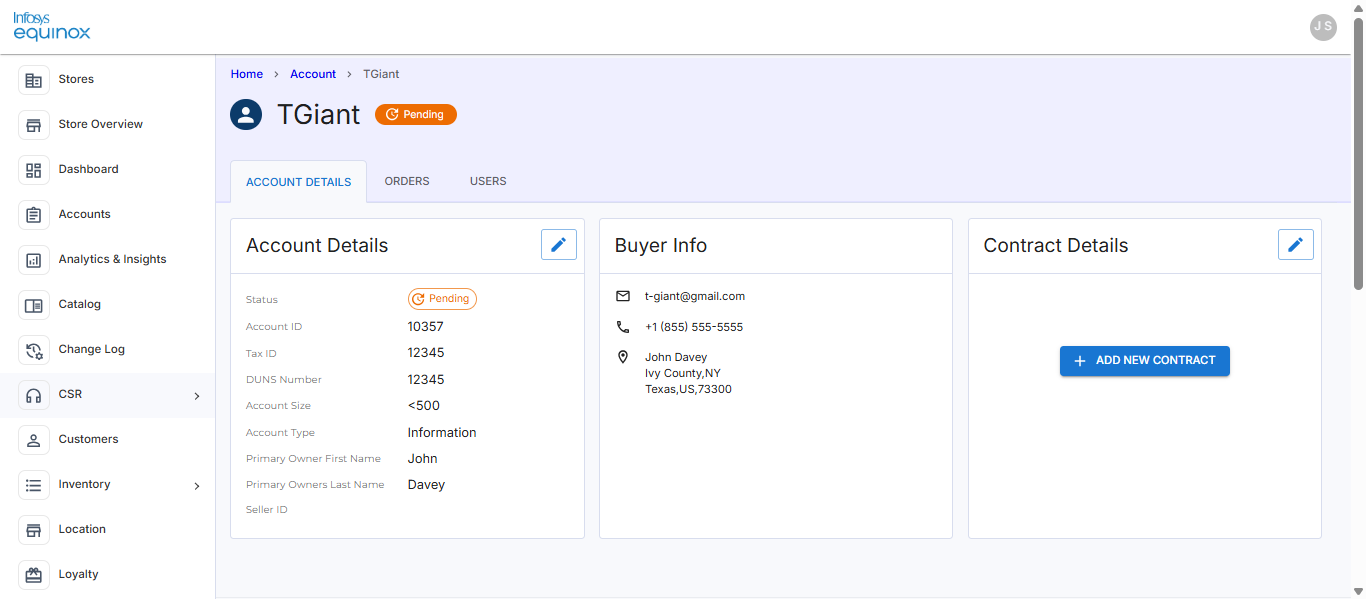
- Click CREATE. The newly created account appears in the Accounts page.
Note: To discard the changes, click Cancel.
Managing Account Attributes
Understanding and Using Custom Attributes
Attributes are properties that help define and categorize an account. You can create custom attributes tailored to your business needs and assign them during account creation.
Custom attributes can be configured as either mandatory or optional:
- Mandatory attributes must be filled in when creating an account.
- Optional attributes can be added later using the Add Attributes option while editing an account.
Each attribute must be assigned a field type, which determines the kind of data it can store. Supported field types include:
- Boolean – True/False values
- Date – Calendar date
- Decimal – Numeric values with decimals
- Email – Valid email format
- List – Single-select dropdown list
- Multiple List – Multi-select dropdown list
- Number – Whole numbers
- String – Free text input
Examples of Custom Attributes
Here are a few examples of how custom attributes might be used:
- Bundle Applicable
- Activation Date
- Rating
- Secondary Contact (Email)
- Business Category
- Tier
- Multiple Payment Methods
Viewing or Editing Attributes
You can view the list of available attributes on the Attributes page. You can click on an attribute name from the list to open its details. From there, you can make the necessary updates and save your changes.
To view or edit a specific attribute,
- Log in to the Foundation console for your business (URL provided by Infosys Equinox).
- Select the required store in the All Stores page.
Once a store is selected, the StoreOps page will appear. If a CSR is associated with multiple stores, they will be redirected to the store listing page upon logging in. If a CSR is associated with only one store, the store operations page will be the landing page upon logging in. - In the StoreOps page, click the CSR card.
- In the left navigation panel, click CSR, then Accounts, and finally Attributes.
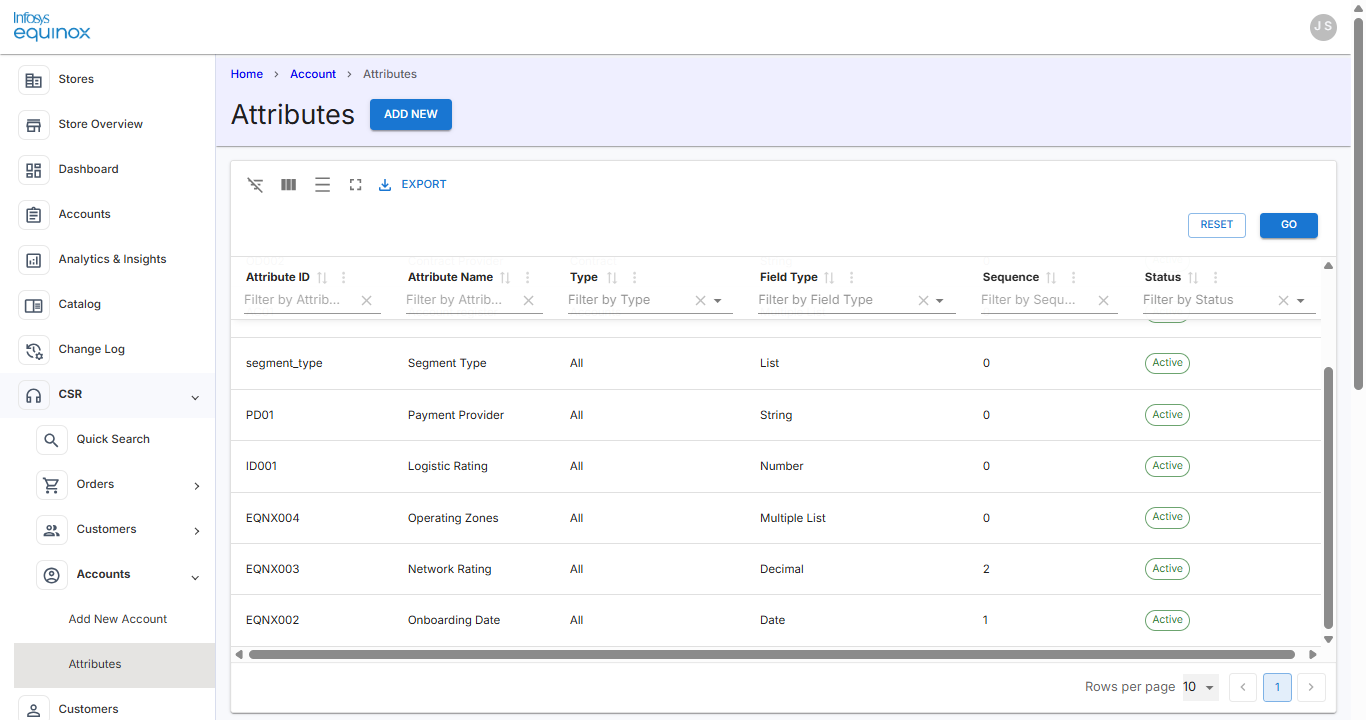
- In the Attributes page, click on an attribute name from the list to open its details to view or edit. The Update Attribute drawer is displayed with the attribute details. click on the attribute name from the list to open its details.
For example,
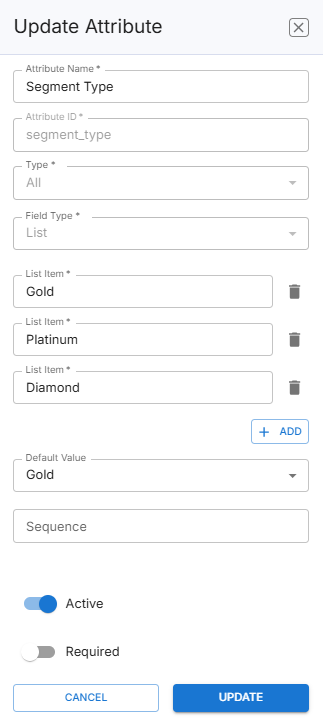
- In the Update Attribute drawer, fill all the required details:
The following table describes the fields to view or update an attribute:
Field Description Attribute Name* Edit the name of the attribute. Attribute ID* View the attribute ID. This attribute identifier is automatically generated based on the attribute name.
This field cannot be edited.
Type* View the type of the attribute with which the attribute is associated.
This field cannot be edited.
The available attribute types are:
- All – Applicable to all entity types
- Accounts
- Contracts
- Teams
- Cost Centers
Field Type* View the field type of the attribute. The field type can be any one of the following:
- Boolean
- Date
- Decimal
- List
- Multiple List
- Number
- String
This field cannot be edited.
Default Value Edit the default value of the attribute. Sequence Edit the sequence of the attribute to order the display of attributes. Active Enable or disable the status of the attribute from active to inactive or vice versa. By default, the Active status is enabled. Required Enable or disable to make the attribute mandatory or optional. By default, the Required status is disabled. - Click https://d1pun0hbam45iy.cloudfront.net/csr-admin-docs/update-butn to save changes.
Note: To ignore the changes, click the Cancel button.
Adding a New Account Attribute
To add a new attribute,
- Log in to the Foundation console for your business (URL provided by Infosys Equinox).
- Select the required store in the All Stores page.
Once a store is selected, the StoreOps page will appear. If a CSR is associated with multiple stores, they will be redirected to the store listing page upon logging in. If a CSR is associated with only one store, the store operations page will be the landing page upon logging in. - In the StoreOps page, click the CSR card.
- In the left navigation panel, click CSR, then Accounts, and finally Attributes.
- In the Attributes page, click .
The Create Attribute drawer appears on the right side of the screen.
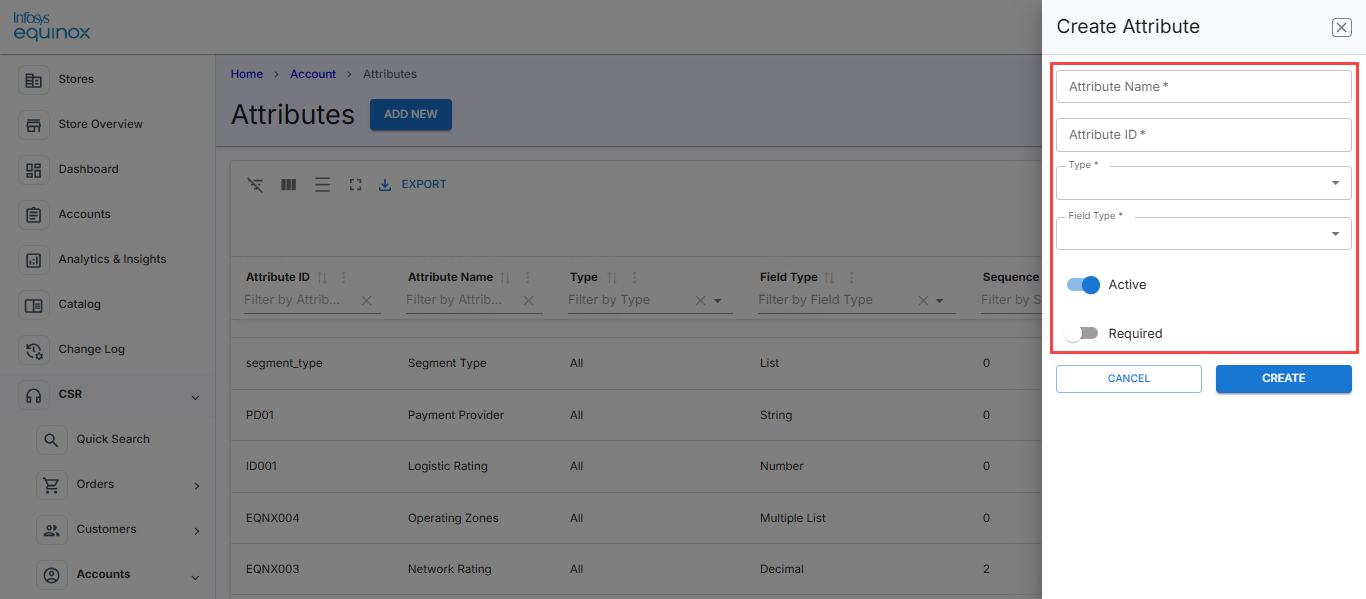
- Enter or select the field information.
The following table provides the create attribute field information:Field Description Attribute Name Enter an attribute name. A maximum of 200 characters are allowed for the attribute name. Attribute ID Enter an attribute ID. A maximum of 200 characters are allowed for the attribute ID. Type Select an attribute type with which the attribute is associated. The available attribute types are:
- All – Applicable to all entity types
- Accounts
- Contracts
- Teams
- Cost Centers
Field Type Select a required field type:
- Boolean: Select this to provide one of two possible values for the attribute.
- Date: Select this to provide date format values.
- Decimal: Select this to include exact numeric values for the attribute. Specify the number of digits after the decimal. A minimum of 1 and a maximum of 3 digits after decimal is allowed.
- Email: Select this to include email values for the attribute.
- List: Select this to provide a list of values to select from.
- Multiple List: Select this to include multiple list values. Click the Add Items button, add items to the multiple list.
Note: To delete a selected list item, click the Delete icon. - Number: Select this to include number values. Specify the minimum and maximum number.
- String: Select this to include string values. Set the minimum and maximum number of characters.
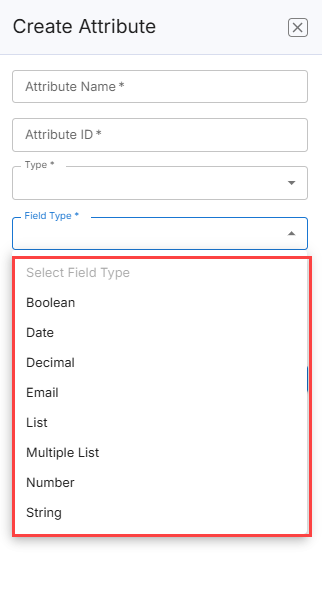
Based on the requirement or customization need, different data types can be selected. Once you select the Field Type, the Default Value and Sequence options are displayed.
Default Value Enter the default value for the attribute based on its field type. For example, if the field type is Email, enter an Email ID. This field appears after selecting a field type. It is optional and can be modified when associating the attribute with an account. Sequence Specify a whole number or decimal value to sequence the attribute. In case, you want to insert an attribute between two attribute sequences, then use a decimal value. For example, you can enter 1.5 to sequence an attribute between 1 and 2.
Note: If two attributes have the same sequence, then the attributes will be listed alphabetically.
Active or Inactive Enable or disable the status of the attribute from active to inactive or vice versa. By default, the Active status is enabled. Required Enable or disable to make the attribute mandatory or optional. By default, the Required status is disabled. If enabled, the attribute becomes mandatory for customer input. - Click
 . The created is added to the attribute list.
Actions Available for Registered Customers
Placing a New Order for a Registered User
A CSR Admin can place a new order on behalf of the registered user from the Equinox Admin console without a need to navigate to the storefront.
To place a new order by a CSR for a registered user,
- Navigate to the Equinox Admin console.
- In the left navigation panel, click CSR.
- Search for the customer and navigate to a particular customer’s account.
- In the customer’s overview page, click the NEW ORDER button:
- In the New Order checkout page, select any one of the channel types:
- Web – Select this option if the order is placed via online.
- Phone – Select this option if the order is placed via a phone.
- Walk in Center – Select this option if the customer places the order in a walk-in center.
Note: The channel type is configured via the store property “orderChannelTypes” in the Foundation Admin Console.
- Click the ADD NEW ITEMS button to add the item(s) that is required by the customer.
- Select the required product.
- In the Products screen, increase or decrease the quantity of the item, and then select the required SKU.
- Click the ADD TO CART button to add the items to the cart.
Note: To ignore the product, click X present at the top-right of the screen. - In the Order Details section, increase or decrease the quantity of the item if required.
Note: To remove the added items, click the Delete icon. - Under Shipping Address, click the Edit icon to select the required shipping address to which the item needs to be delivered.
Note: If an address is not added, click ADD NEW to add the shipping address details. To update an address, identify the address, click the Edit icon, and make the necessary changes. To delete an address, click the Delete icon against the address that needs to be deleted. - Click the Edit icon and select the required shipping method.
- Include other charges at the cart level if applicable, and then click the Add Charge button.
- Add loyalty and/or promotion details.
Note: For more information, see the video Promo Code and Voucher Updates. - View the order summary, make the payment, and finally submit the order.
Note: If payment method is not available, click the Add Payment, and add the necessary payment details. - Click
 to add pre-defined or custom-defined charges associated with a specific charge (for example, Item Convenience fee or Restocking Fees) at the item level. If it is:
- custom-defined charges, then add a charge name, add a corresponding charge value which is to be deducted on the item, and click Save.
- pre-defined charges, then select Item Convenience fee or Restocking Fees, add a corresponding charge value which is to be deducted on the item, and click Save.
- Select any one of the following:
- Ship It – to ship the item(s) to the specified shipping address.
- Pick It Up – to pick the items by the customer from a nearby store location. In Select Store, enter a zip code and select a distance such as 25 miles, 50 miles, or 100 miles, and then click Search. In the result page, select a required location.
Note: If you do not get a location, refine your search by entering another zip code or by selecting another distance.
Resetting a Customer’s Password
As a CSR Admin, you can trigger a reset password email for a registered customer. Once triggered, the customer is notified via email with instructions on how to reset the password.
To reset the password for a registered customer,
- Log in to the Foundation console for your business (URL provided by Infosys Equinox).
- Select the required store in the All Stores page.
Once a store is selected, the StoreOps page will appear. If a CSR is associated with multiple stores, they will be redirected to the store listing page upon logging in. If a CSR is associated with only one store, the store operations page will be the landing page upon logging in. - In the StoreOps page, click the CSR card.
(OR)
In the left navigation panel, click CSR. - Search for the customer and navigate to a particular customer’s account.
- On the customer’s profile page, click the RESET PASSWORD option.
An email is triggered to the customer with a link, which allows the customer to reset their password.
Acting on Behalf of a Registered Customer to Place Orders
A CSR Admin user can place an order on behalf of a registered customer via the storefront. The CSR can browse the storefront, check out the items, and finally place the order just like a registered customers.
- Log in to the Foundation console for your business (URL provided by Infosys Equinox).
- Select the required store in the All Stores page.
Once a store is selected, the StoreOps page will appear. If a CSR is associated with multiple stores, they will be redirected to the store listing page upon logging in. If a CSR is associated with only one store, the store operations page will be the landing page upon logging in. - In the StoreOps page, click the CSR card.
(OR)
In the left navigation panel, click CSR, and then click Customers. - Search for the customer and navigate to a particular customer’s account.
- On the customer’s profile page, click the ACT ON BEHALF option.
The storefront associated with the store appears in the next tab. The CSR can browse the products and place an order on the customer’s behalf.
Deleting a Customer Account
As a CSR Admin, you can delete a customer’s account. Once deleted, the customer account cannot be retrieved.
To delete a customer’s account,
- Log in to the Foundation console for your business (URL provided by Infosys Equinox).
- Select the required store in the All Stores page.
Once a store is selected, the StoreOps page will appear. If a CSR is associated with multiple stores, they will be redirected to the store listing page upon logging in. If a CSR is associated with only one store, the store operations page will be the landing page upon logging in. - In the StoreOps page, click the CSR card.
(OR)
In the left navigation panel, click CSR, and then click Customers. - Search for the customer and navigate to a particular customer’s account.
- On the customer’s profile page, click the DELETE option.
- On the confirmation pop-up, click the YES button.
The customer account is deleted.
Note: To ignore deleting the customer, click the CANCEL button.
Customer Details Tab
Customers Overview
When a customer creates an account, adds their address, and places a normal or subscription order in your store, then the added details are shown to the CSR under CSR in the left navigation panel. A CSR can also create and manage all customer information like registrations, orders, addresses, payment details, and privacy and consent preferences (user profiles) via the CSR Admin console. It enables a business to store everything about its customers in one place. Along with profiles, the Customer manages the end-users attributes like identities, passwords, addresses, custom properties, notes, and consents. It provides various functionalities like inviting a user, activating or deactivating, resetting the password with email or security questions, validating end-user credentials, and much more.
CSR Admin users are individuals who use and manage the Infosys Equinox CSR Admin Console, based on their roles defined in the Authorization Microservice. Storefront customers are the end-users who browse and purchase products using their mobile phones, tablets, or desktop devices.
Viewing or Updating Customer Details
On a customer’s behalf, a CSR can view or update the following customer’s profile such as:
- Customer Details: View or update the first name, last name, gender, phone number, or change the customer status to Active or Inactive.
- Account Details: View account details or navigate to the account ID to view or update the account details including buyer information and contract documents. This section is shown when the store type is B2B2C or B2B.
- Addresses: View or update the existing address, add another new address, set one particular address as a default shipping address, or delete an existing address.
- Payments: View or update the existing payment, add another payment (Credit Card or Debit Card), set one particular payment as a default payment option, or delete an existing payment.
- Attributes: Add, update, or remove custom attributes for the customer.
To view or update the customer details,
- Log in to the Foundation console for your business (URL provided by Infosys Equinox).
- Select the required store in the All Stores page.
Once a store is selected, the StoreOps page will appear. If a CSR is associated with multiple stores, they will be redirected to the store listing page upon logging in. If a CSR is associated with only one store, the store operations page will be the landing page upon logging in. - In the StoreOps page, click the CSR card.
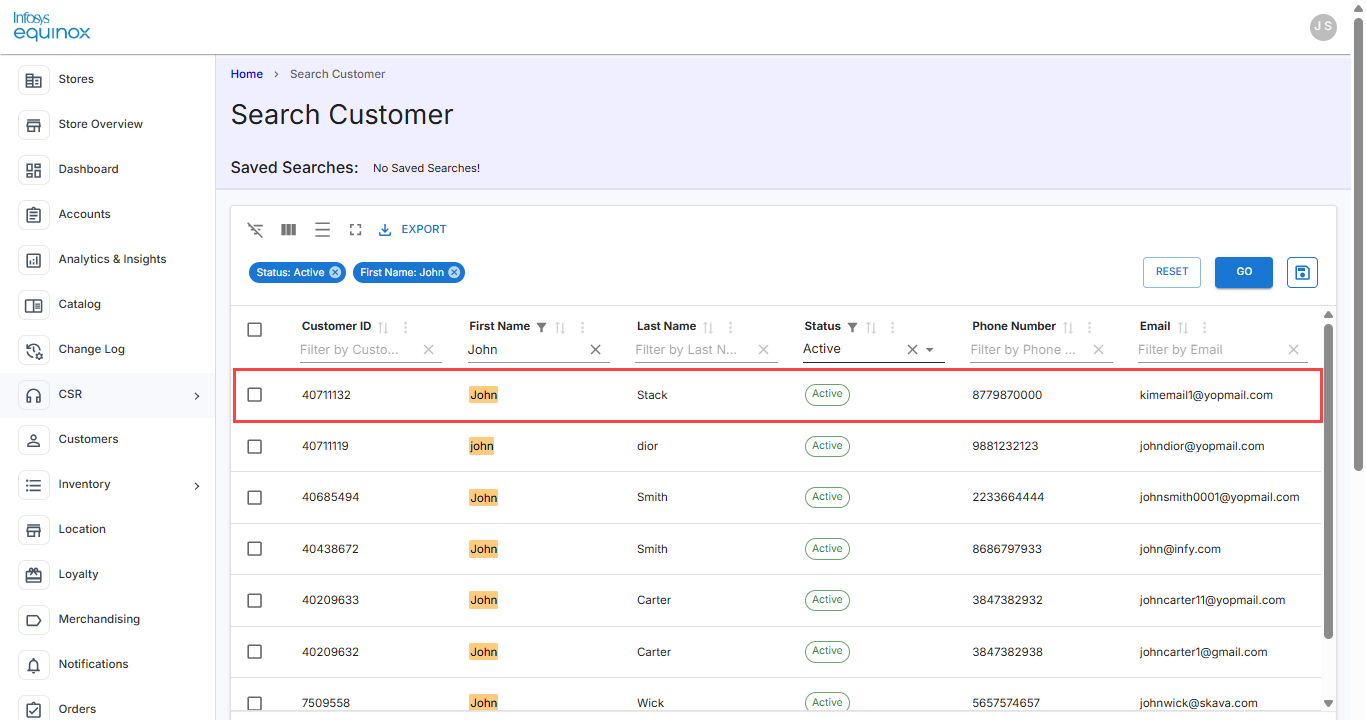
The landing page of CSR is displayed. - Use the Quick or Advanced Search to search for and navigate to a particular customer’s account.
For example, in Search Customer page:
- In the Customer Details section, click to update the customer details.
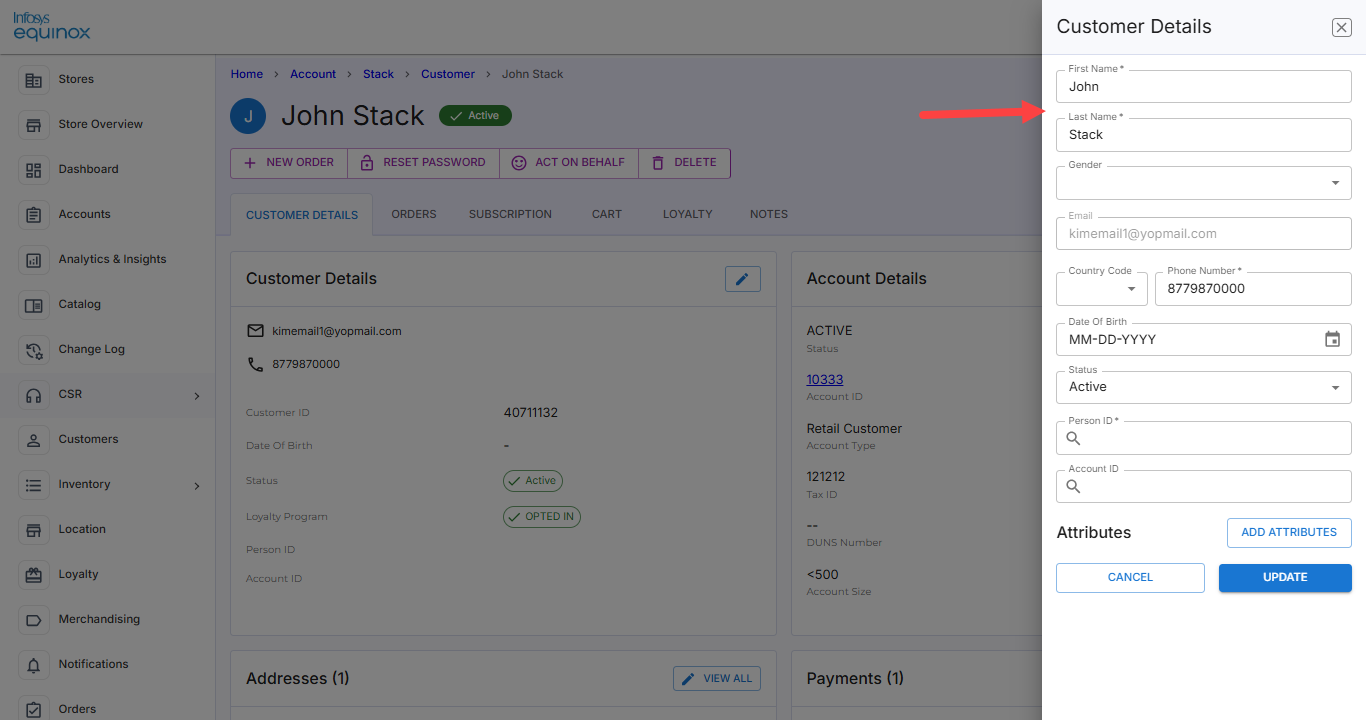
The following table describes the above screen:Field Description First Name* Update the first name. Last Name* Update the last name. Email* Indicates the unique email ID of the customer. This field cannot be updated.
Note: This field can be configured to be editable or non-editable, based on business need. You will only be able to edit the field if the collection property has been set to true.Country Code* Update the country code. Phone Number* Update the contact number for any changes.
Note: This field can be configured to be editable or non-editable, based on business need. You will only be able to edit the field if the collection property has been set to true.Date Of Birth Provide the date of birth via the date picker. Status Update the status from the drop-down list. The possible statuses are:
- Activate – Indicates the active status of a customer account. This status appears when the customer account is inactive or frozen.
- Inactive – Indicates the inactive status of a customer account.
- Freeze – Indicates the frozen status of a customer account. While a customer’s account is in freeze status, NO action should be taken on the account, including sending any communication to the customer.
Note: To unfreeze the account, the customer must call the business’ customer service team to activate the account.
Preferred Language Select the preferred language. Attribute In the Attribute section, you can:
- Add attributes by clicking the ADD ATTRIBUTES button, which opens the Attribute List drawer. Search by attribute ID or attribute name to drill down to the required attribute(s). From the list of attributes, select the required attributes and click the SELECT button. The attribute(s) are added to the customer wherein CSR Admin can fill the required values.
- Update values for the associated attributes.
- Remove the attribute by clicking the Delete icon.
Note: The fields marked with asterisk (*) are mandatory.
- Click to reflect the changes.
Note: To discard the changes, click the CANCEL button. - In the Account Details, view the account details (such as account status, account ID, account type, tax ID, DUNS number, and account size).
Note: Navigate to the account ID to view or update the account details including buyer information and contract documents. For more information on the account in which the user is associated, see the Account section. - In the Addresses section, view the default shipping address or click the VIEW ALL button to create a new address, editing the existing address(es), set one particular address as the default shipping address, or delete a particular address.
- In the Payment section, view the default payment details or click the VIEW ALL button to create a new payment (Credit Card or Debit Card), edit and choose the billing address, set one particular payment as the default payment option, or delete an existing payment.
Orders of a Customer
Overview
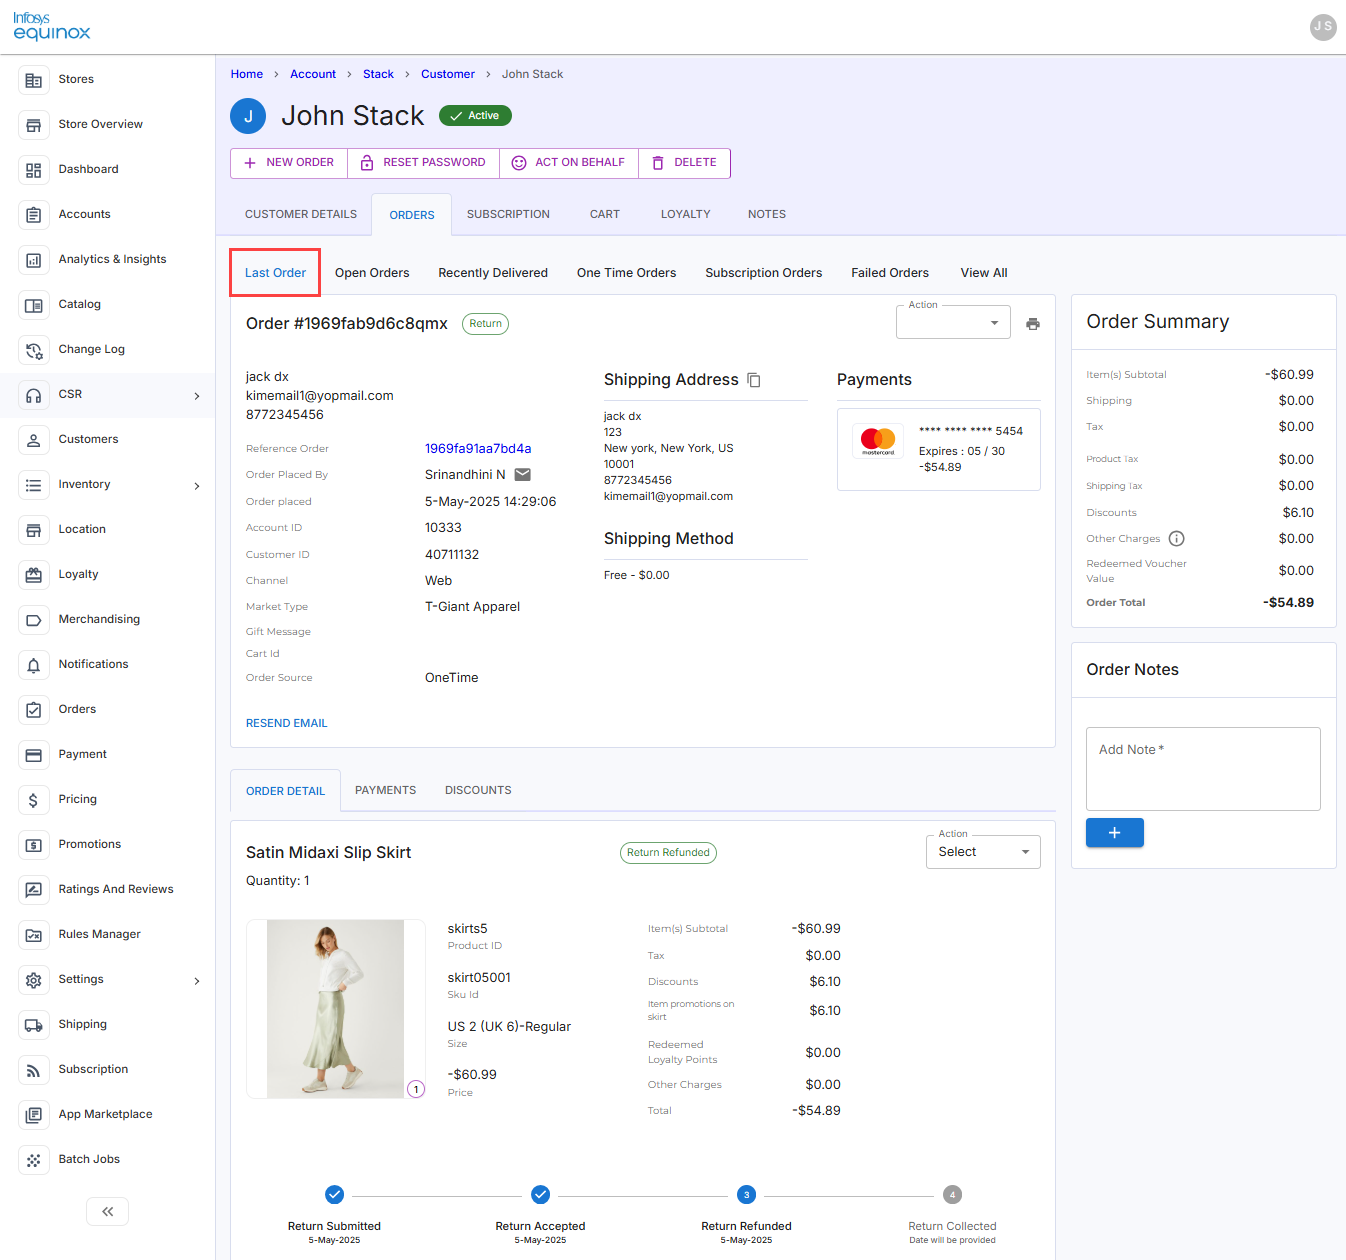
The ORDERS tab allows Customer Service Representatives (CSRs) to view and manage all orders created by a user. After selecting a customer profile, the CSR can access various sub-tabs within the ORDERS tab:
- Last Order: Shows the previous order details placed by the customer such as order, shipping, and payment details. On clicking the ORDERS tab, the last order detail is shown by default.
- Open Orders: Shows the list of orders of the customer that are still in progress and not yet fulfilled.
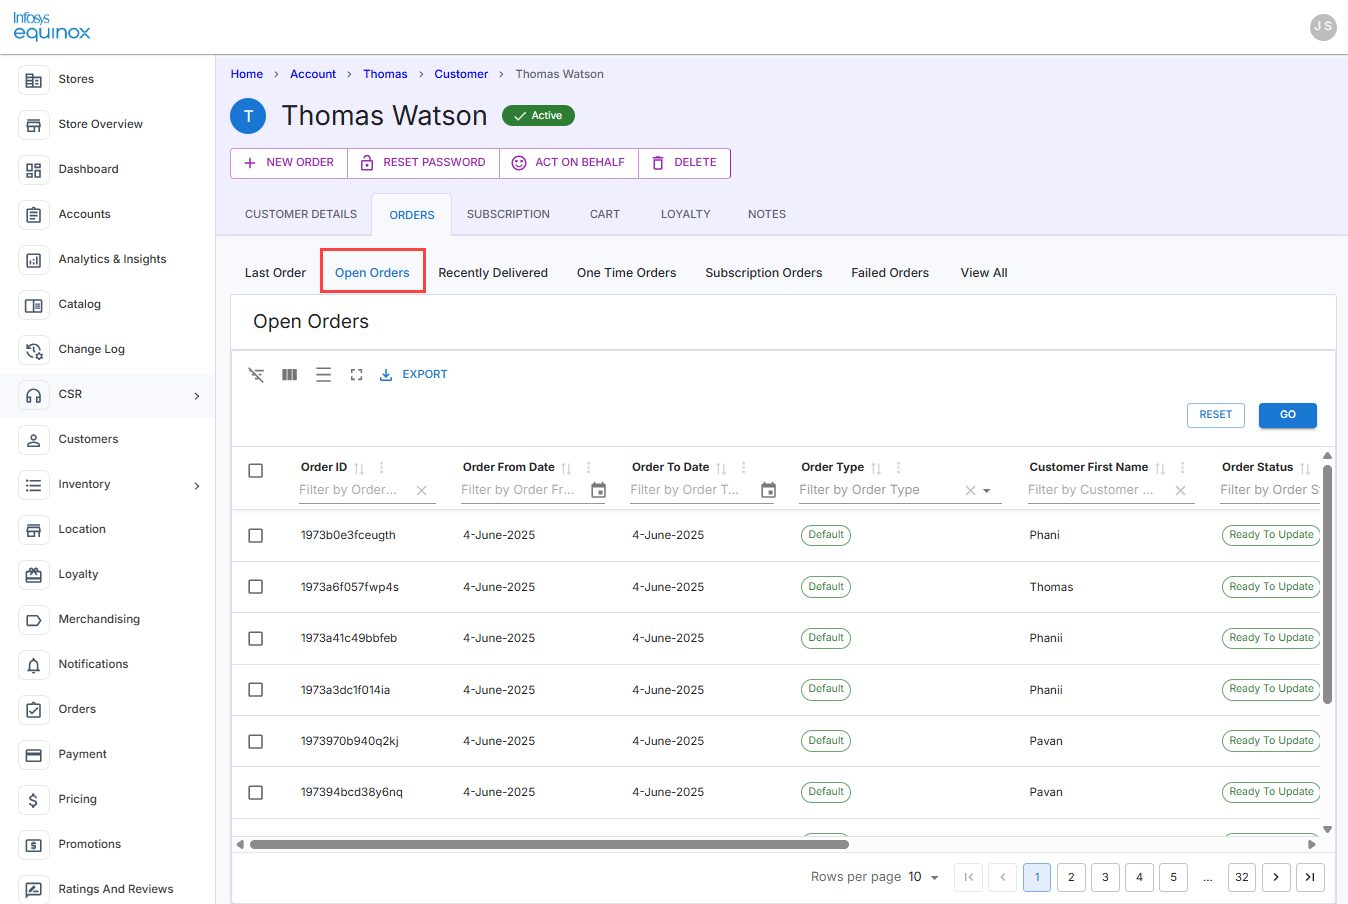
- Recently Delivered: Shows the list of orders of the customer that are fulfilled and recently delivered.
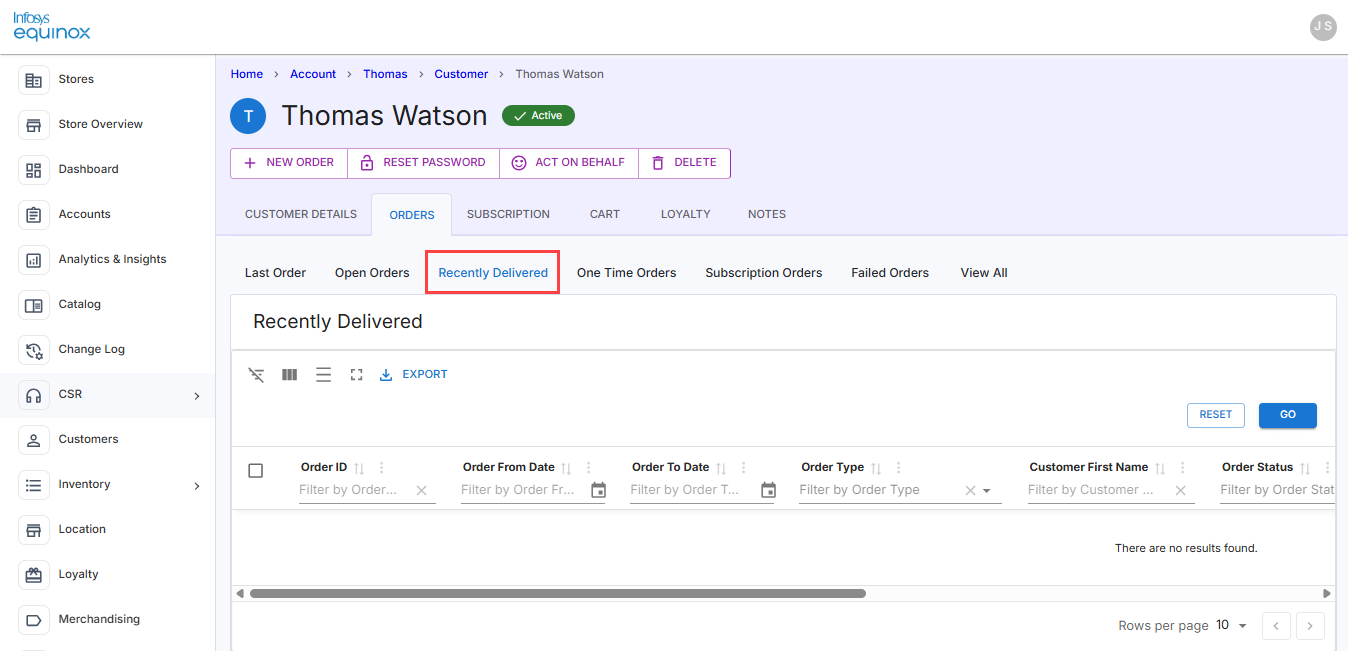
- One Time Orders: Shows the list of one-time orders placed by the customer.
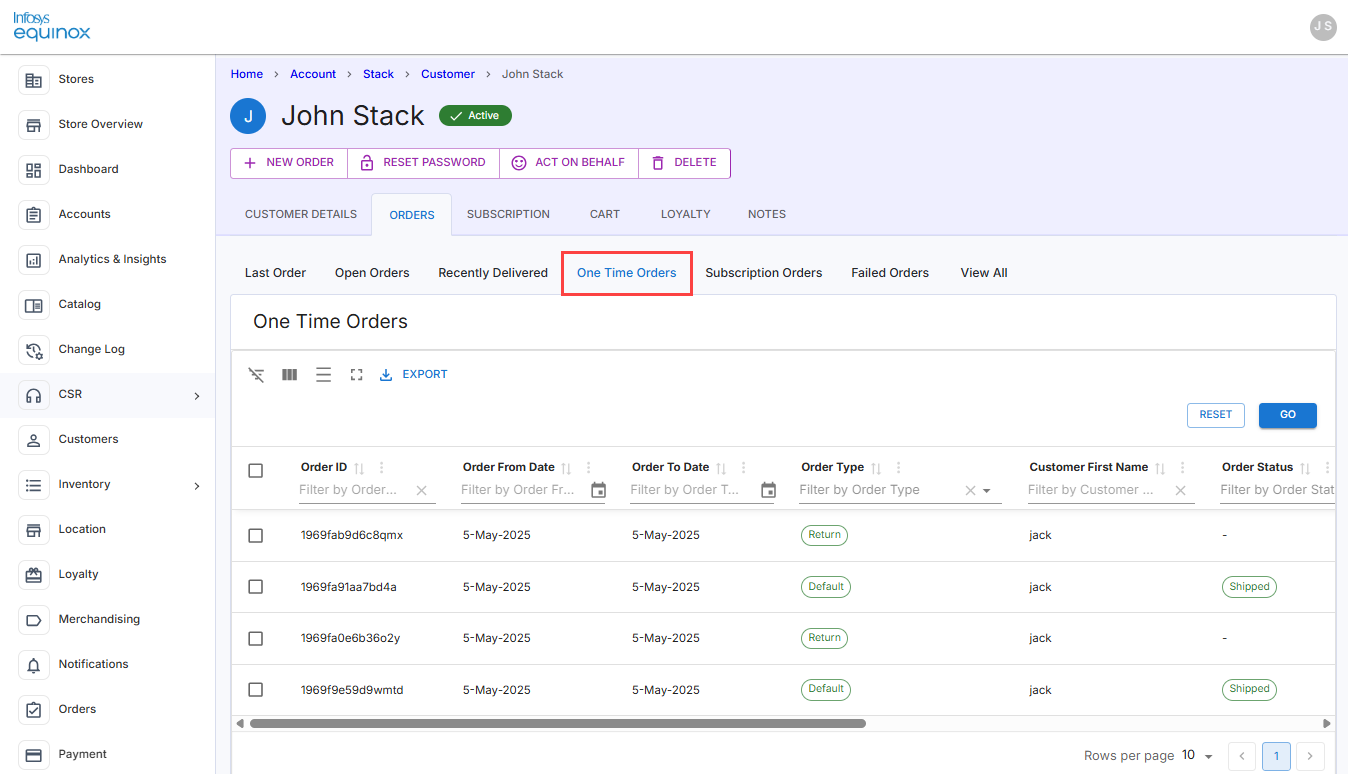
- Subscription Orders: Shows the list of subscription orders placed by the customer.
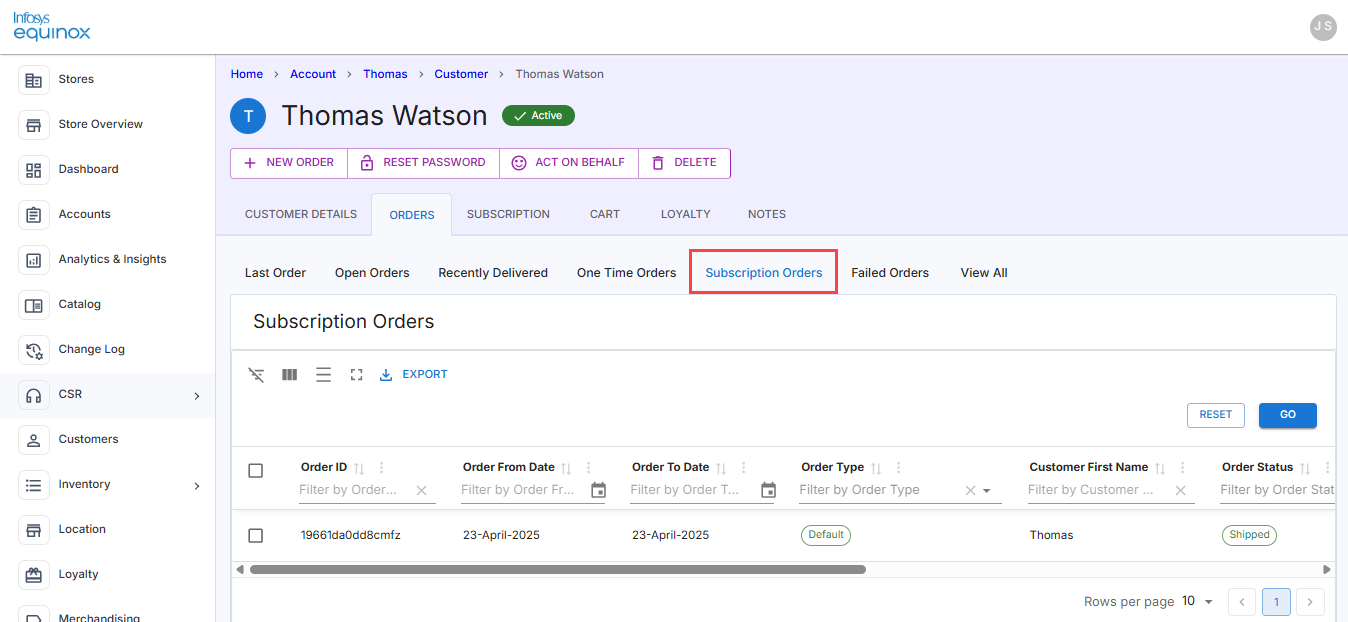
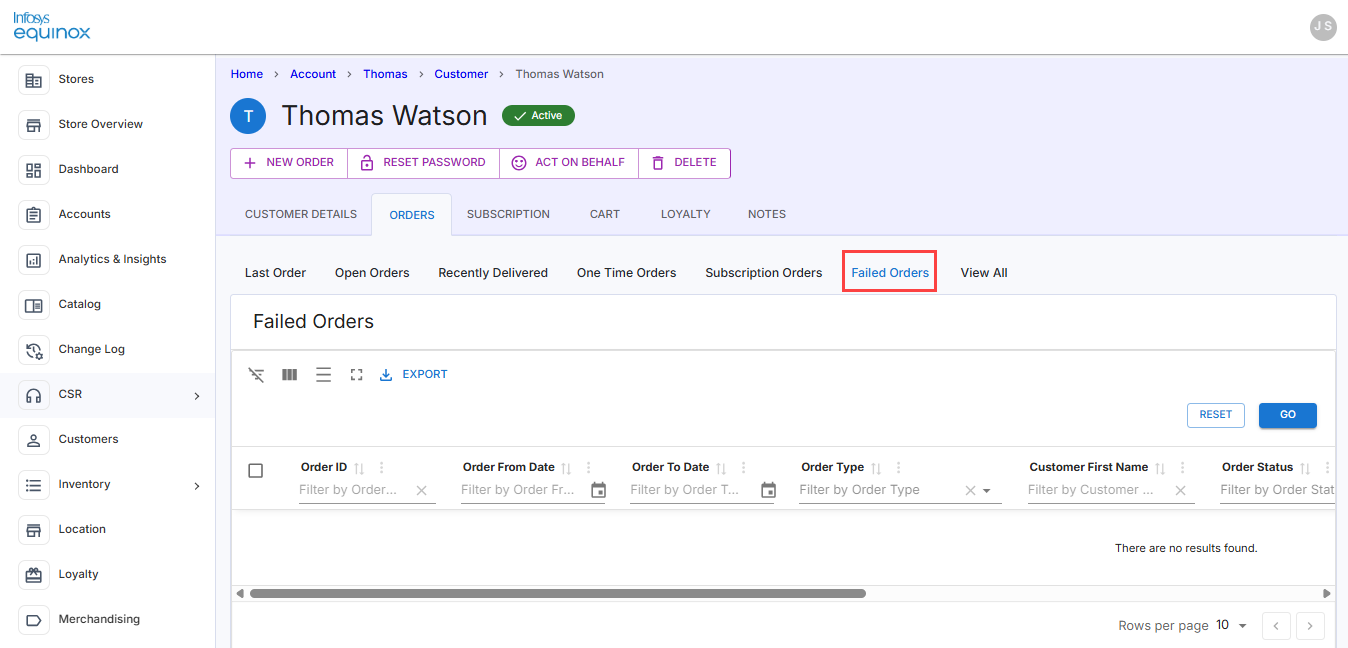
- Failed Orders: Lists orders with pending or failed payments, allowing the CSR to process them further.
- View All: Shows the list of all the order types, with options to filter and sort the results.
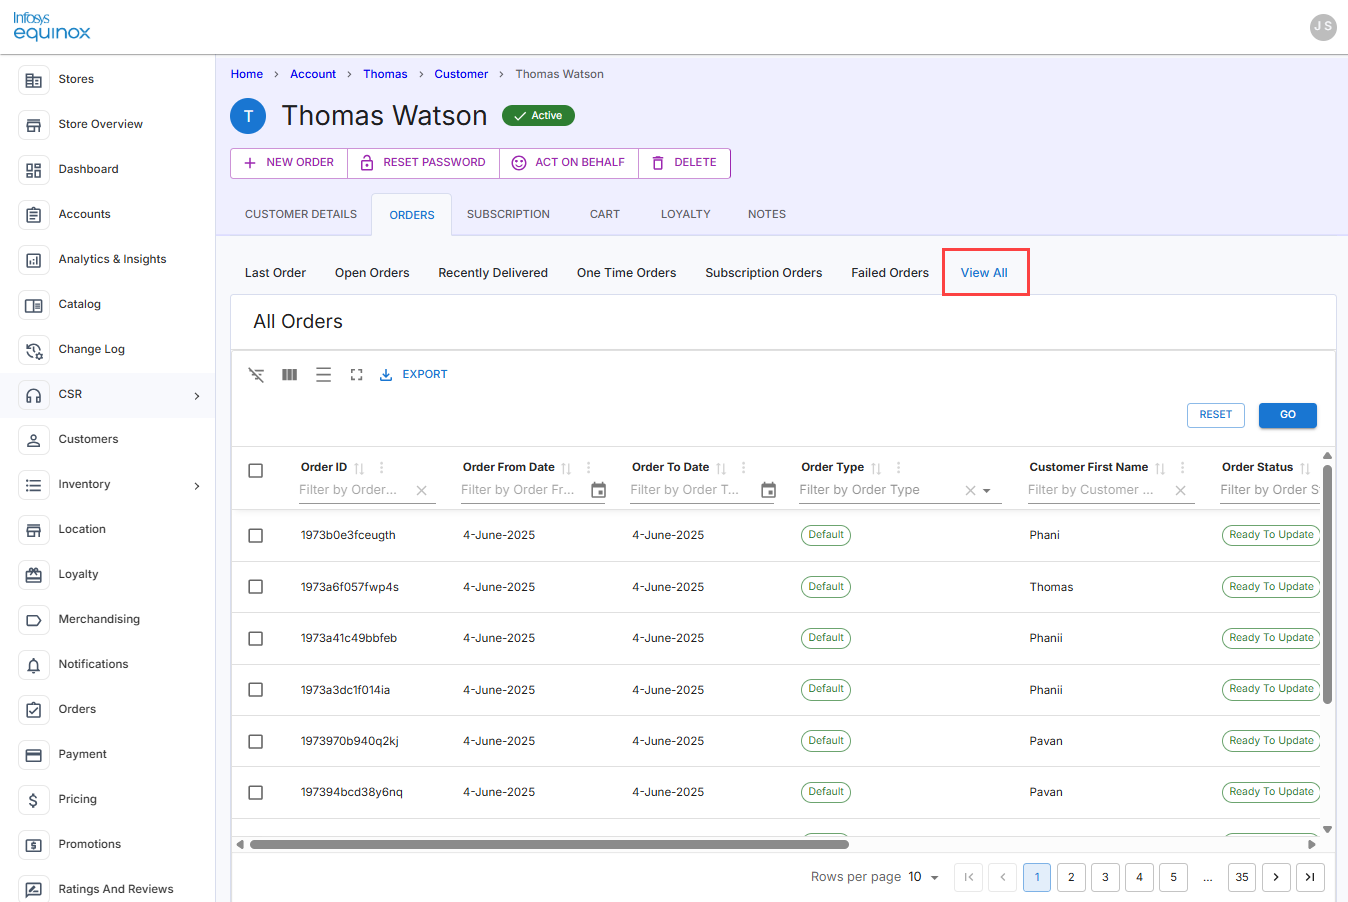
CSRs can click on individual orders to view detailed information and use filters to refine the list of orders displayed.
This section explains the following details:
- Various filter options to locate specific orders
- How to cancel an order or order items
- How to edit an order
- How to return an order or order items
- How to exchange an order or order items
- How to replace an order or order items
Filter Options
In each Orders’ tab, CSRs can filter orders to efficiently manage and locate specific orders. Here are the details about the order filters available:
- Order ID: Filter orders based on the order ID fetches the exact order of the customer.
- Order From Date & Order To Date: Specify a date range to view orders placed within a certain period.
- Order Type: Filter by order type, such as Default, Return, Exchange, Replace, or Correction Orders.
- Customer First Name: Filter by the customer’s first name.
- Order Status: Filter orders based on their current status (e.g., Open, Delivered, Payment Failed, and so on).
- Customer Information: Search for orders by customer details like name, email, or customer ID.
- Channel: Filter orders based on the channel type like Web, Phone, Walk in Center, CSR, and so on.
Add or remove columns as needed on the orders table grid. For more information, see Show or Hide Columns.
Cancelling an Order
Overview
Cancelling an order in the CSR admin is simple and efficient. You can cancel entire orders or specific items by navigating to the order details, selecting “Cancel” from the action menu, adding notes, and confirming the cancellation.
There can be several occasions or reasons a CSR might need to cancel an order for a customer, such as:
- Order created by mistake: The order was placed unintentionally.
- Items would not arrive on time: The delivery schedule does not meet the customer’s needs.
- Ordered the wrong item: The customer selected the incorrect product.
- No longer want the order: The customer has changed their mind and no longer desires the items.
Order Cancellation Criteria
You can cancel an order if it has not yet been moved to the “Submitted to Fulfilment” status. This means that as long as the order is still in the initial stages and hasn’t progressed to the fulfillment process, it can be cancelled.
How to Cancel an Order
To cancel an already placed orders,
- Log in to the Foundation console for your business (URL provided by Infosys Equinox).
- Select the required store in the All Stores page.
Once a store is selected, the StoreOps page will appear. If a CSR is associated with multiple stores, they will be redirected to the store listing page upon logging in. If a CSR is associated with only one store, the store operations page will be the landing page upon logging in. - In the StoreOps page, click the CSR card.
The landing page of CSR is displayed. - Provide the required order ID in the Quick Search to navigate to the order.
Note: Alternatively, use Advanced Search to search for and navigate to a particular customer’s account. - Click the ORDERS tab and navigate to the Last Order tab to get the recent order.
- In the Action dropdown list, select the Cancel option. The items in the order will be automatically selected for cancellation.
- If you need to cancel specific items rather than the entire order, select the items you wish to cancel.
Note: If there are multiple items in the order and want to cancel only a specific item, ensure you select only that item. - Select the appropriate reason and provide any necessary notes or reasons for the cancellation in the designated fields.
- Click Proceed to confirm the cancellation. The selected items or the entire order will be cancelled accordingly, and the order status will be updated to “Cancelled”.
Editing an Order
Overview
A CSR Admin user can edit orders within a customizable time limit before finalizing them. They can add or remove items, update quantities, and adjust charges, vouchers, or rewards. Shipment and payment details can be updated before placing the order.
Order Editing Criteria
When the order status is “Ready to Update”, the CSR can edit the order. There is a customizable time limit during which the CSR can edit the order.
How to Edit an Order
To edit an order,
- Log in to the Foundation console for your business (URL provided by Infosys Equinox).
- Select the required store in the All Stores page.
Once a store is selected, the StoreOps page will appear. If a CSR is associated with multiple stores, they will be redirected to the store listing page upon logging in. If a CSR is associated with only one store, the store operations page will be the landing page upon logging in. - In the StoreOps page, click the CSR card.
The landing page of CSR is displayed. - Provide the required order ID in the Quick Search to navigate to the order.
Note: Alternatively, use Advanced Search to search for and navigate to a particular customer’s account. Click the ORDERS tab and navigate to the Last Order tab to get the recent order. - In the ORDERS tab, click the EDIT ORDER button.
- Add new items, update quantities, or remove items from the order. This is optional.
- In the Charges /Discounts section, add or remove charges, vouchers, or rewards.
- After making the required changes, add the shipment and payment details.
Note: CSR can update or remove the existing shipment and payment details. - Click the PLACE ORDER button.
Once the order is created, it is moved to the status “Freeze Edit”, and then to “Submitted to Fulfillment”.
Returning Orders
Overview
A CSR Admin user can assist customers in returning shipped orders. They can select items and quantities to be returned, provide reasons, and create return orders. The return process includes updating the status to Return Accepted, Return Refunded, and Return Collected.
Order Return Criteria
To return an order, the original order must be in the Shipped status. The customer requests a return due to reasons like defects, incorrect shipments, or personal preferences.
How to Return an Order or Order Items
To return item(s) on behalf of a customer,
- Log in to the Foundation console for your business (URL provided by Infosys Equinox).
- Select the required store in the All Stores page.
Once a store is selected, the StoreOps page will appear. If a CSR is associated with multiple stores, they will be redirected to the store listing page upon logging in. If a CSR is associated with only one store, the store operations page will be the landing page upon logging in. - In the StoreOps page, click the CSR card.
The landing page of CSR is displayed. - Provide the required order ID in the Quick Search to navigate to the order.
Note: Alternatively, use Quick or Advanced Search to search for and navigate to a particular customer’s account. Click the ORDERS tab and navigate to the Last Order tab to get the recent order. - In the ORDERS tab, click the Last Order tab to get the recent order.
- In the Action dropdown list, select the Return option.
- Select the items and quantities to be returned.
- Choose a reason for the return and add any necessary comments.
- Click the Proceed button to create the return order.
- Review the return order details, including the return warehouse address and the payment method for the refund.
Note: If required, make necessary changes to the warehouse address and payment details. - Click the Place Order button to finalize the return.
The “Return” type order is created and shows the status as “Return Submitted”. As the return process progresses, click the Action dropdown list and select Update Status to change the status to “Return Accepted” with a reason and comments. The status, then can be updated to “Return Refunded” and “Return Collected” as appropriate.
Exchanging Orders
Overview
A CSR admin user can perform a full or partial exchanges and add new items to the order. The exchange process involves selecting the items to be exchanged, adding new items, and updating shipment and payment details and marking the order as shipped.
Order Exchange Criteria
To exchange an order, the original order must be in the Shipped status. The customer requests an exchange due to issues like defects or personal preferences.
How to Exchange an Order or Order Items
To exchange the incorrect SKU items with the correct SKU items,
- Log in to the Foundation console for your business (URL provided by Infosys Equinox).
- Select the required store in the All Stores page.
Once a store is selected, the StoreOps page will appear. If a CSR is associated with multiple stores, they will be redirected to the store listing page upon logging in. If a CSR is associated with only one store, the store operations page will be the landing page upon logging in. - In the StoreOps page, click the CSR card.
The landing page of CSR is displayed. - Provide the required order ID in the Quick Search to navigate to the order.
Note: Alternatively, use Quick or Advanced Search to search for and navigate to a particular customer’s account. Click the ORDERS tab and navigate to the Last Order tab to get the recent order. - In the ORDERS tab, click the Last Order tab to get the recent order.
- In the Action dropdown list, select the Exchange option.
- Choose the items and quantities to be exchanged.
Note: Partial exchanges can be performed by selecting specific items or quantities. - Choose a reason and add any necessary comments.
- Click the Proceed button. An exchange order is created. The items to be exchanged will be listed on the top. Below that, items that are required by the customer can be added by the CSR.
- Under Exchanged Item(s), click the ADD NEW ITEMS button to add the new items and quantities required by the customer.
- Once added, verify the order summary and individual item costs.
- The warehouse address details are automatically shown; however, update or confirm for the returned items.
- Confirm or update shipment and payment details.
- Once confirmed for all the details, click the PLACE ORDER button. Place the exchange order.
- Review the return order details, including the return warehouse address and the payment method for the refund.
Note: If required, make necessary changes to the warehouse address and payment details. - Click the Place Order button to finalize the return.
The “Return” type order is created and shows the status as “Return Submitted”. As the return process progresses, click the Action dropdown list and select Update Status to change the status to “Return Accepted” with a reason and comments. The status, then can be updated to “Return Refunded” and “Return Collected” as appropriate.
Replacing Orders
Overview
A CSR Admin user can create replacement orders for damaged products. The replace process includes selecting items for replacement, updating shipment details, and placing a replacement order.
Replace Order Criteria
To replace an order, the original order must be in the Shipped status. The customer requests a replacement due to issues like damaged or defective products.
How to Replace an Order or Order Items
To replace item(s) on behalf of a customer,
- Log in to the Foundation console for your business (URL provided by Infosys Equinox).
- Select the required store in the All Stores page.
Once a store is selected, the StoreOps page will appear. If a CSR is associated with multiple stores, they will be redirected to the store listing page upon logging in. If a CSR is associated with only one store, the store operations page will be the landing page upon logging in. - In the StoreOps page, click the CSR card.
The landing page of CSR is displayed. - Provide the required order ID in the Quick Search to navigate to the order.
Note: Alternatively, use Quick or Advanced Search to search for and navigate to a particular customer’s account. Click the ORDERS tab and navigate to the Last Order tab to get the recent order. - In the ORDERS tab, click the Last Order tab to get the recent order.
- In the Action dropdown list, select the Replace option.
- Choose the items and quantities to be replaced.
Note: Partial replacement can be performed by selecting specific items or quantities. - Choose a reason and add any necessary comments.
- Click the Proceed button. A replace order is created. The items to be replaced will be listed on the top. The items that are required by the customer can be added by the CSR.
- Under Replaced Item(s), click the ADD NEW ITEMS button to add the new items and quantities required by the customer.
- Once added, verify the order summary and individual item costs.
- The warehouse address details are automatically shown; however, update or confirm for the returned items.
- Confirm or update shipment and payment details.
- Once confirmed for all the details, click the PLACE ORDER button. Place the exchange order.
- Review the return order details, including the return warehouse address and the payment method for the refund.
Note: If required, make necessary changes to the warehouse address and payment details. - Click the Place Order button to finalize the return.
The Replace order is created. Once the item’s status is updated to “Submitted to Fulfillment”, click the Action dropdown list and select Update Status to mark mark it as shipped. The return item’s status is updated to “Return Collected”.
Managing Subscriptions of a Customer
Multiple subscriptions differ from singular or preference-based subscription models by allowing users to manage multiple subscription lists, each with its own processing dates and frequencies. This means that users can place multiple orders in a month, unlike singular subscriptions.
Note: For more information, see the video Subscription Future Tab Restrictions.
Subscription Methods
Infosys Equinox offers businesses the option to choose between a preference-based subscription (also known as a singular subscription) and multiple subscriptions. Once the preferred subscription method is identified, the business must configure the store and collection properties accordingly.
Comparison of Single & Multiple Subscriptions
Here’s a detailed comparison of the features available in preference-based (single) subscriptions versus multiple subscriptions:
| Feature | Preference Subscription | Multiple Subscription |
|---|---|---|
| Create a New Subscription | Yes | Yes |
| Add Items to the Existing Subscription | Yes | Yes |
| Process Now | Yes | Yes |
| Update Order Processing Date | Yes | Yes |
| Change Frequency | Yes | Yes |
| Edit Payment Method, Shipping Address, Shipment Method | Yes | Yes |
| Add Shipping Address for each Subscription | One | Multiple |
| Mark One-Time Purchase | No | Yes |
| Manage Subscriptions | No | Yes |
| View Total Order Value | No | Yes |
| Expand/Collapse Product Images | No | Yes |
| Skip Shipment | No | Yes |
| Cancel Subscription Items | Yes | Yes |
Configuring Store & Collection Properties
In both store property and Subscription’s collection property, configure preferenceBasedSubscription to enable either the existing preference flow subscription or multiple subscriptions flow. When this property is set to:
true, enables the preference based subscription flow, that is, this flow will have the address, shipping and payment details common for all the subscriptions.false, enables the multiple subscriptions flow, which means allows a customer to have multiple subscriptions, that is, for each subscription, different address, shipping, and payment details can be selected.
Note: To enable multiple subscriptions, you need to set the above property to false in both store property and Subscription’s collection property.
Preference-Based Subscription
Subscribing Item(s) on Behalf of a Customer
A CSR can shop for items and add subscriptions on behalf of the customer directly from the CSR Admin console, eliminating the need to navigate to the storefront.
To add a new subscription for a customer,
- Log in to the Foundation console for your business (URL provided by Infosys Equinox).
- Select the required store in the All Stores page.
Once a store is selected, the StoreOps page will appear. If a CSR is associated with multiple stores, they will be redirected to the store listing page upon logging in. If a CSR is associated with only one store, the store operations page will be the landing page upon logging in. - In the StoreOps page, click the CSR card.
The landing page of CSR is displayed. - Use the Quick or Advanced Search to search for and navigate to a particular customer’s account. The Customer Details page is shown.
- Click the SUBSCRIPTION tab.
- If you are adding a new subscription for the first time, click the NEW SUBSCRIPTION button.
- Select the type of channel through which the subscription will be managed. The channel type can be Web, Phone, Walk in Center, CSR, and so on. By default, the “Web” is selected from the dropdown list.
- In the Order Details section, click the ADD ITEMS button to add the customer’s requested items.
- In the Products drawer, select the item.
- In the product detailed page, select the required quantity, frequency (such as Monthly, Every 2 Months, or Every 3 Months) of the product to be delivered.
- Select the required SKU to subscribe and click the ADD TO CART button to add the items to the cart.
Note: One or more items can be added in the subscription order. - Verify the shipping address details. If you want to change the address, click Edit to make necessary changes.
- Verify the shipping method or click Edit to change from the default shipping method.
- Verify the payment method or click Edit to update the payment method details if required.
- In the Charges / Discounts section,
- To add other charges, click the ADD button, provide the appropriate additional charge details, and click the APPLY button. This is optional.
- To add a promo code, click the ADD button, provide the appropriate promocode details, and click the APPLY button. This is optional.
- View the order summary, total order value, and make the payment.
Note:- Before placing the order, you can verify or update the order quantity and frequency, set a new override price, and add or remove items at the item level.
- The override price reason is configurable. The reason can be Website pricing issue, Honoring previous promotion, Coupon exception, price match, and so on.
- Select Gift Receipt. For example, the business can configure to print the invoice without price details, and so on.
- Select Gift Message and provide the required gift messages.
- Click the PLACE ORDER button.
After placing the order, you will be redirected to the subscription dashboard where you can see the subscribed order details. For more details, refer to the next section.
View/Update an Existing Subscription Details
In the Subscriptions tab, CSR admin users can process orders immediately, cancel subscription orders, update the processing date, and modify the shipping address, shipping method, and payment method.
In the Subscription Items section, CSR admins can add new items, view all items or a month-wise listing of order items for the next six months, cancel items, skip or un-skip items, and modify quantities or frequencies as needed.
To view or update a subscription,
- Log in to the Foundation console for your business (URL provided by Infosys Equinox).
- Select the required store in the All Stores page.
Once a store is selected, the StoreOps page will appear. If a CSR is associated with multiple stores, they will be redirected to the store listing page upon logging in. If a CSR is associated with only one store, the store operations page will be the landing page upon logging in. - In the StoreOps page, click the CSR card.
The landing page of CSR is displayed. - Use the Quick or Advanced Search to search for and navigate to a particular customer’s account. The Customer Details page is shown.
- Click the SUBSCRIPTION tab.
The subscription dashboard is displayed. - Perform any of these functions:
1. To change the processing date of the subscription, click the EDIT icon and modify the date. Click the UPDATE button to reflect the changes. The subscription order is processed only based on the modified date. To process the subscription immediately, click the ORDER NOW button. Selecting this option will immediately start the order processing. This option is enabled only before the actual processing of the order begins. To cancel the subscription order, click the CANCEL SUBSCRIPTION button. The subscription order is removed from the subscription list. 2. Add or update the shipping address details, which can be done before the next order processing begins. In the Shipping Address drawer, you can select the required shipping address from the list of addresses or select a particular address as default. Click SAVE for any changes. 3. Add or update the shipping method details, which can be done before the next order processing begins. Click SAVE for any changes. 4. Add or update the payment method details. Click SAVE for any changes. 5. To add a new item to the existing subscription,
a. In the Subscription Items section, click the Add New Item button.
b. In the Products drawer, search or scroll to identify and select the required product.
c. In the product detailed page, select the required quantity, frequency (such as Monthly, Every 2 Months, or Every 3 Months), and the SKU.
c. Click the ADD TO CART button to add the selected item to the existing subscription items.
Note: The recently added item appears first on the list of the subscription items.6. a. Subscription Tabs: In the Subscription Items section, click:
- the SHOW ALL tab, which provides a combined listing of all the products.
- on the subsequent tabs, where you have the month wise order items listing for the next 6 months.
b. Frequency: To change the frequency for the subscription in the Show All tab or a particular month’s tab, select Monthly, Every 2 Months, or Every 3 Months from the dropdown list.
Note: If you update a subscription after the edit freeze date, the subscription will be frozen to create a new order for the month. In this state, you can’t change the subscription frequency.
c. Quantity: Select the desired quantity. After making changes, the subscription will be processed with the updated quantity from the upcoming month onwards.
d. SKIP or UNSKIP: Click SKIP or UNSKIP a subscription item, which results in skipping or un-skipping the item on behalf of a customer for the current month. Before processing the order for the month, you can always un-skip a skipped subscription item if required.
f. REMOVE: To cancel the subscription item, click REMOVE in that particular subscription item.
7. In the Summary section, view the pricing details of the subscription item(s), discount, tax, shipping, and order total details.
Working with Multiple Subscriptions
Subscribing Item(s) on Behalf of a Customer
A CSR can shop for items and add subscriptions on behalf of the customer directly from the CSR Admin console, eliminating the need to navigate to the storefront.
To add a new subscription for a customer,
- Log in to the Foundation console for your business (URL provided by Infosys Equinox).
- Select the required store in the All Stores page.
Once a store is selected, the StoreOps page will appear. If a CSR is associated with multiple stores, they will be redirected to the store listing page upon logging in. If a CSR is associated with only one store, the store operations page will be the landing page upon logging in. - In the StoreOps page, click the CSR card.
The landing page of CSR is displayed. - Use the Quick or Advanced Search to search for and navigate to a particular customer’s account. The Customer Details page is shown.
- Click the SUBSCRIPTION tab.
- If you are adding a new subscription for the first time, click the NEW SUBSCRIPTION button from the Subscription dashboard.
- If subscription items are already created, click the ADD NEW button to create another new subscription order.
- Provide a unique name for the subscription. This is mandatory.
- Choose a processing date. By default, the current date is selected automatically.
Note: For multiple subscriptions, provide different order processing dates for each subscription order. If you already have a subscription list on the same date, then you can choose to create a new list or add to the existing list.
- Select the type of channel through which the subscription will be managed. The channel type can be Web, Phone, Walk in Center, CSR, and so on. By default, the “Web” is selected from the dropdown list. The channel type is configurable as per business needs.
- Click the NEXT button.
Note: To cancel from creating a new order, click the CANCEL button. - In the New Subscription Order page, click the ADD ITEMS button to add the customer’s requested items.
- In the Products drawer, select the item.
- In the product detailed page, select the required quantity, frequency (such as One-time, Monthly, Every 2 Months, or Every 3 Months) of the product to be delivered.
Note: Selecting the One-Time option in the frequency settings will ensure that the item is processed only once during the first order and will not be included in the subsequent recurring subscriptions. - Select the required SKU to subscribe and click the ADD TO CART button to add items to the cart.
- Edit the shipping address details if you want to change the address. If you already have the default address, then this is optional.
- Edit the shipping method if you want to change from the default method.
- In the Charges / Discounts section, add promotion details if any.
- View the order summary, total order value, and make the payment.
Note: Before placing the order, you can update the order quantity, frequency, and add or remove items. - Select Gift Receipt. For example, the business can configure to print the invoice without price details, and so on.
- Select Gift Message and provide the required gift messages.
- Click the PLACE ORDER button.
After placing the order, you will be redirected to the subscription list screen where you can view the created subscription.
Note: To go back to the Subscription dashboard at any time, click VIEW ALL SUBSCRIPTIONS available above the subscription order details section.
View/Update an Existing Subscription Details
In the Subscriptions tab, search through subscriptions using product names, subscription names, SKU IDs, payment, and shipment methods to view and manage several subscription lists, each with its own processing dates and frequencies. Orders are processed based on the individual subscription list dates, allowing multiple orders to be placed in a month. This flexibility ensures that users can tailor their subscriptions to their specific needs and preferences.
The Subscription List Screen provides a comprehensive view of individual subscription lists, displayed as cards with relevant details. This feature allows users to easily manage and monitor their subscriptions. Editing options are available to update subscription names, processing dates, shipment, and payment details, ensuring that CSR can make necessary adjustments as needed.
The Process Now option enables users to start order processing immediately, providing a convenient way to expedite orders. Additionally, users have the ability to cancel subscriptions, removing them from the list if they are no longer needed.
The Monthly Order Items feature offers a month-wise listing of order items for the next six months, providing a clear overview of upcoming orders. Users can update quantities and frequencies, skip or remove items from upcoming orders, and make changes that will take effect from the next order onwards.
Overall, the order processing is based on the individual subscription list dates, enabling multiple orders in a month.
To view or update a subscription,
- Log in to the Foundation console for your business (URL provided by Infosys Equinox).
- Select the required store in the All Stores page.
Once a store is selected, the StoreOps page will appear. If a CSR is associated with multiple stores, they will be redirected to the store listing page upon logging in. If a CSR is associated with only one store, the store operations page will be the landing page upon logging in. - In the StoreOps page, click the CSR card.
The landing page of CSR is displayed. - Use the Quick or Advanced Search to search for and navigate to a particular customer’s account. The Customer Details page is shown.
- Click the SUBSCRIPTION tab.
- To search for the required subscriptions, provide a subscription name, payment method, shipping method, SKU ID, and/or SKU Name, and click the SEARCH button.
Note: To ignore the added subscription details, click the RESET button.
You will see the list of subscription cards. - Identify the required subscription to view or update the subscription details.
In a subscription card, you can view the order value by clicking the SHOW VALUE option, subscription creation date, last and upcoming order date, number of items available in the subscription order, subscription status (Active or Inactive), payment method and shipping method opted for the subscription, subscribed item’s image(s). - To view or modify the subscription details, click the VIEW button.
The following table describes the subscription details:
Note: To go back to the Subscription dashboard at any time, click VIEW ALL SUBSCRIPTIONS available above the subscription order details section.
In the subscription order details card, view the subscription ID, next order processing date, previous order processing date.
Note: The subscription ID is generated automatically and cannot be modified.
To change the subscription name and processing date of the subscription date, click the EDIT icon and make necessary changes. Click the UPDATE button to reflect the changes.
To process the subscription immediately, click the ORDER NOW button. Selecting this option will immediately start the order processing. This option is enabled only before the actual processing of the order begins. To cancel the subscription order, click the CANCEL SUBSCRIPTION button. The subscription order with all the subscription items is removed from the subscription list. 
Add or update the shipping address details, which can be done before the next order processing begins. In the Shipping Address drawer, you can select the required shipping address from the list of addresses or select a particular address as default. Click SAVE for any changes. 
Add or update the shipping method details, which can be done before the next order processing begins. Click SAVE for any changes. 
Add or update the payment method details. Click SAVE for any changes. 
To add a new item(s) to the existing subscription,
- In the Subscription Items section, click the Add New Item button.
- Select the required quantity, frequency (such as Monthly, Every 2 Months, or Every 3 Months) and the SKU.
- Click the ADD TO CART button to add the new item to the existing subscription order.
Note: The recently added item appears first on the list of subscription items.

a. Subscription Tabs: In the Subscription Items section, click:
- the SHOW ALL tab, which provides a combined listing of all the products.
- on the subsequent tabs, where have the month wise order items listing for the next 6 months.
b. Frequency: To change the frequency for the subscription, select Monthly, Every 2 Months, or Every 3 Months, One-Time.
Note:
- If you select the One-Time option and if the subscription contains only one item, then the one time purchase is not allowed. At least more than one item is required to process for one-time order.
- If you update a subscription after the edit freeze date, the subscription will be frozen to create a new order for the month. In this state, you can’t change the subscription frequency.
c. Quantity: Select the desired quantity. The subscription will be processed with the change in the quantity from the upcoming month onwards.
d. SKIP or UNSKIP: Click SKIP or UNSKIP a subscription item, which results in skipping or un-skipping the item on behalf of a customer for the current month. Before processing the order for the month, you can always un-skip a skipped subscription item.
e. BULK SKIP: To skip the subscription items in bulk, which skips all subscription items for the upcoming shipment order. This option is enabled only for the items in the Show All tab and the upcoming month’s tab.
f. REMOVE: To cancel a subscription item, click REMOVE in that particular subscription item.

In the Summary section, view the pricing details of the subscription item(s), discount, tax, shipping, and order total details.
Cart Details of a Customer
A CSR admin user can anytime view a particular customer’s cart details.
To view the cart details,
- Log in to the Foundation console for your business (URL provided by Infosys Equinox).
- Select the required store in the All Stores page.
Once a store is selected, the StoreOps page will appear. If a CSR is associated with multiple stores, they will be redirected to the store listing page upon logging in. If a CSR is associated with only one store, the store operations page will be the landing page upon logging in. - In the StoreOps page, click the CSR card.
The landing page of CSR is displayed. - Use the Quick or Advanced Search to search for and navigate to a particular customer’s account.
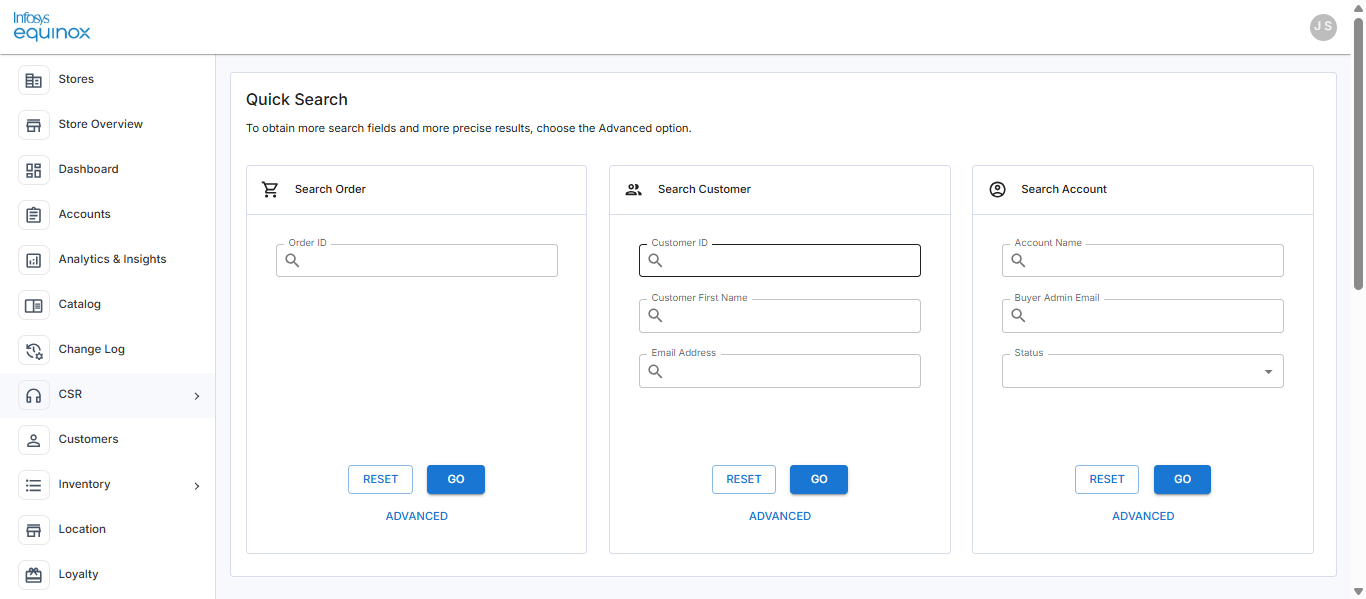
The Customer Details page is shown. - Click the CART tab. This shows the items that are added to the customer’s cart.
Loyalty Tab
Overview
This tab provides a consolidated view of the customer’s loyalty information, including their current tier, points balance, rewards summary, and detailed transaction history. The business can configure for various reward types such as loyalty points, order value, store credit, and/or vouchers to drive customer engagement and boost sales—but each serves a distinct purpose and functions differently:
-
Loyalty Points: These are rewards customers earn over time, typically based on their spending. They encourage repeat purchases by offering future value, such as discounts or free products, once a certain threshold is reached.
-
Order Value: This is the total amount a customer spends in one purchase. Businesses can use this to encourage higher spending by offering perks like discounts, free shipping, or product bundles.
-
Store Credit: A refund given for returned items that can be used for future purchases at the same store. It works like a store gift card and encourages customers to shop again.
- Loyalty Voucher: It is a reward given to customers through a loyalty program. It works like a coupon or discount for future purchases and is usually based on points earned, how much the customer spends, or special promotions.
In the Loyalty tab, a CSR admin can view a customer’s loyalty details, add or remove loyalty rewards, and check their transaction history.
Prerequisites
Users are eligible for loyalty rewards and vouchers only if they opt-in to the Loyalty Rewards Program. For more information, see Creating an Action in Loyalty Admin. Users can opt-in to the loyalty program either during the sign-up process or through the My Profile dashboard on the storefront.
Before You Begin
Before a CSR begins working with loyalty credits and debits, the following configurations must be completed:
- Store and Collection Properties are configured in the Foundation Admin Console. For more information, see store properties and collection properties.
- Loyalty Groups are configured with the appropriate actions. For more information, see the Loyalty Group section in the Loyalty Admin User Guide.
- Event Type is created in the Loyalty Admin console. For more information, see the Configuring Loyalty Events section in the Loyalty Admin User Guide.
- Required Products must be configured via Attributes in the Catalog Admin console with the following attributes set to true:
-
- Earn Voucher Points
- Earn Loyalty Points
- Redeemable with Loyalty Points
- Redeemable Voucher Points
Sequence of Configurations for Loyalty Rewards and Vouchers
The sequence of configurations for Loyalty Vouchers and Loyalty Rewards is similar, requiring the appropriate values to be set.
The sequence of configuring for loyalty rewards is as follows:
-
Configure store-specific property in the Foundation admin console:
Purpose Configuration the Property To opt in or opt out of the the loyalty rewards program. allowedRewardTypesForOptInTo identify if a product is eligible for earning points based on attribute.
productPropertyToEarnRewardsTo identify if a product is eligible to redeem loyalty points and based on attribute. RedeemloyaltypropertyTo upgrade to a tier tierConfig: Calculates the user’s tier.fetchRewardsEventId: Fetches rewards before the actual reward points are credited to the account.
To redeem the earned loyalty points while placing an order. pointValueInPriceUnit: Indicates the loyalty points to price conversion value in unit.percentInPriceToPayByPoints: Identifies if a product is eligible to earn loyalty points.discountModelRewardTypes: Supports the loyalty as discount model based on which the payment or discount type is activated.
To add details for the storefront. sfStoreDetails -
Configure Loyalty’s collection property in the Foundation admin console:
Purpose Configuration the Property To customize the action configuration of loyalty rules. customActionTypesConfigTo configure the list of eligible reward types based on opt-in functionality. allowedRewardTypesForOptInTo send events about the points that would expire. pointsExpiryDaysTo configure the tier names and their percentage, and send events about the current tier and next tier of the user. tierConfig - Associate products with attributes in the Catalog admin console:
Purpose Configuration the Attribute To calculate the product’s eligibility to earn points. All points calculation happens in the Order Shipped Event. pointEarnTo calculate the product’s eligibility to redeem points. pointRedeem - Configure the Loyalty admin console:
Configuration Step Details Configure Loyalty Reward Types Configure Loyalty and/or Voucher in the Loyalty Admin Console.
Manage Rewards Bank - Credit and/or debit Loyalty Rewards and/or vouchers for a user.
Configure Loyalty Group with Required Actions Actions for Loyalty Opt In/Opt Out:
Loyalty OptIn/Loyalty OptOut: Used while configuring Loyalty under Loyalty Groups.Loyalty Forfeit: When the user opts out, all earned loyalty points are forfeited (removed) from their account.
Note: If the user opts in after opting out, a fresh dashboard is displayed.
Tier Upgrade Order Total Value: Calculate the total orders done by the user.Set Tier: Credit points to the user’s account only when the order is shipped.Tierdegrade: Optional.
Update Profile Property Determine the subscription count and update the profile property of the user.
Calculate Loyalty Points
- Based on associating attributes to the products in the Catalog Admin Console.
Earn Points Action,Earn Voucher, andApprove Voucher: Calculate the product’s eligibility for earning points, rewards, and/or vouchers.
-
Configure Event Type in Loyalty Admin Console:
Voucher Eligible Order Value:orderInfo.voucherEligibleOrderValue– Decimal.
Rewards Types
Infosys Equinox offers various reward types, such as loyalty points, order value, store credit, and voucher.
Reward Type: Loyalty
As a CSR, you can view, credit, and debit the loyalty rewards of the customer for the selected reward type.
Viewing Loyalty Rewards
As a CSR, you can view loyalty rewards of the customer, such as their loyalty details, rewards summary, and transaction details.
To view the loyalty rewards,
- Log in to the Foundation console for your business (URL provided by Infosys Equinox).
- Select the required store in the All Stores page.
Once a store is selected, the StoreOps page will appear. If a CSR is associated with multiple stores, they will be redirected to the store listing page upon logging in. If a CSR is associated with only one store, the store operations page will be the landing page upon logging in. - In the StoreOps page, click the CSR card.
The landing page of CSR is displayed. - Use the Quick or Advanced Search to search for and navigate to a particular customer’s account.
The Customer Details page is shown. - Click the LOYALTY tab.
- By default, the Loyalty reward type details are shown. If not, from the Reward Type dropdown list, select LOYALTY:
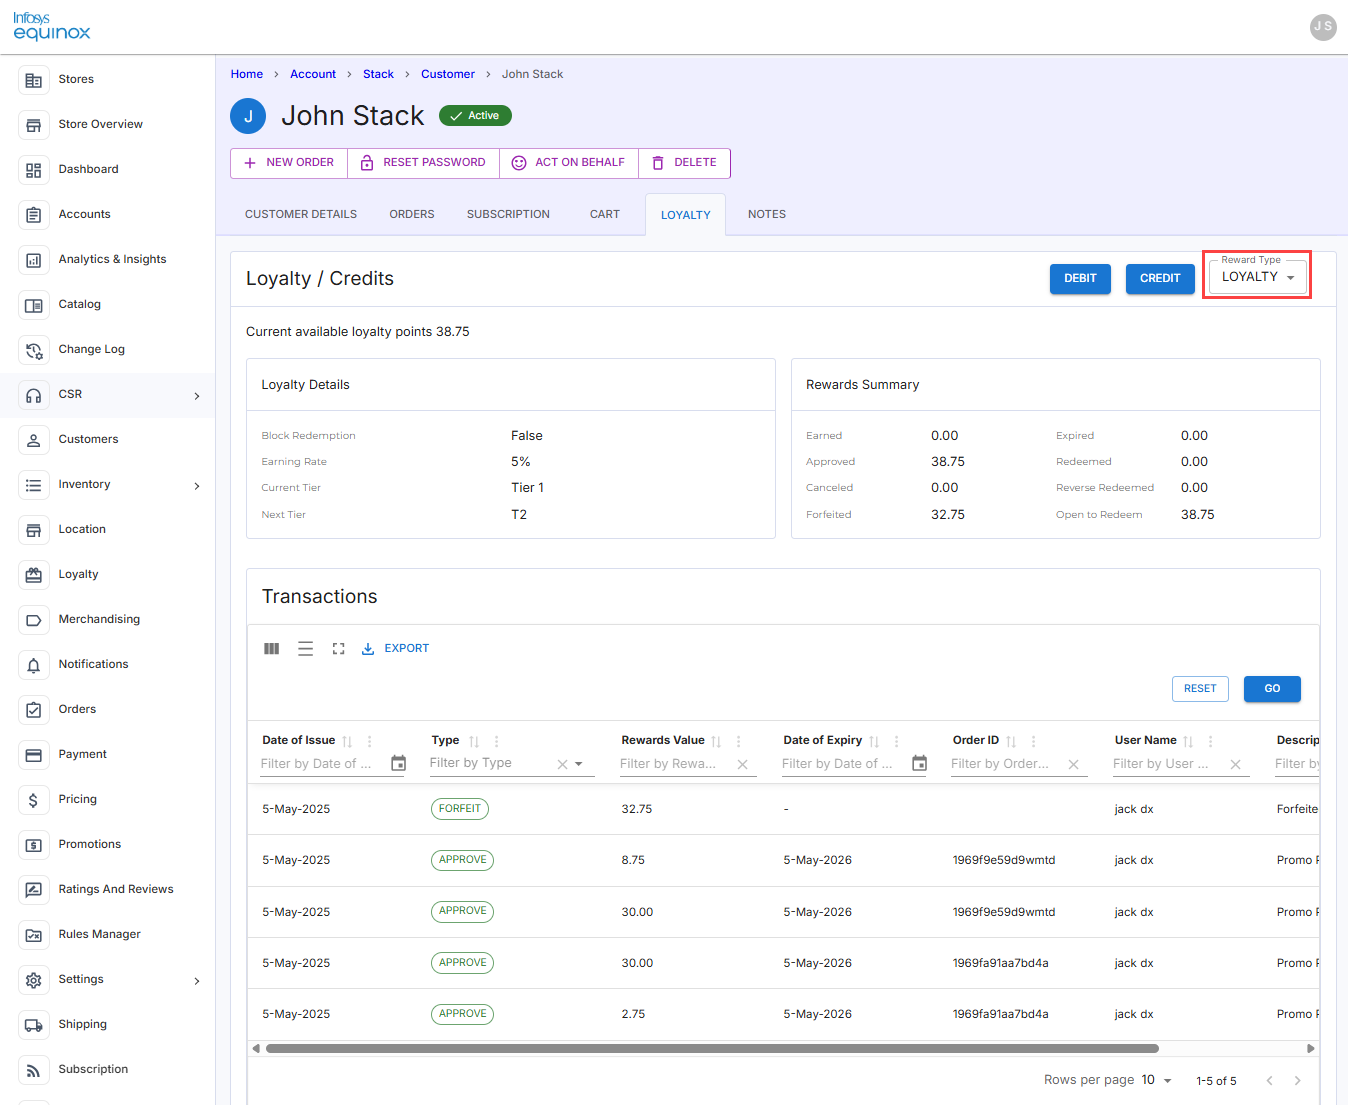
You will see the customer’s current available loyalty points, loyalty details, rewards summary, and transaction details.
Debit Loyalty Points of a Customer
As a CSR, you can debit loyalty points of a customer. Once loyalty point value is debited, a transaction is created.
To debit loyalty points of a customer,
- Log in to the Foundation console for your business (URL provided by Infosys Equinox).
- Select the required store in the All Stores page.
Once a store is selected, the StoreOps page will appear. If a CSR is associated with multiple stores, they will be redirected to the store listing page upon logging in. If a CSR is associated with only one store, the store operations page will be the landing page upon logging in. - In the StoreOps page, click the CSR card.
The landing page of CSR is displayed. - Use the Quick or Advanced Search to search for and navigate to a particular customer’s account.
The Customer Details page is shown. - Click the LOYALTY tab.
- By default, the Loyalty reward type details are shown. If not, from the Reward Type dropdown list, select LOYALTY:
- Click the DEBIT button.
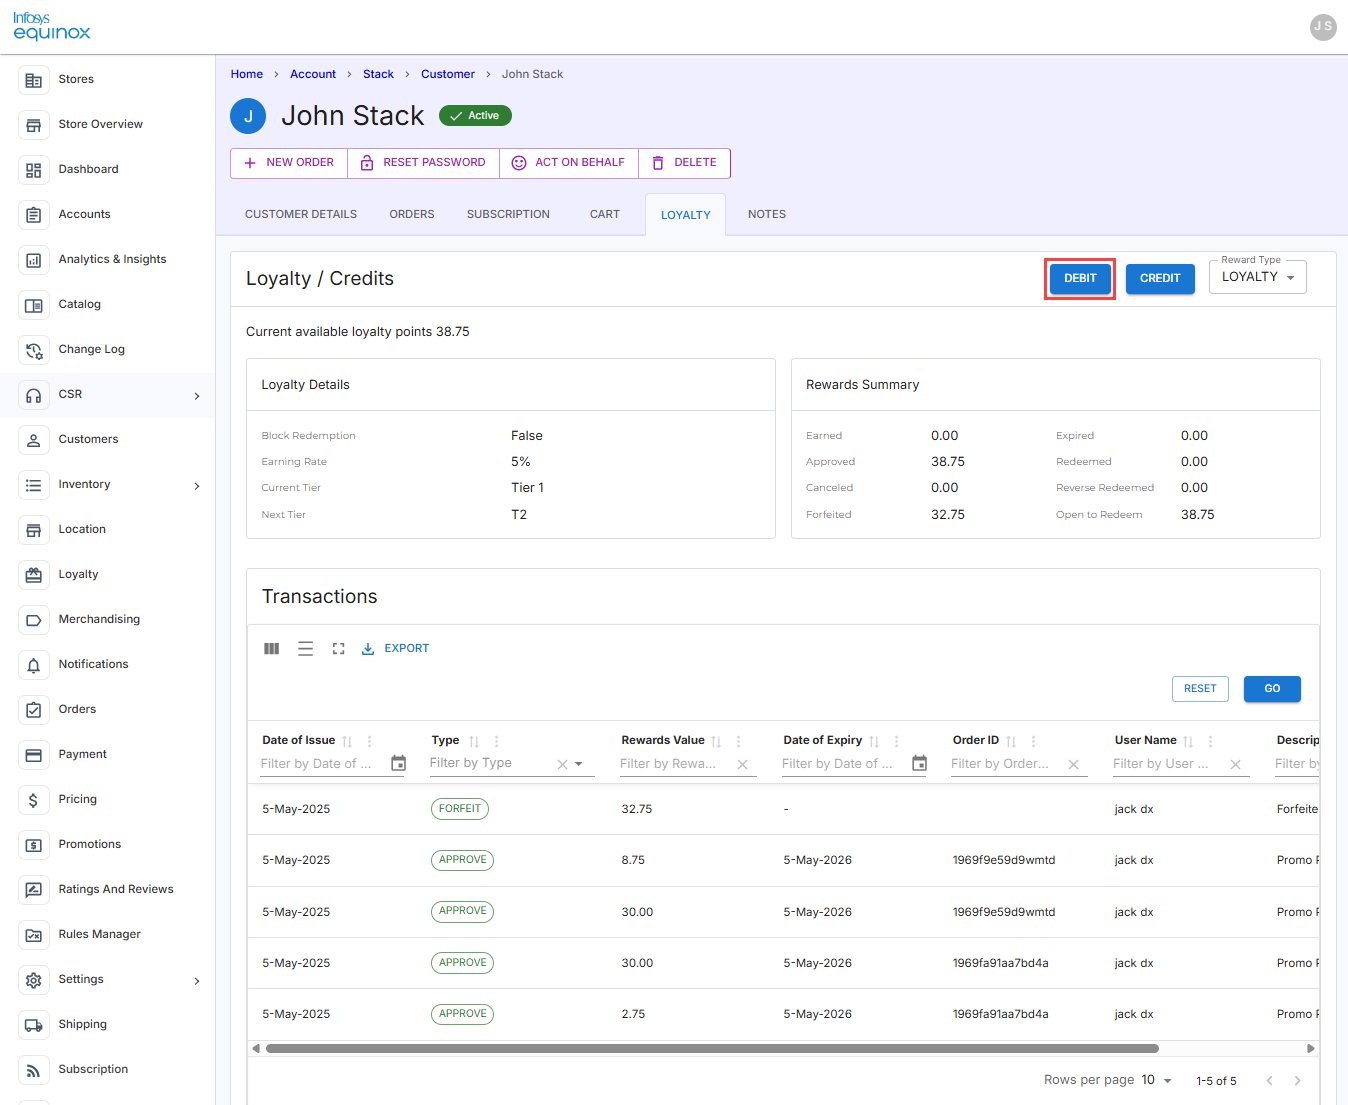
The following Debit drawer appears:
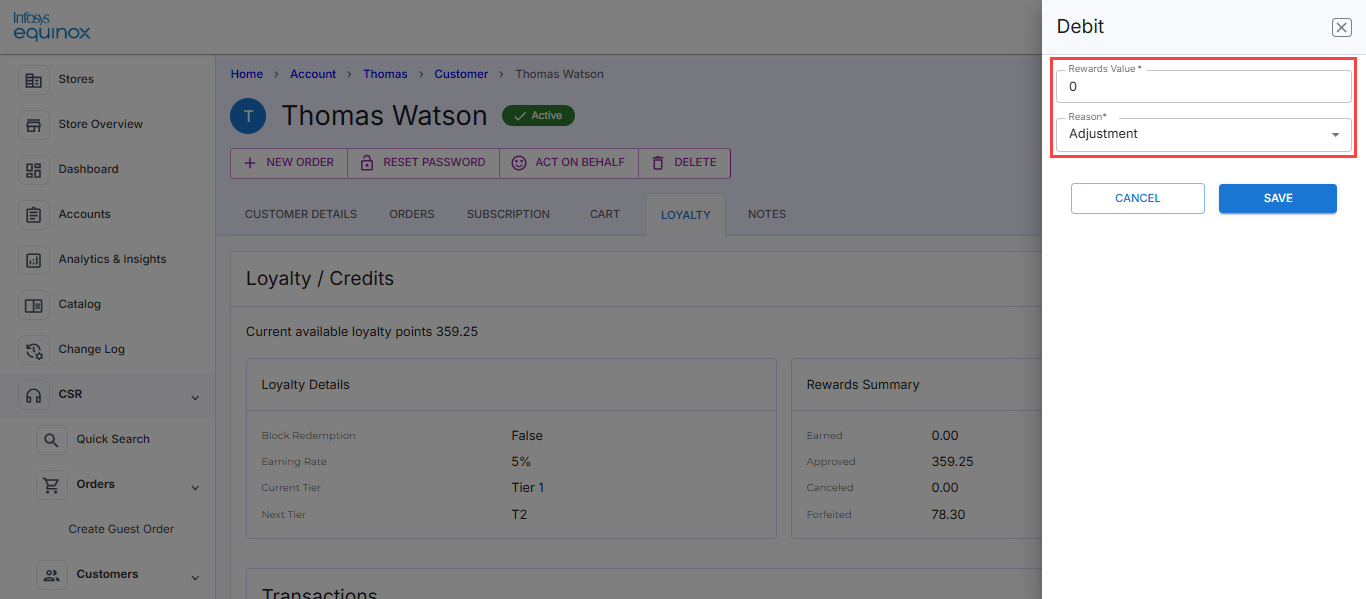
- In the Debit drawer, provide the required details as explained in the table below:
Field Description Rewards Value Enter a value to be debited from the customer. This field is mandatory. Reason Select an appropriate reason, for example, Adjustment to adjust for order item’s return or replacement.
- Click SAVE to debit the loyalty points of the customer.
The required transaction appears in the Transaction section.
For example, when debiting the loyalty points of the customer, a transaction is created and reflects on the Transactions section.
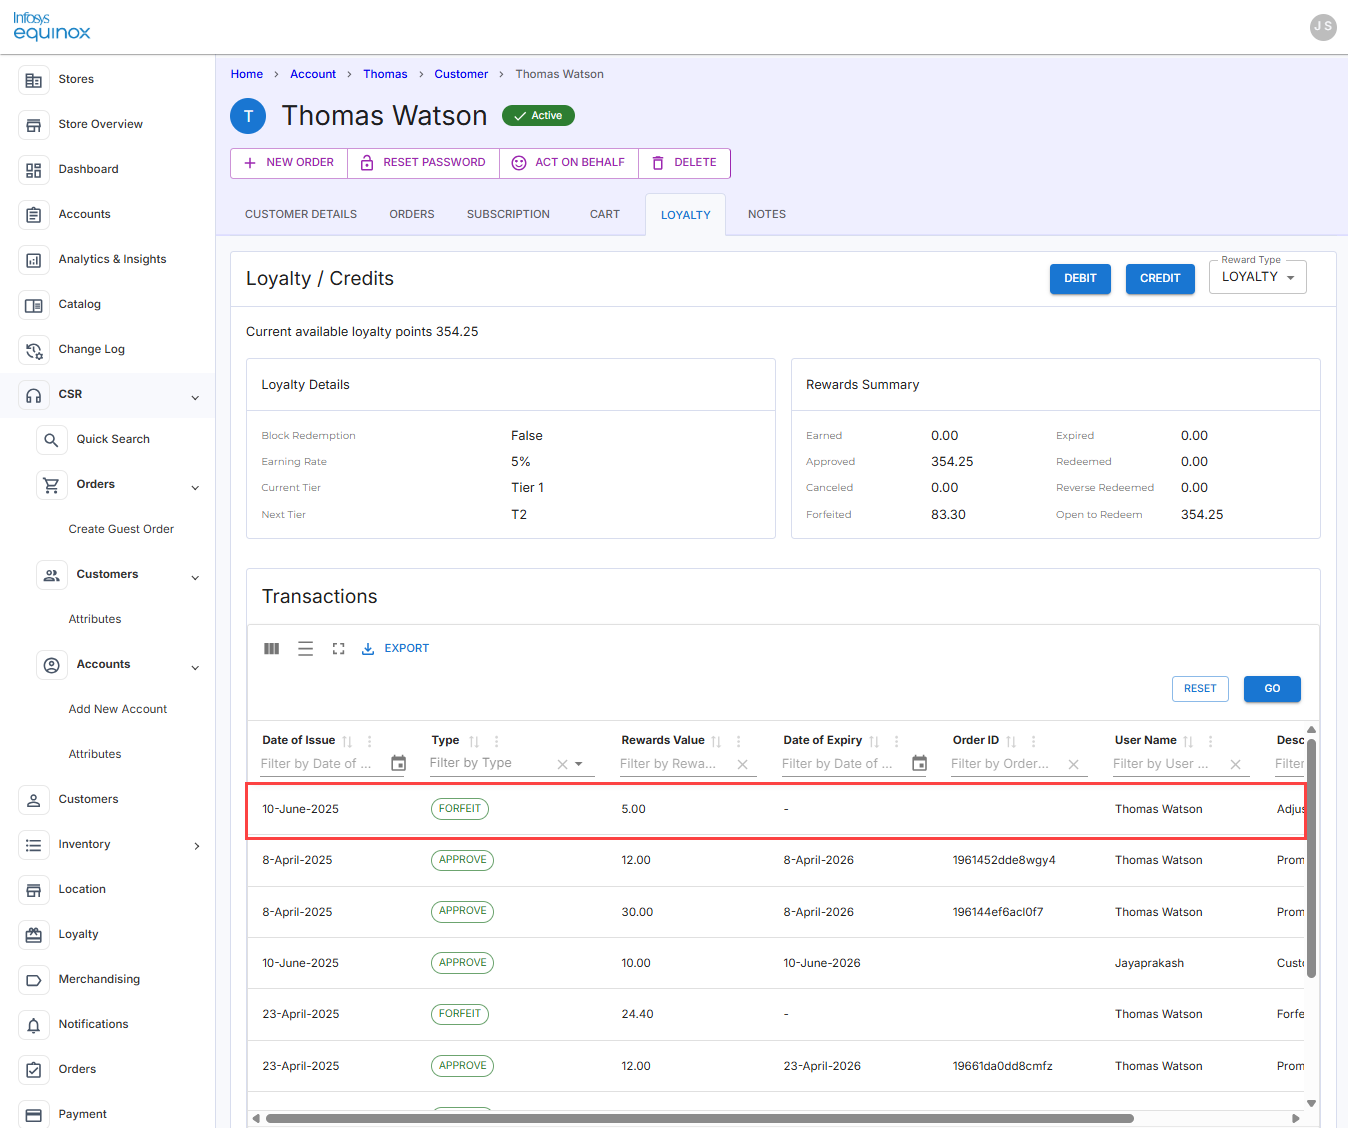
Credit Loyalty Points of a Customer
As a CSR, you can credit loyalty points for a customer. Once loyalty point value is credited, a transaction is created.
To debit loyalty points of a customer,
- Log in to the Foundation console for your business (URL provided by Infosys Equinox).
- Select the required store in the All Stores page.
Once a store is selected, the StoreOps page will appear. If a CSR is associated with multiple stores, they will be redirected to the store listing page upon logging in. If a CSR is associated with only one store, the store operations page will be the landing page upon logging in. - In the StoreOps page, click the CSR card.
The landing page of CSR is displayed. - Use the Quick or Advanced Search to search for and navigate to a particular customer’s account.
The Customer Details page is shown. - Click the LOYALTY tab.
- By default, the Loyalty reward type details are shown. If not, from the Reward Type dropdown list, select LOYALTY:
- Click the CREDIT button.
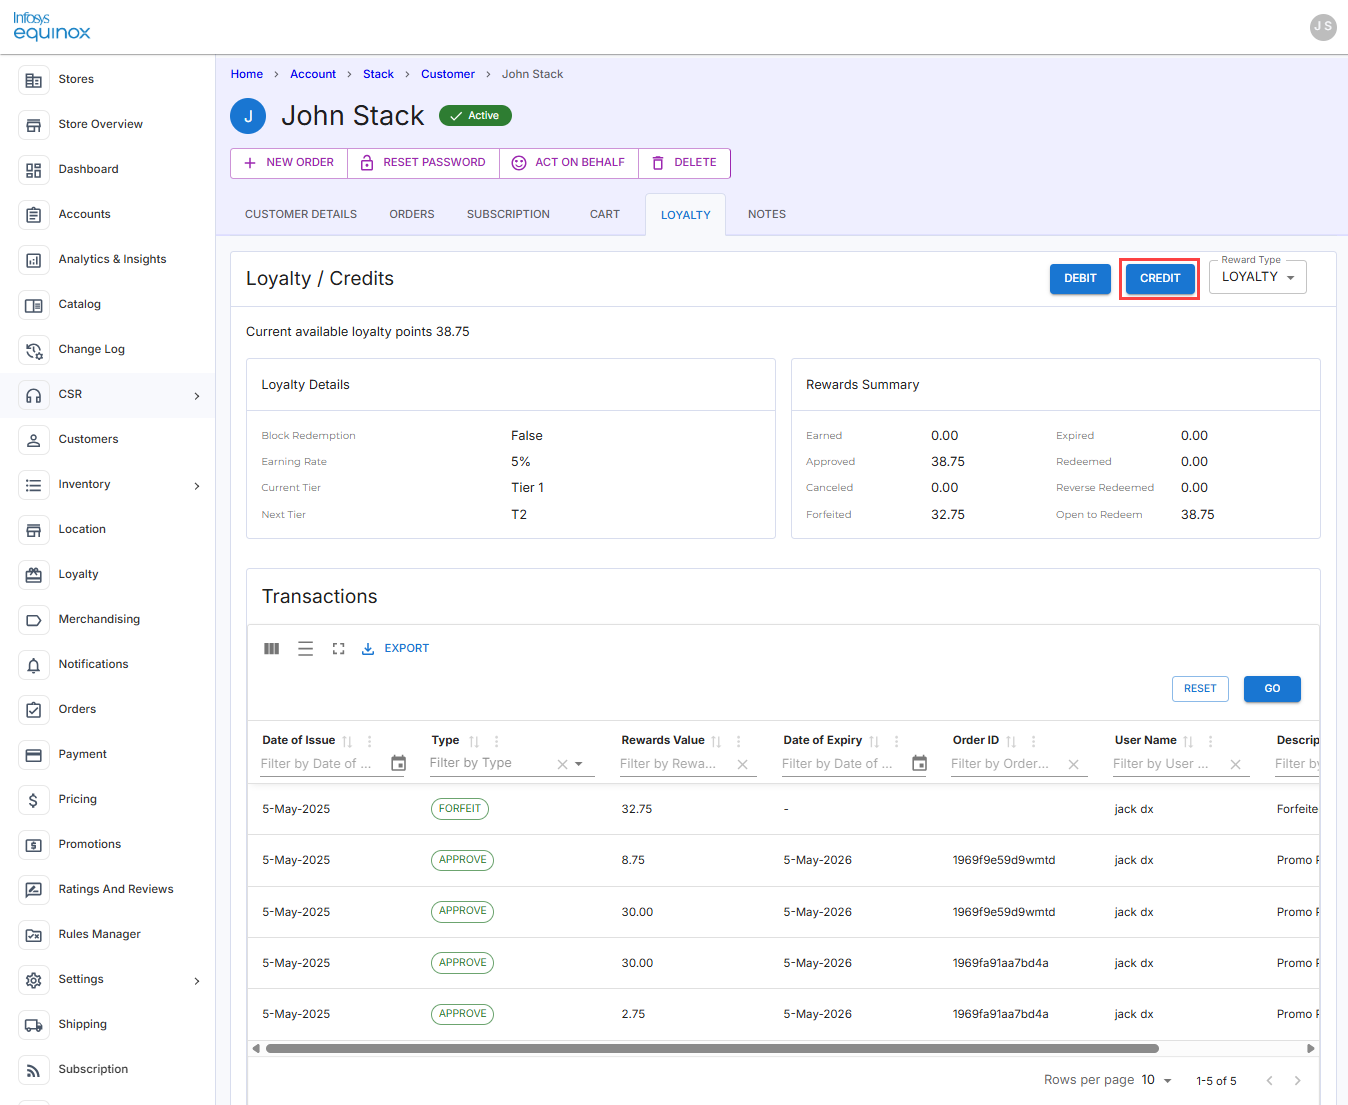
The following Credit drawer appears:
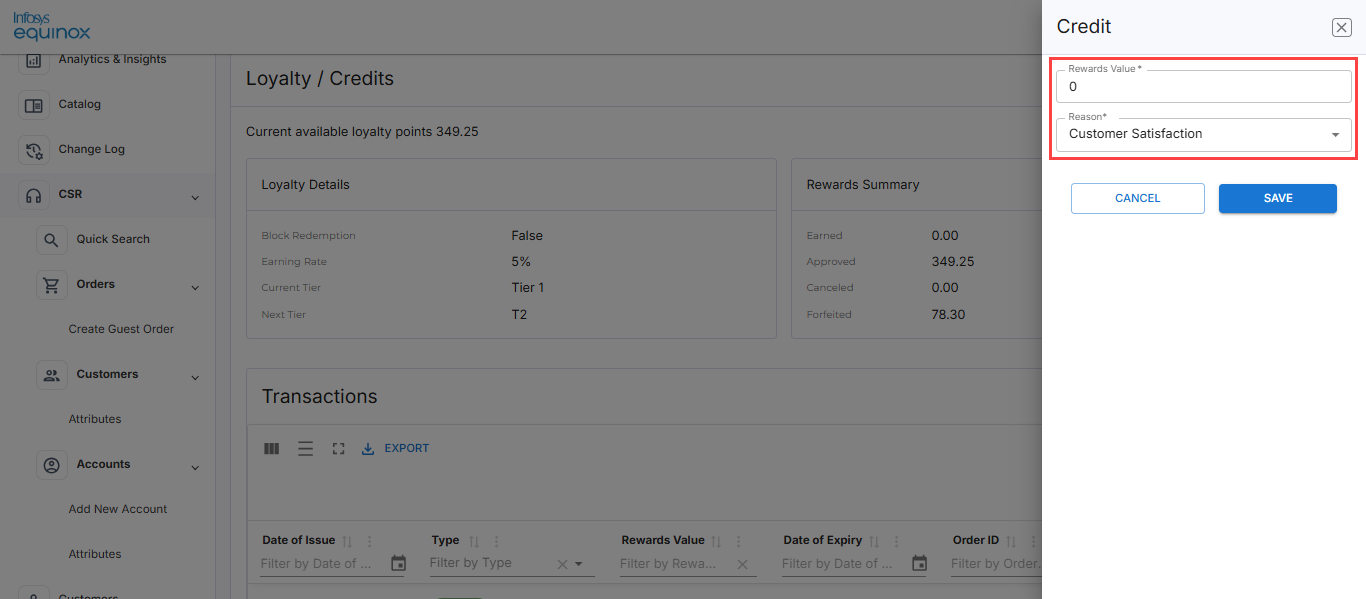
- In the Credit drawer, provide the required details as explained in the table below:
Field Description Rewards Value Enter a value to be awarded to the customer. This field is mandatory. Reason Select an appropriate reason for crediting the loyalty points.
- Click SAVE to credit the loyalty points of the customer.
The required transaction(s) appears in the Transaction section.
For example, when crediting the loyalty points to the customer, a transaction is created and reflects on the Transactions section.
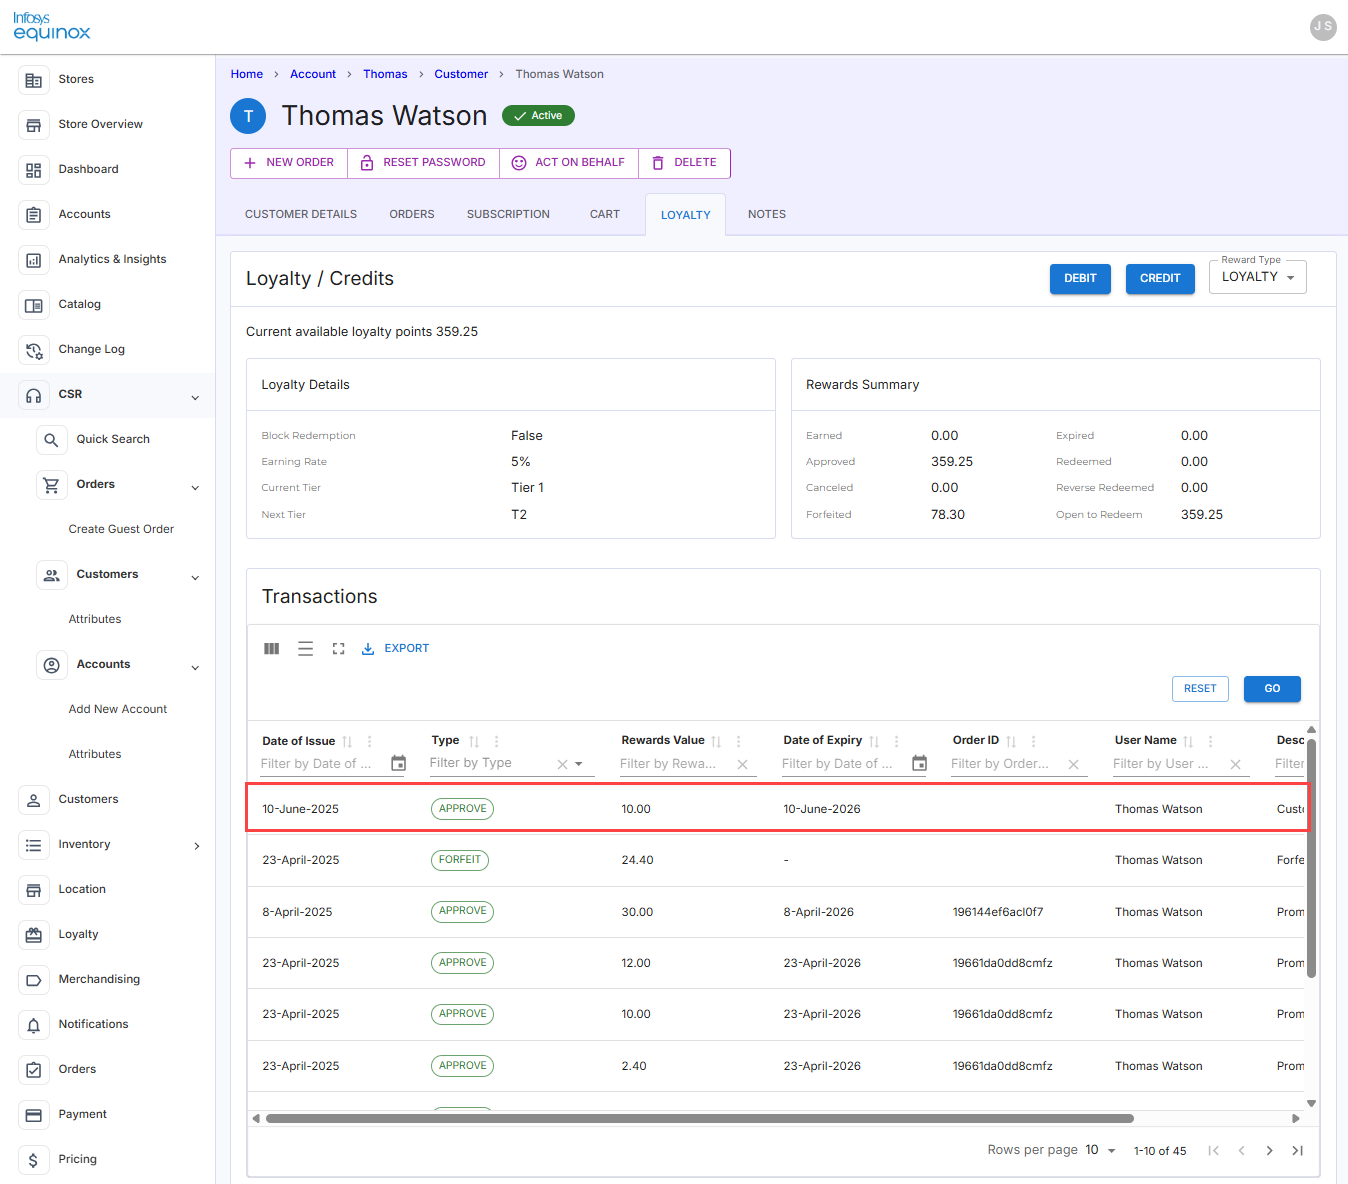
Reward Type: Vouchers
Vouchers (e.g., $5, $10) are rewards given to users based on the loyalty points they earn. These vouchers can be used as discounts during the shopping process. Only users who have opted into the loyalty program are eligible to earn and use these vouchers.
Examples of How to Use Vouchers
- If a user has a $10 voucher, they can apply it at checkout to reduce a $50 order to $40.
- A $5 voucher can be used to get a discount on a minimum purchase of $25.
- During promotional events, users may combine vouchers with other offers (if allowed) for additional savings.
How to Earn Vouchers
Users can earn vouchers through various activities and milestones:
- Welcome Voucher: Earned when a user creates a new account.
- Post-Purchase Voucher: Issued once an order is placed and shipped.
- Order Value-Based Voucher: Earned when an order meets a defined minimum value.
- One-Time Order Voucher: Given for completing a one-time purchase.
- Subscription Order Voucher: Earned for placing a subscription-based order.
- Consecutive Subscription Rewards:
- Scenario 1: Earn a voucher after completing 3 subscription orders within a 6-month period.
Note: The 6-month period starts from the first subscription order under the new loyalty program. - Scenario 2: Earn a voucher by maintaining monthly subscription orders with a minimum value (e.g., $250 USD / $330 CAD) for 3 consecutive months.
- Scenario 1: Earn a voucher after completing 3 subscription orders within a 6-month period.
Crediting and Debiting Loyalty Vouchers
A CSR admin can manage loyalty vouchers by crediting or debiting them from a user’s account. These actions are recorded in the user’s transaction history.
Rules for Crediting and Debiting
-
Opted-In Users:
When a customer has opted into the loyalty program, the CSR admin can:- Credit vouchers – This is treated as an earn transaction.
- Debit vouchers – This is treated as a forfeit transaction.
-
Opted-Out Users:
If the customer has opted out of the loyalty program, the CSR admin cannot credit or debit any loyalty rewards.
Crediting a Loyalty Voucher to a Customer
As a CSR, you can credit loyalty vouchers to a user’s account. However, vouchers are only credited after an order has been placed and successfully shipped. This ensures that rewards are granted based on completed transactions.
To credit loyalty vouchers to a customer,
- Log in to the Foundation console for your business (URL provided by Infosys Equinox).
- Select the required store in the All Stores page.
Once a store is selected, the StoreOps page will appear. If a CSR is associated with multiple stores, they will be redirected to the store listing page upon logging in. If a CSR is associated with only one store, the store operations page will be the landing page upon logging in. - In the StoreOps page, click the CSR card.
The landing page of CSR is displayed. - Use the Quick or Advanced Search to search for and navigate to a particular customer’s account.
The Customer Details page is shown.
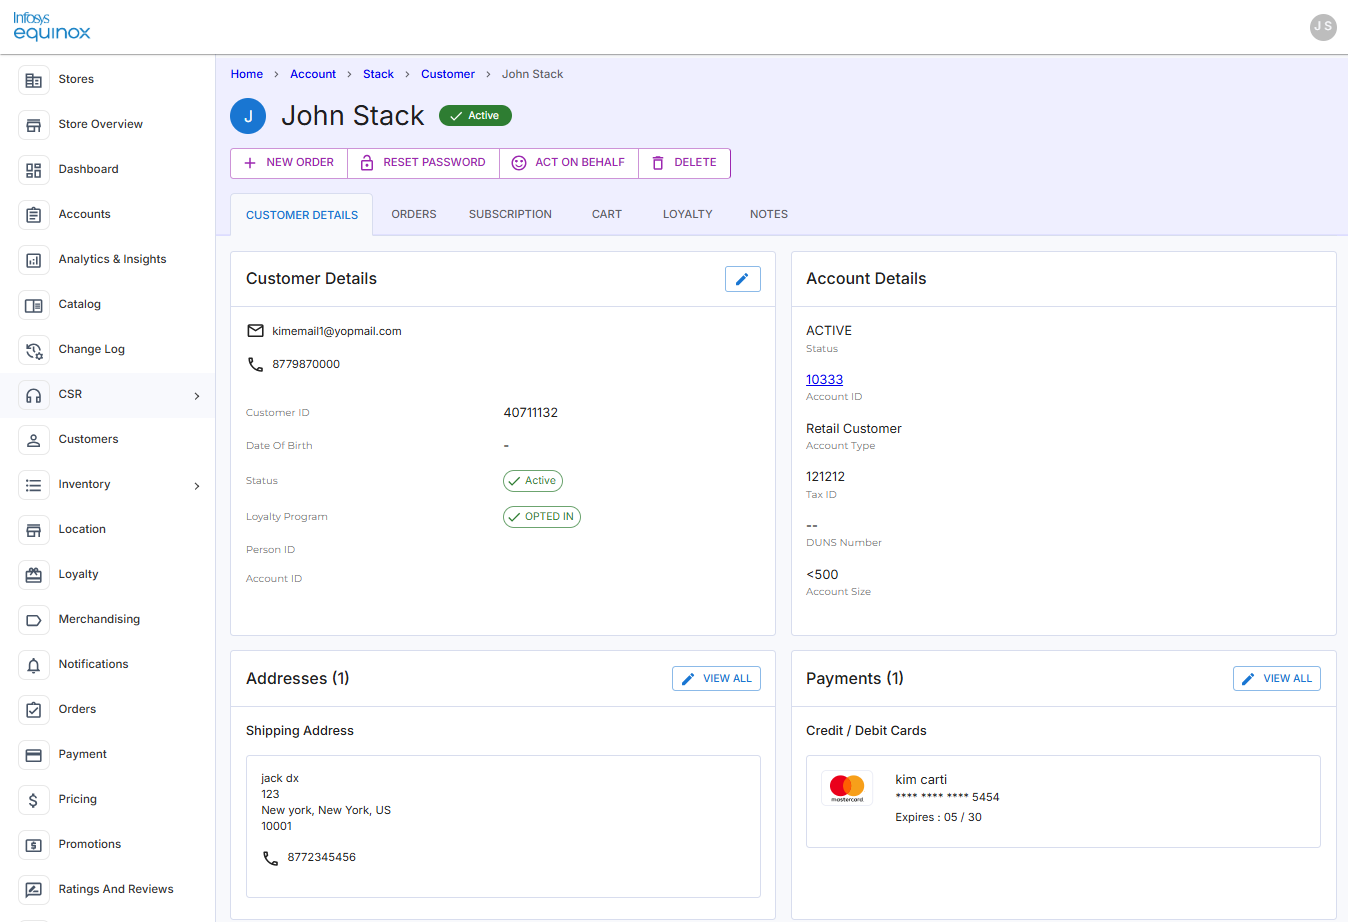
- Click the LOYALTY tab.
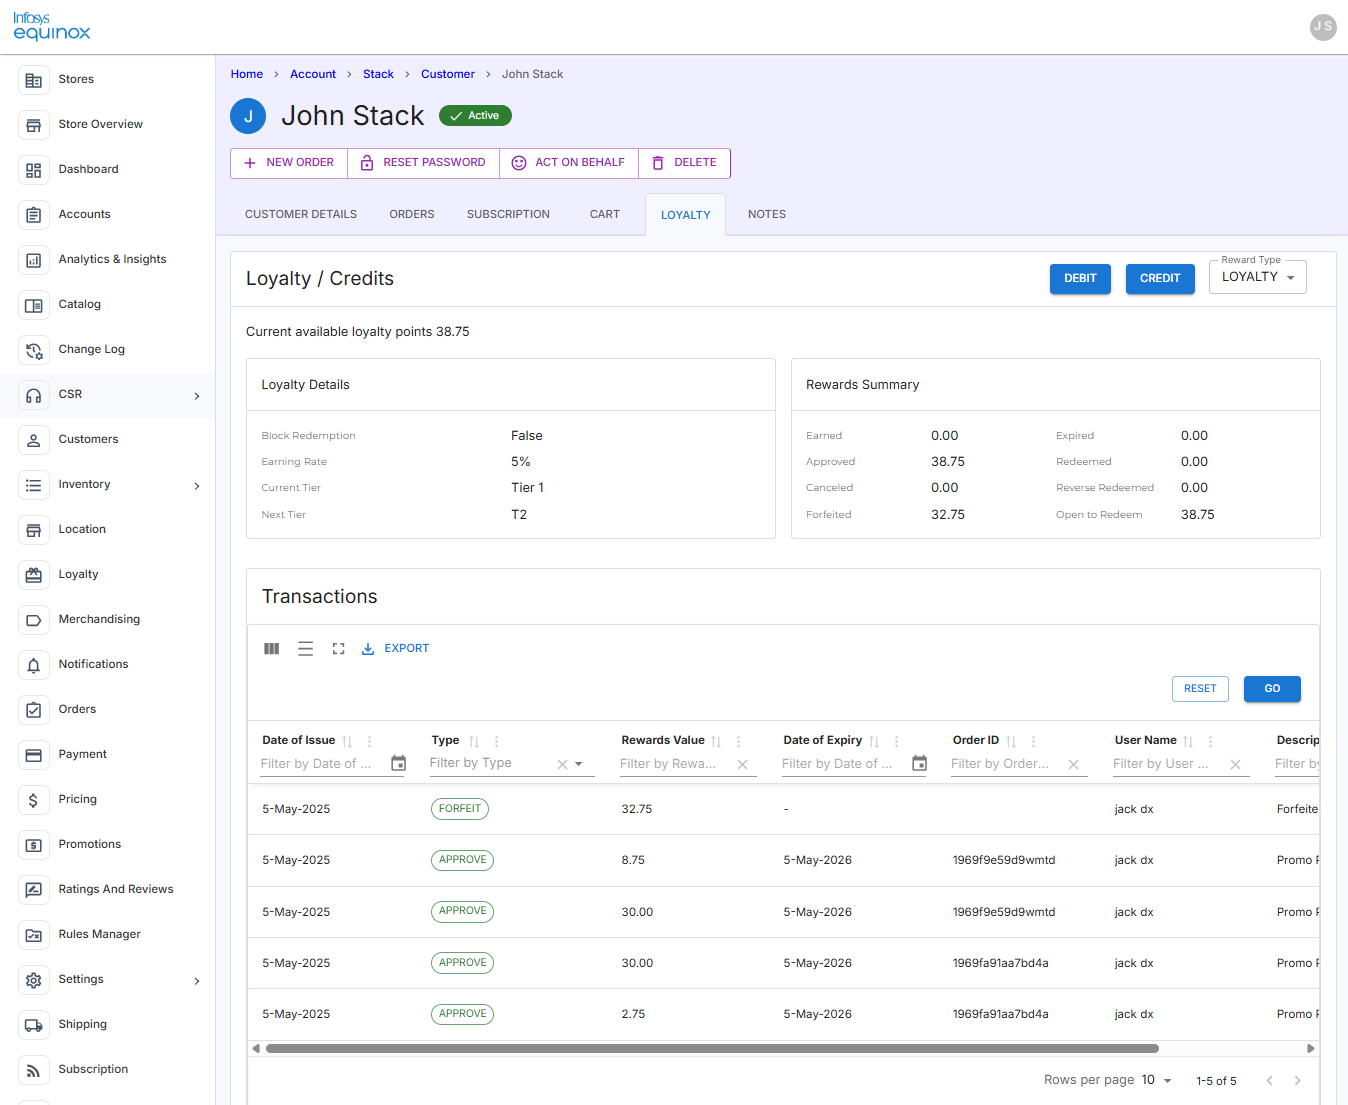
- By default, the Loyalty reward type details are shown. If not, from the Reward Type dropdown list, select VOUCHER:
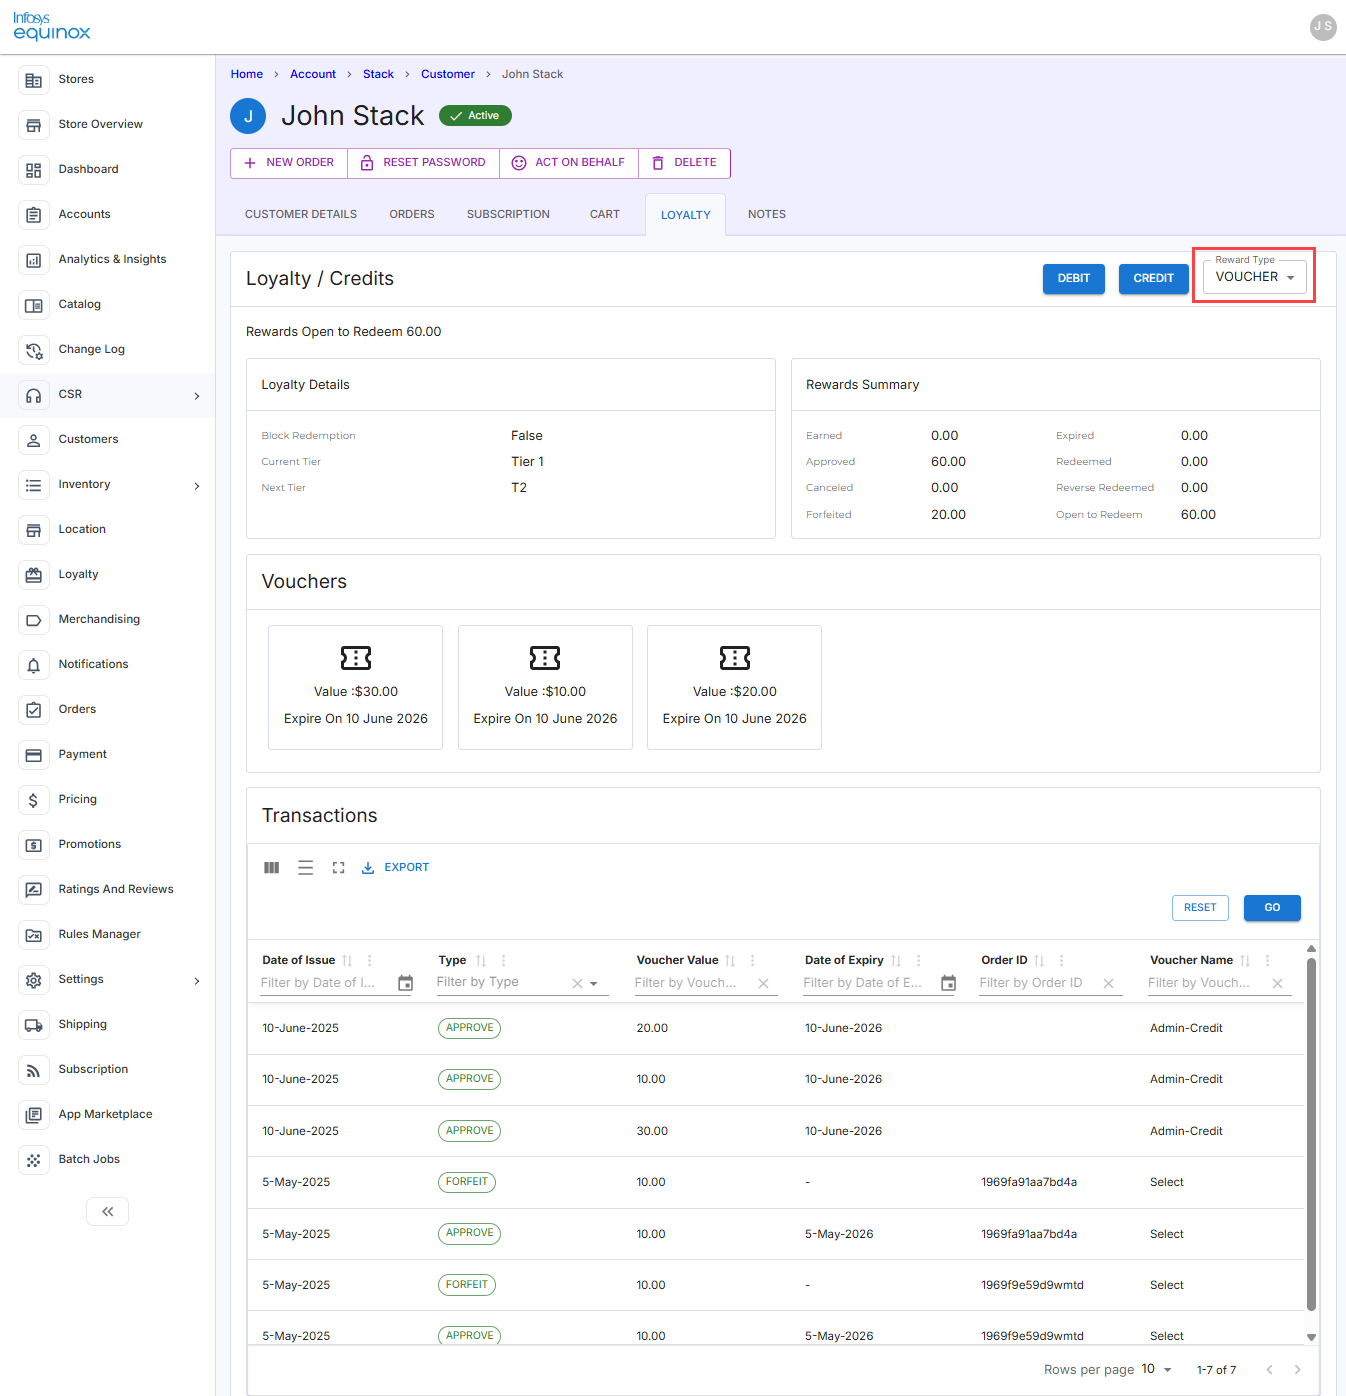
- Click the CREDIT button.
The following Credit drawer appears:
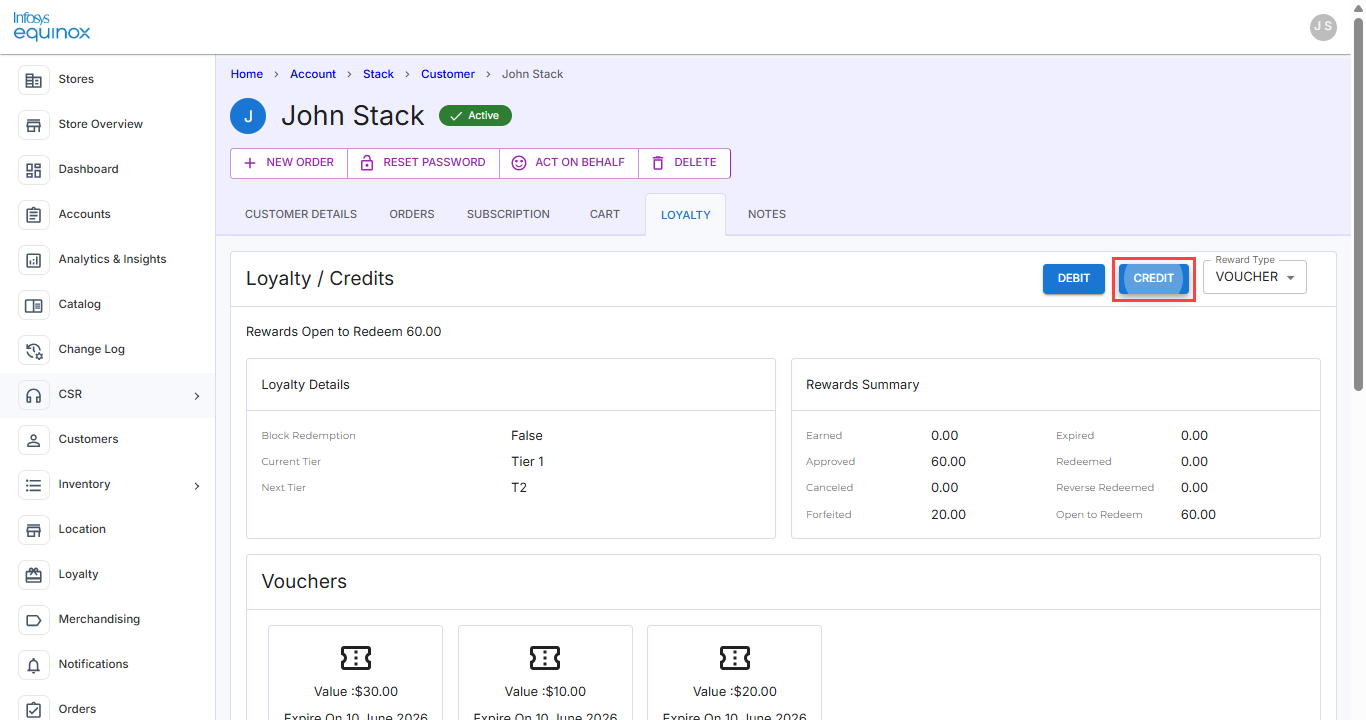
- In the Credit drawer, select the voucher value from the dropdown list, and then click
 :
:
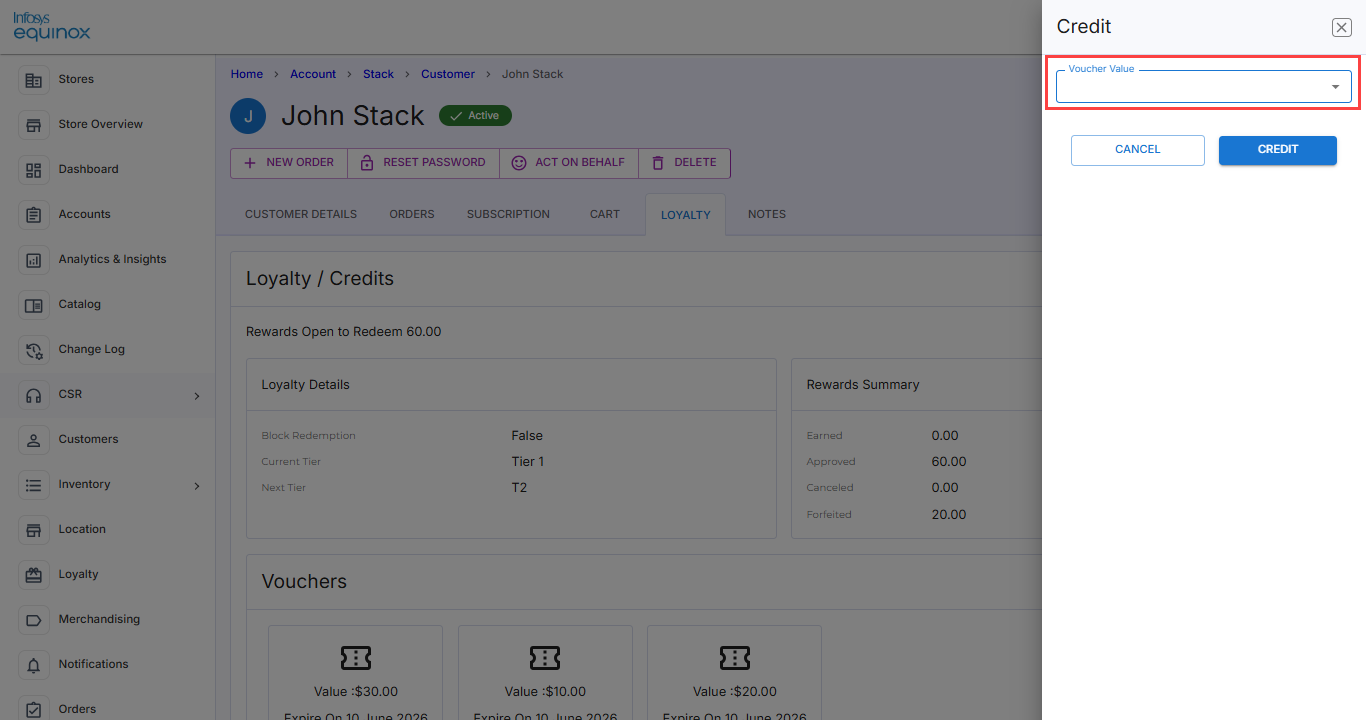
The credit voucher appears under the Vouchers section.
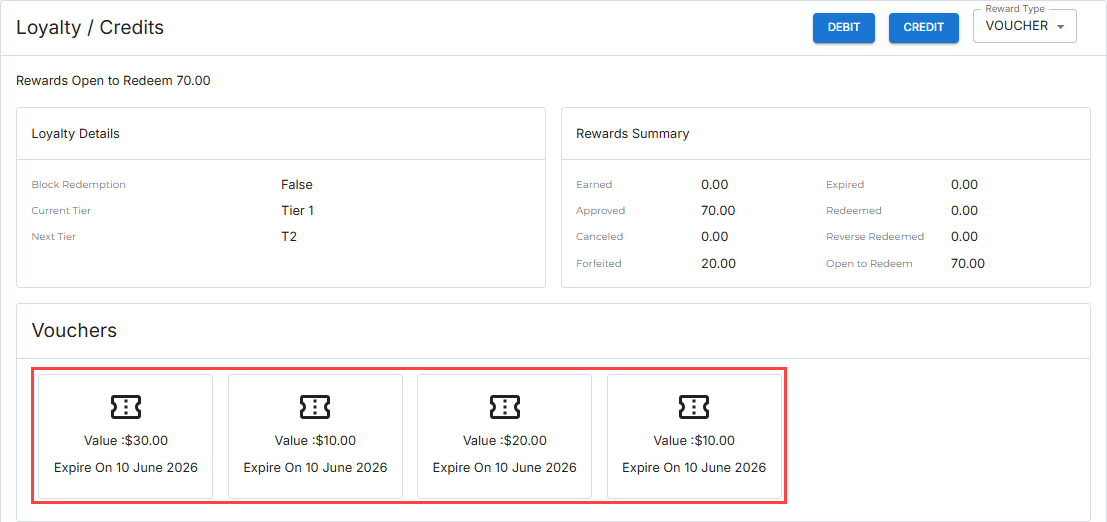
Note: The credited vouchers are visible to the customers in their storefront’s profile page.
Debiting a Loyalty Voucher from a Customer
As a CSR, you can debit a loyalty voucher from a customer’s account when needed. This action removes the reward value and is automatically recorded in the customer’s transaction history for reference.
To debit a loyalty voucher from a customer,
- Log in to the Foundation console for your business (URL provided by Infosys Equinox).
- Select the required store in the All Stores page.
Once a store is selected, the StoreOps page will appear. If a CSR is associated with multiple stores, they will be redirected to the store listing page upon logging in. If a CSR is associated with only one store, the store operations page will be the landing page upon logging in. - In the StoreOps page, click the CSR card.
The landing page of CSR is displayed. - Use the Quick or Advanced Search to search for and navigate to a particular customer’s account.
The Customer Details page is shown.
- Click the LOYALTY tab.
- By default, the Loyalty reward type details are shown. If not, from the Reward Type dropdown list, select VOUCHER:
- Click the DEBIT button.
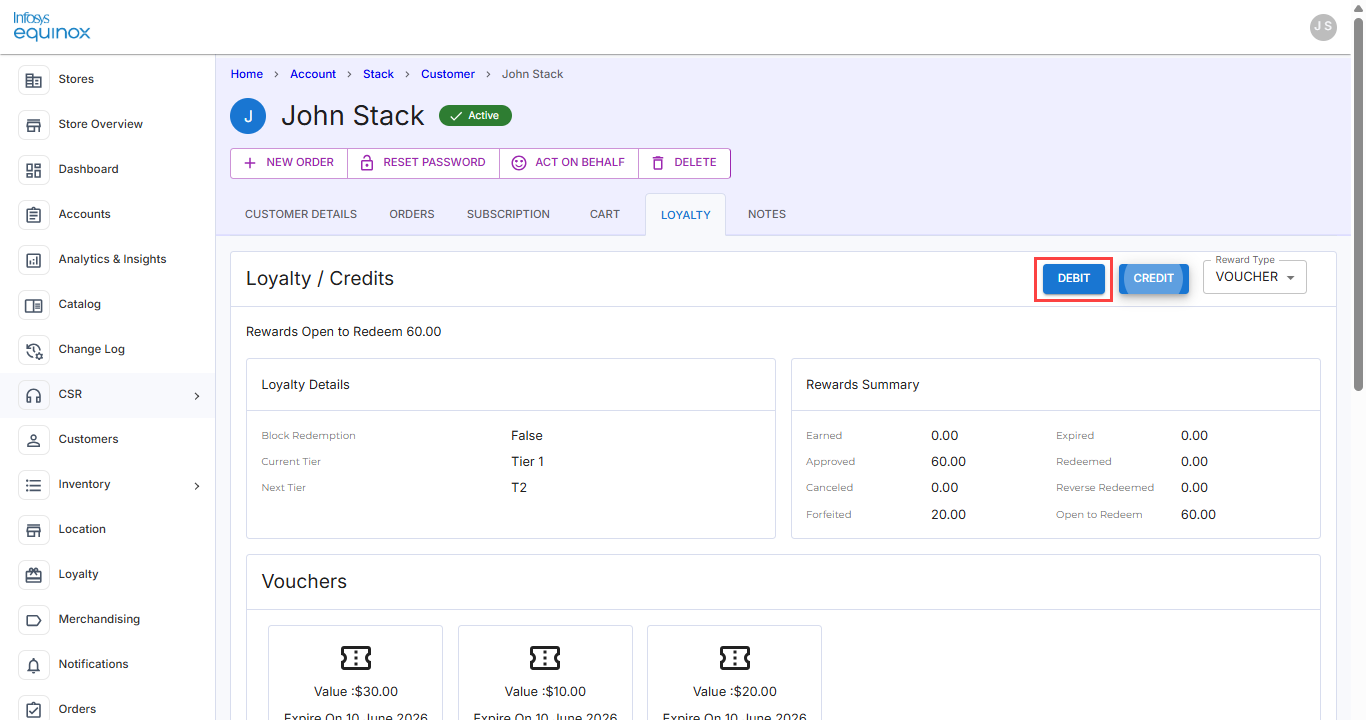
The following Debit drawer appears:
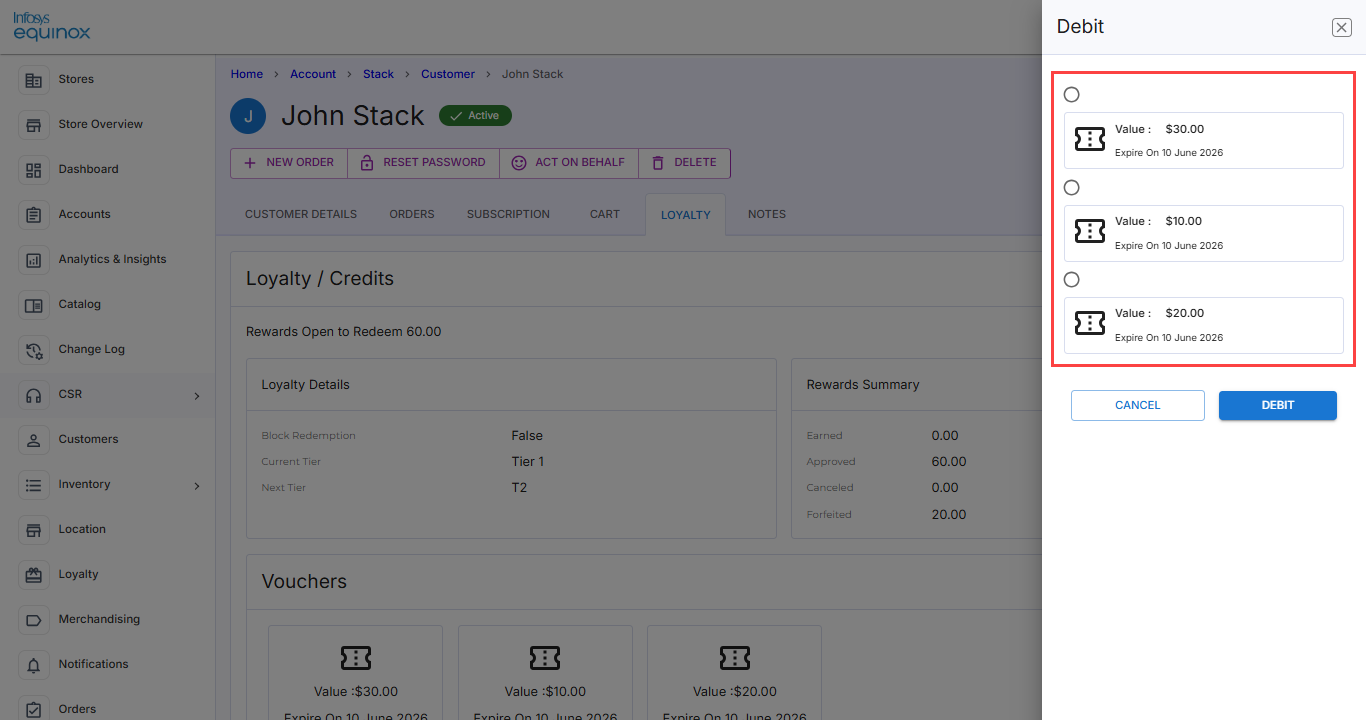
- Select the voucher that you want to debit, and then click
 :
:
The voucher is removed from the Vouchers section.
Additional Notes of a Customer
CSR admin users can use the Notes tab to add and manage important customer information. These notes help keep track of things like customer preferences, past conversations, or any other useful details.
In the Notes tab, you can enter a new note or view the existing notes.
To add a new note,
- Log in to the Foundation console for your business (URL provided by Infosys Equinox).
- Select the required store in the All Stores page.
- Once a store is selected, the StoreOps page will appear. If a CSR is associated with multiple stores, they will be redirected to the store listing page upon logging in. If a CSR is associated with only one store, the store operations page will be the landing page upon logging in.
- In the StoreOps page, click the CSR card.The landing page of CSR is displayed.
- Use the Quick or Advanced Search to search for and navigate to a particular customer’s account.
https://d1pun0hbam45iy.cloudfront.net/csr-admin-docs/csr-admin-guide/csr-adm-csr-qck-src-ldng-pg.png
The Customer Details page is shown. - Click the NOTES tab.
- Click the ADD NOTES button.
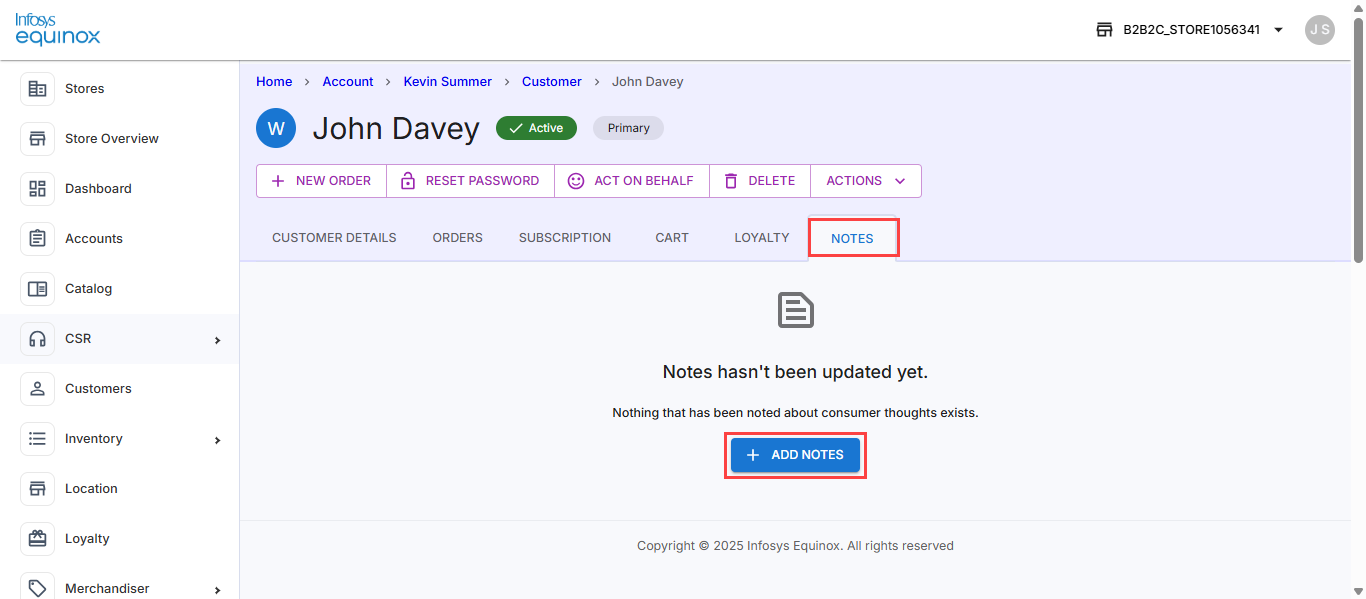
- Enter the customer notes in the input box, and click the ADD NOTES button.
The added notes appear in the NOTES tab as shown below:
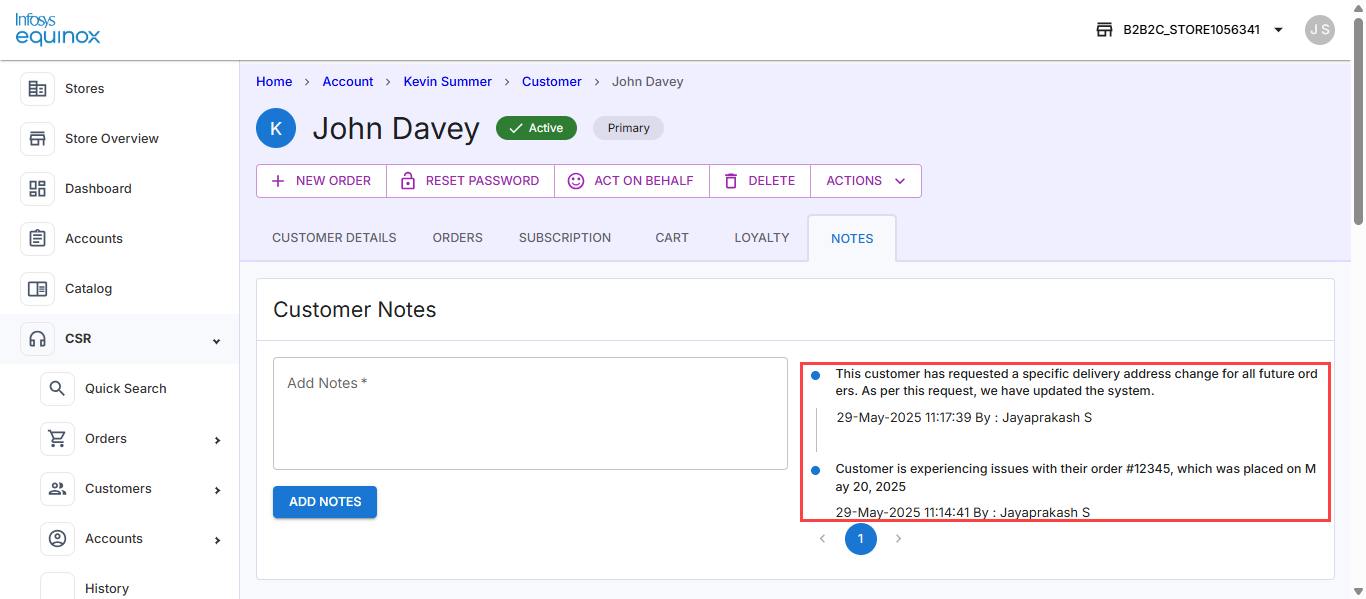
Managing Inventory
Infosys Equinox’s Inventory Admin console enables business administrators or inventory administrators to manage and monitor stocks by location or store.
Inventory transactions can be performed, impacting:
- Available-to-Promise (ATP) quantities
- Pre-order quantities
- Back-ordered quantities
The inventory system is structured around a hierarchical bin model:
- Bins act as containers within a store.
- Each bin contains multiple child bins or bin items.
- A bin item represents a specific SKU (Stock Keeping Unit).
For each bin item, administrators can configure:
- The quantity of a SKU available to buy
- The quantity of a pre-order
- Threshold limit for low stock
- Threshold limit for out-of-stock
When a user places an order via the storefront, the stock will be reduced in the given bin.
Managing Bins
A bin is a container for SKUs and is always associated with a specific store. Each bin is uniquely identified by a Bin ID.
When you navigate to the Inventory component, the Inventory Bins page allows you to:
- Search for a specific bin
- View the list of existing bins
- Create a new bin
- Select a bin to view its items, modify a bin item, or perform inventory transactions
The following screen shows the Inventory Bins landing page:
<screenshot to be added>
You will see additional options above the table grid data of the Inventory Bins page, Bin Items page, and Bin Item Transactions drawer, see the section Additional Options in Search Result Page.
<screenshot>
Adding a New Bin
You can create a new bin for a specific channel, such as an online or offline store. Each bin must be associated with a store and can optionally be linked to a parent bin to form a hierarchical structure.
While creating a bin, you can also specify whether it is a primary or secondary bin.
To add a new bin,
- Log in to the Foundation console for your business (URL provided by Infosys Equinox).
- Select the required store in the All Stores page.
Once a store is selected, the StoreOps page will appear. If a CSR is associated with multiple stores, they will be redirected to the store listing page upon logging in. If a CSR is associated with only one store, the store operations page will be the landing page upon logging in. - In the StoreOps page, click the CSR card.
- Click Inventory on the left navigation panel:
<screenshot to be added> - In the Inventory Bins page, click ADD NEW BIN.
- In the Add New Bin drawer, fill all the required details:
<screenshot>
The following table describes the fields to add a new bin:
Field Description Bin ID* Enter a bin ID. Description* Enter a description that describes the new bin.
Channel* Select the required channel type for the bin, such as Online or Offline, from the dropdown list.
Online refers to digital storefronts, while Offline refers to physical retail stores.
Type Select the required Bin Type from the dropdown list:
- Primary: A primary bin is the main inventory container used for storing and managing SKUs. It is typically the default bin for inventory transactions and fulfillment operations.
- Secondary: A secondary bin serves as a supporting container. It is often used for overflow stock, specialized inventory categories, or backup purposes. Secondary bins are not prioritized for fulfillment unless explicitly configured.
Note: The available bin types are displayed based on the configuration defined in the collection property BinTypes.
Status Enable or disable to activate or deactivate the status of the bin:
- Enable: Only in the active bin, you can add items to the bin and perform transactions for a given SKU.
- Disable: You cannot add SKUs or add transactions to the bin.
Leaf Bin A leaf bin is a terminal bin in the inventory hierarchy. It determines whether the bin can contain bin items (SKUs) or child bins.
You can enable or disable the leaf bin setting based on your inventory structure needs:
If enabled,
- The bin can contain multiple bin items (SKUs).
- You cannot create child bins within this bin.
- A leaf bin cannot act as a parent bin.
If disabled,
- The bin can contain child bins.
- You cannot add bin items directly to this bin.
- This is the default setting.
- Useful for organizing bins into a hierarchical structure.
- Click ADD to create the bin.
Once created, the bin will appear in the list and can be used to manage SKUs and inventory transactions.
Note: To edit a bin, navigate to a desired bin and click the EDIT BIN button. The Edit Bin drawer opens, allowing you to update the necessary details, and then click the UPDATE button. Note that Bin ID cannot be modified.
Managing Bin Items
The contents, primarily the SKUs, are referred to as bin items. After creating a bin, you must assign items to it.
In Bin Items, you can:
- View an overview of the bin
- Edit bin details, if needed
- Search for SKUs using filters such as SKU ID, status, ATP quantity, out-of-stock threshold, low-stock threshold, or backorder quantity
- Select or deselect columns to display in the Bin Items section
- Rearrange columns
- View details of SKUs associated with the bin
- Navigate to a specific SKU to perform transactions such as Add, Transfer, Reconcile, or Remove
- Export bin item details to your local computer
Adding a Bin Item Manually
To add an item to the current bin,
- Log in to the Foundation console for your business (URL provided by Infosys Equinox).
- Select the required store in the All Stores page.
Once a store is selected, the StoreOps page will appear. If a CSR is associated with multiple stores, they will be redirected to the store listing page upon logging in. If a CSR is associated with only one store, the store operations page will be the landing page upon logging in. - In the StoreOps page, click the CSR card.
- Click Inventory on the left navigation panel:
<screenshot to be added> - In the Inventory Bins page, navigate to a desired bin.
- Click the ADD BIN ITEM button.
- On the Add Bin Item drawer, fill all the required details:
<screenshot>
The following table describes the fields to add a new bin:
Field Description SKU ID* Enter the SKU ID to associate the SKU to the bin. This field is mandatory.
ATP Qty* Enter the quantity of a SKU that needs to be added to the bin item.
Pre-Order Qty Enter the pre-order quantity.
Back Order Qty Enter the back-order quantity when the item is low-stock or out of stock.
Low Stock Threshold Enter the threshold limit for low stock.
Out-of-Stock Threshold Enter the threshold limit for the out of stock.
Status Enable or disable the inventory status of the SKU.
Note: When the SKU inventory status is inactive, it will not be considered. - Click the ADD button to associate the SKU with the inventory details of the bin item. The SKU and its inventory details appear under the list of bin items.
Note:
- To cancel adding inventory details to the bin item, click the Cancel button.
- To edit bin item details—such as updating low-stock or out-of-stock thresholds, or changing the bin item status between Active and Inactive—click the Edit icon next to the desired SKU and make the necessary updates.
Exporting Entire Bin Items from the Inventory Bin
The Inventory Admin console allows you to export all bin items with inventory details in a CSV file format. To export the bin items with inventory details,
- Log in to the Foundation console for your business (URL provided by Infosys Equinox).
- Select the required store in the All Stores page.
Once a store is selected, the StoreOps page will appear. If a CSR is associated with multiple stores, they will be redirected to the store listing page upon logging in. If a CSR is associated with only one store, the store operations page will be the landing page upon logging in. - In the StoreOps page, click the CSR card.
- Click Inventory on the left navigation panel:
<screenshot to be added> - In the Inventory landing page, click the EXPORT button. The list of bin items is downloaded to your local computer in a .xlsx file format.
Note: For information on additional options shown above the table grid data, see the section Additional Options in Search Result Page.
Managing Inventory Transactions
The Inventory Admin console allows you to perform the following transactions, which impact ATP and/or back-ordered quantity for a bin item:
- Adding quantities to the bin item.
- Removing quantities from the bin item.
- Transferring quantities from one bin item to another bin item.
- Reconciling quantities if there is any discrepancy.
To add, remove, transfer, or reconcile the differences in quantity,
- Log in to the Foundation console for your business (URL provided by Infosys Equinox).
- Select the required store in the All Stores page.
Once a store is selected, the StoreOps page will appear. If a CSR is associated with multiple stores, they will be redirected to the store listing page upon logging in. If a CSR is associated with only one store, the store operations page will be the landing page upon logging in. - In the StoreOps page, click the CSR card.
- Click Inventory on the left navigation panel:
<screenshot to be added> - In the Inventory landing page, click the Plus icon against a particular SKU.
The Bin Item Transactions drawer opens with the previous transaction details or to perform a new transaction. - To create a new transaction, click the ADD TRANSACTION button on the Bin Item Transactions drawer:
<screenshot> - In the Add Transaction drawer, fill all the required details.
The following table describes the fields to add a new transaction:
Field Description Type* Select one of the following inventory transaction types. This field is mandatory.
- Add: Adds the specified ATP, pre-order, and/or back-order quantities to the current SKU.
- Transfer: Transfers the specified ATP and/or back-order quantities from one bin to another.
- Reconcile: Updates the inventory to match the actual physical count. The entered quantity overrides the existing values.
- Remove: Removes the specified ATP and/or back-order quantities from the current bin.
Atp Qty* Enter the ATP quantity. This field is mandatory.
Pre-Order Qty* Enter the pre-order quantity. This field is mandatory.
Back Order Qty* Enter the back-order quantity when the item is low-stock or out of stock.
To Bin If the transaction type is Transfer, the To Bin is enabled where you need to add quantity details to the target bin.
Notes Provide additional notes describing the transaction.
- Click the ADD button. Once the transaction is performed, the details can be viewed in the Bin Item Transactions drawer.
Bulk Uploading Inventory Data
On the Inventory Bins page, you can bulk upload inventory data by completing the Excel template (.xlsx) with the required details and uploading it from your local computer to the Inventory component in the Ultra Admin Console.
- Log in to the Foundation console for your business (URL provided by Infosys Equinox).
- Select the required store in the All Stores page.
Once a store is selected, the StoreOps page will appear. If a CSR is associated with multiple stores, they will be redirected to the store listing page upon logging in. If a CSR is associated with only one store, the store operations page will be the landing page upon logging in. - In the StoreOps page, click the CSR card.
- Click Inventory on the left navigation panel:
<screenshot to be added> - In the Inventory landing page, click the IMPORT button.
- Select the filled in Excel sheet (.xlsx.) file format, and click the Open button.
The content from the file is uploaded on to the Inventory component.
Revision History
2025-06-08| JP – Created the page and added the content.
2025-10-10| JP – Added the Inventory details.